JMortensen
-
Posts
13742 -
Joined
-
Last visited
-
Days Won
68
Content Type
Profiles
Forums
Blogs
Events
Gallery
Downloads
Store
Everything posted by JMortensen
-
-
You tell em Mr Hat.
-

rear poly bushings on outboard end of CA
JMortensen replied to blueovalz's topic in Brakes, Wheels, Suspension and Chassis
I use GC camber plates, so the load goes to the needle bearing underneath. Probably just crappy bearings that beat the liner out like John said. Thanks for the recommendation, I'll take a look at those XM rod ends. I'm going to need 10 rod ends and 8 monoballs, so a little bit cheaper per unit makes a big difference in the end... -
Question about dual master cylinders...
JMortensen replied to JMortensen's topic in Brakes, Wheels, Suspension and Chassis
I think he mounted the masters too far apart, so the washers are spacing the black parts (don't know the name of those) so that the rod from them to the masters are straight. -
rear poly bushings on outboard end of CA
JMortensen replied to blueovalz's topic in Brakes, Wheels, Suspension and Chassis
I was going to put washers on the outer ends of the spindle pin, but I think the inside is OK, like you said. My understanding is com-12 is just a size designation, I'm pretty sure the 5/8" monoballs like those used in my camber plates are com-10. I don't think that these are going to fail and cause a crash or anything, I just think that they need to be lubed to move smoothly, and since I don't have an easy lubing mechanism installed and don't want to have to install one and then constantly lube these, I'm going to try and finds some good quality teflon lined monoballs. I still have a really hard time picking them out though. I could spend $80 each on these things if I wanted to. I know the ones I'm using on the front control arms are still very tight after years of service, and they are these here: http://www.stockcarproducts.com/rodend3.htm On the other hand the monoballs in my camber plates haven't held up for ♥♥♥♥, even though I bought the most expensive ones the bearing supply place could get there hands on. Maybe they just sold me crap, I don't know. If it was crap, it was very expensive crap... -
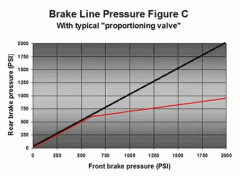
Exactly. What you have may be working, but even if it is working it's not optimized for any pedal pressure. At best its optimized at one point along the graph there. Did you see my post on dual master setups? Lunar240z is finishing up modifying a pedal box. Looks pretty easy to do, so that is the route I'm going. http://forums.hybridz.org/showthread.php?t=115678
-
Because on a standard system with the prop valve in the rear, the harder you step on the brakes the less work the rears do compared to the fronts. With the prop valve in the front, the harder you step on the brakes the less work they do compared to the rears. So you can tune Pete's setup to be right on at one braking level, but the harder you step on the brakes the worse it is going to get. Imagine the black line is the rear brakes and the red is the fronts. Pretty easy to see the problem now, eh? The harder you step on the brakes the less braking you want in the rear. This is due to weight transfer. In the front you want the opposite. You have more traction in the front when the weight transfers so you can put a LOT more into the brakes without locking up a wheel. This is why you really ought to use dual masters to fix the problem. You can keep the fronts making lots of pressure all the way through, and have the rears making proportionally less. The typical dual master kind of ignores the weight transfer issue though. You could even go a little small on the rear master to put "too much" pressure to the rears, and then put a traditional prop valve in the rear to give it a little knee. This would give you as close to optimal braking at lower speeds where there is not as much weight transfer, and then taper it off at higher speeds.
-
-
Don't know too much about them other than that they're a fairly restrictive muffler. If you look at a cutaway of them though, it looks pretty clear that the exhaust is intended to flow in one direction and not the other.
-
rear poly bushings on outboard end of CA
JMortensen replied to blueovalz's topic in Brakes, Wheels, Suspension and Chassis
I kinda figured the idea was for them to be a bit loose so that when the housings got welded the balls still slipped in. I didn't try to minimize the warpage, I just welded all the way across and all the way around all at once. If I need to buy a brake hone to get the balls back in so be it. I'll have to check it all out tomorrow though, already took the shop clothes off and took a shower... Llave, I missed your question before. I don't really know how to determine if a monoball is good or bad other than by price. Last time I needed some for my sway bar project I just got a recommendation here and went with it. I do know that Teflon linings help, and with a teflon lined monoball you don't need to lube it. So that will definitely be a priority for me when I replace them. If anyone has any suggestions on a good quality monoball to use, I'm all ears... -
If you run an 8mm bolt all the way through the frame rail and out through the captured nut then you can weld the bolt head to the top side of the rail, and now the rail is supported vertically like Terry wanted. Then you use the part of the bolt that hangs out the bottom like a stud and fasten the bushing saddle with nuts and lockwashers.
-
It is a bad idea. Here's info from Stop Tech: http://www.stoptech.com/tech_info/wp_proportioning_valves.shtml If your bias is that far off, the right answer is dual master cylinders in my opinion. Even if the result in Pete's case wasn't an uncontrollable car, the fact that the prop valve has a "knee" in its pressure gradient means that he could probably get a better bias all the way through the range were the brakes such that the prop valve was in line to the rear brakes and the bias were correct.
-
My Snap-On ratcheting screwdriver is my all time favorite tool. Unfortunately I can't find it!!!
-
Very Stiff Pedal - Weak Braking
JMortensen replied to oinojo's topic in Brakes, Wheels, Suspension and Chassis
Compression would, I suppose size of carbs would too. I had 8.5:1 compression with triple 44s and a similar cam and I didn't have trouble. It's possible for the cam to cause those kinds of problems, but I'd say that is probably not it in this case. -
rear poly bushings on outboard end of CA
JMortensen replied to blueovalz's topic in Brakes, Wheels, Suspension and Chassis
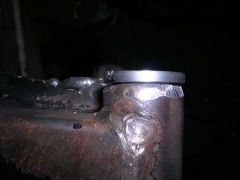
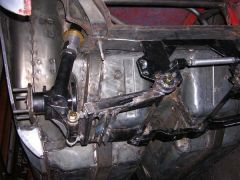
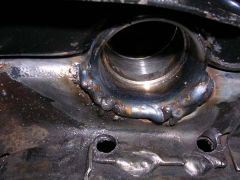
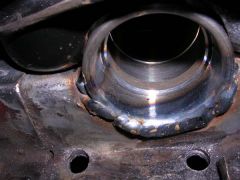
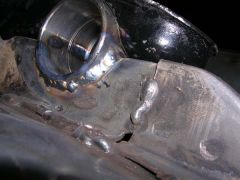
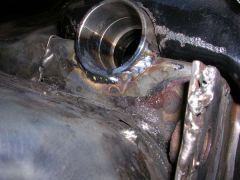
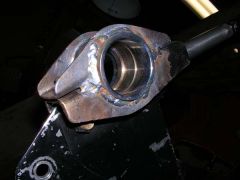
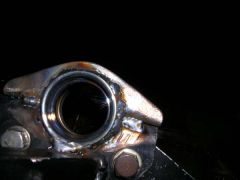
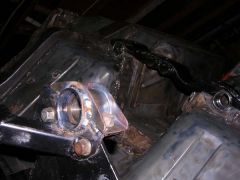
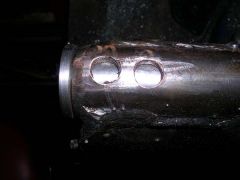
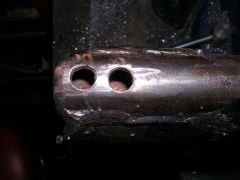
Here's what I got done today. I welded all the bearing holders in place. In the rear I welded the caps to the monoball holders and to the uppers as well. In the front I welded the monoball holders to the frame rail, and I left the crossmember loose. I welded all the way down the sides of both holders to the frame rail, then found that my weld interfered with the crossmember and had to grind it all down. It's still there and providing some support though. In the front of the front monoball holders it was really hard to move the welding gun, so those welds aren't very pretty, but I'm sure they'll hold. The welds in the back look a lot better. I also positioned the bearing holders so that the ridge inside faced outward on both the front and the back. This way that steel rim inside takes any load instead of the snap ring. First some control arm shots for John. End of control arm cut, cleaned and beveled. Then the modified tube ends (THANKS AGAIN RON!), then the tube end in the control arm ready to weld, and the holes drilled in the control arm to plug weld. Then the rear bearing holders from various angles: Then the front bearing holders: Now all I have to do is reassemble one last time and make sure nothing moved, then it's on to the next project... Driving the car is still a long ways off, but I can say this; DAMN that is a HUGE reduction in friction!!! -
-
-
-
-
-
-
-
-
-