

JMortensen
-
Posts
13742 -
Joined
-
Last visited
-
Days Won
67
Content Type
Profiles
Forums
Blogs
Events
Gallery
Downloads
Store
Everything posted by JMortensen
-
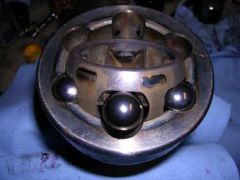
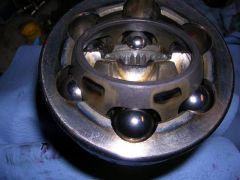
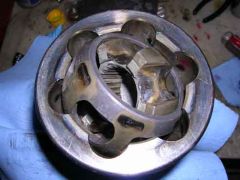
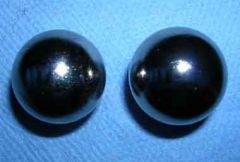
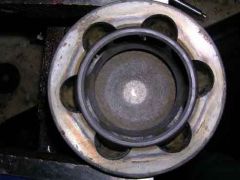
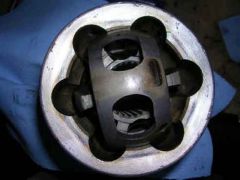
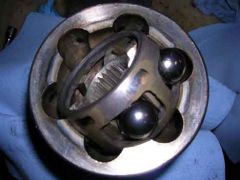
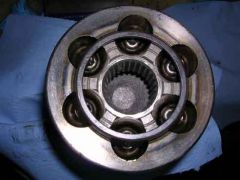
Neil previously described how to get the inner apart, but I doubted his instructions because I couln't rotate the cage enough to get the balls out. Anyway, he's exactly right, and I uploaded some pics of it just to share since it gave me some trouble the first time. The trick is that the inner race and the cage will get WAY out of alignment, and you have to push pretty hard, but it will rotate enough to allow the balls to come out.http://album.hybridz.org/showgallery.php?cat=500&ppuser=9095 I also noticed that the inner CV balls are smaller than the outers. I guess they don't have as much misalignment as the outer which has to deal with toe and camber as well as just up and down.
-
-
-
-
-
-
-

-
-
-
-
-
Here I was thinking he had to fart to get boost...
-
I would NOT anti-seize the crank bolt. I put antiseize on the part where it slides onto the crank, not the threads on the bolt. What locktite are you using, red? Red is what you should be using. There is a super gnarly green you can get if this is that much of an issue. Other than that I've NEVER heard of damage from overtorquing this bolt. I'd put it on as tight as you can by hand, or set your impact on RFT and that should do it. I assume you got the larger crank bolt with the Euro damper?
-
Earlier supra diffs were 7.5", smaller than R200. Not sure on later ones.
-

Did a search, couldn't find a definite answer..
JMortensen replied to flashstang04's topic in Nissan L6 Forum
They are COMPLETELY different suspension systems. Short answer is no. -
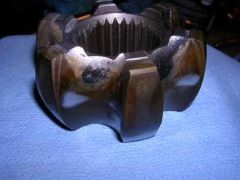
One more thing, the cage is NOT symmetrical, and that's why Ross tells you to flip it around. If you look closely the opening on one end of the cage is bigger than the other end. It comes assembled with the big end facing the stub axle. If you pull the cage off and flip it over than it sits ~3/8" farther in, basically making the shaft a hair shorter so it doesn't bottom out.
-
Nissan Motorsports still has them for $6 each I believe...
-
I used to service Porsche CV's a lot and never put them back the way they came out. We used to disassemble 2 or 4 at a time and we'd put all the balls in the solvent together along with all the cages, and reassemble however they came back out of the solvent and never had a problem. Very few worn out CV's too, but we did service quite a few for torn boots. Coincidentally I am trying to take apart an inner Z31 joint today and it doesn't look as though the cage can be twisted sideways to get the balls out. Maybe I just need to push harder. Then again maybe I don't need to break it. It looks to me as if the outer housing is pressed onto the stub that goes into the side of the diff, so you'd have to remove the green part from the gold zinc plated part to get it apart. I guess I'll just put the whole end in the solvent tank and try to get as much grease as I can out of there and pack it full of new stuff and call it a day. That's the plan for me...
-
I bought the o-rings from Nissan about 10 years ago when I did mine. I think if I had to do it over again I'd see if the parts store had stuff that would work. The fill plug is on the driver's side about 1/2 way up. With the car level you fill it until oil just reaches the fill plug and starts to leak back out. I think on the trans it should be a 1/2" square drive plug, so you just take your 1/2 ratchet and plug it right in. Oil recommended is regular old gear oil. 80-90 will work fine. If you change it and it is still a little clunky you might try mixing the oil with ATF 50/50. Thins the oil up a little for a bit faster shift.
-
Quiz: Why Not Equal Spring Rates?
JMortensen replied to johnc's topic in Brakes, Wheels, Suspension and Chassis
Usually the upper perch has holes in it. Just run a couple zip ties around the top coil and through the perch. The bottom will always seat itself. -
Tail shaft seal is the likely culprit if it's not coming from the speedo. It's the seal that seals to the end of the driveshaft.
-
-
That is the speedo cable. There are just a few o-rings in there. Replace and you should be good to go.
-
No Way!!!