

JMortensen
-
Posts
13742 -
Joined
-
Last visited
-
Days Won
68
Content Type
Profiles
Forums
Blogs
Events
Gallery
Downloads
Store
Everything posted by JMortensen
-
OK, so Jody, is this the right one??? Seems to be the largest that HF carries. http://www.harborfreight.com/cpi/ctaf/Displayitem.taf?itemnumber=35336
-

CHEEEEEEEEAP pyrometer... possibly.
JMortensen replied to JMortensen's topic in Brakes, Wheels, Suspension and Chassis
I was thinking it might be a good deal for taking tire temps, not for an EGT. I guess the problem that has been pointed out is that it takes too long for the cheap gauge to get a temp reading. Need to take tire temps very quickly after getting off the track. I guess I'll just stick with my IR pyrometer for now. -
Damn. This thread had gotten my hopes up. So no go on 1 5/8" DOM then Mike? Bummer.
-
The poor man's rear toe-in adjuster
JMortensen replied to blueovalz's topic in Brakes, Wheels, Suspension and Chassis
Thanks for that Terry. Kinda puts things back in perspective a little. I think putting the angle across the top is a good idea because I've heard of several racers who have had failures where the uprights bolt to the frame, and by connecting the two uprights the "footprint" of the piece that now takes the side load is much bigger. I had thought about some gussets too. Maybe I'll make some. I think you're right that having the link bolted to the bottom does mean that the turnbuckle doesn't need to be quite as burly as I've been thinking, so that is helpful. Sometimes I go a little overkill on this stuff. I think I've figured a way to make the construction of the link a bit easier too. Had plenty of time to think about it while I'm grinding away... Cut the whole angle off the top of the link. Weld the square tube as before, except without warping the crap out of it this time. Then make a small gusset to weld in between the upright and the inside of the tubing. The advantage here is that I don't have to cut the slot in the angle to make the square tube fit, and on the outer end I might be able to put a couple marks so that I can know where 0 toe is. Might be that the marks are too close together based on your comment from yesterday, but it would make the job of welding everything easier today anyway... I appreciate the feedback. -
Removing tierod end from the hole on the thing
JMortensen replied to PUSHER's topic in Brakes, Wheels, Suspension and Chassis
Don't hit the threaded part of the tie rod. Hit the side of the steer knuckle. Or use the pickle fork. On really bad ones I used to wedge a pickle fork in there then use an air hammer with a blunt tip on the steer knuckle. I think you can get a pickle fork end for your air hammer too. -
The poor man's rear toe-in adjuster
JMortensen replied to blueovalz's topic in Brakes, Wheels, Suspension and Chassis
lol "filler material buildup to a minimum". I was thinking "I'm gonna weld this sucker GOOD!!!" : Just means that I'm REALLY gonna learn this lesson. -
The poor man's rear toe-in adjuster
JMortensen replied to blueovalz's topic in Brakes, Wheels, Suspension and Chassis
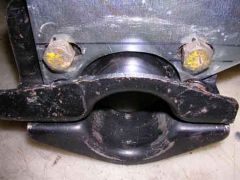
Well I blew it today! I welded up the sides of the link. I had checked it, tacked it, then welded it all up. Be the time I was done welding it it was WAAAAAY warped. I guess this is how I learned exactly how badly things warp when you weld them. So tomorrow I've got a hell of a lot of grinding to do. I'm going to make the link one whole piece, instead of doing each side separately. Then I'll cut it, and then weld the rod ends in. Kinda bummed at how bad it went, but I think I can salvage the part. Even if it's totally screwed, I'm sure I can get a link from somebody on hybridz and start over if need be. -
Take a look at this... http://www.harborfreight.com/cpi/ctaf/Displayitem.taf?itemnumber=37772 Who knows about the accuracy, but I might get it for the multimeter and see what I think of the pyrometer function.
-
As to the diesel running higher compression, I still believe the compression is necessary, and if you tried to run a gas engine with gas compression on diesel fuel it won't burn. The compression is needed to burn the fuel. Me too! Even with a lot of boost it still isn't going to be "fast". After all this hassle it might make it back to stock hp levels.
-
The poor man's rear toe-in adjuster
JMortensen replied to blueovalz's topic in Brakes, Wheels, Suspension and Chassis
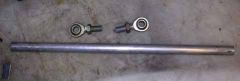
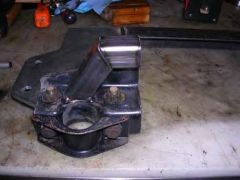
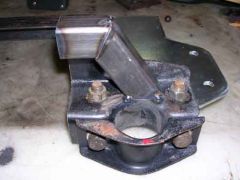
More progress. First I cleaned the garage for about 5 hours. Amazing what a mess I can make... anyway, I worked on two things today. I welded a piece of angle iron between the uprights up at the top. This came off pretty smoothly. The hardest part about it was trying to get everything lined up. I measured the distance between the uprights and cut a piece of 1 1/2" x 1/8" angle iron to fit. I tried to lay on my back under the car and hold the piece up there to tack it in, but I just couldn't seem to get it lined up. So I pulled the uprights back out and realized that they are 3/16" thick, and my angle is 1/8", so there's the problem. Duh. So I set them on the edge of my workbench and clamped them all to the edge upside down, so that the top would stay flat. Then I tacked them pretty good, put it in the vise and welded it all up. Done. I think that piece is going to add a lot of structure to the uprights, so I'm glad I did it. Then I started in on the link. I used my 1" square stock and cut the first pieces to come off of the original link ends. I cut them at a 30º angle and 3" long, which gives me about 2" clearance behind the uprights. That should be enough to clear the cover. I tacked them to the original parts just to see how this is going to end up. Here are some pics. I don't like the way the square stock sits so close to the bushing cup. I think I'm going to grind all the tack welds off and then cut a slot in the angle at the top of the original link, and weld this piece right into the angle. It would give about 1/8 or 3/16" clearance between the bottom of the square stock and the bushing area. The plan is to connect these two pieces via some tap tube and some old rod ends. This was my old rear strut bar: I'm going to weld in a new solid bar based on info from a thread with Drax and John Coffey, so I figure I'll cut the ends off of these rod ends and weld them in the square tube ends, then cut the tap tube and retap it at the needed length to make the turnbuckle. I still need to make a plate to go here to hold these bolts from the back. -
-
-
-
-
You could port the combustion chambers, just open them up with a die grinder and a burr, and cc them to whatever compression ratio you need. It would be a PITA, but I agree with you that the headgasket might be an issue at 20:1 + boost.
-
I was trying to figure out why that thing looks SO badass. Looks like they removed the "supersonic" body line. Looks like a totally different car. AMAZING.
-
Gas pistons won't work in a diesel, this I'm SURE of. Way too much compression for gas pistons.
-
Should Tokico's put me this low?
JMortensen replied to Zoldman's topic in Brakes, Wheels, Suspension and Chassis
Not like it matters too much since Wheelman is going to do something else anyway, but I would think that you would want 1/2 of the progressive part of the spring to be bound when sitting. If you had more than that then you'd have to blow through quite a bit of travel before you got to the other spring rate, and if you had less then you'd only have the softer droop, and not the softer bump, which might make for some wierd handling. I can say that every progressive spring I've seen (and I've seen probably 30 sets over the years) has had the first 3 or 4 coils bound with the car on its wheels. Some had a couple coils bound or nearly bound right out of the box IIRC. You can always tell a progressive spring because a linear spring won't compress the first couple coils. It compresses ALL of the coils equally, unless something is wrong with it. Also the compressed part goes on top Wheelman, because the top of the spring is sprung weight and the bottom is unsprung. So you want the heavier part on top. -
Diesel fuel has more energy per unit than gas. You have to have much higher compression to burn it though. That's why diesels run 20:1 compression, and that's why they make so much torque. Given two engines that are exactly the same size, say 2.0L, there is NO reason that the cylinder on the diesel engine will fit more air into it than the 2.0L gas engine. Hence the designation of 2.0L. Given a volume of 2 liters, you can then tune the engine to burn the fuel you want. If you're burning gas, you need 9:1 compression. If you're burning diesel, you need 20:1. That doesn't change the volume of the cylinder, only the relationship between the cylinder volume and the combustion chamber volume. Again with the cam example let's compare a stock L28 with a Rebello or a Sunbelt L28. You'll get more vacuum (a lot more) with a smaller cam. This is why you see guys with HUGE cams sometimes buying vacuum canisters or vacuum pumps. It's not because their engine doesn't flow as much air, it's because there is more overlap in the cam, so there is no vacuum at low rpms.
-
His post was that he put 280 struts on his 240 and it jacked the back end up. This is because the 280 strut tube is longer than the 240 tube. So basically to get the ride height he wanted he needed to section the struts, as here comes trouble and jamie said. If you want to put this on a 240, it's going to be riding on the bumpstops unless YOU section the struts. So if you don't want to do that work yourself (requires a welder and a saw to cut the strut tubes), and Juan hasn't already done it, then don't buy them.
-
Weird, it doesn't look that good on paper. .87 on the skidpad, and something like 3200 lbs, right? I guess there's something to be said for 35 years of suspension technology. I bet the 350Z would have a tough time in a Prepared class just due to the weight though.
-
what do you suggest for a first ignition upgrade
JMortensen replied to JaysZ's topic in Ignition and Electrical
I wasn't trying to be rude or anything, 2126. I just don't think there would be a significant advantage for anyone who just wants a mechanical advance distributor to spend $350 on the Mallory vs the ZX distributor with some slight modification. -
What do you think of running no rear Sway Bar?
JMortensen replied to cyrus's topic in Brakes, Wheels, Suspension and Chassis
-
What do you think of running no rear Sway Bar?
JMortensen replied to cyrus's topic in Brakes, Wheels, Suspension and Chassis
I was running 1" front and 7/8" rear MSA bars. I am now installing a ST 3/4" rear mounted bar, because the MSA was binding on the frame rail. -
Savage adjustable control arms?
JMortensen replied to auxilary's topic in Brakes, Wheels, Suspension and Chassis
If you have say 1º camber on the left side and -1º camber on the right side, and you wanted -2º camber, you'd have to move the left side WAY out to get there, and this would end up making your left front wheel stick out farther, basically meaning it wasn't in line with the LR, so now your wheels aren't square front to back anymore. If you had camber plates too you could set the track width you want in the front, then use the plates to adjust the camber from the top.
