EMWHYR0HEN Posted June 9, 2008 Author Share Posted June 9, 2008 Guys, Thanks for the kind words. Just like my other projects couldn't do this with out HybridZ. I'll have more pics when their welded and test fitted. I'm still thinking of how I should finish them. Zinc plated? rattle can? Quote Link to comment Share on other sites More sharing options...
EMWHYR0HEN Posted June 19, 2008 Author Share Posted June 19, 2008 I finally finished the rear arms. I tiged everything using ER70S-2 filler rod and it came out pretty good. The chrome-moly was a really easy to weld. I did a test install, (i'll have pics when their painted) which only took a couple minutes, and right away I could tell there was less bind because I could actually push up on the suspension unlike before. I compared the weight to the stock flimzy arms and my new tubed ones came in 1.6 lbs less. Not much, but the stiffness gained is what counts. In fact, when I had the stock arm on the jig I could actually bend the mounting points in almost every direction, by hand! Total spent on rear arms: $219.22 Time spent: Too much! Quote Link to comment Share on other sites More sharing options...
capt_furious Posted June 19, 2008 Share Posted June 19, 2008 VERY nicely done! So...when are you setting up a group buy and producing 20 sets? Quote Link to comment Share on other sites More sharing options...
buZy Posted June 19, 2008 Share Posted June 19, 2008 Great Job Myron!!! Quote Link to comment Share on other sites More sharing options...
Evan Purple240zt Posted June 19, 2008 Share Posted June 19, 2008 Looks great, how did you do the sweet fish mouth cuts on the tubing? Quote Link to comment Share on other sites More sharing options...
RB26powered74zcar Posted June 19, 2008 Share Posted June 19, 2008 Sweet!!! I'll shoot you twice that amount (or?) if you'll make me a pair... I'm serrious. Please PM me if interested! Quote Link to comment Share on other sites More sharing options...
EMWHYR0HEN Posted June 19, 2008 Author Share Posted June 19, 2008 Thanks guys. I actually considered making a few sets, but I just don't have the proper tools to do the job efficiently. In fact the tools I used were; hand drill, angle grinder/cutoff wheel/wire brush, hacksaw, and I used the TIG welder at my school. I'd love to reproduce these but unfourtunatly I can't. I used this http://www.metalgeek.com/cgi-system/php5.cgi/static/cope.pcgi to make the notches on the tubes. Just plug in the tube sizes, angle then print, cut, tape, draw, notch! Quote Link to comment Share on other sites More sharing options...
1 tuff z Posted June 19, 2008 Share Posted June 19, 2008 myron, you got skillz! perhaps you could take your jig and arms to a local fabricator and have them quote the job...i'd be in for a set. Quote Link to comment Share on other sites More sharing options...
74_5.0L_Z Posted June 19, 2008 Share Posted June 19, 2008 Those look great! When I get around to making my next set, they will be similarly constructed. The only thing that I plan to do differently is make the rear heim the solid point, and let the front heim be the toe adjuster. What wall tubing did you end up with? My current control arms are made using 1.125 x 0.058 4130 tubing, but they use a lot of extra triangulation for redundancy. With your new control arms you have converted the rear suspension from an H-arm to an A-arm toe link type strut. By doing so, you have given youself more freedom regarding toe and caster. The H-arm type strut suspension demands that the strut is perpendicular to the control arm. If the strut isn't perpendicular, the control arm and strut must flex or bind as the suspension goes through its range of motion. Because of the requirement for an H-arm strut to be always perpendicular to the control arm, caster and toe are limited. The A-arm type gives you more options. You can now move the top of the strut forward or aft. As the suspension moves through its range of motion, the toe link rotate to prevent the suspension from binding. Moving the top of the strut forward or aft will allow you to play with anti-squat and roll steer of the rear suspension. Quote Link to comment Share on other sites More sharing options...
EMWHYR0HEN Posted June 19, 2008 Author Share Posted June 19, 2008 What wall tubing did you end up with? I used 1'' OD x .095. Quote Link to comment Share on other sites More sharing options...
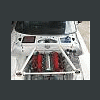
EMWHYR0HEN Posted June 23, 2008 Author Share Posted June 23, 2008 Painted and installed: Another plus with these arms is that now I can lengthen the travel of my axles ( lowered 240Z W/ R200 = little axle travel esp. on driver side) when adjusting camber by extending the arms outward. Maybe I don't need to switch to cv's after all! Quote Link to comment Share on other sites More sharing options...
woldson Posted June 23, 2008 Share Posted June 23, 2008 Very nice!! Quote Link to comment Share on other sites More sharing options...
thehelix112 Posted June 23, 2008 Share Posted June 23, 2008 Looking good Myron! Dave Quote Link to comment Share on other sites More sharing options...
JMortensen Posted June 23, 2008 Share Posted June 23, 2008 Very nicely done Myron. Be careful adjusting the track width too much though. You want no more exposed thread than is absolutely necessary on those rod ends. The rule of thumb is 1.5x the thread diameter, which on a typical 5/8" rod end means that you can move them out 5/16". If you wanted to make the arms significantly longer the thing to do would be to move the tube out that holds the rod end or make the triangle bigger, then use a longer turnbuckle in back. Quote Link to comment Share on other sites More sharing options...
Evan Purple240zt Posted June 23, 2008 Share Posted June 23, 2008 Man you really have something you should be proud of there! Quote Link to comment Share on other sites More sharing options...
zr240 Posted June 23, 2008 Share Posted June 23, 2008 Looks awsome Giving me motivation to try it myself Ash Quote Link to comment Share on other sites More sharing options...
rsicard Posted June 24, 2008 Share Posted June 24, 2008 Myron: Have you finished the fixture to build rear control arms. If so it would be nice to send a deposit and have you send the fixture so that I can make a set of rear control arms made of Chrome-Moly Tubing. Quote Link to comment Share on other sites More sharing options...
ttsbc280z Posted June 24, 2008 Share Posted June 24, 2008 those front control arms make me piss my pants just thinking about my car coming down on the front after lifting the front wheels of the ground out of the whole! i guess they would be more suited for a 6 cylinder car and autocross vs turbo sbc and at the drag strip. Quote Link to comment Share on other sites More sharing options...
EMWHYR0HEN Posted June 25, 2008 Author Share Posted June 25, 2008 Myron: Have you finished the fixture to build rear control arms. If so it would be nice to send a deposit and have you send the fixture so that I can make a set of rear control arms made of Chrome-Moly Tubing. Sure your welcome to use it just PM me. Quote Link to comment Share on other sites More sharing options...
tube80z Posted July 3, 2008 Share Posted July 3, 2008 Having run similar arms on the back of a V8 powered car with wide slicks (FA) we've found that the toe-link rod ends need to be very high quality. The slot gap (speedway, jegs, summit QA-1 parts) wore out in about 6 events. These were the 5/8 best quality with kevlar liners. These parts have been switched to Aurora 3-piece rod ends in a higher spec. I'll report back how these do once we have more mileage. But for anyone looking to use this in competition (or possible extreme street use) please keep in mind the rod end requirements. Another option would be to convert to 3/4 rod ends to gain bearing surface area. Quote Link to comment Share on other sites More sharing options...
Recommended Posts
Join the conversation
You can post now and register later. If you have an account, sign in now to post with your account.