240zip
-
Posts
352 -
Joined
-
Last visited
-
Days Won
1
Content Type
Profiles
Forums
Blogs
Events
Gallery
Downloads
Store
Everything posted by 240zip
-
This is some footage from HPR in Colorado. What SW created this?
-
It's just open lapping with the club, but should be fun.
-
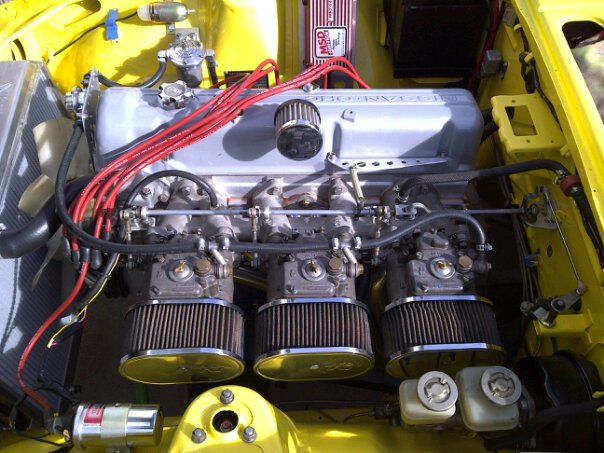
Innovate sells the following package. Racer Kit - This kit features a DL-32, LC-1, Speed sensor, and pressure sensor. Log 6 channels, including MAP, acceleration & sideforce, air/fuel ratio, and more... Expandable to 32 channels. It's $699. We have the bits and pieces of this kit and will be running it at the track with the triples this weekend. After a week of tuning and experimentation it seems we've dialed in the fuel map rather well. After my experience with the DCOE's, I understand why someone would go to ITBs, EFI, and an EMS like MegaSquirt. Better mileage, easier to tune, and likely more HP (due to better tuning). I wondered if anyone else is doing data logging at track events and what SW / HW set-ups they're using. Anyone else using this 'Racer Kit'? I'll information after this weekend about my experience with the set-up we're using.
-
Anyone recall 'NapaBill'? He contributed a while to the whole DCOE thread. Did he just drop off the board or is he under a different name?
-
Buying an unfinished project car
240zip replied to soarer86's topic in S30 Series - 240z, 260z, 280z
For a complete car, $500 is a good price provided it's not a complete rust bucket ... even then the motor, trans, and ECU are likely worth the $500. I know people who have paid more for a L28ET, trans, and ECU. Wiring is not a huge issue, you may decide to go with a standalone ECU like MegaSquirt. I agree, RUST is an issue, likewise with the car having been wrecked. Look for welding jobs and patches. You didn't mention the year. If it's a 75, then that gas tank will swap into a 240Z. You'll want an EFI tank for a turbo swap. Decent running turbo swaps (into 240, 260, and 280Zs) sell in the $4,000 to $5,000 range. That's for a decent, not showcar, job. Superior high-end examples sell for $15,000 to $50,000. I'm going to guess you could part out the car for more than $500. Offer $400 and it's pretty hard to go wrong, even at $500 it's worth looking at. Just be prepared to haul it home and have cash in hand. Make sure it has a title, that can be a pain to deal with. -
This is the best site for digital camera reviews http://www.dpreview.com/ I went with Canon because I had a huge selection of lenses. If you're serious, consider a full-frame digital SLR. For the money, some of the Lumix series DLSRs are good. Check the reviews.
-
The following instructions detail the surface prepping and refinishing of plastic dash panels and metal console covers. This also details the supplies needed to complete the process. These instructions were detailed in a post by lars from the Corvette Forum. Thanks for the great info lars. Having seen some pretty rough-looking Corvette interiors, and some rougher-looking Corvette interior repair & refinish jobs, I thought I'd put together a little how-to on making your black plastic panels look better than new again. Supplies needed: All supplies are available from most automotive paint supply stores. I have had very good luck with the PPG stores and dealers.) 1 qt can PPG Silicone Remover 1 qt can PPG Wax & Grease Remover 1 aerosol can SEM Original Trim Black Trim Paint (part # 39143) 1 pt bottle SEM Plastic Prep or SEM Vinyl Prep (part# 38348) 1 kit SEM Rigid SEM-Weld II plastic repair compound (part # 39508) Lint-free paper towels (available in big, cheap bundles at the paint supply store) Tack clot h The black plastic dash and console panels in your C4 are not bare plastic. The are coated with what GM calls "Dulso." This is what gives them the unique satin black appearance, but it's also what makes them difficult to keep looking nice: as you rub and clean them, the Dulso wears off, leaving shiney plastic areas. The Dulso also stains if you spill things like acidic soft drinks on it, like Mountain Dew. A good refinishing process is certainly needed. Before starting an interior refinish job, you need to be aware of the single biggest problem with interior parts: Silicone contamination. Interior "care" products, such as Armor-All, Son-Of-A-Gun, and others, contain HUGE amounts of silicone. Once this has been sprayed on interior parts, it is extremely difficult to remove. Silicone is a painter's worst nightmare: even the slightest amount of silicone will cause primers and paints to "fisheye," separate, and loose adhesion. Not good. In order to do a good plastic refinish job, we must first address preparation and silicone removal. Silicone cannot be removed by sanding or abrading (like with a Scotch-Brite pad or SOS pad). In fact, any attempt to sand or abrade the parts to clean them will embedd the silicone into the parts, and you will be doomed to failure. DO NOT sand the parts before doing a good cleanup on them. First clean the parts in hot water with dishsoap in it. Use a sponge (something non-abrasive) and put some effort into it. Rinse them off and dry them. Dump out the contaminated water and don't use it again on the parts. I have an automatic parts cleaner at my house: my wife thinks it's a dishwasher, but I know it's an automotive parts cleaner. Just turn the drier heat "off" before running your plastic parts through it. I leave the heat "on" and put it on the "potscrubber' cycle when I run rods and pistons through it (I don't understand why this upsets my wife: don't they advertise that these machines remove caked-on grease…?). Next, use your silicone remover, following the directions on the bottle. You will soak a lint-free paper towel, wipe once in one direction, flip it over, and do it again. Then throw that towel away and do it again with a fresh one. If you wipe back and forth with the same towel, all you will do is smear the invisible silicone all over the parts with no gain. So do the one-wipe thing and use up some of those cheap towels you just bought. Once you've done this several times to all the parts, give them a wipe-down with the grease and wax remover, using the same technique. The parts should now be about as contaminant-free as they're going to get. If they have nicks or etched-in imperfections, you can now use some sandpaper or Scotchbrite to smooth them out. If they are cracked or damaged, clean the damaged area with the SEM Plastic Prep and use the SEM-Weld II two-part plastic repair kit to fill the damage and sand it out like body filler. It sands really nice, and is easy to form. If you sand the parts, make sure that the parts do not have a finish any coarser than a wet 600-grit finish when you're done: anything less (even wet 400-grit) will leave visible scratch marks in the finished product. If the area has large cracks around the screw holes, the SEM-Weld II can be used to fix this as well. Using this two-part plastic repair compound, you can grind out the cracked area of the panel, and using the SEM, bond a plastic doubler to the back side and fill the front side with the SEM. Then sand it smooth and re-drill and re-countersink the hole Final prep step is to clean the parts completely with the SEM Plastic Prep or Vinyl Prep. This stuff actually slightly softens and dissolves the surface of the parts, and makes the surface "fuse" itself to the paint you will apply. So don't rub aggressively with these prep products: follow the label directions and give the parts a gentle wipe-down. Rinse with water. If your parts are perfectly prepared, the water will "sheen" off the parts and will not separate or "break." This is known as a "water break free surface condition," and indicates a contaminant-free, clean surface. Dry the parts. The SEM Trim Paint is actually an exterior trim paint product, but it works perfectly on these Corvette plastic parts. Lay out your parts and lightly go over them with the tack cloth to remove any dust or particles. Apply the first couple of coats of paint very light and fairly dry, in a criss-cross pattern to assure coverage. Observe if you are getting any fish-eying or separations. If you are, the areas that are fish-eying must be coated with VERY light and VERY dry coats at first until they are covered with the paint, allowing the paint to dry between these coats. Be patient. Don't try to cover it all with a big wet coat at first. Once you have complete coverage with your light mist coats and this has dried to a tack-free state, lay down two medium, even coats. This will give you a perfect, even, beautiful sheen to your parts. On some dash panels, there are area which are made of a rubber or viynl surfaces. The flexible, rubber-like or vinyl surfaces can also be refinished. You want to prep them the same, and use the vinyl prep stuff listed above. But instead of using the aerosol trim paint referenced, you'll need to use the PPG Vinyl Dye for these parts. This dye is much more flexible than the paint for the plastic parts. The PPG Vinyl Dye comes in pints, quarts or gallons, and you'll need to shot it through a paint gun. It's really great stuff. SEM also makes a vinyl dye that's equally good. Your paint supply store should have this stuff in stock, and they can mix it to any color you want if you need something besides black. On the metal parts, you should degrease and de-silicone as with the other parts, then wet sand with 600 grit on a rubber block. The paint in this article is actually an exterior metal trim paint, and it will work very well applied directly to the metal cup holder lid, and other metal console surfaces, with no primer. Install the parts back in your Corvette and admire how good of a painter you are! For additional info on SEM products, or for a distributor near you, contact them at: SEM Products 1-800-831-1122 Son-Of-A-Gun and Armour-All both provide great looks at a cheap price. If you've already hosed your interior down with it, you may as well keep using it. However, after refinishing your dash and console, you're looking for something new, there is a fantastic new product out. It's called 303 Products Protectant. It provides much better UV protection than the silicone products, and it does not contain silicone. It still needs to be cleaned off thoroughly before painting, but it cleans up with much less work. 303 also makes an incredible fabric protector that they developed for the Porsche convertible tops. It can be used it on fabric interiors. Unfortunately, the 303 line can only be procured from area dealers.
-
l28 w/ triples average mpg??
240zip replied to jimmyjones000's topic in S30 Series - 240z, 260z, 280z
Try them and you may I say ... Some helpful links ... http://www.teglerizer.com/dcoe/webertune.htm'>http://www.teglerizer.com/dcoe/webertune.htm http://www.tjwakeman.net/TR/WeberDCOEinfo.htm http://7faq.com/owbase/ow.asp?HowDoI%2FTuneWeberCarburettors http://joltfreak.tripod.com/id28.html this one has a link to a DOS program for jetting http://www.teglerizer.com/dcoe/ -
John ... can you provide us with some additional tire resources. I too tend to navigate to Tirerack ... what are some other sources we could look into?
-
so funny, thanks for sharing
-
Kumho Ecsta AST are like $68 each ... man that's cheap.
-
I got 205/50/15's for my 15x7 Konig rewinds. I got Dunlop Direzza Sport Z1 Star Spec tires. I checked their sizes and man, you're right ... nothing wider. I couldn't find anything in your size for any brand of performance summer tires. it seems they stopped carrying them.

-
l28 w/ triples average mpg??
240zip replied to jimmyjones000's topic in S30 Series - 240z, 260z, 280z
I think TonyD understands the Mikunis, I only speak Weber. My carbs were OEM on a Maserati 3500 GT. They had the following baseline settings. 32 3.5 135 F15 155 55F2 45 200 They're fine from 2500 RPM and up but right now are too rich at idle. So after attempting to lean out the idle, we're likely going to swap the 55F2's with 55F5's. Right now the plugs are black with soot. I had Rex Chalmers rebuild mine, the cost was $95 per carb which was cheap given the quality of his work. He's been helping remotely with some of the tuning aspects. I had rebuild kits otherwise those are an additional $45 per carb. On the K&N filters. I put in the air horns and tried a few different combinations. In the end, it seemed the mid length air horns and the K&Ns gave the best response and AFM. -
Recommended 15 tires for street / track
240zip replied to 240zip's topic in Brakes, Wheels, Suspension and Chassis
OK, here's the car with the tires mounted. Not bad, they don't rub. Car 'could' drop another inch, especially in front, but we're going to take it to the track as it. It rides better (no bouncing around) and isn't harsh at all. From a pure aesthetic standpoint, I like the fatter tires. From a ride, performance, and handling feel, I like the 205/50's. Unfortunately it really rubbed up front before and they were T-rated M&S tires.
-
l28 w/ triples average mpg??
240zip replied to jimmyjones000's topic in S30 Series - 240z, 260z, 280z
My triples ... FYI ... no comparison between EFI and DCOE's with respect to mileage. Two different animals in terms of fuel efficiency. I suspect that much of this is due to improper jetting and tuning. In my experience, many people set their DCOE's to be overly rich. Also, few people really dial-in their DCOE's with the proper chokes, emulsion tubes, and jets. The expense, dyno-time, and expertise all make people want to move to EFI (ITBs) or other set-ups.
-
l28 w/ triples average mpg??
240zip replied to jimmyjones000's topic in S30 Series - 240z, 260z, 280z
8 to 9 MPG? Sounds low, but also within the realm of possibility I have 42DCOE's, 2.8L, E31, headers, and a moderate cam ... more like 15 to 18 MPG, but I need to check and that's very mild driving, not racing. I suspect you're running way too rich. Have you hooked up a wide band AFM and checked? -
Question on Air Supply Tube for 240Z
240zip replied to 240zip's topic in S30 Series - 240z, 260z, 280z
Mine wasn't connected to anything ... just sort of dangling there in the rear of the car. No wonder I smelled gas. -
Question on Air Supply Tube for 240Z
240zip replied to 240zip's topic in S30 Series - 240z, 260z, 280z
-
Recommended 15 tires for street / track
240zip replied to 240zip's topic in Brakes, Wheels, Suspension and Chassis
Are you going to the club track day? -
Recommended 15 tires for street / track
240zip replied to 240zip's topic in Brakes, Wheels, Suspension and Chassis
I just picked up the Dunlop Direzza Sport Z1 Star Specs (Tirerack) and am very pleased. They even came with an $80 rebate. Got them mounted today. Car dropped a bit but clearance is no longer an issue. Was way too high before. Should be fun on track days and seems streetable. More rubber than I thought there would be. -
Does the Air Supply Tube (#13 FSM Figure FE-9) simply vent from the Expansion Tank to open air? For SCCA Autocross and other track events, does one have to make any changes (like a catch can)?
-
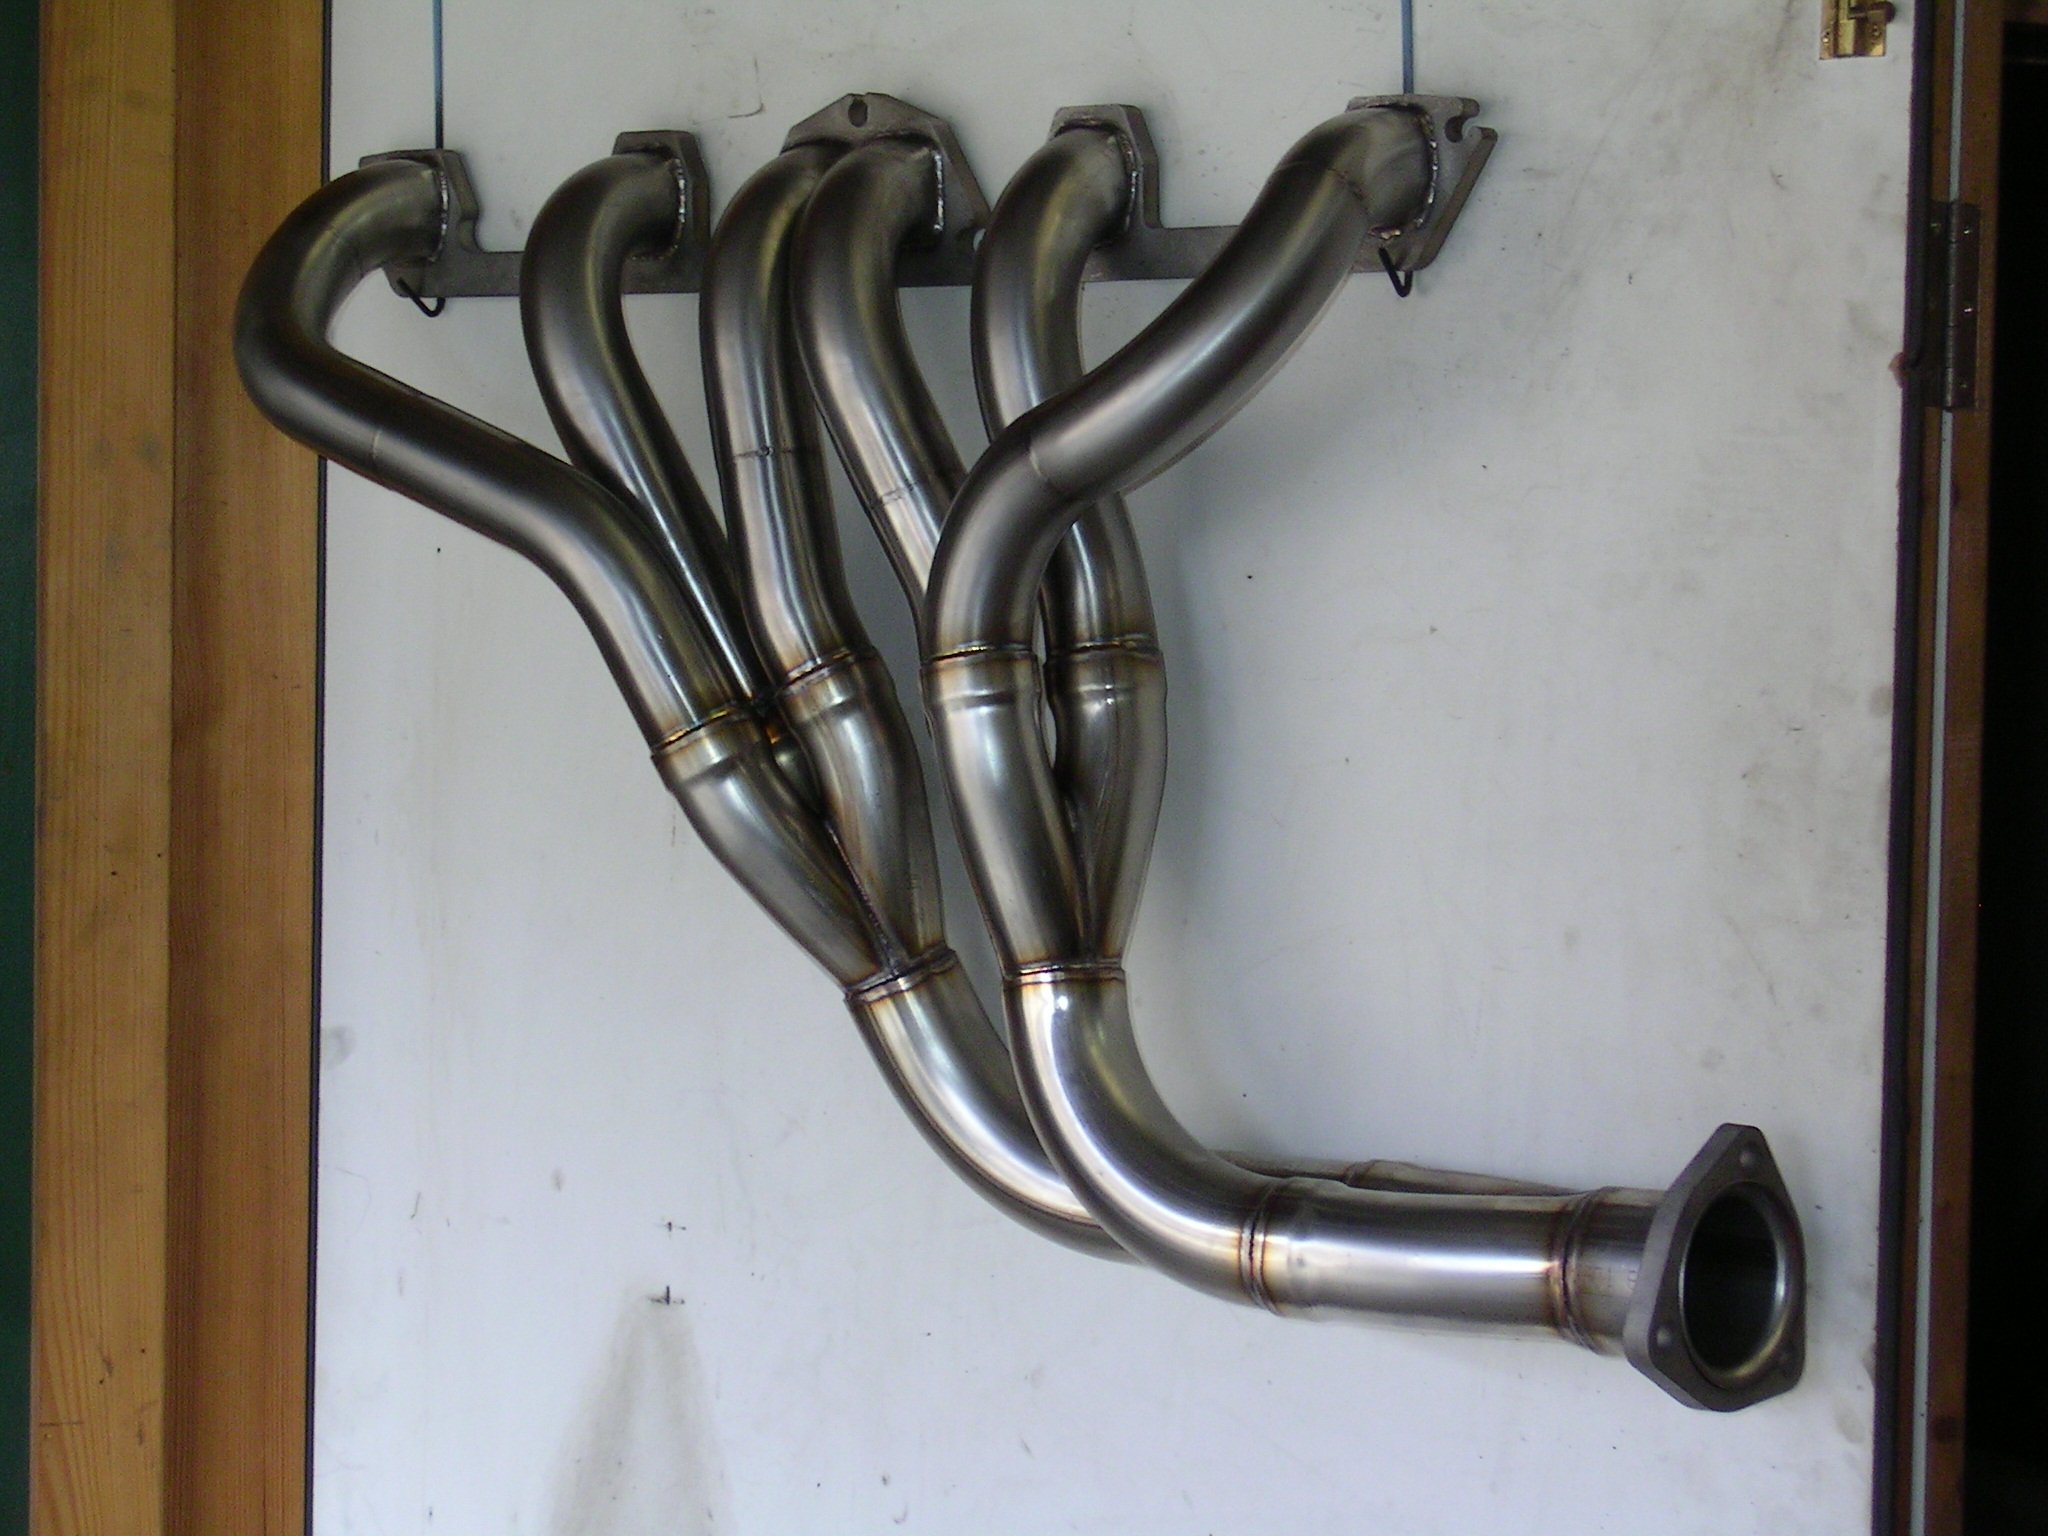
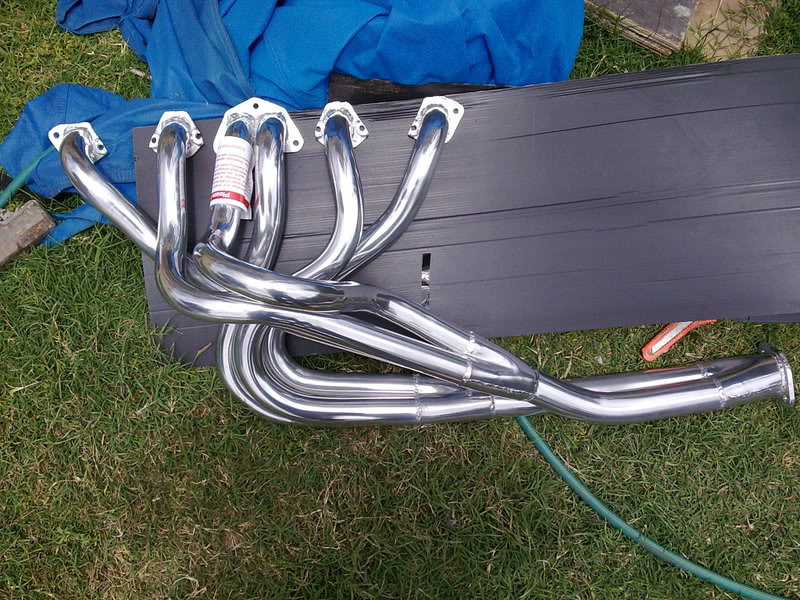
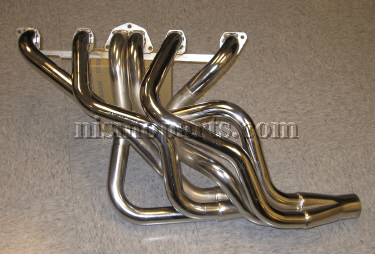
Interesting design ... love the stainless fabrication. At 700 (British Pounds + VAT) I think the Stahl header is a better choice. The following is set 'inspired' by the Stahl header design (from NZ) You can still get a Nissan Factor header (Model # 99996-E1142) http://www.nismoparts.com/catalog/?section=297 For the price, the Nismo header with the chrome plating seems to be a good deal. Not sure about the flange, can't see from the photo how thick it is. For a
-
I'm somewhat confused on which channel weathership (holds glass secure in frame) to buy? I've seen OEM examples (around $90/pair) and this reproduction: http://www.thezstore.com/page/TZS/PROD/34-1050A which runs about $18/side ($36 for the pair). Has anyone tried the reproduction MSA?
-
I bought the Chester and Harod carpet kit for my 240Z and didn't think it was bad. Yes, the jute was not glued on, but otherwise it was fine. Mine cost about $210 including shipping. I think it was $175 plus shipping, but need to look at the invoice to be sure. I have an old, but OEM carpet and I wanted the closed loop. I think the C&H was the closest to the OEM. I'll take some pictures. Of course I bought mine a few years ago. I selected C&H because someone told me they were used for the Nissan factory restorations. They told me I got one of the NOS sets from that run.
-
Recommended 15 tires for street / track
240zip replied to 240zip's topic in Brakes, Wheels, Suspension and Chassis
The Star Specs (Dunlop Direzza Sport Z1 Star Spec) sound interesting. I could keep the T-rated 60 / 215 balloons for cruising and put the 205/50/15 Star Specs for other events since I have two sets of rims.