-
Posts
743 -
Joined
-
Last visited
-
Days Won
1
m1ghtymaxXx last won the day on July 7 2014
m1ghtymaxXx had the most liked content!
About m1ghtymaxXx
- Birthday 06/16/1988
Profile Information
-
Gender
Not Telling
-
Location
St. John's, Newfoundland, Canada
Recent Profile Visitors
The recent visitors block is disabled and is not being shown to other users.
m1ghtymaxXx's Achievements
-
m1ghtymaxXx started following 280zedx
-

Can anyone ID these wheels on this Z?
m1ghtymaxXx replied to luke87gt's topic in Brakes, Wheels, Suspension and Chassis
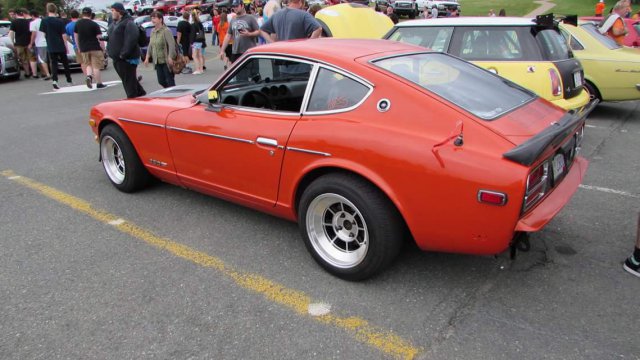
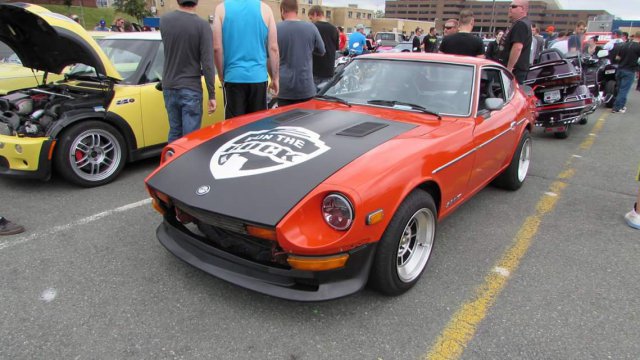
Here's some old pics with 225/50s that give a better idea of the poke. I would say the tires would interfere with the airdam before they would rub the fenders. I did mount up some 215/60s which had that issue, they would only fit the rear. -

Can anyone ID these wheels on this Z?
m1ghtymaxXx replied to luke87gt's topic in Brakes, Wheels, Suspension and Chassis
0 offset, plus 8mm spacers on the front. The tires in this pic are actually 205/55s as the selection of 225s has dropped off over the past few years, but it never once rubbed with the various 225/50s and 225/45s I've had on it. I only bought them because several others reported no issues with the same wheels and tires. -

Can anyone ID these wheels on this Z?
m1ghtymaxXx replied to luke87gt's topic in Brakes, Wheels, Suspension and Chassis
It shouldnt' take any real work to make them fit. I run 15x9s with 225/50r15s with sock fenders and stock strut housings with Eibach lowering springs. All it took was 1/4" spacers to clear the struts, though I went with 8mm for peace of mind. Fenders aren't rolled and it has never once rubbed despite aggressive driving on rough roads. Of course the setup mentioned has 1" greater tire diameter but I think you're severely overestimating what's involved. -
Often referred to as a "frame horn" or similar.
-
Bit late to the party, but what size filler are you using? The only way to keep the heat low enough on thin stainless is to use thin filler, like 0.040" or less. If you can't find it, MIG wire works in a jam. I snip off a couple feet, put one end in the vice and chuck the other into a drill put some tension on it and spin it until it breaks. Than stick it back in the drill and turn it the opposite way until it breaks and then you should have nice straight length of filler for TIG.
-
I bought an Everlast 200DX almost 3 years ago would certainly recommend it. I've used Miller Dynasties and cheap Princess Auto (Canuck Harbour Freight) machines as well. They all weld basically the same, so the difference comes down to reliability, ease of setup, duty cycle, value etc. My Everlast hasn't had a hitch, and I chose it based on their customer service reviews, and the fact they had a Canadian distributor. And of course the price. My only complaints about mine are that the LCD screen only displays voltage. It's not a problem 99% of the time, but now and then I like to play with slow pulse (like 1 dab per pulse), and the small pulse frequency knob doesn't make the settings all that repeatable as its hard to know what the exact value is. Also I find the high frequency start to be less snappy than other machines I've used. Unless you give the pedal a good jab when striking the arc, you tend to get a soft start with tungsten arcing from the side until you up the amperage a bit. This doesn't really effect welding any, but kind of annoying. Some tungstens are better than others too though. As many people mention, the included torch is garbage, but that's true for any consumer grade machine, fortunately CK Worldwide torches are great and affordable. The pedal gets a bad rap too, but it certainly does the job. The company name escapes me but someone makes a decent yet afford pedal upgrade for these machines. All in all I wouldn't hesitate to recommend it. Also Everlast seems to be constantly updating their product line so it wouldn't surprise me if my complaints have since been rectified.
-
This sounds like a similar issue to my 77. I wasn't able to start it after taking it out of storage (storage meant frozen into my driveway this winter unfortunately). First thing the fuel pump wouldn't fire, so I bench tested the fuel pump relay and AFM and both tested good. After reinstalling the AFM it fire right up, so my guess was the flapper was slightly stuck after sitting, and my starter is on a button so the fuel pump won't be triggered by the ignition switch, though this has never been a problem. Once started I was able to drive the car just fine for about 2 hours, once losing power for second under acceleration. Then it died completely a while later, but after a few attempted starts it ran normally...for a few more minutes, then it died again and I ended up calling a tow truck. As it was still running on the gas that was in it for storage, I figured it was probably condensation in the fuel so I pumped it out (only ~6 liters remaining) and replaced the fuel filter. After that it ran just fine, but during a 20 minute test drive the clutch master cylinder began failing, so I replaced that, but when I went to drive it again the same issue came back. Once again I could get the car started with throttle, but it was running extremely rough, shaking and spewing black smoke. Sometimes it will idle without extra throttle, but usually not for very long, and at around 500rpm or less. I hooked up a fuel pressure gauge and it was in spec (~36psi). Cap and rotor looked normal for its age (4 season old), plugs were fouled but in good condition, but I replaced them. All cylinders are getting spark. At this point I'm ready to start from page 1 of the EFI troublshooting chapter in the manual but it it looks pretty daunting. I began testing the ignition system yesterday but ran into some inconsistencies between my car and the manual, specifically the transistor ignition according to the manual is supposed to have 6 wires (2 black and white), mine only has one black and white. I moved onto the coil, and the 2 posts that are supposed to have 1.6 to 2 ohms resistance had 2.3 ohms resistance. I'm not sure if that's out of spec enough to cause issue. Sounds like I'll have to look at the CHT sensor and coolant temp sensor next.
-

OBX Differential Inspection and Installation
m1ghtymaxXx replied to TrumpetRhapsody's topic in Drivetrain
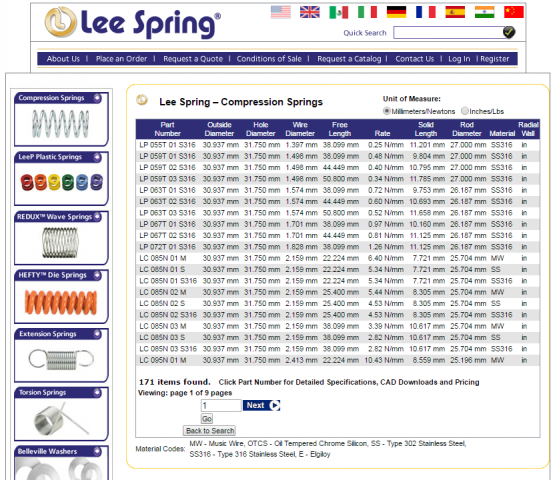
I found this site that has a good selection of springs that may be suitable in place of washer stack, here's a chart of potentially suitable spring sizes. The same site sells belleville washers also so I was thinking of putting in an order for new washers and a spring and test fitting both. I think one of the main issues with the belleville washers is that each side of the stack spins in opposite directions and the washers wear against each other giving them a sharpened edge, and if one cracks, all that friction must tear it to shreds such as the case of one of my large washers. Any thoughts on how to reduce wear in the spring and spur gears it will inevitable spin against? I was thinking it may be wise to put a washer each end of the spring as a sacrificial wear piece, as long is it doesn't wear to the point of disintegrating. Any thoughts? After a closer look at the table, I'm thinking of going with the one at the bottom of the table, part # LC 095N 01 M mainly because it has the highest spring rate. Full specs are: Part Number LC 095N 01 M Outside Diameter 30.937 mm Hole Diameter 31.750 mm Wire Diameter 2.413 mm Load At Solid Length 142.513 N Free Length 22.224 mm Rate 10.43 N/mm Solid Length 8.559 mm Rod Diameter 25.196 mm Number of Coils 1.4 Total Coils 3.4 Finish ZINC PLATE AND BAKE PER ASTM B633 Material MW -

OBX Differential Inspection and Installation
m1ghtymaxXx replied to TrumpetRhapsody's topic in Drivetrain
After 3 seasons one of the large Belleville washers disintegrated and filled my diff with metal shavings. After a teardown and inspection it seems everything is okay except for a some slightly bent and chipped teeth on the helical gears inside the LSD unit. My plan of attack is to grind down any high spots on the gears, (possibly even weld up and grind down low spots too), then reassemble the carrier and give it to a local driveline shop and have them pull the pinion shaft, thoroughly clean the case and reassemble everything using new pinion bearings and reusing the carrier bearings and shims which seem to have survived unscathed. I have 2 questions. First is regarding replacing the Belleville washers. I used the Rbryant washer and bolt kit at first assembly and even the quality replacement washers failed catastrophically. Did anyone every find a coil spring that fits, or anything other alternative solution to the Belleville washers for gear preload? Since replacing the washers is likely the only solution, I've been looking to source them from my local Fastenall branch (McMaster and Carr doesn't sell personal orders to Canada). The RBryant kit comes with a pair of 35mm washers that go in the centre of the stack in between the sun gears to hold the remaining 31.5mm washers in place. I measured the indside diameter of the large helical gears to be about 36.4mm to the inside of the teeth, yet Fastenall only caries 34.036mm OD washers. It seems to me that might be a tad on the loose side. Thoughts? Secondly, as far as replacing the pinion bearings, should I be alright reusing the existing shims? I'll be using quality SKF bearings as replacement, I'm not sure if bearing replacing typically warrants reshimming or if that's more so when replacing the pinion gear and setting its height. Knowing that the quality washers are still prone to failure makes me a little nervous about this diff. I'm wondering if I should be replacing the washers every second season as preventive maintenance or something. The first sign of trouble was the sound of the stub axle studs grinding on the case but I though it was just the washer stack flattening out. The last time I drove the car before pulling the diff it was making some terrible banging noises when pulling a U turn, no doubt that was washer fragments beint forced through the helical gears. -
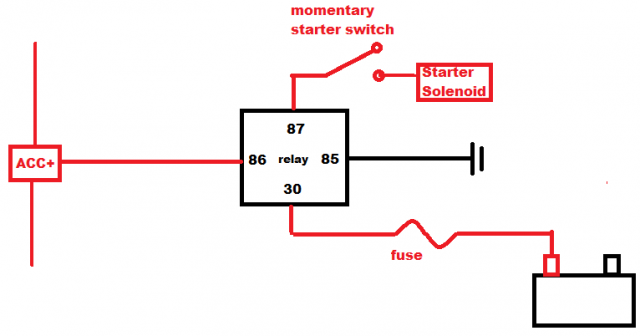
I've had to wire push button starts in both my 77 and 83 Z's. My electrical knowledge is minimal and I had no trouble cobbling together a working system from individual components. Here's what you'll need: - Momentary switch - 4 pin relay & pigtail - Constant fused 12v+ - Wire & spade terminal to fit the starter solenoid, ring terminal for ground. - Multimeter - Soldering iron etc. to make some splice connections. Chose a location for your starter button. In my 77 I used a knockout in the center console about the hazzard light switch. I brought the knockout with me to the electronics store to size up a button that fits. Also, find a location for the relay. I put mine in the passenger footwell bolted to the inside of the firewall. You'll need to find an accessory wire to trip the relay when the key is in the "on" position. To do this, ground the negative probe on the multi-meter, turn the key to the "on" position, and make sure everything is turned off (wipers, HVAC, headlights, etc, otherwise you risk wiring your starter to another accessory, ask me how I know ). Unplug connectors at the column and check the pins (on the chassis side of the harness) for battery voltage. You should find several, mark the wires coming of them. Now take the key out and see which no longer has power. Voila, you have your switched power. You'll need to splice into that wire, what I like to do is snip it, strip the insulation, and twist a 3rd wire into that, solder and seal. Run this wire to the 86 Pin on the relay Next you'll need constant fused 12V power. You can go straight from the battery with an inline fuse, take it from the stock or added fuse panel. Connect this to the 30 pin on the relay. Now find a female spade terminal that fits the starter solenoid terminal snugly. Run this through the firewall grommet, to one of the starter switch terminals. Then connect the other terminal to the 87 pin of the relay. Now ground the 85 pin of the relay. If all is done right, nothing should happen with the key out and the button pushed. Now turn the key to the on position, push the button, and the car should jump to life. I've attached a quick MS Paint wiring diagram of how it should look. DISCLAIMER: This is all off the top of my head and I'm not a trained professional. Use your own judgement or seek the approval of more knowledgeable hybridzedders before proceeding! Also, I believe there's more than one way of wiring a relay to accomplish this same task. This is how I recall doing it.
-

280z track car by Performance Motorsports Fabrication
m1ghtymaxXx replied to Rosco's topic in S30 Series - 240z, 260z, 280z
That's the first I've seen a flex plate used with a manual transmission? What does it take to make it work? I presume a friction surface is welded or bolted on? New holes drilled for the pressure plate? No issues with the the flexibility or strength of the thin flex plate?- 75 replies
-
- performancemotorsportsfabric
- track car
- (and 3 more)
-
Did you look to see if the circlips were bent out of shape?
-

Techno Toy Tuning Strut Brace
m1ghtymaxXx replied to dreco's topic in Brakes, Wheels, Suspension and Chassis
^ I came to post the same thing. Moment resistance may not be your friend, and if the pinned connection weren't pivoting, the bars would probably be flexing. The fact that it's a triangle means it should keep its shape in both axis on the horizontal plane. -
Hub arrived and installed thanks to NW240Z!

