Zetsaz
-
Posts
943 -
Joined
-
Last visited
-
Days Won
34
Content Type
Profiles
Forums
Blogs
Events
Gallery
Downloads
Store
Everything posted by Zetsaz
-

A musician's therapist (The $300 Z)
Zetsaz replied to Zetsaz's topic in S30 Series - 240z, 260z, 280z
I will take you up on that! Small update: Slowly purchasing little things here and there again. I'm not happy with my LS coils slowly going out and even less happy with my bracket. Granted the placement is better than most i've seen. I REALLY don't like how high up on the valve cover the Protunerz one is. Mine normally goes where one of the heater hoses is, but I'm retaining stock function and moved it. Between those problems and having to buy new coils soon I chose to upgrade to Nissan coils. Got the bracket from @DuffyMahoney and ordered the Hitachi coils from RockAuto. In a few weeks I'll hopefully get a chance to work on it again.
-
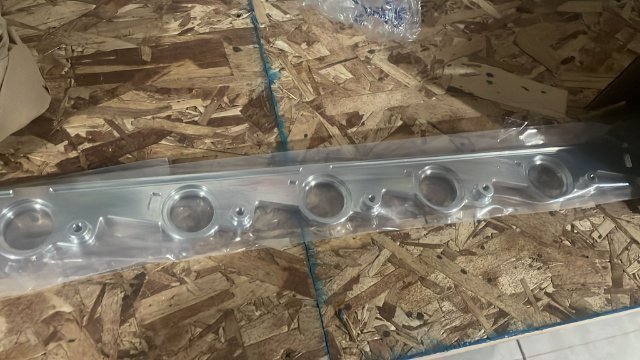
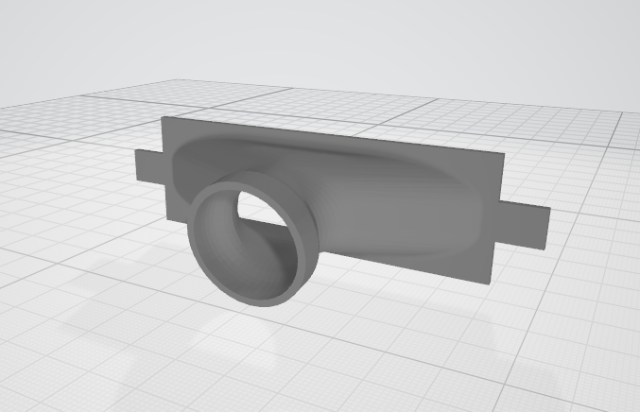
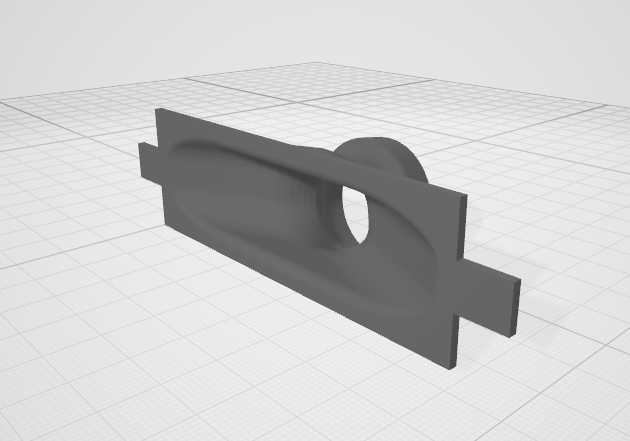
I did something very similar a few years ago, but I had the tabs to bolt it in in the same location as the original, and I kept the same angle on the rear inlet as the stock piece. It flows okay as well, but it tends to flow mostly out the center. I had some help with this design since I'm a complete novice with 3D modeling software, but if I could do it again, I would add some kind of center diverter to prevent the air from just flowing into the center and actually directing it slightly to the side to each vent.
-
Are you sure you didn't have a Jeep stepper? Looks almost identical but the pattern isn't the same. I had both on hand and realized the bolts don't line up on a Jeep stepper despite being a nearly identical part.
-
I think he might have short injectors on there. The protunerz page specifically says not to use those. He's testing the clearance with the injectors instead of the supplied brackets which would have clued him in to why it's too close to the thermostat. Not to knock on the guy, I'm sure he got it figured out, but definitely seems like typical videos people post hoping to get some internet clout instead of spending their time actually working things out. A lot of folks on youtube and other social media tend to post these long videos before even asking the supplier about their issue, instead of posting the result then mentioning the problems they ran into and how they were solved.
-
What was painful to watch about the videos? I feel like this intake is not that much different from installing a different oem one. Only thing you have to change is where some vacuum is going to. Well, I guess other than the cable throttle needing to be installed.
-
A musician's therapist (The $300 Z)
Zetsaz replied to Zetsaz's topic in S30 Series - 240z, 260z, 280z
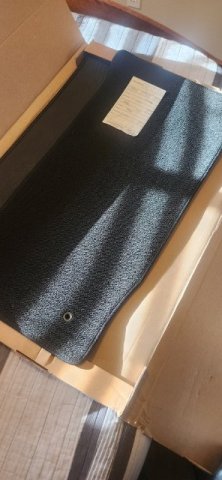
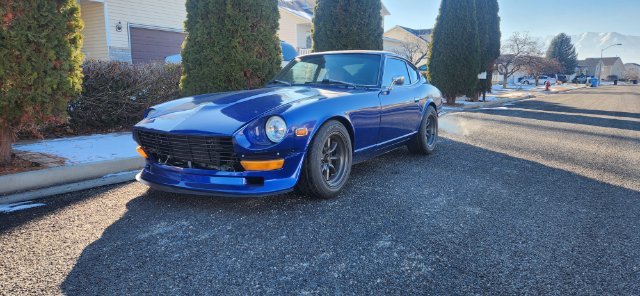
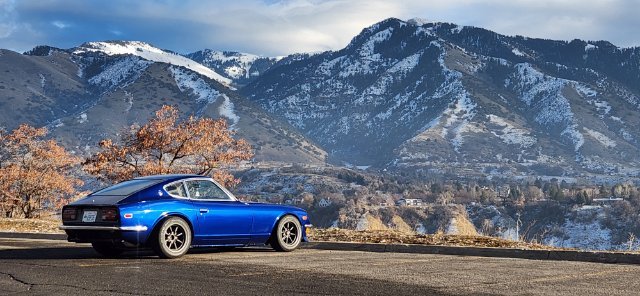
Didn't do a whole lot while I was home for Christmas like I was hoping. Since the weather was so unusually warm and no much snow (and consequently not much salt on the roads) I couldn't pass up the opportunity to take the car out for some cruising. Here are just a few of the updates Found the mats I thought were missing! DID replaced the horn retaining ring, but not sure how I feel about how tight it is. Don't want to glue the horn pad to it just yet in case something chips. Already has some small bits if it flake off when removing the original ring, but at least now it doesn't fall every time I hit a bump. Installed only a small handful of shims. Realized most of them are still good. I think if I visit this spring the big work will be finally fixing the seals on the hatch and adjusting it properly. Right now it tends to pull back on the seal. Ugly and makes it inconvenient to use since I have to tuck it back. Also broke my IAC valve running it through test mode in tunerstudio somehow... woops haha. Blew the end off. Put it back together but now it won't go in or out. Also bought a proper reproduction windshield washer bottle Biggest mishap... found out one side of the bumper hasn't been hanging on to the brackets at all. Probably broke early on. It's just a few tacks holding it on Gonna fix with epoxy when I get back.
-
A Excellent Video on A Complete Body Restoration of a 240Z car
Zetsaz replied to toolman's topic in Body Kits & Paint
Even my "rust free" 280z had the floors replaced at some point (poorly, I might add). I'll agree with you here, it's so worth it to find a body that needs as little work as possible. His example in the videos is FAR better than most and still required some patching to get it to a high standard. Very impressed with his videos and the work on the hood though. It's almost motivating me to replace my floors properly, now with properly reproduced seat supports that weren't available when I made mine out of square tubing... slightly less tempting now that it's painted though haha. -
Not sure if you're still taking orders but I'd definitely be interested 1 Hoody Size: (M) color black 2 T Shirts Size: (M) color black Size: (M) color royal blue ZIP - 84321
-
They seem pretty reliable. Honestly I don't trust any of the current suppliers for carbon parts.
-
Thought this was pretty intense and honestly really well done. https://www.motortrend.com/events/datsun-240z-tesla-restomod-ev-sema-2023/
-
Wide body would be slightly better if the rear arches were higher. They seem to sit very low. Considering the rest of the work I think they just kept them even with the front, but with that hump in the rear it looks a bit awkward. Same thing happens with ZG flares honestly. Lots of people place them too low. Pretty impressive otherwise. Only the second functional awd I can remember seeing. Both with american v8s
-
Makes me wish I hadn't tossed my originals. I don't like the way the rear one mounts on the 280z, but I honestly don't have much of a need of stiffer sway bars. At best I do a bit of canyon driving and I'm probably too scared to slide off the road and ruin all my time (and money) to really push the limits. As far as the transmission mount goes that looks correct. Like @madkaw said it definitely flexes a lot. When I first installed my 71c transmission it had enough flex for one of the bolts to put a nice gash on the side of my shiny new T3 trans crossmember. I still have the original and it's honestly not bad with the new Kameari engine mounts since now there's not much side to side movement and the trans mount really mostly needs to be fore/aft isolation. If you're not trying to go solid mount or find a stiff poly alternative you could do what I did for the engine mounts and buy a Kameari mount. Supposedly 1.5x harder than OEM but still rubber. I might be doing that when I pull the trans to fix my rear main leak. I'm honestly very happy with the compromise between OEM and poly on my engine mounts
-
Is that an ST front sway bar? Doesn't look like you have spacers on it. Do you have any issues with it fowling against the frame rails on the outside? Mine seems to rub and it looks like if I hit a particularly rough bump I'd probably just slightly bend the pinch on the outside. Right about where it curves to the rear it just touches.
-
Honestly wish I'd stopped by during my pacific coast cruise, but that was around peak covid time so I was just camping out of the Z on the way to my brother's in LA. How are the KWs vs something like BCs? What did you have before? My only complaint just by looking at them is that you can't set preload independently and change ride height with a threaded body like the BCs, but I honestly don't know enough about suspension dynamics to say if that's that much of a difference at the end of the day. I think for an old car I'm actually not too noisy, but on bumps the pillow ball at the top coupled with the camber tops being metal right onto the metal of the car adds more noise than most things. I've almost been tempted to create at least a little poly "shim" between the coilovers and the strut towers so it's at least not metal directly onto metal.
-
Am I reading this correctly? Despite being on adapters and worn out OEM seats you were able to get about 2in of extra head clearance?
-
That's my thought. General feedback I've gotten from people who actually drive their cars a lot is that the T3 or really anything by Wilwood is mostly just fine. I'm at a point where I'm okay spending a bit more for great instead of still paying a lot and potentially ending up dissatisfied. You're gonna be really happy with the T3 steering rack though. Best thing I've done so far for driveability.
-
A musician's therapist (The $300 Z)
Zetsaz replied to Zetsaz's topic in S30 Series - 240z, 260z, 280z
Assorted small purchases over the past month or two as we slowly prepare for winter work: OEM Rear main seals - might not manage these over the winter but they'll at least be available. OEM oil pan gasket Horn pad retaining ring (see recent post for details, mine's been cracked and the horn button falls between legs on hard bumps) Differential axle clip - realized my right side is missing. Not sure if it stuck to the half shaft and I didn't notice unlike the other one which stayed in the diff, but needed new one. Pinion Seal for diff - splattering fluid all over my nice stainless exhaust and gunking up the underside of the tunnel Skillard shim kit - includes door latch striker shims, inspection cover shims (actually necessary for me), door hing shims, rear hatch shims (super grateful for these because the actual oem ones seem integrated and I've just had the hinges right over the gaskets). Skillard rear speaker brackets - kept trying to find an original to copy, but for the prices people were selling it wasn't worth it. Glad skillard made good aluminum reproductions for both sides. Still debating on which receiver to use and whether or not to bother creating a 3D printed bracket for a single or double din to replace the original. Skillard door handle backers - I very very carefully pull down and out every single time I use my door handles to get in because the small amounts of flex are enough to get the top of the handle to rub the paint when I'm opening the door. I need to open up the back to slightly bend and fix the passenger side lock rod anyway, so i figured I'd get these along with the batch of new parts. No oil cap gasket yet. Still debating if I buy the cheap seal, or use this as an excuse to get some more bling for the engine bay with an all new oil cap. At some point I need to powder coat the valve cover soon. -
Daaaaaaaaaamn, the KW bits look good! Getting your ZCG brakes is just motiving me to finally pay up for the upgrade.
-
A musician's therapist (The $300 Z)
Zetsaz replied to Zetsaz's topic in S30 Series - 240z, 260z, 280z
I'm with Dave here. Don't use silicone on threads. The white thread sealant I've been using has been great. I use the liquid one and make sure it's slightly tacky before threading like the instructions say. I really think it's just that npt to an adapter not being tightened enough. The problem was it was only leaking once it got really hot on the long drives once the coolant gets really hot and thinner, so I hadn't noticed it on my shorter test drives. -
Do you have a link to the before/after? Would love to see it
-
Just as an example of the engineering costs adding up, the ProTunerz intake is a fine piece that looks pretty but it's pretty basic and not overly engineered. @lowrider from Milkfab is in the final stages of an actual performance intake, and the preorder is about 60%+ more than the ProTunerz intake despite being a low volume part that seems like more of a passion project. The price is only going up after the initial pre-order. Good engineering isn't just amazing parts, it's also working within specific limitations, and I think your complaints about the limited aftermarket options are ignoring that.
-
Agreed with everything @AydinZ71 said here. You're not helping the discussion by criticizing feedback as "emotional crap." I'm running a lightly ported stock exhaust manifold, but I know 3 people personally who are running the protunerz and have seen its fitment, helped them work on their cars, and driven with them. None of them have had issues with cracks so far. It's decent quality for what it is, but the limited engineering time was focused on allowing it to work with the size of turbos they were aiming for and clearing stock components like the steering shaft and even AC which is why it's farther back than the CX manifold which doesn't have much clearance for that. People who are running oversized GT35 turbos with a large hot side are going to get progressively closer to brake components, there's no getting around that. Moving the turbo to the other side is definitely an option, but as a vendor its pros are outweighed by the cons. I've seen at least one person recently that moved the turbo over to the passenger side, only one other before that. I think they ran a stock NA manifold or did custom parts added onto an aftermarket NA part like the MSA header. You run into the issue of hot exhaust gases running right underneath the oil pan or behind the head which is already the hottest part of the engine. As far as making any sort of off-the-shelf production manifold like that, you have to start considering the fact that you're running somewhat long lengths of pipe before you get to the turbo. It adds weight and size which affects shipping cost, as well as adding to materials cost, and it gets progressively harder to guarantee your welds will hold based on how people reinforce where the turbo is mounted and how heavy their specific turbo is. If you think the ProTunerz manifold is poor quality and prone to cracks, something designed around moving the turbo to the opposite side will be way more likely to develop them due to the torque placed on bends created by a much longer lever arm the turbo is acting on. If you're adding supports to provide for people to mitigate this, it's hard to guarantee they'll actually fit if people are running any aftermarket parts like ignition coils, and again, adds even more to the cost of materials and design time. Depending on where you have the turbo end up, you can also be close to aftermarket ignition coils which you don't want running too hot. That's its own other problem. I've only seen one person that had their turbo as close to the brake distribution block as you mentioned and it was massive (probably way oversized for what their engine was capable of honestly). At some point you can't account for every other mod and option people choose to go with if you're trying to make a mass produced product. TL;DR - You said the people making these shouldn't be held highly for their design choices, but they didn't just not think of this - they just aren't aiming for maximum performance . Its a high-ish volume part intended to be usable by as many people as possible while keeping costs down for themselves and the end buyer. Like Aydin said, what you're looking for is going to cost plenty of money and will probably never be available as a ready-to-go aftermarket part.
-
Not that things can't be done better, but the protunerz manifold is on some pretty high budget cars. It's limitations and most of its "poor engineering" has nothing to do with their design and everything to do with the L series. Unless you do full custom with longer piping running behind the engine or under the oil pan to get the turbo on the passenger side, it's always going to be right under the intake and will also always be at least somewhat close to the brake master unless you have a right hand drive car. The stock manifold had the same issues. The L series regardless of the manifold you pick will always have some heat issues to deal with due to it's reverse flow/non-crossflow design. Haven't heard anything about them being full of cracks, that might be a one off, and they're pretty good about backing up their work. For what it's worth, I would trust the quality and customer service of ProTunerz over CX any day. The fact that CX's turbo manifold for the L series looks better has no bearing on its actual quality. I'm more than happy to be wrong, but it's not for nothing that many people are running the ProTunerz and almost no one is running the CX one.
-
Clearance issues aside this is looking pretty sweet. You're one of the first I've seen running the newer G series turbo on an L engine, much less one with carbs.
-
You're gonna be out by an entire inch from where you are now. More aggressive negative offset on top of the extra width is going to require flares or some pulling and rolling. The front fenders have a bit more clearance, but the rear will definitely be rubbing and the top of the wheel will be outside the body line unless you get some fairly aggressive negative camber. I'm with jhm that's it's partially the style of the wheels that will determine the look of the dish You're near the limit of what you can do on a stock body with reasonably wide tires and camber.