

speeder
-
Posts
933 -
Joined
-
Last visited
-
Days Won
2
Content Type
Profiles
Forums
Blogs
Events
Gallery
Downloads
Store
Everything posted by speeder
-
The car is uniformly dark colored now - in gray pimer, block sanding has begun. Looks really good. The multicolored front with the dark rear (before priming) made the proportions wierd visually. I'm taking it to the SEZS Saturday-Sunday so there will probably be some pictures from there. Regardless, I'll post some next week. We will paint in the next couple weeks. I really can't wait to replace that sig picture!
-
For all that think Centerforce clutches are good
speeder replied to EZ-E's topic in Miscellaneous Tech
Yup, that's exactly what my dual sliption looked like... -
Very doable given enough time and determination. I considered a G- nose when planning my YZ project. I wouldn't have been very much, if any, more work.
-
For all that think Centerforce clutches are good
speeder replied to EZ-E's topic in Miscellaneous Tech
Pete, The SPEC stage 3 with the standard pressure plate has a firmer than stock (or CFDF) , but not excessive , pedal effort. Nice feel and control , despite having a ceramic 6-puck disc. My dual diaphragm upgraded pressure plate (I think it's called a Stage 3+), with McCleod hydraulic TOB and 5/8" Tilton Master, is really firm. Maybe too firm. But it's lasted. -
For all that think Centerforce clutches are good
speeder replied to EZ-E's topic in Miscellaneous Tech
-
For all that think Centerforce clutches are good
speeder replied to EZ-E's topic in Miscellaneous Tech
I have never known anyone running over ~275 hp/300tq on a turbo L that has had good luck with the "Dual Sliption". I would be curious if any turbo inliner members reading will report different. May be something specific to the 240MM Datsun setup from Midway - But all I've seen have the some pressure plate and flywheel hot spots as in the pictures above, with a crispy clutch disc. I personally smoked two of them, the second of which was a replacement under warranty by Midway. I didn't ask for the second replacement because I didn't want one even for free. I scrupulously observed the adjustment and breakin procedures each time. My personal opinion is that the CF Datsun pressure plates don't have strong enough diaphragm springs, relying too much on the centrifugal weights for clamping force at high rpms, leaving low rpm grab weak. CF clutches have great feel and grip for lower performance applications, and that's all I run in my na (185 rwhp on a good day - L28/E31/Haltech/header/moderate cam) beater 280Z. I also had bad luck with the SPEC Stage 3 at the 400hp level - According to the reps that 475 tq rating is a "little optimistic". They provided a modified Stage 3 with their "dual diaphagm" pressure plate that seems to hold everything I can throw at it now. Again, this is personal experience and direct observation. -
PM'ed about the larger rear spoiler. I want one now!
-
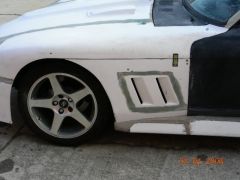
The gas cap is the famous "LeMans Filler Cap", a piece sported by several classic sportscars, among them the Ferrari GTO and Shelby Cobra, back in the 60's. I installed mine in the fberglass recess supplied by Reaction research (Part of their Vella Rossa kit) which was molded into the 280YZ rear quarter. The LeMans filler is just a door covering a capless filler tube(has a spring-loaded door) on a custom made tube. i don't have pictures but will try to remember to take some when it's in final assembly. Dan Juday's LeMans filler was so attractive to me that I shamelessly copied the install with his helpful advice. The filler cap itself also was supplied by Reaction Research.
-
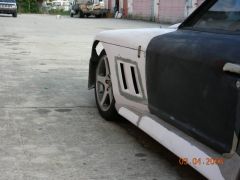
Yeah Dan I still have to do something about this - Will probably bite the bullet and dive back into the fiberglass to make those pesky cheek panels into properly fitting inner fenders. My old one-piece front didn't have inner liners but had a thick coat of truck bed liner on the inside/top portion of the fender sections over the wheels. This was effective in preventing the flying debris damage. Lighft01, The Duraglass is strong and sandable, but has a rather coarse texture that isn't good for final finishing. I have used Duraglass to fill in major voids and irregularities in the fiberglass, especially where I've connected the major panels, then will use a high quality body filler for the finish smoothing and blending. The normal 280YZ body kit install is not for the faint-hearted - and making the front one-piece with Z-car headlight buckets makes it a much bigger job.
-
Dan, That's a meaningful compliment from a man who's been there. Your car was an inspiration for my project. After doing the original one-piece front and flare job 10 years ago, I swore I would NEVER do another large fiberglass job, and now I'm reminded why. This one is probably an order of magnitude more difficult. I have the VR Cheek Panels but they will require extensive reshaping to install. Lots of interference with the YZ fenders. If I do bridge that gap, I'll do it later, and probably go ahead and redo the VR cheeks rather than try to build something from scratch. Whatever, I'll make them bolt-on pieces. The Z's unibody under the fenders sure is ugly, but that open area is nice for access. The previous body didn't have any panels there, and had rubber strips along the top of the unibody rails to prevent splash. Hey EvilRufusKay, You catching this? What'cha think?
-
I havent decided on a rear spoiler yet - Am also feeling that the BRE isn't it. I'm actually thinking I will do the paint without a spoiler, and decide later. I think the shaved rear will look more "blended" when everything is all one color. My sig pic has essentially the same proportions in that area as the new body. White gel coat,green Duraglass, raw brown fiberglass, and pink filler with dark gray primer is not the most flattering color scheme. * my server has been a bit flaky lately - pics are working well now-
-
I've installed several of the Schneider cams and never had a problem. If you have not centered the cam lobes' wipe patterns on the rockers or if your valve springs are bottoming you will have lobes being chewed up.
-
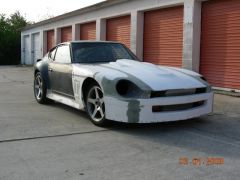
Thanks guys - I think that is the Subtle Z hood. John Washington says I get a prize for the most and most diverse Reaction Research products on one car. I was going for a somewhat brutal, stubby look and think I got what I wanted. Lots of filling and sanding to go, but all the major fabrication and fitting donkey work is done. I have professional help with the "smooth and shiny" work, as I have no talent for that and can't seem to develope it. Paint color will be the same '90 300ZXTT dark pearl blue that the car was before. At some later point I'll build a splitter to bolt to the aluminum flange on the bottom of the air dam. Probably good to have some kind of sacraficial material there. The big Mickeys that started this whole mess are here: http://forums.hybridz.org/showthread.php?t=105742 325/50-15 ET Street Radials. Rereading that post, I was predicting paint in 2 weeks! Blind optimism and ignorance. In the the drag race configuration with those meats, Porkchop does indeed look angry. Appearance wise, I prefer the street/ roadrace stance. Some kid was driving by, screeched to a stop, backed up, and yelled, "Nice Viper!":mrgreen: I plan to run the dual exhausts from my new engine (no, not a V8 - that's been done) through the inner fenders and inside the side skirts, exiting just ahead of the rear wheels. Re-power is still some time in the future, but it doesn't hurt to think ahead.
-
This front assembly was one SOB to make. I want my car to look like a Z, albeit a grossly mutated one, so Z headlights were a must.The YZ fenders were modified with stock fiberglass headlight buckets molded in. The curves of the stock headlight buckets don't match the YZ fenders, so lots of sculpting was required to fair the buckets into the fenders. I then had to fabricate aluminum plates mounted inside to bolt the headlights to. The fenders were then bonded to the hood and air dam to make the one piece assembly. I ground down the edges that were to butt together to a feather edge, then laid fiberglass mat on both sides of the joint, and ground the whole thing smooth. For the time it took to do this I probably could have made a mold and done the whole thing in one piece. Staledale, Yeah, I was worried about the lack of gluing area on the insides of the rear quarters - I first test dry-fit them with self-tapping screws. and removed them several times for trimming. When I was satisfied with the fit, I then removed them and enlisted two friends to help glob on lots of Duraglass on the joining surfaces for the final install. They attach really firmly. Just remember to 40- grit the metal so the Duraglass has something to grab. Ya, I'm proud of them hinges. The wheels I'm getting are these :http://www.ccwheel.com/files/wheelprofiles-model.php?id=classic Looks to be 18X12-13" in the rear, 11-12" front. I still need to install my AZC 5-lug brakes in order to do the final measuring for wheels.
-
Na, the rear shots were from slightly one side. This time I paid special attention to both sides being identical.
-
Almost out of Fiberglass hell! All panels fit to my satisfaction, hood hinge works (the deep air dam required the hood to lift up,then tilt.), everything finally looks good. The rear spoiler isn't attached yet and was blowing crooked in the wind. Had to lose the Kaminari wing because it just didn't look right with the new curves. The side skirts were a pure biatch to make - I started with the MSA ones and widened/reshaped them. Next week we will prime and begin block sanding - I really can't wait to see it smooth and all one color. I will be ordering some black centered CCW Classic wheels to fit out to the new flares. It's really looking like it may be painted in time for SEZ. Whew!
-
-
-
-
I like the bumperless look too!
-
That info is appreciated- however, I just wimped out and purchased a "built" synchro box that is rated for equivalent torque/hp to the Jerico. It was probably a bad idea anyhow.
-
A properly tuned modern port EFI setup will *always* outperform (in terms of power, economy, yes, emissions too,and driveability) the metered fuel leak called a carburetor, given identical engines. With differences between engines, and the fact that some intake manifolds may be optimised for carb'ed versus FI applications, it's very hard to run comparison tests. I once installed and tuned a Holley Commander 950 port FI on a local guy's strong running, Bo Laws-built 406 SBC, replacing a 1000cfm 4-barrel leak. After this was done, we saw ~50 more rwhp on the dyno, instant cold start/warmup, and vastly improved idle/part throttle response. The only change to engine configuration was the intakes with their respective fuel systems attached, which appeared very similar in overall design. There are people who are very talented at tuning carburetors, but the fact remains that they can come nowhere near controlling air/fuel under all conditions as well as with EFI. Note that I said "modern". This does not include the stock early Z's analog sytems.
-
I am about to buy either a Tex Racing T101 or a Jerico (X)R4 for my "next" engine (4.5L Turbo Buick V6 Stage 2), because of the torque handling capabilities of those transmissions. I've not been able to find an affordable synchro box that will stand up to 800 lb/ft or so expected from the Buick. The car sees about 3000 street miles a year - with both drag and roadrace duty planned, and I'm really ignorant of what driving techniques to use for a dog-box.. John, care to help educate me on How To Shift? Or point me to some resources?
-
WHEELS ON THE CAR!!.. heh
speeder replied to wigenOut-S30's topic in Brakes, Wheels, Suspension and Chassis
Me too. Stylin'! -
You may want to change the turbine housing to something smaller - That .95 AR will make for a lazy spool on an L28. Probably good for an SBC.