palosfv3
-
Posts
175 -
Joined
-
Last visited
Content Type
Profiles
Forums
Blogs
Events
Gallery
Downloads
Store
Everything posted by palosfv3
-
Did this one a couple of years ago.
-
Wheel Question. (A.R.E 15" Mesh)
palosfv3 replied to junyar's topic in S30 Series - 240z, 260z, 280z
-
If you want fast Porsche videos that make you nervous how about this one. While this Lemans video says 917 some believe its a 962. http://www.youtube.com/watch?v=QpFlE9PFTzs . Its said Mark Donohue sat for ten to twenty minutes after driving one of these at Le Mans to compose himself and control the shaking .
-
This is correct. info. I would only add to be sure you have cleaned all the blasted metal with the proper agent extremely well and to follow with a chemical cleaning of the metal before priming . I recommend you view the bare body before its primed by anyone else to ensure any rust is properly tended to as soda doesn't remove rust only paint coatings. We have had several projects brought to our shop over the years that have been primed by the soda blasting company only to have to strip them down to bare and start over again because the rust' wasn't tended to correctly. All filling primer is porous . Moisture can and will permeate through the coating and cause issues with the metal . I always coat all bare metal with an etch or epoxy zinc based primer before topping with a fill primer. Etch or zinc based primers have the best adhesion qualities to bare metals and are the only products that actually resist oxidation of the metal.
-
If memory serves me correctly each state has a "Department of Profession and Ethics " that is charged with keeping tabs on local law enforcement . If your town or local police officer isn't applying the law or is playing around with things they should be made aware of whats going on. But before you pull out a big gun make sure those who are charged with the responsibility of overseeing the behavior of the local officers are aware of things and allowed an opportunity to correct things . I know of police officials that would welcome feedback on how their patrol officers are handling situations and for all you know there could be written reports of bad behavior already recorded .
-
Your situation can get quite complicated especially since your not the registered owner of the car . In the best case the other party has a great insurance company and they will take care of things but I dont think this will be easily resolved. Was the other driver cited for anything and did they have coverage ? You will have some difficulty in dealing with the other parties insurance company because they will owe the damage repair cost to the vehicle owner and must make payment to him to clear the liability. Notifying the TRs owner of the incident is important for several reasons. If this insurance company fails to acknowledge their insured's liability the owner may have coverage under his auto policy.( Keep your fingers crossed he didn't suspend the collision coverage since the car was stored ) In most states the insurance stays with the car . If he doesn't have coverage and they deny the claim, the liability coverage on your personal car may provide coverage . If your an employee of your fathers garage and you were test driving the car when this happened, there maybe coverage under the garage keepers insurance they should be carrying. The important things you need to do are , Make sure you are not injured ( Once the adrenalin rush subsides you may feel differently than you do now ). Make sure the an accident report is filed and it clearly states the events in the order that they occurred, make sure you have all the necessary contact info from the other party including their insurance info with policy number, notify the TRs owner of the accident, notify your insurance company and that of the garage if applicable., notify the other parties insurance company of the loss ( don't wait for the person that struck the car to do this, by putting them on notice of the accident they can settle the loss without the consent of the insured if there is sufficient evidence that the insured is liable ), make sure you have your neighbors contact info so he can give a statement to the insurance claims rep on what he witnessed. Oh by the way I have been driving manual trans cars for a very long time and I have stalled a car or two leaving the light . The police officer may have been correct to cite the car for no inspection sticker but he should not be making any statement or coming to any conclusion in the report that the cars lack of a sticker caused the accident. From your description of the accident it is evident that she was not paying attention to the traffic situation in front of her car . Best Regards
-
Frame rail restoration pics
palosfv3 replied to ComicArtist's topic in S30 Series - 240z, 260z, 280z
Just because someone has done it doesnt make it ok. It will fail. A properly executed hat channel would not have two pieces laid inside each other . Doing a replacement as suggested creates a corrosion hot spot and would not add any significant structural stiffness or torsional rigidity to the body. If this is such a good way of doing things why dont we see the auto manufacturors use this type of doubled up panel as part of their build process ? -
Looking for quality red paint? Undecided
palosfv3 replied to voltron_boi's topic in Body Kits & Paint
Most reds are some what tranparent and the level of transparency differs from brand to brand as well as product line. Lesser cost paints tend to need more coats for complete coverage . Many of the catalysed single stage colors are very user friendly , sand and buff nicely and have good lifespans. Stay with the higher grade products if you can as they have better UV protection , better gloss retention, ect. At $1100.00 you friend is being very cost consious. The amount of color needed can vary on the transparency issue and brand . 4 quarts should do the exterior and jambs but not under the hood . Check the color formula for the recommended sealer color as this will minimize some of the coverage issues you may encounter . Make especially sure the sealer or primer coat that you are applying your color over is consistent . Applying color over a multi colored patched subcoat can result in a dark or light spot in the final color coat. We would use Du Pont Chroma One here at our shop for a refinsh repair similar to yours . -
The seat being out maybe a minor issue . The anchor points and their supports are really not that strong and it could just be a bent lower track or support.
-
Before making any decision you need to know what type of insurance policy you have . Market value , stated value or appraised value. SF sells all three. They all have different agreements on how value is determined, I hope the neighbor has a more knowledgeable and fortright staff there than they do here in Illinois. Determining the cost on a repair of this type will be challenging .and any competent shop will probably bill as time and material. Your neighbor wont like that and will try if repairable limit their exposure before repairs are complete. As far as damage goes you relly need to get the front sheetmetal off of the car to accurately determine the extent of the structural damage and and other conditions that may complicate the repair process.
-
Take the time to read the appropriate part of your insurance policy that is appllicable to this loss. This is what will really matter most in your negotiation with the insurance company. Surprisingly many of the claims service reps dont completely understand what they owe under what part of the agreement. If in doubt ask them to " put it in wrting " . The verbal vs written answer can many times be different and to your advantage .
-
It appears there is confusion on the proper usage of weld through primer . It should only be used in the immediate area of the plug weld . It is not to be used to replace ecoats or for rust prevention on parts other than the immediate heat affected area where the weld is being made. I have posted a link to the ICar website where all of the tech articles about welding are listed . Take some time to review these as they are great sources of info straight from the people that test correct repair processes on todays cars. This info is directly transferable to use on older cars. http://fms.i-car.com/advantage_search/FMPro For the Weld through PDF follow this link . http://www.i-car.com/pdf/program_support/advantage/1996/julaug96.pdf
-
060 Your misunderstanding the Mitchell estimating data software and how the info is gathered. Mitchell is not timing anyone and doing the math. They do very few time studies and the deeper you dig into the info the more flaws appear in the system. The base for times starts with the manufacturors warrantee labor guides. Are these accurrate or not ? Talk to some dealer ship techs and ask their opinion. There are so many variables as said in the first paragraph of the p pages . Remember these times are for replacement with new OEM undamaged parts on a new undamaged vehicle and the information is to be used as a guide not the "Bible" . Read up on your p pages as well as some of the other info on the manipulation of the labors time and pricing by the insurance industry. You will be shocked by what you learn. I dont do this to stir the pot just to call your attention to the abuses I have expierienced and seen in this industry by the insurance companies. Take some time to look through these sites. http://www.theccre.com/ here a forum discussion on ADP you may find interesting. http://prodiscussions.com/proboard/showthread.php?583-Check-this-out-read-from-the-bottom-up-Audatex-at-it-s-finest http://www.linkedin.com/groups?gid=160427&trk=myg_ugrp_ovr
-
What makes you believe the body shop owner is dishonest ? Stateing he needs $600.00 to refinish a rear bumper doesnt make him a crook. I believe he is a business person that is aware of his operarting costs are and understands what is needs to charge for repair. You have a choice to conduct business with him or not. Simple as that. Unless you know what the competition may charge for this repair you cannot draw any conclusion as to if he is priced competitively or not. You may want to become aware of your true costs of doing business. Based on your statement you could have difficulties keeping your enterprise open. Costs of doing business involves more than just buying a small amount of paint and clear. I don't want to upset anyone but come on guys . Be realistic. I have been in the business for longer than many on this forum have been around. It disturbs me to have shop owners blanketly called dishonest for no apparent reason and to have those new to the industry unaware of what it takes to exist and become solid reputable entities. Yasin . Its good to see you not afraid to attempt this repair . Do your homework on what the correct repair procedures and the proper repair materials needed . Your rear 280zx cover should be of a urethane composition . If you need to fill any gouges or repair any tears make sure the repair material is the correct flexable material for the urethane. Adhesion promoter is primarily for todays new TPO family covers which have a release agent impregnated into the plastic. Urethane is more flexable than TPO and as such will require a flex additive to be mixed into primers as well as top coats . If your cover has almost invisible cracks in the finish look carefully to make sure they cracks have not extended into the urethane. If they have you will have to repair the urethane . If you just sand and primer they will reappear shortly. There also is a difference in how the bumper is refinished . Off or on the car ? Its best to remove the cover from the car to paint. This way all the edges can be correctly cleaned and sanded. This will give you a better end result. Regards
-
You may find this article interesting as it is applicable in todays new autos and has relevance to replacement of welded panels in general. Advantage Online: 2011 Archives Figure 1 - Anti-corrosion compound is applied to enclosed interior surfaces with a wand using access holes. CORROSION PROTECTION TO STRUCTURAL PART INTERIORS There has been a longstanding recommendation to apply epoxy primer, as well as anti-corrosion compound, on the inside of rails and pillars and rocker panels as a last step for structural repairs. Going back as far as the July/August 1988 I-CAR Advantage, in the article “Restoring Corrosion Protection,†is the following step for providing corrosion protection to enclosed interior surfaces: “Apply primer. Two-part epoxy recommended. Then apply anti-corrosion compound.†The reason given, is that on areas where the coatings have been entirely removed, this is a two-step process that is replacing the two original coatings, zinc and E-coat. During research for the recently updated I-CAR course, Corrosion Protection (CPS01), I-CAR asked several product and vehicle makers if this is still the most frequent recommendation. I-CAR was told it is not, due to several reasons. These include possible primer adhesion problems on these surfaces, the lower prevalence of epoxy primer at repair facilities, the increased popularity of self-etching primer, changing primer chemistries, and an increase in the effectiveness of anti-corrosion compound. E-coat is the best corrosion protection material that will ever be applied to a vehicle surface, and aside of the weld backside, the enclosed interior areas have E-coat. Still, there is a concern among repair facilities for longevity of repairs, retaining corrosion warranties, and assurance that there is one more layer of protection, especially in the rust-belt areas. For these reasons, and more, several facilities will continue to apply epoxy primer in addition to anti-corrosion compound to enclosed surfaces as a standard operating procedure. Primer Requires a Cleaned Surface Product makers have a concern with adhesion if these backside areas are not cleaned properly. Any surface to be primed must be cleaned, both mechanically and chemically. If applying epoxy primer inside rails and other structural parts, the surfaces must be cleaned before the part is assembled. This requires sanding followed by a thorough chemical cleaning, especially the joint area backside to remove coatings. There might be access to a rail joint, if the joint is near the very tip of the rail and the rail is open-ended up through the joint location. Other than a situation like that, there isn’t enough access for proper cleaning after welding, so it must be cleaned before assembly. Anti-Corrosion Compound Alone The recommendation from the product makers and vehicle makers that I-CAR communicated with during research for updating the I-CAR course, Corrosion Protection (CPS01), is to apply anti-corrosion compound alone. Anti-corrosion compound, applied as a mist coat using a wand inserted through access holes or from the end of a rail, is designed to protect enclosed areas from corrosion (see Figure 1). The proper application technique should treat the backsides of the welds. Excess material should creep into the flange areas, sealing off those areas from moisture. At least one vehicle maker, Chrysler LLC, recommends a double application of anti-corrosion compound (see Video). AC_FL_RunContent( 'codebase','http://download.macromedia.com/pub/shockwave/cabs/flash/swflash.cab#version=9,0,28,0','width','320','height','240','src','8-04-11','loop','false','quality','high','pluginspage','http://www.adobe.com/shockwave/download/download.cgi?P1_Prod_Version=ShockwaveFlash','play','false','movie','8-04-11' ); //end AC code Video: Chrysler Collision Repair Manager Doug Craig explains that Chrysler recommends applying two coats of anti-corrosion compound. Do Not Use Self-Etching Primer It is still recommended to not use self-etching primer inside enclosed areas, because it doesn’t form a barrier like epoxy primer and would eventually break down. Self-etching primer must be coated with another product, and it would be difficult to see inside an enclosed area whether or not the primer is completely coated by the anti-corrosion compound. Conclusion The recommendation to apply epoxy primer followed by anti-corrosion compound inside an enclosed area is not included in the updated I-CAR course, Corrosion Protection (CPS01). When using this two-step process, the surfaces must be cleaned for the primer to properly adhere. The more general recommendation is applying anti-corrosion compound alone. The instructor-led (live) I-CAR course, Corrosion Protection (CPS01), has been refreshed. It includes updated manufacturer recommendations, as well as an updated presentation. Watch for this course in your area. For course details and to register, visit the I-CAR website. For comments or suggestions on the Advantage Online, please contact I-CAR at advantage@i-car.com. var _gaq = _gaq || []; _gaq.push(['_setAccount', 'UA-17694430-1']); _gaq.push(['_trackPageview']); (function() { var ga = document.createElement('script'); ga.type = 'text/javascript'; ga.async = true; ga.src = ('https:' == document.location.protocol ? 'https://ssl' : 'http://www') + '.google-analytics.com/ga.js'; var s = document.getElementsByTagName('script')[0]; s.parentNode.insertBefore(ga, s); })(); Terms and Conditions | Privacy You should note their suggestions about the useage of all materials , self etch primers , epoxy primers and rustproofing compounds. This noteable as this is somewhat changed from their original recommendations in past bulletins.
-
Frame rail restoration pics
palosfv3 replied to ComicArtist's topic in S30 Series - 240z, 260z, 280z
Please take the time to do proper research and know the correct information on a repair procedure or process before suggesting to others its OK to do it this way. Installing a new rear rail extension over the original is just creating a situation where the new rail will cause accelerated rusting of the new part and the adjacent areas it attaches to. The proper way of installing the rail is to remove the seats and carpets , locate the spot welds that hold the rail to the floor pan ( you will have to remove the sound deadening pads to find them) , drill out the spot weld from above with a spot weld removal tool ( Blair makes one that is inexpensive and available at most PBE stores), . There will be 4 to 6 spot welds you will need to cut where the rear rail meets the end of the front rail ,. Be carefull to only drill through the outer rail with the SWR as you will need the rear of the rail without any holes. Now you can clean all rust and undercoating from around the area and flanges. Drill 10mm holes in the same location of the removed spot welds on the lower front of the new rear rail extension where it attaches to the front rail. Paint all bare metal areas with a zinc based etching primer except for a small area at each spot weld hole . These spaces should be covered with a weld thru primer and should be directly in line with each drilled hole. Once proper fit and materials are applied its simply a matter of plug welding each hole. Make sure all metal is tightly fitted at each weld and is clean so the weld will not be contaminated by rust undercoating and such. There are other threads on here that may show the process in detail. I thought I had pics but the ones I have are not showing the area in question. -
Welding new passenger front frame to wreck 240z frame.
palosfv3 replied to voltron_boi's topic in Fabrication / Welding
Don't cut anything apart until the structure damage has been pulled back into tolerance, Then and only then should you start to remove the sections needing replacement. Check the r/door for proper fit . A hit of this type can create a sag conditon at the cowl hinge pillar area which will cause the door to drop when opening. The front section of the structure is also swayed to the passenger side . It may come back into alignment with the length pull on the r/upper and lower rails but you may need to make an additional pull to correct the sway. From the pics you posted it is possible to keep all work forward of the strut tower. This is not the type of a repair where you just cut out the damaged section and weld in a new piece. The construction of the front inner structure of a Z actually has a built in safeguard to make sure things are back in tolerance . The hood fit to the fenders is critical as there is no side adjustment on the fenders . It may be less costly and more time efficient to have the structure pulled at a qualified shop. Since the Z has no HSS or UHSS as in todays cars. The correct shop may actually be able to save the side panels and upper rail. -
Check the little plastic bushing the e/brake cross bar sets into. These have a habit of cracking over time and the e/ brake shaft drops slightly .
-
This is a pic of the housing we did on a LS! conversion for a customer. Here is the link to the thread showing how it was done. http://forums.hybrid...__1#entry695698

-
Where to shim to fix rear toe in?
palosfv3 replied to thewaiverproject's topic in Brakes, Wheels, Suspension and Chassis
Front Left Front Right -0.2degrees Camber 0.5degrees 3.8 degrees Caster 1.7degrees 2.2mm Toe 0.2mm Rear Left Rear Right -1.8degrees Camber -3.4degrees 6.5mm Toe -3.1mm Car pulls to the right. thrust angle is pointed that way from the numbers. I dont think it's a subframe problem, so I'm seeing if i can straighten the back 1st before i try the front. Leave the back suspension alone until you fix the problem in the front . You need to go back to square one and check all suspension control point measurements . What I read from the numbers posted is a huge difference in the front caster . 3.8 lt and 1.7 rt . You have more than the preferred 1 degree difference between the two. I believe your problem lies here. I'm assuming this is a stock suspension which should be around 2.5 to 3.0 caster in front. More than likely you have something worn out ( t/c rod bushings )or bent ( lower control arm , damaged engine/suspenion cradle, bent t/c rod or bracket. or unrepaired structural damage ) on the right front lower suspension. Rear suspension alignment , especially toe in , will have minimal effect on front suspension conditions. As far as your rear suspension I would suspect a weak rt rear spring as you also have a fairly large difference in camber in the rear . Since the factory rear suspension is non adjustable , you will find that this ride height issue can change toe . One other issue to consider is the tires. If tires on this car have been driven for an extended time with these settings there is the possibility of the steel belts being distorted . This means that once you get all the suspension back in spec the tires could still cause a pulling condition . -
There is no true spot welder available that has the ability to properly produce a spot weld on a household electrical power service. Most good spot welders used in todays repair shop require a minimun 220v 3phase power source. The old style Blair panel spotters that have been around the shops for decades just dont cut it and have been lying around in the back of many shows a cou[ple of weeks after purchase. Many of the good repair shop spot welding machines today start in the $10K range and go over $35k for new machines. Trying to double up spot welds on old existing flanges will probably not work to well with all the years of contamination and corrosion that can be present in between the panels. Your best bet may be purchasing a small MIG machine and learning how to do a correct plug weld .
-
Remove the door latch striker plate from the lock pillar before starting your door alignment., as it can cause the door to misalign if not set correctly. Next loosen all the hinge bolts to the door with the exception of the outer upper most hinge bolt to the door. Now push the lower section of the door inward toward the hinge pillar. and tighten the lower outer most bolt , Check for alignment. Sometimes if all of the hinge bolts are tight it may not allow the door to rotate on the opposite hinge. If all is well after this then reinstall and adjust the striker. Also check the inner door jamb at the upper rear and upper front where it is welded to the outer panel . Z doors are known to stress crack in these areas.
-
Paint Job Advice for Atlantis Blue Metallic color
palosfv3 replied to mpramsey's topic in Body Kits & Paint
I posted this a while go regarding painting a Z . If your car is in bare metal let the shop take it from there. Its assumed that all trim and glass is removed since you have gone this far. Its interesting to listen to opinions of what a paint job should cost. The comments reflect personal standards , financial affordability, knowledge variables. Now add into the mix condition of the car, color , and region and you get some complicated data to sort out. Lets look at some basics that should be considered. Time study guides (flat rate book ) .There are posted times to paint each panel on a Z. These times are based on painting a new undamaged panel and are a good reference point to start from. If you had a new replacement fender for your car the book states it should take 2.5 hours to prepare and refinish the exterior of the panel and .5 hours to paint the inner edges. All panels of the car have a time assigned to them. Hood exterior (2.6 ) Door w/jamb (3.3) ect. There are corrections allocated for overlap and ad ons for getting exterior panels to the condition of a new part. Once the total time has been calculated industry standards apply a dollar amount per paint labor hour for materials and color. Flat rate time for painting all new condition panels is around 35 hours. This time also reflects a car that is apart and requires no masking. It doesn't include the engine compartment or other interior areas. Now add the time to remove the old finish , Many believe this is not necessary . This statement only shows ones inexpierience of the correct process. Any finish over 10 years old should be stripped. You're only throwing away good money and will jeoperdize the lifespan of the new paint. Figure about $900.00 to $1200.00 to media blast the body. Be aware that this will not remove any rust. Paint and material costs will vary depending on several things. Basecoat/clearcoat paints are more costly than single stage enamels. Reds are more expensive than whites and black. Pearls and tricoats are most costly than metallics. Good automotive paints ( DuPont, Sikkens , ect.) are significantly more costly than fleet paints ( Nason, Matrix. ect.). We have seen reds and orange pearls on standard late model colors at $500.00 plus for a gallon of basecoat. Yes , many will complain that that is just way to expensive but that is the going rate , if that is the color you want. I'm not going into what the body work would cost to restore each panel to new condition as that could take a long time to explain but plan at least 1/2 to 3/4 of the cost of painting minimum. Quick recap Refinish exterior panels 35 hours @ $$$.$$ per hour Rates can vary from region to region ( $45.00 to $ 95.00) Add labor for Clearcoat 10 hours @ $$$.$$ per hour Paint Materials $25.00 to $40.00 )per paint labor hour . Additional Clearcoat materials same as above. Color sand and buff can vary depending on desired finish . Figure between 12 to 20 hours @ $$$.$$ per hour. A quick add of the numbers runs a range of around $3500.00 for a quicky paint to about $9200.00 on the other side. This upper figure doesnt represent a show finish where the entire car would be water sanded with #1000 paper and recleared and buffed a second time to get an orange peel free finish. If your talented , have a work area available for an extended time and have lots of time on your hands, you can do this yourself and limit your expenses to basically material costs and your time but you wont get a quality professional job for $3000.00. Best Regards __________________ Larry -
240z frame damage advice needed
palosfv3 replied to matt_w's topic in Brakes, Wheels, Suspension and Chassis
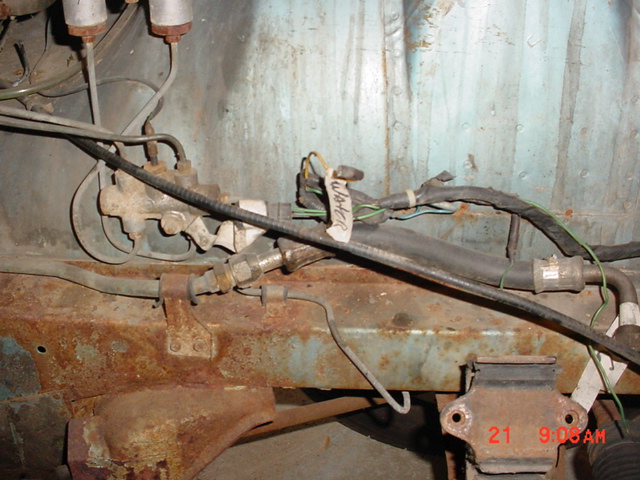
This area is damaged ! The repair your attempting is not a good choice and will only lead to the accelerated failure of this area . Overlapping a patch like this creates a doubled up area that is prone to trapping moisture and increasing the risk of rust perforation of the area over time. The best repair for this area is as I stated before . Covering the area also does not allow for the ability to monitor the repaired area in case it starts to crack. Here is a pic of an undamaged rail. you will see no such condition as which exists on your car , This damaged area should look like the pic and the same area on the right rail of your car . Please take the time to reconsider what direction your taking . Its just not a good repair option. Acceptance of improper repair only misleads others to think that a method like this is ok.
-
240z frame damage advice needed
palosfv3 replied to matt_w's topic in Brakes, Wheels, Suspension and Chassis
It appears that the weld is torn and the rail has a buckle in the circled area. This should be pulled , rewelded and the rail dimensions checked very carefully. While the length measurements may be in tolerance the datum height measurements are more than likely out on the left rail. Some type of impact caused this damage and it appears it is still unrepaired. A buckle like this over time will stress crack up the rail. It may not happen in the near future but it will eventually crack.