palosfv3
-
Posts
175 -
Joined
-
Last visited
Content Type
Profiles
Forums
Blogs
Events
Gallery
Downloads
Store
Everything posted by palosfv3
-
A bolt in that hole can cause problems . The coolant sensor that goes in the hole is a push in type with an o ring on it. Inspect carefully to ensure no damage was caused to the flange by the threads of the bolt. If so clean well and put a little sealant on the o ring before installing the sensor. You may want to consider a shroud for your radiator & fan . You will get better cooling with one.
-
Anything can be done . It just gets expensive. I'd guess $15k to $20k for the fabrication work at a competent metal shop.
-
This condition is common with all steering gearboxes or steering racks that have a lot of miles on them . The "sweet spot " that is the spot that gets the most wear between the worm and sector shaft or the gear and tooth assembly depending on what type of steering system you have. Wears out before the outer parts of the gear and tooth. Adjusting this can be difficult since once you tighten up the "sweet spot " it tends to bind up as you turn outward toward the end limits . Sometimes you can get lucky and get away with an adjustment. sometimes its best to replace the worn component. Many steering rebuilders/remanufacturers encounter this on a daily basis. Not too many of them replace the necessary parts in a worn assembly like this . You will need to exercise a little caution when getting a rack rebuilt or replacing with a used unit.
-
I am a firm believer in doing a sketch before any of this kind of work is started. Its easier to change things on paper than it is in metal. By doing this you will also be able to tie the whole car together visually. I've seen so many custom mods done to cars over the years and it rarely comes together correctly without drawings. Janne Kutja has done a couple of cars for me over the last couple of years take a look at what he does. Its not as expensive as everyone thinks and takes most of the confusion out of the equation. www.jannekutja.com
-
Yet another rust question (3M Undercoating)
palosfv3 replied to attworth's topic in Body Kits & Paint
Many areas of the US are "dry climate " and some areas have minimal rust issues due to their location. Any time you can see condensation on the exterior of your automobile you will find the moisture actively accelerating the rusting progress regardless of locale. If you can see condensation on the exterior of the car you are pretty much guaranteed that the inner side of the same or adjacent panel is wet. It is this inner panel moisture that is the primary cuase of panel rust through since the moisture is trapped in the corners and crevices of the inner areas of the car and these inner areas dont have the air flow necessary for the moisture to evaporate quickly. Cars from the rust belt states or coastal areas exhibit this type of damage quicker because of the salt in the enviroment and the higher exposure to moisture. Being in Texas doesnt make a car immune from rust. It just has a lower exposure to the conditions that cause it . Unless its near the Gulf . -
Yet another rust question (3M Undercoating)
palosfv3 replied to attworth's topic in Body Kits & Paint
Any of the 3M undercoating or chip coating (3m-8964) products have no rust inhibiting properties . They seal out most moisture but if you apply it over rusty metal it can, in certain exposures, actually trap moisture and accelerate the rusting process. If your really serious about things . Clean all rusted surfaces to bare metal by sandblasting or other mechanical means , treat with the proper metal conditioners and apply a zinc rich epoxy primer ,sealed with some type of top coat before applying any undercoating or chip guard. I prefer the chip guard since it hardens and is paintable later . The undercoating just doesnt perform as well . -
Quick question for guys who have restored their z's
palosfv3 replied to blake culp's topic in S30 Series - 240z, 260z, 280z
Plan carefully and keep as many as you can. Some may break off from repeated bending .Regardless of the modifications your doing much of the factory harness locations make fairly good sense. Make sure you identify these before any painting. Simple to replace with a 3/16" wide flat piece of sheetmetal , a little paint and some heat shrink tubing for the insulation. If your soda blasting eveything remember the residue cleaner/remover before primeing. The blasting company should tell you about this important step. -
Kinda reminded me of this one. Dear Abby, I've never written to you before, but I really need your advice on what could be a crucial decision. I've suspected for some time now that my wife has been cheating on me. The usual signs... phone rings but if I answer, the caller hangs up. My wife has been going out with the girls a lot recently although when I ask their names she always says, "Just some friends from work, you don't know them." I always stay awake to look out for her taxi coming home, but she always walks down the drive. Although I can hear a car driving off, as if she has gotten out of the car round the corner. Why? Maybe she wasn't in a taxi? I once picked her cell phone up just to see what time it was and she went berserk and screamed that I should never touch her phone again and why was I checking up on her. Anyway, I have never approached the subject with my wife. I think deep down I just didn't want to know the truth, but last night she went out again and I decided to really check on her. I decided I was going to park my Harley Davidson motorcycle next to the garage and then hide behind it so I could get a good view of the whole street when she came home. It was at that moment, crouching behind my Harley, that I noticed that the valve covers on my engine seemed to be leaking a little oil. >>> Is this something I can fix myself or should I take it back to the dealer? Thanks, Bob __________________ Thanks, Bob __________________
-
Semi will probably be the right call for the type of finish but expiriment with the level of gloss reduction. Chose the color carefully. Dark or light color coordinated metallics that are flattened can give a very nice touch to the finished project.
-
Decision time ! Whether your going to use the original frames or not, you should weld the brackets in or make other modifications before any other interior work is completed . Unless you like taking the carpets in & out.
-
One more LS1 on the street.
palosfv3 replied to palosfv3's topic in Gen III & IV Chevy V8Z Tech Board
Fuel filler neck was a combination of the original rubber fuel neck and the Camaro filler neck. The Camaro neck is 1 1/2" metal tubing. Just like exhaust pipe. We used the upper portion of the Camaro neck for the fill cap and housing. We then cut off the remainder of the Camaro neck and made up a length of new pipe to the tank inlet. We then used the original short length of fuel neck hose from the Camaro to connect to the tank. Now the tricky part . This new metal fill pipe was trial fit in place without the Datsun neck. Once the proper angles and turns were put into the new neck ,it was inserted into the rubber Datsun neck so the filler neck was isolated from the interior compartment. The upper part of the Camaro neck will slide into the original Datsun filler and a hose clamp used to secure in place. You may need to raise the filler location in the pocket to clear the fuel filler cap. -
One more LS1 on the street.
palosfv3 replied to palosfv3's topic in Gen III & IV Chevy V8Z Tech Board
Quote: Originally Posted by kjones What year(s) camaro tank is this? (I've seen a few posts where there are slight differences and I'd like to be sure) Also, did you remove the rear spare tire well for installation of this tank? Would love to hear more... I'm about to do the same and have been anguishing over details like this... Thanks for your help and AMAZING job! Indeed, the spare tire well had to go. Used a steel sawzall to cut around. Then use sheet steel to patch in. I got this far on putting in the T/A tank before deciding to use a new tank. I spent a bunch of time removing the original tank strap mounting plates from the T/A, one spot weld at a time. Then I welded them onto the bottom of the spare tire hole plate. Turned out really heavy, but sturdy. I'm hoping the new tank helps out the exhaust issue. I'm looking into oval cross-section pipe for the part that goes under the rear suspension. BTW, I won't be teaching welding school anytime soon :roll:22 Hours Ago 06:42 PM We thought about using the Camaro/Firebird upper floor reinforcements for mounting the tank into the Z but it just doesn't fit into the Z floor with out major work. The Camaro brackets also hang down way to far near the rear axle assy. We drilled out the spare tire well spot welds to neatly remove it from the floor pan. Flipped it over on a piece of 20 guage sheetmetal and traced the pattern and cut out the metal for the new floor panel. We then fabricated 2 pieces of 16 guage into hat channels that fit neatly into the locating slots in the top of the tank. We the cleaned all the areas that were to be welded to . This included the crossmember above the axle , the lower portion of the trunk floor and the rear body reinforcement at the floor pan. Straps were then formed around the tank so as to have the correct shape to hold things in place . A reinforcing plate was made and welded into the hat channel for the strap retaing bolt nuts. Things were dry fit (Tank, rails & straps ) and all rail locations marked with the floor panel removed. Once everything was in place the floor panel was put in place and scribed . All new reinforcements and panels were then plug welded in place . Similar to the way the factory would spot weld these together . All pieces were tacked in place . Test fit one more time and then final welded in place . I have pics of some of the work. Will post them as soon as I can get to the other computer they are stored in. -
One more LS1 on the street.
palosfv3 replied to palosfv3's topic in Gen III & IV Chevy V8Z Tech Board
New straps were fabricated from 1 1/4 " wide x 1/8" flat stock. We used the original anchor slots in the rear body inner panel and modified the length to fit to the new front floor mount area and tank contour. Take an original strap and overlay the anchor area with some masking tape. Trim to the edges and transfer to the flatstock. Works pretty nicely and not difficult to do. -
One more LS1 on the street.
palosfv3 replied to palosfv3's topic in Gen III & IV Chevy V8Z Tech Board
Looked real hard at tanks for this swap. I believe you will run into many of the same issues whether you use the Camaro/Firebird tank or the custom tank in your link. Theres really no easy way with the exhaust around the tank. This is due to where the pipes need to be routed under the center of the car and around the rear suspension. The Camaro tank offers one other little advantage. It tapers from front to back and as such tucks up under the rear valance much neater than other tanks. -
One more LS1 on the street.
palosfv3 replied to palosfv3's topic in Gen III & IV Chevy V8Z Tech Board
The car has coil overs and I just haven't set them to the lower settings. Trying to keep everything under the car in place till spring. -
T-56 transmission lengths, LSx, F-body & GTO.
palosfv3 replied to BRAAP's topic in Gen III & IV Chevy V8Z Tech Board
If your going to use a Camaro shifter on a GTO T56 you will need the GM #12523298 block. We would experience a partial engagement of first gear with the Camaro shifter using the GTO block. -
One more LS1 on the street.
palosfv3 replied to palosfv3's topic in Gen III & IV Chevy V8Z Tech Board
Much of the design credit goes to Janne Kutja of Finland. This is one gifted young man. He was recently featured in this months "Rod & Custom". This is the second car I have built using his design talents. Check out his web page at www.jannekutja.com -
Paint does not cause orange peel. It is a result of reduction, gun settings and painting application techniques. All paints will have some level of texture from the spray gun ,settings and painter technique. Many of the economy brand paints and clears are more sensitive to flash times ( time between application of coats) reducer temperature to ambient temperature which in turn can result in die back of the gloss of the finish. Paint shrinkage that many old timers were familiar with was from the issue of solvent entrapment in the old lacquer paints and primers which are for the most part unavailable today and are pretty much eliminated with todays urethane/epoxy materials . Many application issues also arise from the mixing of brands .Mixing one companies clear with anothers reducer and hardener. This should be avoided even with the economy brands. The economy clears dont have the clarity of product that the hi end clears do. In some instances this may result in a color not looking as clean ( brilliant ) as it should.
-
One more LS1 on the street.
palosfv3 replied to palosfv3's topic in Gen III & IV Chevy V8Z Tech Board
It is a combination of a MSA type 3 and the aftermarket spoiler that was previously mounted to the car. I'm unsure of exactly who made it but you still see them on Ebay regularly. There is a picture of the unknown spoiler on the picasa link below. -
One more LS1 on the street.
palosfv3 replied to palosfv3's topic in Gen III & IV Chevy V8Z Tech Board
The quarter wheel openings are slightly flaired and the edges rolled. They only have about 5mm space on either side of the wheel/tire and strut tube. Its close and was a lot of trial and error fitting to get the correct wheel offset to work with everything. -
Well the 260Z finally left to go to the upholstery shop. Thought I'd post some pics for the record. 04 GTO LS1 with 6 speed , Modern Motorsports front & rear suspension and brakes, HRE wheels w Toyo Proxes 245/45r17 fronts & 275/40r17 rear. 3.70 lsd ith cv axle conversion, Speartech modified harness and ECM . A/C , custom hood, grille, front bumper., front valance. rear body panel, rear bumper, rear valance, air cleaner , engine cover. Thanks to all who took the time to post your efforts on your LS conversion. The info was extremely helpful in putting this one together.
-
Its interesting to listen to opinions of what a paint job should cost. The comments reflect personal standards , financial affordability, knowledge variables. Now add into the mix condition of the car, color , and region and you get some complicated data to sort out. Lets look at some basics that should be considered. Time study guides (flat rate book ) .There are posted times to paint each panel on a Z. These times are based on painting a new undamaged panel and are a good reference point to start from. If you had a new replacement fender for your car the book states it should take 2.5 hours to prepare and refinish the exterior of the panel and .5 hours to paint the inner edges. All panels of the car have a time assigned to them. Hood exterior (2.6 ) Door w/jamb (3.3) ect. There are corrections allocated for overlap and ad ons for getting exterior panels to the condition of a new part. Once the total time has been calculated industry standards apply a dollar amount per paint labor hour for materials and color. Flat rate time for painting all new condition panels is around 35 hours. This time also reflects a car that is apart and requires no masking. It doesnt include the engine compartment or other interior areas. Now add the time to remove the old finish , Many believe this is not necessary . This statement only shows ones inexpierience of the correct process. Any finish over 10 years old should be stripped. You're only throwing away good money and will jeopordize the lifespan of the new paint. Figure about $900.00 to $1200.00 to media blast the body. Be aware that this will not emove any rust. Paint and material costs will vary depending on several things. Basecoat/clearcoat paints are more costly than single stage enamels. Reds are more expensive than whites and black. Pearls and tricoats are most costly than metallics. Good automotive paints ( DuPont, Sikkens , ect.) are significantly more costly than fleet paints ( Nason, Matrix. ect.). We have seen reds and orange pearls on standard late model colors at $500.00 plus for a gallon of basecoat. Yes , many will complain that that is just way to expensive but that is the going rate , if that is the color you want. I'm not going into what the body work would cost to restore each panel to new condition as that could take a long time to explain but plan at least 1/2 to 3/4 of the cost of painting minimum. Quick recap Refinish exterior panels 35 hours @ $$$.$$ per hour Rates can vary from region to region ( $45.00 to $ 95.00) Add labor for Clearcoat 10 hours @ $$$.$$ per hour Paint Materials $25.00 to $40.00 )per paint labor hour . Additional Clearcoat materials same as above. Color sand and buff can vary depending on desired finish . Figure between 12 to 20 hours @ $$$.$$ per hour. A quick add of the numbers runs a range of around $3500.00 for a quicky paint to about $9200.00 on the other side. This upper figure doesnt represent a show finish where the entire car would be water sanded with #1000 paper and recleared and buffed a second time to get an orange peel free finish. If your talented , have a work area available for an extended time and have lots of time on your hands, you can do this yourself and limit your expenses to basically material costs and your time but you wont get a quality professional job for $3000.00. Best Regards
-
Ls1 Custom Air Filter Housing
palosfv3 replied to palosfv3's topic in Gen III & IV Chevy V8Z Tech Board
Car was painted 2007/2008 Corvette Atomic Orange , GM code #418P -
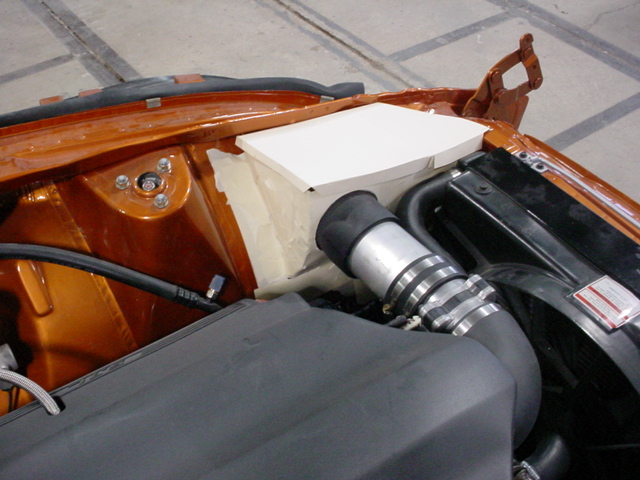
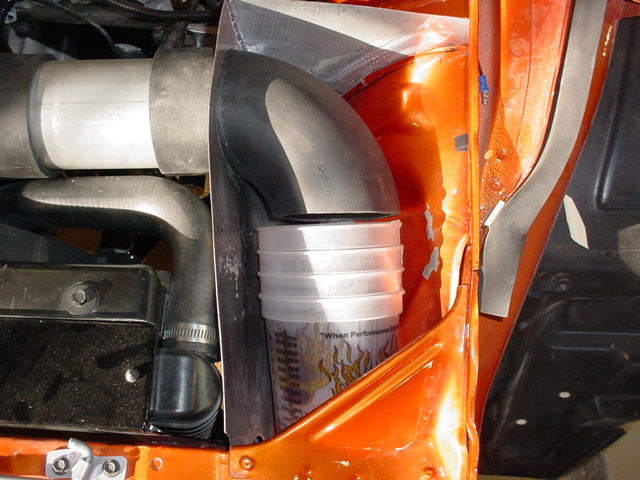
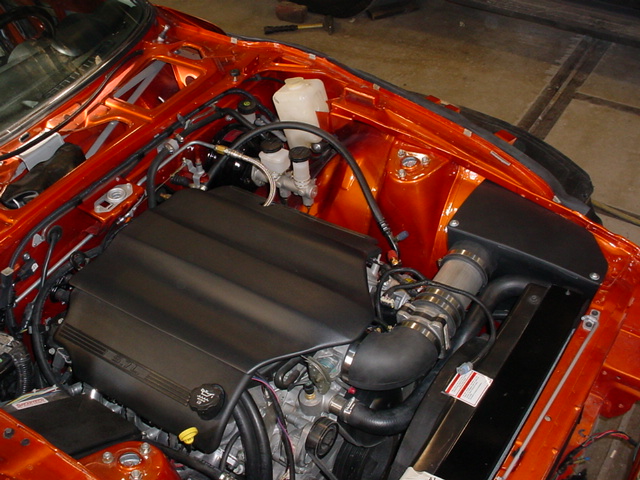
The LS1 conversion were doing here at the shop is off to the upholstery shop and will be completed in the next several weeks. One of the things that bugged everyone here was the air filter choices for this conversion. No one really had an assembly that looked similar to a factory style set up. The KN style cone filter hanging out in front of the radiator was just not in keeping with the rest of the build . I thought I'd post a couple of pics on our solution to the problem. After everything is in place there are only one or two locations that are suitable to hold the air filter assy. We decided to use the front section of the l/fender inner apron. We used a KN # 3130 filter and some intake ducting from JCI . The large holes in the core support that many run the ducting through are large enough to flow a good amount of air into the engine compartment . We decided to mount the filter directly behind these factory holes in the l/side of the core support. The front section of the l / inner apron needs to be reshaped slightly with a rubber mallet to give just a little extra clearance for the filter to angle down into the corner of the compartment. To make a filter housing was not that difficult . First a construction paper box was made to fit everything together. Its much easier to fine tune shapes and brackets with scissors , paper and masking tape than to continually reform metal to you get it to fit. Once the pattern shapes were established. They were transfered to some 20 guage sheetmetal and cut to fit. There was a small amount of welding necessary mostly to the rear edge of the box. The side and top panel spent some time on the english wheel since they needed some forming to contour around the support, radiator hose and filter. Once all was formed and welded together a final test fit was done before refinishing with a textured coating and semi gloss black paint. We used many of the factory mounting holes and nuts. The test drive of the assembly checked out well. We got a little carried away and decided the top of the LS1 needed a little different look also. Finished and installed

-
New paint job has lines - opinions please? Pics inside...
palosfv3 replied to zeeboost's topic in Body Kits & Paint
Sounds like the owner wants to do right but he may not understand urethane paint technology or hasnt been to one of the manufacturers trining seminars in a while. The real question is does the painter understand what hes doing . Putting the car into the sun to cure isnt going to do anything to harden or reflow base coat. One other thing that wasnt mentioned about color coverage. Some base coats are highly transparent and require a proper colored sealer to be applied before the application of the base coat. We recently painted an 08 Corvette . Using a matching orange sealer , as one may think would be correct, would not allow proper coverage of the base and uneveness of the base was apparent even with an extra coat. Changing to the recommended gray sealer produced an outstanding coverage with minimal basecoats and the sparkle of the pearl was more dramatic. These recommended sealers are listed with the mixing formula info.