palosfv3
-
Posts
175 -
Joined
-
Last visited
Content Type
Profiles
Forums
Blogs
Events
Gallery
Downloads
Store
Everything posted by palosfv3
-
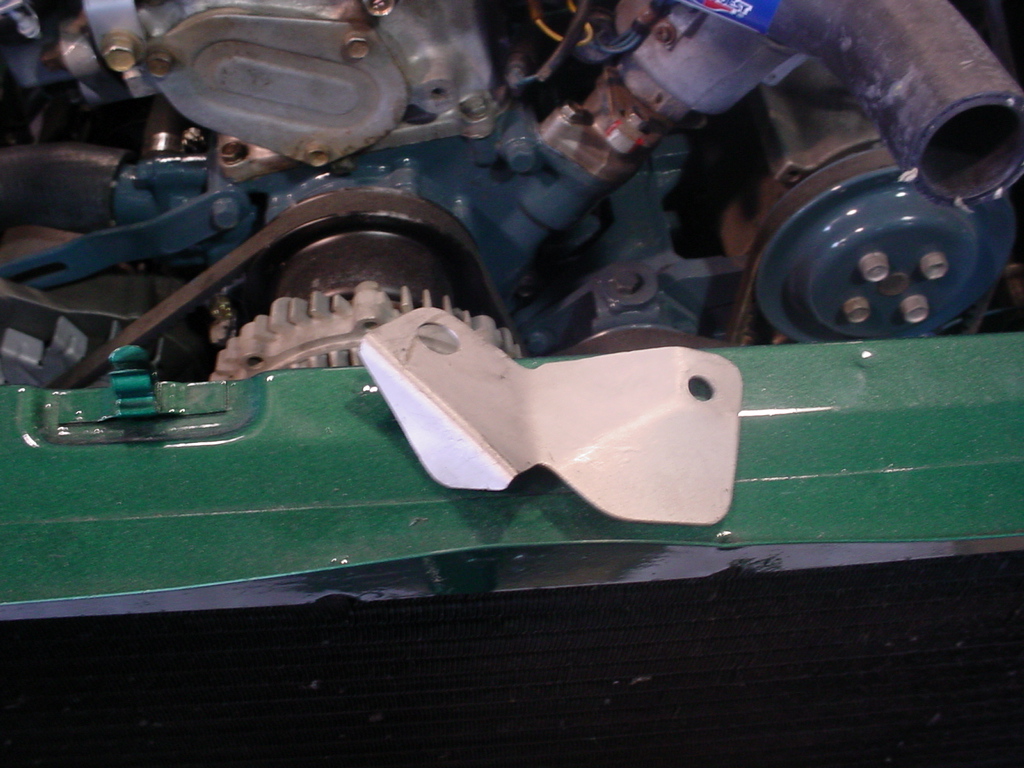
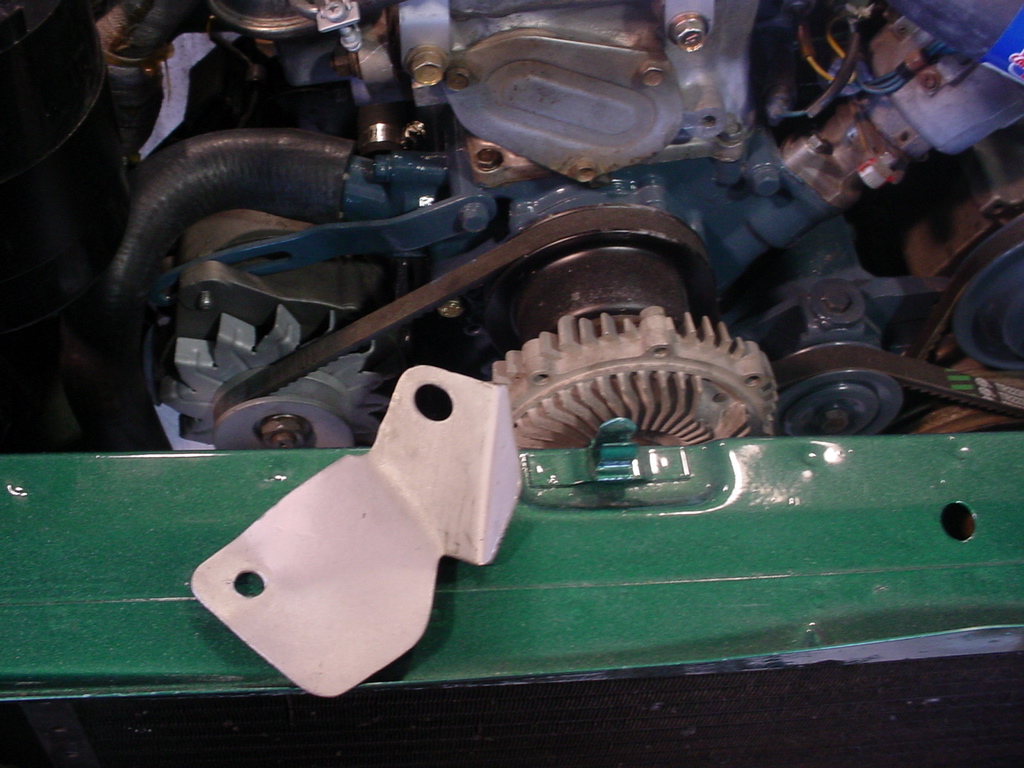
Can any of you Z experts help ? I recently purchased an early 260Z ( factory A/C & AT )for summer running around. I'm in the process of cleaning up and painting the car. When detailing the engine compartment we found a what I have seen on other cars as belt guide bracket / shield attached to one of the timing cover bolts adjacent to the alternator but not completely secured . I'm a pain in the ass for getting everything back in its proper place and this bracket is driving me nuts. Yes , I could just throw it into the parts pile and forget about it but I dont like working that way. I've searched several Z forums and have been unsuccessful in finding a pic or diagram showing the location of this bracket. Can anyone help ? Pics of the bracket are attached below, its resting on the upper core support. Thanks

-
There is a proper weld type for the area and metal needing to be welded. If the panel was spot welded from the factory replace the spot weld with a plug weld. Try to replicate the spacing and size of the original spot weld. Replacing a spot weld with an edge weld can result in fatigue cracking around the weld as this moves the load point of the weld away from where it was engineered to be . Just like in painting preparation is key to a good weld. Clean unrusted metal and tight fitting pieces go along way to ensuring a good weld. Learn to read your welds to ensure you are getting proper weld pentration. Practice welds on similar pieces of scrap metal are sometimes necessary to make sure you have the correct set up on your welder. While Z cars dont use any HSS or UHS steel , its important to understand how loads move through the structure and how weld type and placement affect the movement of these loads. Since the availability of low cost MIG welders there are many new people trying their hand at welding. There is more to welding than just purchasing a machine. The old addage is " If you dont weld well , weld often. "
-
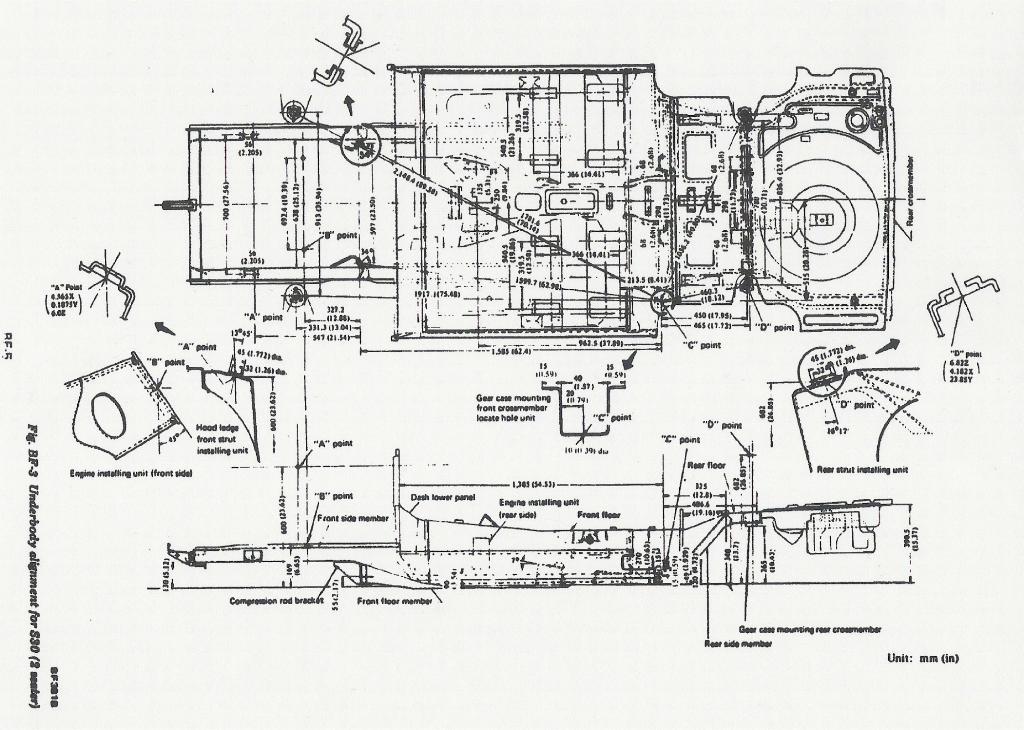
The Datum plane is a horizontal imaginary plane parallel to the horizontal lower edge of the rocker panels where the height measurements are taken from. The datum plane in the drawing is a little tricky to pick up on as it is actually the lowest edge of the rails and not clearly marked. Datum planes are usually shown several inches below the floor so they are easier to read. It is not surprising to hear you state the length measurements are close to each other side to side. You need to remember someone has straightened much of the damage . So it should be reasonably close. I need to check the computer at the office for the web address I pirated the drawing from. If you need to my number is listed in my signature website.
-
hope this is helpful. Pay close attention to the Datum height measurements. this is where I think you will find most things out of shape.
-
I am more familiar with the 240/260 but have doing structural repairs on cars for a very long time. There is definately something amiss with your 280. The pics are a little difficult to closely view as they lose some clarity when they are expanded. I'll try to tell what I can see that is of concern. You will need a very skilled and expierienced frame guy to put this back together. He could be hard to find. My initial thoughts lead me to suspect that the car did a General Lee , Dukes of Hazard type jump across a median or ditch. There should have been significant damage to the front suspension and the cradle and more than likely lower control arms and such may have been replaced . Check these pieces as well as the engine mounts, oil pan and trans to see if anything has been replaced. This picture shows the lower side of the passenger front rail and core support. The outer edge of the rail appears to have split several of the factory spot welds and they appear to have been brazed back together. There is also a small buckle just behind the core support just forward of the stablizer mount bracket holes. Where drivers rail intersects the firewall, the firewall is wrinkled . I believe this area is damaged as the passenger side is smooth. Can any 280 experts confirm this. You can also see evidence of a section of the drivers floor being welded to the tunnel. Looking at the backside of the firewall. The drivers floor just to the left of the accelerator pedal appears to have been torn open for some reason . This isnt from the factory. The firewall on the passenger side looks to be hammered on quite a bit . The vertical bead roll to the right of the tunnel is all distorted. The firewall has been worked from the drivers trans tunnel edge all the way across to within 8 " of the passenger inner hinge pillar. The driver floor has had a piece of sheetmetal welded in . The rubber floor plugs are missing on the drivers side. The passenger side floor pan looks to be pushed up where the rail extension is located. I remember the passenger floor being flat but I'm getting old you know. The stress cracks in this pic are evidence of unrepaired damage that occurred a long time ago. Replace this rail . Both floor rail extensions are junk, from being misused as a jacking point and damaged from impacts and what not. These should also be replaced. You will need a frame diagram for you 280 . I know there are a several posted either here on the Hybrid site as well as the Classiczcar site . Dont do anything until you have these dimensions in your possession and have checked them against the car. Make sure the strut tower dimensions are checked. All structural dimensions should be brought back to within 3mm of the factory measurements. Now comes the tough part deciding whether its cheaper to fix this shell or find another. I would guess to see upwards of $3000.00 to fix this plus parts. This repair cost is close to the price of a good solid shell or another car. If you decide to repair you will need lt and rt floor pans and rails and there may be other parts that are damaged that may found later. Let me know if you need any other info.
-
81' 280ZX R200 w/ CV half shafts swap question
palosfv3 replied to warsZ's topic in Brakes, Wheels, Suspension and Chassis
These are the axle shafts I'm was referring to. There were not peened over and were a simple task to flip. I need to find the receipts to verify exactly which ones they were . They appear bigger than the axles in GMAC's pictures. Sorry for the inconvienience.
-
81' 280ZX R200 w/ CV half shafts swap question
palosfv3 replied to warsZ's topic in Brakes, Wheels, Suspension and Chassis
If memory serves me correctly , the outer cv needs to be taken apart, the bearing removed from the shaft and reinstalled flipped 180 degrees of how it came off. This should shorten the overall length of the assembly by about 10mm to 12mm. -
Check out Metal Meet forum. If you cant find it there your out of luck. http://metalmeet.org/forum/index.php
-
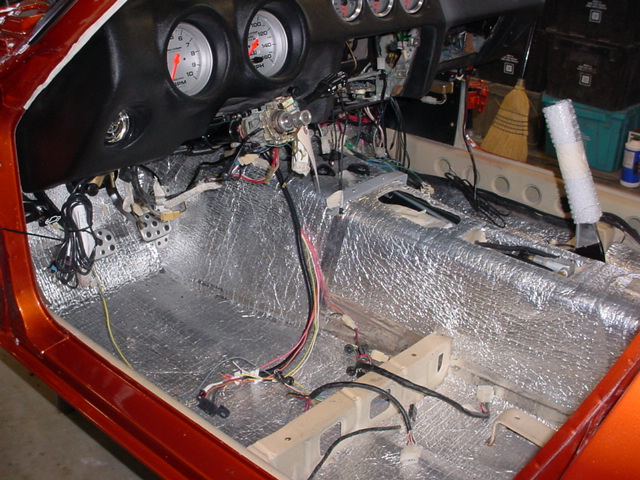
If you can forgo the ashtray in the console, there is a depression in the top of the trans tunnel next to the emergency brake handle that lends itself well to the proportionig valve location. The original brake line runs right next to the location . If you remove the ashtray from the console and leave the cover in place it is nicely hidden yet right at your figertips.
-
Its interesting to listen to opinions of what a paint job should cost. The comments reflect personal standards , financial affordability, knowledge variables. Now add into the mix condition of the car, color , and region and you get some complicated data to sort out. Lets look at some basics that should be considered. Time study guides (flat rate book ) .There are posted times to paint each panel on a Z. These times are based on painting a new undamaged panel and are a good reference point to start from. If you had a new replacement fender for your car the book states it should take 2.5 hours to prepare and refinish the exterior of the panel and .5 hours to paint the inner edges. All panels of the car have a time assigned to them. Hood exterior (2.6 ) Door w/jamb (3.3) ect. There are corrections allocated for overlap and ad ons for getting exterior panels to the condition of a new part. Once the total time has been calculated industry standards apply a dollar amount per paint labor hour for materials and color. Flat rate time for painting all new condition panels is around 35 hours. This time also reflects a car that is apart and requires no masking. It doesnt include the engine compartment or other interior areas. Now add the time to remove the old finish , Many believe this is not necessary . This statement only shows ones inexpierience of the correct process. Any finish over 10 years old should be stripped. You're only throwing away good money and will jeopordize the lifespan of the new paint. Figure about $900.00 to $1200.00 to media blast the body. Be aware that this will not remove any rust. Paint and material costs will vary depending on several things. Basecoat/clearcoat paints are more costly than single stage enamels. Reds are more expensive than whites and black. Pearls and tricoats are most costly than metallics. Good automotive paints ( DuPont, Sikkens , ect.) are significantly more costly than fleet paints ( Nason, Matrix. ect.). We have seen reds and orange pearls on standard late model colors at $500.00 plus for a gallon of basecoat. Yes , many will complain that that is just way to expensive but that is the going rate , if that is the color you want. I'm not going into what the body work would cost to restore each panel to new condition as that could take a long time to explain but plan at least 1/2 to 3/4 of the cost of painting minimum. Quick recap Refinish exterior panels 35 hours @ $$.$ per hour Rates can vary from region to region ( $45.00 to $ 95.00) Add labor for Clearcoat 3.5 to 6.5 hours @ $$.$ per hour Paint Materials $25.00 to $40.00 )per paint labor hour . Additional Clearcoat materials same as above. Color sand and buff can vary depending on desired finish . Figure between 12 to 20 hours @ $$.$ per hour. A quick add of the numbers runs a range of around $3500.00 for a quicky paint to about $9200.00 on the other side. This upper figure doesnt represent a show finish where the entire car would be water sanded with #1000 paper and recleared and buffed a second time to get an orange peel free finish. If your talented , have a work area available for an extended time and have lots of time on your hands, you can do this yourself and limit your expenses to basically material costs and your time but you wont get a quality professional job for $3000.00. Best Regards __________________ Larry I posted the above on a thread a while back . It should still be relevant. Be aware that the above information makes no consideration for any body or metal repair as well as labor for disassembly and reassembly. Plug in your area shop rates and you should come up with a ballpark dollar amount. Many will say you can do it cheaper or do this or that. You know what your expectations are for a finished car and what you can afford. I will tell you this much and I speak from an experienced prospective. For all the work quoted in you post , the cost seems cheap and the time frame to short ! Don't be surprised if something goes astray , takes longer or the cost goes up. Don't forget to factor costs for items such as carpets , chrome and the like. Do the smart thing, ask the person who quoted the price for a couple of references from past clients and ask to see his finished product.
-
Sandblasting shell, but what to put down afterwards?
palosfv3 replied to Marine1342's topic in Body Kits & Paint
The problerm with Lizard skin or similar products are that most are not repair friendly. If you have to weld, straighten or replace any metal you will find it very difficult to work around or patch in. Its fairly routine to replace a damaged pick up bed sprayed with this stuff. There are other products out there that work well for the application and are cost and user friendly. T -
The color in question appears to be a Kandy Gold . More than likely a House of Colors paint. Based in a silver or gold with a semitransparent gold mid coat and then cleared. Pricey.
-
Sandblasting shell, but what to put down afterwards?
palosfv3 replied to Marine1342's topic in Body Kits & Paint
The conditions and location of the area that you are wanting to get to clean bare metal will determine what method of removal is best. I would not recommend removing the paint on any exterior panels (hood ,roof ,doors.)with BlackBeauty . . It would be best to soda blast these areas. Use the BB on the real rusty parts, jambs(not underside of hood), eng compt, underside. S&W 980/981 vynil wash primer is a zinc etching primer and would be an acceptable choice. You dont want to prime anything else until all metal work is complete. This application of zinc primer is preferred before an epoxy primer. Some may say its overkill but this is the best way for your situation. Please explain your meaning of Media Blasting. Its been defined in the shop as removing the paint from sheetmetal or plastic with a hi volume low air pressure system with a plastic cutting agent. I have never heard of this system/method being used with BlackBeauty. -
Sandblasting shell, but what to put down afterwards?
palosfv3 replied to Marine1342's topic in Body Kits & Paint
There are many different types of blasting media. Walnut shells, aluminum oxide, glass beads, iron slag, plastic and yes sand. There are also different sizes of each material type, just like grit on sandpaper and different nozzles , pressures and volumes of air for each material. Its important that you use the correct material for the application . Some materials cut more aggeressively than others , some leave residue others dont. Using sand is also unhealthy and unprotected inhalation will result in silicosis. Sandblasting is an often misused word that encompasses the use and application of these materials and processes. You should know what is the correct material to use for the application. Dont always rely on the blasting company to know whats best. If they recommend a particular material or process , ask why and what will the end result be like. If you going down to bare metal there is no need for Por 15 and it can compromise the chemical integrity of the paint system . I'm not a real believer in this product . I've been repairing and restoring cars for over 40 years and have found nothing that works better on clean rust free metal than a Zinc (epoxy ) based primer. These zinc primers have the best adhesion and rust resistance properties known to man. Primer surfacers are porous and susceptable to moisture penetration to bare metal and should not be confused with zinc based primers. -
Sandblasting shell, but what to put down afterwards?
palosfv3 replied to Marine1342's topic in Body Kits & Paint
You have a couple of choices on how to protect the bare metal . You can coat it with Gibbs or other similar product or just spray a light coat of a zinc based etch primer. Each paint company makes a competative etch primer. Its just best to use one manufacturers line from start to finish for your paint and materials. A product like DuPonts 615s is a good choice for this step. You want to be somewhat careful with sandblasting per say. You dont want to use sand to remove rust or paint. It leaves an embeded residue on the metal that should not be painted over. BlackBeauty or aluminum oxide is a better choice. -
JCI T56 trans mount issue?
palosfv3 replied to auxilary's topic in Gen III & IV Chevy V8Z Tech Board
You want to minimize any lateral tension on the mounts . If the front engine mounts are slightly off they will side load the trans mount. Sometimes a slight shift of 1/8" in the front mount can multiply into more than a 1/2" at the end of the trans. -
JCI T56 trans mount issue?
palosfv3 replied to auxilary's topic in Gen III & IV Chevy V8Z Tech Board
Place the jack back holding the trans in place and remove the JCI trans bracket to allow the rear of the trans to center back to the original position shown in your second pic. Check your driveshaft angles to make sure they are within acceptable tolerance. You may have to move the trans around till you get the driveshaft angles in the correct alignment. Once the angles are confirmed. Check the fit of the bracket. We found ours needed quite a bit of adjusting to fit into place. It been awhile since we did the conversion so my memory is a little foggy as to how much we cut and welded . You will need to make modifications to this bracket in order for it to work correctly . Dont be afraid to slot the holes in the bracket for the trans mount. Most trans tail mount holes are slotted . Are the front motor mounts and brackets tight ? I would suggest to finger tighten all mounting bolts until you are sure you have the motor and trans lined up correctly. -
JCI T56 trans mount issue?
palosfv3 replied to auxilary's topic in Gen III & IV Chevy V8Z Tech Board
The first pic shows the slight modification we made to the trans bracket. We modified the angle of the bracket to parallel the outer edges of the tunnel. Takes about an hour or so but worth the effort. This will allow you to get the exhaust pipes to fit nicer in the space . Dont beat the floor in . You will make the job of bending the front pipes more difficult. -
Clive , I posed the question to see what Z people think the top end of the market for a nice turnkey V8 car is. There are some out there that want a V8Z but dont have the time to build one but have the money to purchase. Is the upper end $40k ? $50k?I know many will state that this is nuts and no one would pay this for a car but then we had a customer put over 6 figures into building a LS powered Z. So what is the reality of the market?
-
So what is an exceptionally nice LS1 Z worth ? Top dollar range ?????
-
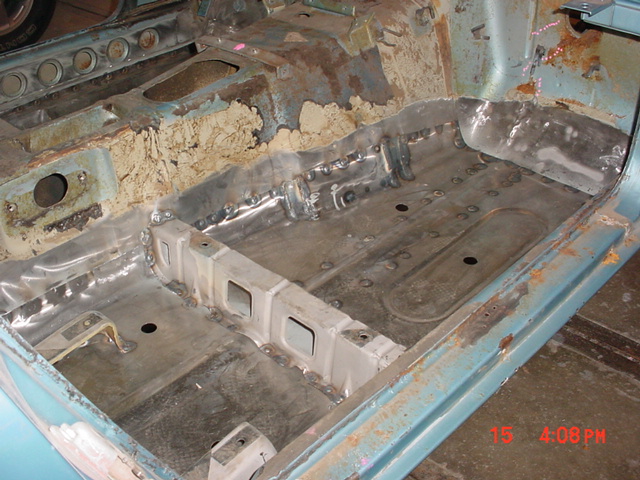
After reviewing your pics, you appear to have things well under control. The only suggestions I would make are to use weld through primer between the flanges , to remove all fitted panels and drill a 9mm hole on the the flanges every 3/4' to 1" so you can plug weld the panels into place similar to the original spot welds. The new floor pans appear to be properly fitted . Attach a straight edge from lower rocker pinch weld flange on either side to use as a measuring reference to determine the the floor pans are level laterally from the tunnel to the inner rocker. As far as suggestions for the fabrication of new panels . These are not bad pieces considering they appear to be a not stamped piece. It wold be nice to see a rounded or stamped kick up to attach to the trans tunnel but its not the end of the world.
-
Could you tell us how bad the front of the car is rusted ? Are you replacing front rails also? It appears the drivetrain is removed . You may want to confirm that the body is parallel to the datum plane( level ) and not twisted or distorted from the positioning of the jack stands and uneven garage floor or the weaking of the structure from the removal of the rusted areas. This could result in some fitting issues of the replacement pieces. I know this may or may not be the case but just asking to confirm before any comments.
-
Post your favorite Z other than your own.
palosfv3 replied to dailydrifter's topic in S30 Series - 240z, 260z, 280z
Rear liscense lamps and housing are from a 2002/06 Toyota Camry . You will the need the deck lid for the formed pocket the housing sets into. Check the pics in the picasa link for details. -
Post your favorite Z other than your own.
palosfv3 replied to dailydrifter's topic in S30 Series - 240z, 260z, 280z
This is my personal favourite, although I realize it is photochopped, I still love the Aston look of the side vents, the clean C pillar. And I love the silver: real clean look. It is my desktop. Attached Thumbnails Here is the completed car. Sorry the fender grilles got nixed. Maybe the next one. Would be happy to build another one as in the pic. These LS1 swaps are unreal. -
I expierienced the tent disaster first hand. We brought our Facel Vega down for the auction. It was an expierience that many will remember for years to come. hopefully all will be able to grab a beer 5 years from now and have a couple of good laughs about these days. I was one of the fortunate ones and the Facel didnt sustain any damage other than a little dulling of the paint on one corner of the car from the car cover. While many have commented about things one way or the other, all I can say is good about the way R&S handled the situation. The damage was actually minimized in many cases due to the fact that when many of the poles fell they landed in between most of the cars . Most of the heavy damage was from the lights and supports remaining attached to the canvas while it was flailing in the strong winds. Many new acquaintances were made during this trying time and it is one of those positives that are frequently overlooked in tragedies like this.