Six_Shooter
-
Posts
1471 -
Joined
-
Last visited
-
Days Won
2
Content Type
Profiles
Forums
Blogs
Events
Gallery
Downloads
Store
Everything posted by Six_Shooter
-
The regulators from the Spal kit fit over the stub where the crank handles attach, with adaptors. There are also caps that get installed on the door panel, to cover up the crank area.
-

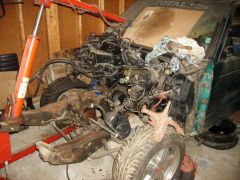
Homemade headers installed on the 383
Six_Shooter replied to blueovalz's topic in Fabrication / Welding
Looks like TIG to me. BOZ, do you have any pics of other views, I just realized they are all from above the "frame rails". I'd be interested to see how the primaries below the frame rail are routed and merge into the collectors. -
Homemade headers installed on the 383
Six_Shooter replied to blueovalz's topic in Fabrication / Welding
I have used hose clamps clamped onto the primary tubes, to be a guide for a line or saw blade. I have also used a large tube cutter where I could, to get a square cut. Even if you have a ragged or not so square cut, you can use a belt sander (preferably a vertical) to square up the cut, before fitting it to the next piece. -
Homemade headers installed on the 383
Six_Shooter replied to blueovalz's topic in Fabrication / Welding
I like the jig, very creative. -
Homemade headers installed on the 383
Six_Shooter replied to blueovalz's topic in Fabrication / Welding
Did you just not set the date or are these pics 4 years old? Looks like there's lots of clearance for the steering shaft to pass the lower part of the driver side header. -
I like that idea too. Just curious for the lack of ability to reply to other's threads, I mean I kinda like the way it's set-up now, and understand it keeps it possibly cleaner, but I'm just not used to not getting responce in project threads like this. I have noticed other people posting similar content threads in other forums. Maybe for the reason of getting feedback?
-
Hmm, Am I the only one that prefered the old format, since it was MUCH easier to find what I was looking for? The cars section isn't so bad, but when you're trying to find a particular interior or exterior part, and it's all lumped together with drivetrain, wheels suspension, etc, it can take a while to go through what is there.
-
Check in the player set-up menu, I'm quite sure my Pioneer DVD player has a selection for that. Mine is a few years old too. To get into my set-up menu there can't be a disc in the player, and use a menu or set-up button on the remote to access that menu.
-
There's like another 2 parts to that, it's great.
-
Looks interesting.
-
That's a good point, for some reason I was looking at this from a restoration point of view.
-
It's 6 lugs.
-
Most divorced transfer cases I've seen are quite large, and may not easily fit with in the contraints of the S30. Using a 2+2 you could eliminate the rear seats and use that area for the divorced transfer case, what I mean by this is that the tranny/driveshaft tunnel will have to modified to clear the transfer case, and would eat up a lot of interior room. the 2+2 might leave enough space to use a divorced transfer case mounted behind the front seats and have enough distance to have a (very) short drive shaft to the rear diff. The only possible problem with this is that the front prop shaft might need to cut right through the passenger side foot well/seat area. the Sy/Ty and Astro van AWD transfer cases really become a non-option, since they place the front diff and the front prop shaft on the driver side, that in a car, especially the S30 would not work (I'm speaking LHD here, though this would give even more reason to get a Failrlady Z. ).
-
I was thinking about doing that exact front end treatment, glad I was able to see it on another car before doing it on mine, I no likey. I'll have to figure out another way to finish off those corners or edges. The interior is quite nice though.
-
By the sounds of it, for the $400 it would be more than worth it as a parts car. Getting a lost title shouldn't be too difficult, but may require the current owner to get the title for you. I had to go through this with a bike I was given last year, wasn't too difficult, but the guy that owned, as the guy than ran the local MTO office pissed me off, with the transaction. If it was owned by someone else I would have just gone to another MTO location, but my nuts were kinda in a sling over that one. Oh well, it's all dealt with now.
-
Sweet!
-
Very cool idea, but I know that I would just get more than annoyed with the hoops and the needed supports. I know that there would be at least one in the way, probably half a dozen that are just in that wrong spot. Hmm, I wonder if there could be a way to incorporate a conventional rotisserie, and this design, to keep access to all areas as open as possible.
-
I have a few pics in my gallery, of the car that I took last weekend. I'll be posting a lot of pics when it gets here. I can't wait for that. http://album.hybridz.org/showgallery.php?cat=843 I also have pictures of my Jimmy, and the T-bucket that my Grandfather and I are putting back together, originally built by my Uncle and grandfather 30 years ago, in thier specific galleries. OZC? Ontario Z Club? No, not a member of anything at the moment. Sounds like it might be worth the membership though. I will need a few Z specific parts, like seals and such. Thanks for the tip.
-
I was looking at a set of locks at the Toyota dealership yesterday that no socket would fit into the lock, the keyed part was a square (pretty much), with an addition couple "bumps" in two of the sides of the square. I actually thought back to this thread when I was looking at them. This is why I still believe it's best to find a socket that will fit the outside of the lock nut, or easier in a lock of the cases of lock nuts I've had to deal with. The chisel technique works as long as the lugnuts haven't been on too long, I hate wheel locks. I used to have them, but after loosing my key a couple times decided that it just wasn't worth the aggrivation. I've had to use the chisel technique with a few nuts, can be a life saver. Wiat a second..... They leave the wheels on at the JYs near you guys? Around here the JYs remove all wheels, along with the gas tanks, alternators, and batteries, before they are put out in the yard. It just hit me, that I've never needed to worry about this, at the JY.
-
Hmmm, interesting.
-
You can also get a 4 terminal master cut off switch. Taylor has them. This would provide the main battery disconnect along with an alternator specific cut off. This same switch would also need to be used on the negative cut off, to control relays for ignition cut off. When disconnect the negative, the car would still need to shut off, before the ground potential would be lost from the alternator, so a 4 pole switch would need to be used to cut off the negative on the coil (or control) side of the relay(s), to use a negative only cut system. P/N 1033 http://www.taylorvertex.com/Products/pdfs/taylorcatalog37.pdf
-
And that's why you find one that is snug and hammer it on, just like the lock removal tolls that are available to do this very samething.
-
Ok, but that won't work on every lock, since they have different shapes to the "keyed" part. Also different manufacturers create that keyed part differently. Best to use the tool for the job, or at least use a socket that will fit on the outside of the lock, but as said the socket can split easily.
-
-
-
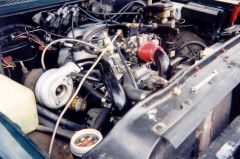
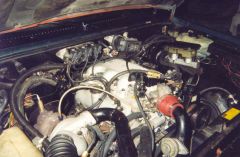
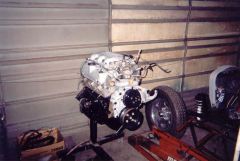
From the album: Typhony
This is the morning after she first fired. This picture was taken during break in.