inline6
-
Posts
483 -
Joined
-
Last visited
-
Days Won
7
Content Type
Profiles
Forums
Blogs
Events
Gallery
Downloads
Store
Everything posted by inline6
-

Just started playing with Innovate LM-2 on Mikuni 44 2.9L stroker
inline6 replied to inline6's topic in Fuel Delivery
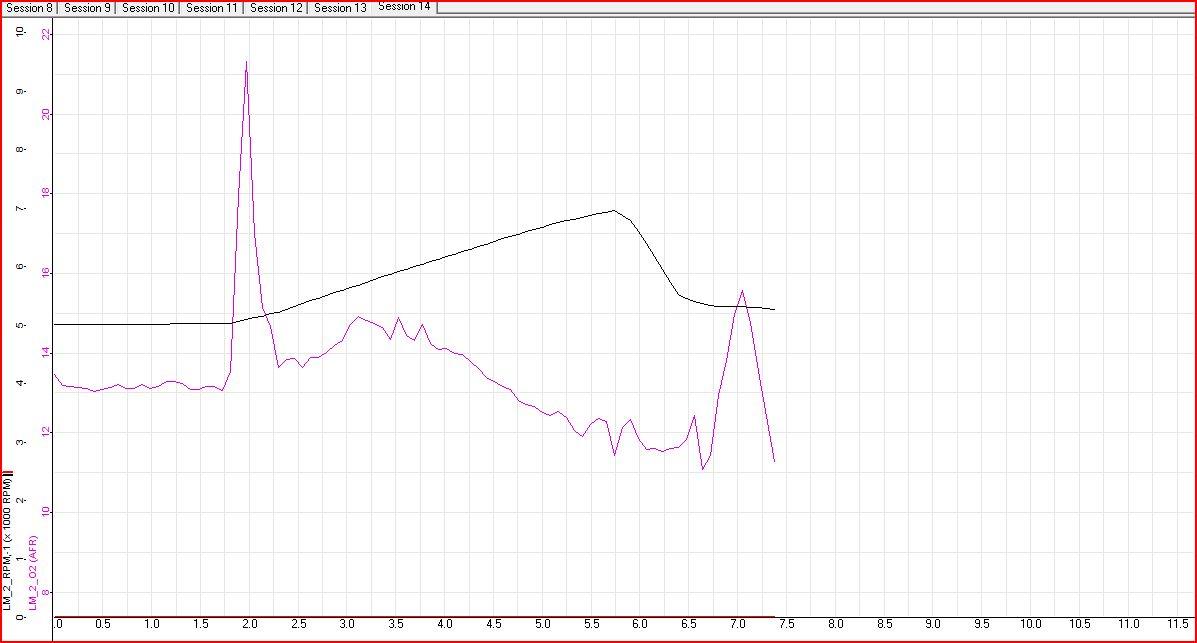
Cool. Thanks for offering... I just started doing some more testing and when I feel like I know what direction I need to go, I'll be in touch. Basically, what I have been doing is taking the car up on the highway and doing 2 pulls in 5th, 2 in 4th, and 2 in 3rd. With each, I start our 65 or so MPH. I had the car running pretty well with one combination, but the thing that is bugging me is the 5th gear pulls. Consistantly, shortly after giving full throttle, the AFR drops down... down and then, when it gets below 10, the motor starts acting up, so I immediately let off. So... to rich on the mains right? To see if I could alter this behavior in 5th specifically, I went with the leanest sets of jets I have on hand. 150 Mains and 190 Airs... along with the 57.5 Pilots and 40 Pumps. And here is what happened: Sooooo... how could that be? Mains too big? I think not - as here is a run through a couple of gears with moments of full throttle, but it was leaning out big time with this combo. This graph shows that pretty clearly. I have a run in 4th also, but I just stopped making runs with this combo because it is clearly too lean. I guess it is possible the air is too big, and the main could be sized correctly, but based on my results from this following combo, I don't think that is the problem: 180 Mains, 220 Air, 57.5 Pilots, 40 Pumps... these are the two 3rd gear runs: And, yes, I totally have a hesitation for a split second when I snap the throttle open. I'll try larger pumps... which should shorten the duration of the fuel stream event. The way I read these graphs, it seems that right at full open, the AFR jumps lean, but then is followed by a brief rich spot before it seems to come into a steady line. This can more readily be seen in this 4th gear run: Perhaps larger pumps will put more full into the first half and less into the second... and smooth it out. We'll see.
-
I'd like a set of the clear with polished aluminum rings. Looking forward to seeing the final installed fit, when you can. Oh, and isn't there a forum for group buys? I just happened to visit this forum for like the second time ever and saw this. I think you should post something about this in other forums as is appropriate so some more people will see it - if that is a good thing. G
-
Just started playing with Innovate LM-2 on Mikuni 44 2.9L stroker
inline6 replied to inline6's topic in Fuel Delivery
Got the potentiometer from radio shack. They didn't have a 20k or 50k one, so I got 100k instead. Wired it up as instructed in the LM-2 manual, turned it all the way clockwise, and started the car. The LM-2 was reading 0 RPM's (as the manual indicated it would). I then slowly turned the potentiometer counter clockwise and "voila", RPM's are showing on the screen now - nice and constant... and changing with engine speed. I was going to go record a couple runs, but the transmission has been leaking and it seems to be getting worse. I'm not 100% positive, but I think it is leaking from the O-ring on the "striking rod". That is the main shifting shaft. There is also an oil seal in there. I rebuilt the transmission a couple of years ago, and definitely didn't replace those. So, I think I'll try to order those up and see if that fixes my leak. -
Just started playing with Innovate LM-2 on Mikuni 44 2.9L stroker
inline6 replied to inline6's topic in Fuel Delivery
Read some forums and found where people having same symptoms with AFR readings on their LM-2 fixed it by re-calibrating the o2 sensor. So, I pulled the sensor out of the exhaust pipe and took the unit outside the garage to another one of my cars (for power) and re-calibrated it. Then I re-installed it but it was too late at night to fire it up to see if the AFR readings had returned to normal. As I was trying to go to sleep, I recalled that I had seen "CAL" show up very briefly on the LM-2 screen. Thinking through the event... I believe I somehow triggered the calibration mode without going through the menus... and the thing calibrated while the engine was running. Again, E9 is "supply voltage too low", so when I first saw it, I reached in and pulled the power adapter from the cig lighter and put it back... and I did this a couple of times in rapid succession hoping to get a better good connection (I have since then gone through the cig lighter and cleaning everything for good electrical connection). I also read through the Crane Hi-6 manual and the LM-2 manual in search of answers for why the RPM's weren't being read correctly. I'm using a MSD tach adapter with my Hi-6, which I had to put into the loop to get the stock tach to work. Not sure, but I am guessing that wiring the tach adapter into the mix could be causing the signal the LM-2 is looking for to be unusable (the negative from the coil). So tonight, I took the LM-2's black and white wire which was hooked to the negative wire coming from the coil and changed it to the tach output wire on the Hi-6 (green wire). Seems logical that with so many people having good results with hooking that wire to the MSD 6AL tach outputs (more forums) that the LM-2 should be able to use the Hi-6 tach output signal. Then I fired it up. First, the AFR readings are back to normal. So, the O2 sensor isn't fried yet. The change I am seeing as a result of moving the RPM wire location is basically twofold. First, RPM's almost never read 0 now. Second, I get a few, somewhat accurate readings around idle speed, but when I get into the throttle at all, the RPM reading on the LM-2 screen jumps to various readings in the 1k to 5k range. They are pretty random. The LM-2 manual has a brief section on "Attenuating a Tach Signal" which involves putting a potentiometer into the circuit. I figure that is worth a try next. Progress can be painfully slow sometimes. -
Just started playing with Innovate LM-2 on Mikuni 44 2.9L stroker
inline6 replied to inline6's topic in Fuel Delivery
Until the learning stops... completely. Tonight, I again hooked up the black wire with white stripe from the analog cable to the negative on the coil (it is actually a Crane LX91)... I was watching the RPM's on the display of the LM-2 to see if there was any pattern to what it was displaying. I'd get all kinds of numbers but generally it would bounce from some random number like 240 to 540 and then to 0... then to 360... and 0. I was playing with the wire to move it around and see if that made a difference (which it didn't) but the longer it ran, the better it got. After a few minutes it was actually registering some rapid changes for short bursts of time like 850, 870, 840, 880, and when I revved it a touch it read 1100's, but then it would still revert back to 0 or 300 or 540 for brief periods of time. I got distracted for a minute or so doing something, and when I looked back at the meter, it wasn't displaying AFR any more. It said "E9". I turned the car off (because running it with the O2 sensor not working is bad) and pulled the cigarette adapter power cord out and plugged it back in again. Fired it up and AFR was again displaying but long story made very short, now the AFR is completely wacked... reading completely different readings than before and jumping absolutely all over the place. I think the 02 sensor is shot - thanks to me running it without power for too long. I took it for a drive to see if it would "clean up", but no luck. And the RPMs won't even begin to work at anything over 1100 RPM. As soon as I give it any throttle, they drop to 0 and stay there most of the time... or go to 10... or 30... but that is it. So... I'm pretty stuck at the moment with a non-functioning LM-2. -
Just started playing with Innovate LM-2 on Mikuni 44 2.9L stroker
inline6 replied to inline6's topic in Fuel Delivery
Looking forward to that day... in the meantime, the learning continues. -
Just started playing with Innovate LM-2 on Mikuni 44 2.9L stroker
inline6 replied to inline6's topic in Fuel Delivery
Did some more testing yesterday and today. With the 57.5 pilots, I am no longer seeing (lean AFR on the meter) or feeling that brief lean spot during light throttle tip in - which felt to me to coincide with the transition off of the pilot circuit and onto the pump circuit. I also tried hooking up the analog cable today - for RPM input only. Not sure what is going on. I tapped into the negative lead on the coil (Crane PS 9 I think). When I checked it briefly at idle before actually splicing (and after running through the configuration), it seems to read the RPM's. I saw it read 900 or so at idle briefly, so I turned the car off and ran a wire from the neg on the coil into the passenger compartment (the cable that comes with the LM2 is not long enough) and spliced it to the black with white stripe wire on the LM2 analog cable. Now, it will intermittently read like this 50......0.......200........80....... at idle. Each number shows for a few seconds. Anyone have any ideas what the problem is? Since the engine has enough run time on it now, I decided to get into the revs a bit more and to record some data for the first time. It would have been nice if the RPM hookup had worked, but oh well. I also put 180 mains in before going for another road test. I did this specifically because during previous testing with the 165s in there, I was seeing 15s after opening the throttle about 60-75% but also holding it in a fixed position for many seconds... the car was accelerating briskly but with no movement of the throttle. I am confident I was completely out of the pilot circuit and I did spend a significant amount of time accelerating after all pump jet effect should have been out of the picture. With the 180s, reproducing this same situation as best I could, I believe I am seeing low 12s to 13s instead of 15s. The AFR's are ok in most situations. The one thing I know I can't do is give 3/4 to full throttle in high gears at low RPM's... that can cause the AFR into the 9's and the motor will start sputtering. I don't want to wash the cylinder walls with lots of fuel! Other than that scenario, AFR in quite varied situations is almost always between 12 and 16. I was pleased to see that I could rev into 7k territory with no problematic AFRs. I recorded one run from standstill through 3 gears (still not full throttle). Just finished looking at it on my laptop. Generally, I am seeing that as the throttle opens, the AFR drops quickly to around 12 or even into the 11s, then it climbs out of that into low to mid 12's and then low 13's . Hard to know for sure what the plot on the graph relates to during the run without the RPM's showing. Definitely some pretty cool stuff. Going to have more fun with this once I get the RPM signal working right. -
Just started playing with Innovate LM-2 on Mikuni 44 2.9L stroker
inline6 replied to inline6's topic in Fuel Delivery
Middle hole. Not positive on the cam power band, but probably something like 3000-7700. Redline from the manufacturer is 7700. Hear ya. I switched to the biggest pilots I had tonight - 60's. Was able to achieve high 14's, low 15's AFR with 1.25 turns out, but as soon as I cracked the throttle at all, the AFR dropped into the 12's. It sounded fat, and throttle response was noticeably subdued. Switched from those to 57.5's and was able to get the AFR around high 14's low 15's at close to 1.5 turns out. Slight opening of throttle gave me 13's instead of 12's - the engine was clearly happier - throttle response was happier. I didn't get a chance to road test because it started raining. I will do that next to see if the lean spot is subdued to any degree. Thank you! for that offer. I think I have all the pilot jets I need. You wouldn't have any 35 or 30 pump jets would you? Thanks for the info. I'm all over it - learning so I can make improvements. -
Just started playing with Innovate LM-2 on Mikuni 44 2.9L stroker
inline6 replied to inline6's topic in Fuel Delivery
Took it for two test drives tonight. I also put some miles on it over the weekend, so hopefully it is breaking in nicely. So, the change for the first run was to put in main fuel jets one size smaller - 160's and then see what that did. I went out on the interstate and played with some acceleration runs in 5th, 4th and 3rd, with revs from 3k to around a little south of 6k. The goal was to spend at least a few seconds with throttle open 50% to 80% while looking at AFR. On this outing, during those moments after transitions, when the car was pulling well, I was seeing 16's and 17's. Another thing I tried was quick and substantial throttle openings. The quicker they were and the deeper they were, the lower the AFR dove. With really quick and really deep throttle applications, even in 3rd at something north of 4k RPM, it would go down into the 10's. With 4th or 5th, it would go down into the 9's. It was dark out, so I couldn't see any smoke. Anyway, as a result of those tests, I decided I would try smaller accel pump jets. So after that test, I changed back to the 165's (main fuel) I had in there before, and I lowered the accel pumps to 40's. For test number two, I went out to the same interstate and repeated the tests. Again, depending on how quick and deep I got into the throttle, I was still seeing 10's and even an occasional 9 something just after initial throttle opening, but as RPM's went up, the AFR climbed, only this time it didn't go as high as before. I was seeing low 15's and the engine seemed to be pulling noticeably harder. Perhaps going with 165's was the right move. And here is something really interesting. On the way back home, I was playing with very slight dips into the throttle and noticed a hesitation that seemed like it was consistently in the transition from pilots to accel pumps - throttle opening had to be "enough" but not more than "a little" - in other words, it felt like it was right around 20% throttle opening. I did it repeatedly and every time the AFR would show a very brief lean spike. I'd be cruising at 70 mph or so, dip just that right amount into the throttle, and then see the AFR spike up with one brief instant to 17 something before blinking back to something more normal like 15. And again, with heavy and quick throttle openings, I could send the AFR down into the 9's and choke the engine up. Having read quite a bit of what others have posted in various carb tuning threads, I think what is going on is I am too lean on the pilot jets so the transition off of the pilot circuit is causing a brief lean condition. Again, I am running 55's and I am 1 and 3/4 turns out on the pilot screws. The consensus from the experienced seems to be to go with the richest pilot jet you can get away with and keep the turns on the pilot screw to no more than 1. With either 57.5's or 60's, I hope to get down to 1 turn out... and still get the same overall driveability experience from idle to 20% throttle as I am getting now, but to eliminate or minimize that brief lean spot in the transition away from the pilot circuit. And I think the 40 accel pump jets that I put in are still too dang big. I don't have enough 35's - only have four, so I will have to buy some. With the 165's main fuel jets, I am seeing what looks to be a fairly stable AFR in the 15's. This seems to indicate the need for bigger main fuel jets, so I will give that a try next. I'm really not sure how the air correction is going to play into this. My basic understanding is that I need to play with that to adjust AFR in the 6k-7.7k rpm "high engine range" (whatever that is) territory. Best to put some more miles on the engine before testing up there. Also, I need to find a way to check for constant fuel pressure from the pump as Tony said... -
Just started playing with Innovate LM-2 on Mikuni 44 2.9L stroker
inline6 replied to inline6's topic in Fuel Delivery
Should I just trust the numbers then - assume the flow was done correctly? I'm having some difficulty with the fact that the flow on the various jets I have differs a lot with the same size hole in them - there isn't much to them except a hole! I've got some 170's and 185's that measure the same size opening. Now that you mention this, I do recall stumbling across an article once about someone measuring flow rates of jets to get everything matched up. I'll switch to my EFI before I get that deep in into it. I have just wanted to have a triple Mikuni engine since my teens... so I am doing it, but will put the EFI on after I have my fun. So, for me, playing with these carbs is sort of like the moment when you finally get to drive that Exotic car you had posters of in your room. When you actually drive it, you realize that you really shouldn't have because the actual experience can't live up to the dream. -
Just started playing with Innovate LM-2 on Mikuni 44 2.9L stroker
inline6 replied to inline6's topic in Fuel Delivery
Thanks. I read the whole thing. Definitely some things to keep in mind in there like it's ok to run lean (leaner than 14.7) at idle and cruise... if having stumbling during pilot to main transition, go with the largest pilot possible and get the pilot screws dialed in to less than 1.5 turns... big cams require less pilot. Hmmm. My fuel pressure gauge is on the regulator in the engine compartment. I'll have to wait until I can get it on a chassis dyno before I can check that properly. I've got a full set of 6, 155 main fuel jets. I'll give them a shot. Unfortunately my full set of 160's actually measure out to be the same as my 165's --- they are all 170's! I learned from Tom Howen (driver and engine builder for Malvern Racing) a long time ago that Mikuni jets are often totally different sizes than the number on them - seems to be especially the case with the main fuel jets in my experience. -
Just started playing with Innovate LM-2 on Mikuni 44 2.9L stroker
inline6 replied to inline6's topic in Fuel Delivery
I currently have 210 air correction jets installed. So, 170 main, 210 air, 55 pilot, and 45 pump. Today, I drove the car on the interstate some. I did a couple of downshifts to 4th to bring the revs up above 3500, let it stabilize, then squeezed deep into the throttle - not fast and not full throttle. I typically held it there for about 4 or 5 seconds at a time. At the beginning of that 4 or 5 seconds, the AFR would drop down into the 10's and then as rpms would build, AFR would climb with also. In the back half or last part of the 4 or 5 seconds the car would start pulling hard and I could see the AFR was around high 12's, low 13's. The above is really quite different than from a few nights ago, and nothing really has changed with jetting. I think the float adjustments caused a noticeable difference. I've got the pilot screws turned out 1 and 3/4 turns exactly right now. I'm thinking about going one size larger on the pilots because the Honsowetz book says to shoot for 1.5 turns. I've got 55's in there right now. Driving around with low throttle applications, here is what I am seeing, generally, in the following three situations: steady state on flat surface - generally seeing high 14's low to mid 15's climbing a slight hill where a small amount of throttle is needed - generally seeing 16's and briefly into the low 17's... no hesitation when this is happening. down hill with no throttle at all - generally much like at idle in the 14's and down into the 13's some if I remember correctly -
Just started playing with Innovate LM-2 on Mikuni 44 2.9L stroker
inline6 replied to inline6's topic in Fuel Delivery
Thanks for the advice. The pump jets are 45's. I have an OEM, european distributor (single points instead of dual and possibly a difference advance curve than US spec - and of course, I have replace the points with the optical pickup for the Crane HI-6 ignition) and I have the initial ignition setting at 17* BTDC. On my last motor, total advance was about 36* and it was all in at something less than 3k rpm - haven't checked that with this motor, but it should be identical. I am confused by the "Setting of Carburetor Main System with Running Test Alone" section in my Mikuni manual. It says "After warming up the engine, bring the engine revolutions up to the maximum rpm through rapid acceleration from around 1,000 rpm." I can't tell if that description is just of just blipping the throttle when the car is stationary, or while driving under load. I can discern nothing really when blipping the throttle heavily. The throttle response is good and the engine revs instantly and high. I don't want to rev it past 6k yet, as the engine only have about 100 miles on it. Thus, the reason I did a road test and was watching the AFR under various instances. I guess I don't need to make sense of what the manual says since I have the LM2. My plan is to change the main jets lower and then go see what the AFR is with the throttle open more than 20% (to get out of the pilot circuit) and at some RPM that should be sufficiently high as to require operation of the Main circuit. Recording several pulls from 40 to 80 in 3rd gear with half-plus throttle application should do it. -
Just started playing with Innovate LM-2 on Mikuni 44 2.9L stroker
inline6 replied to inline6's topic in Fuel Delivery
I decided to pull the covers off and double check the floats, to eliminate being unsure about that. On thing I didn't pay much attention to last time was making sure that each float in the carb was set. When I pulled them off and checked each one in each carb, I did find one where the floats were different levels - out maybe as much as 2 mm. So, now that I am confident the float levels are correct, next step will be to fire it up and adjust the pilot screws as necessary to fix any change in mixture the float adjustment caused. Then, I think I will try to record some data. From just driving it around and watching the AFR, it runs ok at small throttle openings. The more I open the throttle, the worse it seems to run. For example, giving it full throttle in a taller gear, like third, at say, 45 MPH, the AFR quickly nose dives 14... 13... 12... 11... 10... 9 and at 9 the engine actually starts misfiring. I don't have a lot of main fuel jets in my inventory, but my guess at this point is the 170's in there are too big. Will need to see if the float adjustments changed any of that before I change anything else. -
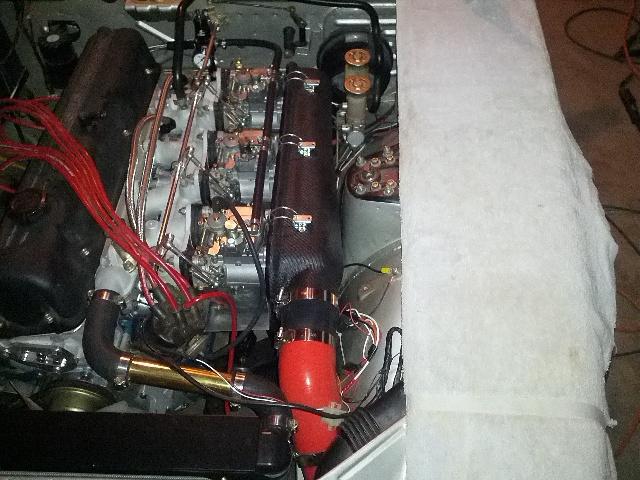
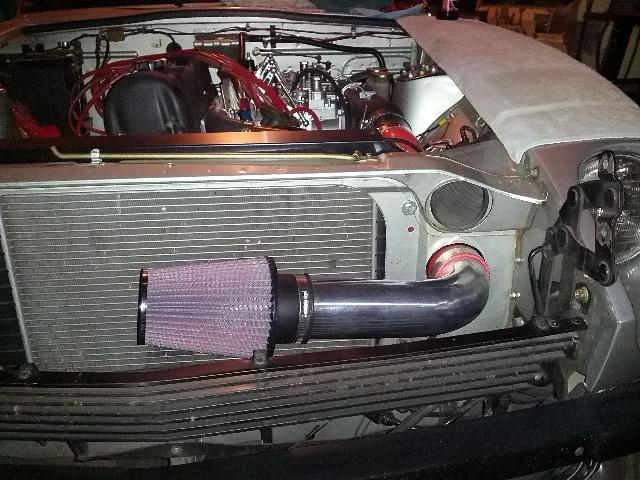
Yeah, it's on my "to do" list to search the forums and elsewhere to see if the noise is to be expected with the special Kameari chain tensioner set up. I also will loosen the bolts on the tensioner and see if it feels right to back it off a tad. In the meantime, I got the air box cover on... it is super tight to the point of almost breaking it to get it on. Unfortunately, the combo of the Cannon manifold, the rubber carb isolators, and the carbs and the .030" heat shield and the air box mounting plate combine to make it too long. Here is a pic of it installed: I am still wondering what to do with the air filter... I have it installed in this pic. I have two things I am thinking about. First, should the filter be pointed up like this? Over a long drive in the rain, I can see the water coming in and pooling in the bottom of the aluminum tube. That wouldn't be good, because eventually, its going to get sucked into the engine. And second, Should I put it in the center like this, in front of the radiator? Seems like I could shorten the run a touch and point it downwards and still get all the flow it needs, but the downside is that it will be exposed even more to water spray coming in the front. Where it is now, it is protected by tucking under the hood a bit. Anyway, still pondering.
-
Wheels are Panasport c8's. Rear is 16X9, front is 16X8. The flares were purchases from Motorsport Auto in 1992-3 - they were called "street flares", though they accommodate more wheel and tire than "ZG" flares. I see they are no longer available from there, and maybe nowhere? I saw identical ones in an old Bob Sharp Racing catalog I believe - they were very popular in the 70's and 80's for sure. Seems like ZG is most popular nowadays - just from my point of view.
-
Yes, it is. I drove it around the neighborhood today for all of ~ 8 minutes. It was starting to rain... And it isn't registered/licensed just yet. My plan was to get a better video of the exhaust sound. I'm very interested myself... I mean, I have only heard it from the tail pipe end at idle so far. The induction noise is very loud... much louder than expected, but I don't have the air cleaner cover on there, and no filter... and no hood right now either! I am fairly certain I'll need to wear ear plugs when driving it more than 10 minutes at a time. We'll see. Here is my exhaust system build thread if you are interested in seeing that: http://forums.hybridz.org/topic/109185-3-exhaust-for-na-modified-engine-muffler-options/ And another very short video of the car after the 8 minute drive... not running this time.
-
Well, I started a post over in the fuel delivery section because that is more relevant to what I am actually doing right now with the car, but I thought I'd post a video in this thread too. I've got the car idling at about 800 RPM now. Tomorrow, I hope to put it on the ground and get it to move under its own power for the first time in 3 years.
-
Just started playing with Innovate LM-2 on Mikuni 44 2.9L stroker
inline6 replied to inline6's topic in Fuel Delivery
I had some time today to work on it and made some good progress. First I updated the firmware on the LM2. The instructions weren't great. Basically, what you need to do is go to the Innovate site and see what version of firmware is available - that latest, of course. You download that file to your laptop. Then you follow the instructions in the manual to get the LM2 into boot mode. Then you fire up LM Programmer, which is the software for the LM2. Then you click the button to "update firmware", select the file that you downloaded, and wait for it to update. Do it in that order, and you'll have no issues. Now, on to the tuning. I fired the engine up and got it up to operating temp. It still wouldn't idle without some throttle of course. That is pretty much where we left off. This time, I checked the fuel gauge with the engine running and it was showing something less than 3 lbs. The needle wasn't bouncing as much... so I undid the lock nut, adjusted it up between 3 and 3.5 and tightened the lock nut. So, picking up where I left off... except now I could read the AFR and it was showing between 20 and 30 when I would let go of the throttle for brief instances. Whenever the engine was about to die, I'd open the throttle a bit and keep it alive, and the AFR would drop down to around 13-15. With this info, I started playing with the pilot screws again - backing them out to see what would happen with the AFR. Interestingly, when I backed the screws out (they were at 1/4 turn out) the AFR dropped to the high teens. So, I backed them out some more. Then I was around 16. Then some more... 13. But it STILL wouldn't idle. It was at this point that I turned off the engine and pulled out the Mikuni manual, again. I was thinking to myself "how could the AFR be that close to the right ratio, and the engine still won't idle?" and "you're supposed to be able to get it to idle without using throttle screws...". Well, I happened to turn right the page in the manual with the instructions on setting the idle speed. And what do you know? It says right there "turn the throttle screws in until they touch the lever, then turn about one turn". I thought, one turn on the throttle is about all I need to get this thing to idle. And something else I had been thinking about clicked as well. I was thinking that you were supposed to get it to idle with just the pilot screws, but if that was the case, there would be absolutely no need for the throttle screws. Clearly they were there for a reason. So, I screwed them in until they touched the lever, and then 1 full turn. then I fired it up again and used the UNI SYN to check carb synchronization. A few little adjustments to each throttle screw and the carbs were in sync and the engine was idling at 1000 RPM. Then I went back to the pilot screws. The AFR was close. At this point, I stopped turning the screws 1/4 turns and went to literally 1/16 turns. Doing this, I was able to get the AFR to around 14.4 to 15.0, with much of the time an indicated 14.6... Just a side note, there is a reason for the really fine pitch of the threads on the pilot screws. 1/2 turn on the screws was moving the AFR from around 16 down to 13. So, keep that in mind. So, here is a video - post changes... I've got the idle set at 800-850 here: -
Just started playing with Innovate LM-2 on Mikuni 44 2.9L stroker
inline6 replied to inline6's topic in Fuel Delivery
Yep. I addressed that before touching the pilot jets again. Needle on the gauge which is on one of the regulator ports is bouncing between 2.8ish and 3.5ish now... hoping that the accurate reading is in the middle of that range. I am not sure I have the floats set 100% perfect. The way I set them was to trim and sand a nail to the right length, then use that as a gauge for setting the float lever distance from the float cover. I put the nail in position with needle nose pliers, seat the float assembly against it, and then blow (with my mouth) through the fuel inlet. I consider it set correctly when no air gets by the needle and seat assembly. This was done while the carbs were in hand many months ago - they were not on the car. Two of the carbs are essentially new, and the third may be a touch older, but is visibly in the same excellent condition. I totally rebuilt that one with a rebuild kit. Everything is tight, sealed, nice. If I confirm with the LM2 that it is still crazy rich, and the 45 pilots I have on order don't show marked improvement, I'll revisit the float levels. The only reason I turned the pilot screws in that far: I only have 4 sets of pilot jets in my inventory - 52.5, 55, 57.5 and 60's. Since, with the garage door open, my clothes and hair would reek after running it for 10 minutes with both the 60's and 55's, I hypothesized it is running absurdly rich. Honsewetz says in the How to Hot Rod your Nissan book start at 1.5 turns out and that for each turn you have to go in, you need to go down one jet size and also the converse of this (I'm paraphrasing). So, I put in the 52.5's - the smallest in my inventory. then, I set the screws at 1.5 turns out and started it. It still wouldn't idle but didn't die quite as fast as with the 60's or the 55's. So, I turned in the pilot screws one turn, and tried again, hoping that I could at least discern some improvement - to give me some evidence I was on the right track. There seemed to be slight improvement. I turned them in one more quarter... leaving them basically 1/4 turn out at this point. That seemed to help a tiny bit more. Since I had no smaller jets to try and the screws essentially couldn't be turned in any more, I finally went and grabbed the LM2 off the storage shelf. I wanted to test my hypothesis that it was indeed running really rich. Then I got bogged down in reading the manual and the rest is detailed in my other post. I pulled the O2 sensor from the pipe tonight, and calibrated it per the instructions - in open air. It reacts to exhaling on it, so hopefully that is a sign that it isn't damaged. We'll see I guess. Thanks very much for the input. Between that and searching and reading the manual and some experimentation, I'm sure I'll have it running well soon. -
I got my new engine fired up last Sunday. Instead of getting the LM2 set up right away, I was excited to get it started for the first time and check the usual basic stuff... for leaks and such. After that part went ok, I wanted to play with it a bit just to see if I could get it idling alright. I tried the few pilot jets I have in my inventory. Started with 60's, went to 55's, then went to 52.5's. With each, within a few minutes, my clothes and hair would stink... (car is in the garage with the door completely open while doing this and I let it air out after these episodes - so I am fairly certain I won't die from it... ) There is no smoke to speak of, but man is it running rich. Anyway, the 52.5's are the smallest pilot jets I've got currently, so I have those in there and dialed the pilot screws in to about 1/4 to 1/2 turn out... and it still won't idle without throttle, but it doesn't die as fast as with the other sizes when I close the throttle plates completely. By this point, I am fairly certain that it is exceedingly rich, and I don't have any smaller jets to try, so I brought out the LM2 to start playing with it. I figured I'd hook it up and get confirmation that I'm running stinky dog rich. Tonight, I proceeded to read through the instructions, and the online manual. And I learned a couple of things I wish I had known before now - clearly I should have looked at this stuff before firing up the engine... First, it warns to never run the engine with the oxygen sensor installed in the exhaust pipe and not hooked up to the 12 volt power supply (that heats it up) or the 02 sensor will be damaged. Oops. Before the first start on Sunday, I plugged the 02 bung in the exhaust with... the oxygen sensor that cam with the LM2. So much for that. Who knows if I have damaged it? I've started it about 5 times and run it for a collective 30 minutes perhaps - running exceedingly rich in each instance... I guess, I'll just have to try to use it and see if it "works" at this point. Second thing is more minor, but it is pretty obvious it would be an issue... the manual warns of having absolutely no exhaust leaks or the readings will be inaccurate (leaner than should be). The band clamps I am using on the exhaust joints are not quite sealing a 100% yet. I have used band clamps in the past and have found that they have to be modified by hand to seal completely - they just don't seal 100% right out of the box. So, that is next on my "to do" list before anything else. Then I have to remove the O2 sensor from the exhaust pipe and "calibrate" it in open air... Then, I can get down to trying to actually use the thing. Judging by what I read through in the manual tonight, it looks like I have a lot of learning ahead of me.
-
Thanks for that info. I'm running a 17010-A7600 NISMO High Volume fuel pump... The gauge on the aeromotive regulator was showing 4+ but below 5 lbs. So, maybe it was enough pressure to push past the needle and seat and raise the fuel level too high in the carburetor body. Since 3 to 3.5 lbs is what I see as the recommendation from searching, I adjusted it downward. Only problem is, for some reason, the needle on the pressure gauge is rock steady from 0 to 2.5 lbs and above 3.5 lbs... but adjusting to bring it into the 3 to 3.5 territory, it gets some kind of resonance thing going on and the needle on the gauge bounces up and down like crazy. Go figure. Haven't had a chance to see if that changes things yet - it is too late to start it up tonight - even though I should to get back at the neighbors with their freaking loud and constantly barking dogs.
-
It runs! Got it started yesterday. Doesn't idle without the throttle screws set to push the throttle plates open a bit. Not sure what is going on yet. I set the ignition timing at about 17* as with the previous engine. For now, I am using the same "Euro" distributor in combination with a Crane Hi-6 ignition - optical sensor replaces the points. Have tried 55 pilots and 60 pilots thus far and engine doesn't seem to respond to screwing pilot screws in or out with either one... just doesn't idle and makes the whole garage stink, and my clothes stink. Seems crazy rich. Anyway, here is a short video. Throttle response is nice. The whining coming from the engine is noteworthy. I'm not sure if that is normal with the Kameari timing chain tension set-up, but my guess it that it is. I could have the tension too tight... not really sure. The instructions had some crazy number that didn't make sense.
-
When I did the body work on my car, the roof took a fair amount of work to straighten out... very thin layer of bondo... primer... the usual. I'd examine the spot welds on the seams and verify they are factory... that the roof hasn't been replaced somewhere along the line. If the welds are factory, and from the inside you can't perceive any undulations in the headliner, then it's nothing that can't be addressed by a body shop during a repaint. If factory spot welds are not obvious (in the rain gutter areas) or you have obvious undulations in the headliner, then their could be gobs of bondo in the panel or other nightmares waiting for you.
-
No, I didn't think to ask. My preference was to put it another eight or twelve inches downstream, but everything after the merge collector is stainless and I had a regular steel fitting... I couldn't put it in the 3" part of the merge collector because the transmission cross member is right there and I didn't move it any further forward because it would be on 3 cylinders only. So, is this a known, bad thing, or an unknown but certainly wouldn't think it is optimal kind of thing? What is the best solution? I welded the fitting as high up and out of the merge collector as possible to try to minimize obstruction... Should I put a plug in that one, and grind down the inside as flush as possible... and then buy a stainless fitting and weld that into the 3" stainless pipe a bit further back?