tube80z
-
Posts
1401 -
Joined
-
Last visited
-
Days Won
31
Content Type
Profiles
Forums
Blogs
Events
Gallery
Downloads
Store
Everything posted by tube80z
-
Near Zero Front Suspension Droop
tube80z replied to 260DET's topic in Brakes, Wheels, Suspension and Chassis
Yes, but only for that axle pair. Often before the tire is off the ground it may have almost no net load on it anyway. So even on the ground it wouldn't be contributing. See above. Well before the tire comes off the ground the most of the load has already transfered to the outer tire. If you pulled a loaded tire off the ground then I could see this happenning. I've really been waiting to get this issue because I wanted to see what Ortiz had to write. I've read the article about ten times and I still don't get it. He doesn't really answer the question, talks about dirt cars, and then says something with no real proof. Keep in mind I'm not an expert, I play in parking lots with traffic cones, and occasionally run up mountain roads but here's what I know about reduced droop. If we have a car with 500 pound springs, 500 pounds of corner load, and a motion ration of one, what happens when you set the car on the ground? I think the spring compresses one inch. What happens if I lift the car anything over an inch? I think the spring becomes unseated and there's no load on the tire (I'm not counting the unsprung weight in this case). So in the case of reducing droop to less than an inch I'm keeping a set amount of load on the tire. This is very similar to how the stock suspension works by having a soft rate and a spring the is longer than the available space and it's pre-loaded. I'm just using a lot less space. So here's what I think happens. Droop limiting either via pre-loading the spring on the strut, or using a mechanical stop allows the car to accept lateral loading and roll a specific amount before the inside spring tops out. At that point there is a certain amount of vertical load still left on the inside tire. For any further load transfer (and the necessary increase in lateral loading) the actual roll center moves to the center of the inside tire contact patch. For any further roll (from increased lateral loading) the car now pivots about that point, and lowers itself. That lowering in turn decreases the jacking effect. Roll stiffness from the springs and bars is not changed at all, so the net effect is a decrease in roll stiffness (or at a minimum, no further increase) When I started running stiffer springs (400 to 500 pound range) it was obvious when jacking the car up the springs would unseat with very little droop. I noted the fender gap when this happened. I then looked at pictures I've taken of the car under high lateral loads and saw that sometimes the gap appeared to be bigger than just having the spring unseated. I remembered back to playing with formula cars running droop limiters and figured why not try this on a tin top. My original idea was that it didn't do any good to allow the suspension to droop anymore than the spring becoming unseated, which was a little over an inch (lets say 30 mm). Running the car this way it worked better. I didn't see tires come of the ground and more importantly the rear tire temp were more even. Previously they looked to have too much camber. So then I played with this some more. I tried reducing droop at both ends to see what happened, then one or the other. I found a way to make a killer drift car (not what I wanted) and a way to get quicker turn-in and less roll, which was what I was after. Pictures of the car after it was droop limited have a lower roll angle. I think this is attributed to the car no longer being able to jack the inside up off the spring seat because it now has to overcome a specific load. It's sorta like running a larger swaybar and the car works better. Theory tells you that's wrong but sometimes it works anyway. In this case I think the tires are held flatter to the road. Cary -
Near Zero Front Suspension Droop
tube80z replied to 260DET's topic in Brakes, Wheels, Suspension and Chassis
You're mistaking suspension droop with tire load. Just because you run reduced droop doesn't mean the tire is being pulled off the road. It's quite the opposite. At least if you're running spring rates to properly support the platform. What happens when a spring is unseated versus still having load on it? Reducing droop in this case keeps a set amount of load on the tire. What happens is you top out the shock and now the tire has to dampen all road irregularities, but it still has load on it. -
Near Zero Front Suspension Droop
tube80z replied to 260DET's topic in Brakes, Wheels, Suspension and Chassis
I've seen a few cars setup this way. They work fine but generally have a problem of abusing the rear tires and the car goes away pretty quickly. Make sure you don't get too out of whack with frequencies front and rear. If you have access to a datalogger look at the roll angle of the chassis mid-corner. What you want to see if more or less an equal roll angle. This indicates the tires are used about the same. Cary -
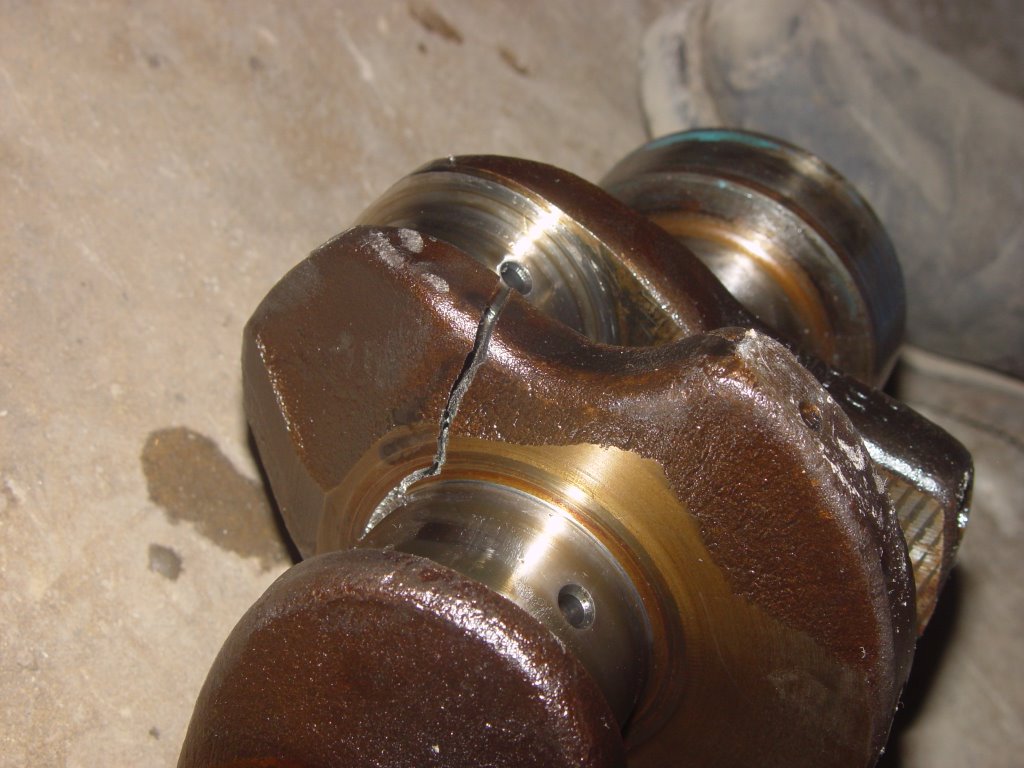
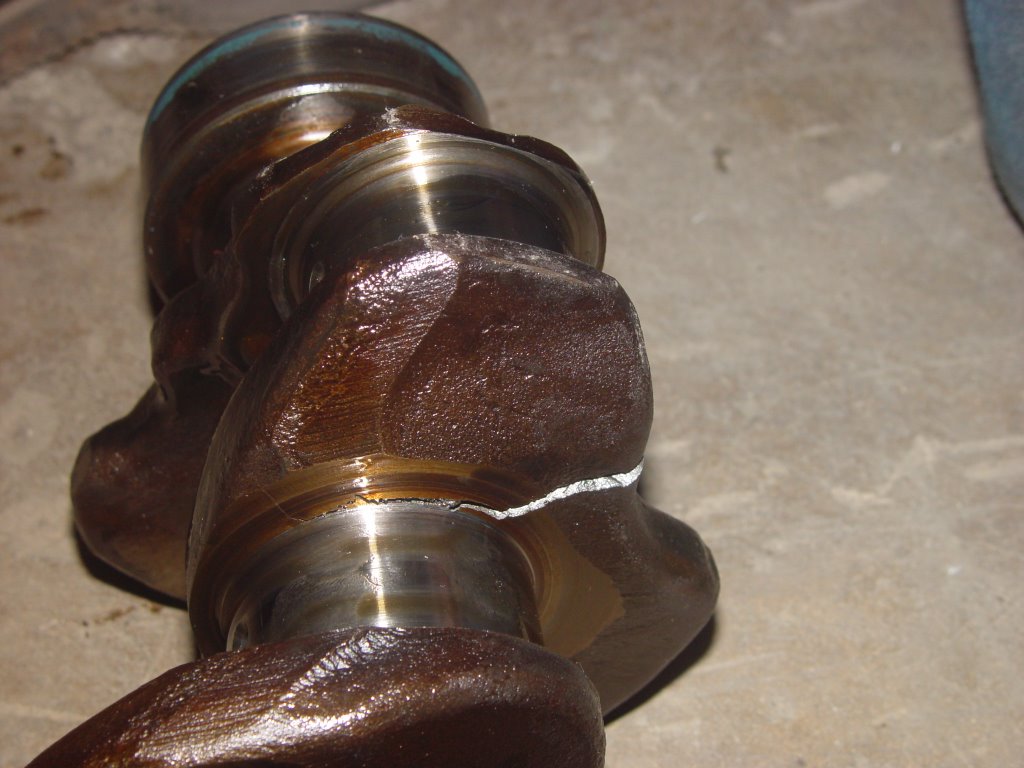
The crank was cleaned, checked for size, magnafluxed, and all the parts were checked for balance and found to be close after a few small drills. Race motor in this case is really just an autox car and you could have said hot street or something similar. It's not prepped to real race car levels. That said I've never had a problem with them coming apart like this ever and was sorta surprised. I should also mention this crank was put in to replace a crank that was killed then I had a balancer come apart and spun on the nose of the crank. I had a race the next week and needed to get the car together. So this was a rush job at best and what little was done was all my fault. Cary
-
running a 260z without the brake booster?
tube80z replied to caszboy's topic in Brakes, Wheels, Suspension and Chassis
I think the difference is something like 45 lbs of effort compared to 120 lbs of effort. Numbers could be off but it's a lot more. -
Front diff crossmember no longer necessary
tube80z replied to JMortensen's topic in Brakes, Wheels, Suspension and Chassis
That's easy, just don't screw up -
Near Zero Front Suspension Droop
tube80z replied to 260DET's topic in Brakes, Wheels, Suspension and Chassis
From my experience running reduced droop you will notice much quicker turn-in and shouldn't really have any ill effects. If you try and run a true zero-droop setup you may get some bouncing that can be hard to tune out. It depends on how much anti-squat you have but that may cause problems when trying to put power down on corner exit. It works well in a straight line but not so well when you are turning. -
Front diff crossmember no longer necessary
tube80z replied to JMortensen's topic in Brakes, Wheels, Suspension and Chassis
You have subframe connectors, cage diagonals, etc. all welded in that help keep the floor from moving. Those are all going to help keep this from moving. Take a look at the top of the tunnel, I don't think you need a lot more than that to strengthen the bottom. From personal experience I can tell you that I've broke that crossmember (diff mount issue) and never noticed any handling issues. I even ran one race with just the caps and couldn't tell. I have broken cracked and broken the rear transverse mounts, which I can feel. So I'd say you're safe and I'd spend the effort at the back and leave this area alone. Cary -
Front diff crossmember no longer necessary
tube80z replied to JMortensen's topic in Brakes, Wheels, Suspension and Chassis
Or if you really think you need it weld a tab along the bottom of the RT mount for a bolt in crossmember. This would be more in line with the lower control arm mounts than a piece further up where the seat belt anchors are. I don't think you need much to strengthen this area given the rest of what you have done. Cary -
Magnafluxed and all bearings are standard. Maybe a fluke but still impressive to see. Even more impressive when you think it was still revving to about 6K for a bit after this.
-
A friend has my old race motor and it started getting what sounded like a nasty rod knock. He took it apart expecting to find a broken crank. I've never seen one break like this and it was very close to coming all the way apart. This engine had one season under me 7500 RPM limit and a few events for him at a lower 7K limit. Just goes to show that these parts are getting older and racing is hard on things. Cary

-
If you have the large front damper it won't hack 7K very well. The first signs of a problem are bits of rubber that look like they came from the fan belt on the bottom of the hood and up the inner fenders. That's the sign of a damper dieing, and you better take notice. You also need to throw away the flywheel bolts and install new ones. When you lose one end of the crank the other takes all the beating. It may seem like overkill but you won't be very happy when the flywheel comes loose and wipes the end of the crank. Don't ask how I know this. Cary
-
You may want to take a look at http://www.jakelatham.com/radical/info/brake_calculators.shtml and see what your current system looks like before making changes. C
-
HybridZ custom suspension design thread
tube80z replied to e_racer1999's topic in Brakes, Wheels, Suspension and Chassis
There's a group of us that are racing in XP, which has basically turned into our own little rivalry between a 89 vette and the rest of the Zs. If I look at the vette in pictures you can see the suspension on it does a much better job of keeping the tires flat to the ground. Currently the vette is quicker but if I look back at times against my old car they are closely matched. So like many things there are other variables at play that make a direct comparison difficult. I had the opportunity to race a 510 on struts and then run the same car converted to double a-arms. What I mostly noticed was the car had much better steering feel. The odd thing was that it didn't have a lot better front grip. It was very similar to the lexus setup discussed in a different thread. As Ron points out above the Z has a lot of SIA and this is what I think is more of an issue than the scrub. If you look at the tire contact patch you'll see the SIA has a tendency to roll it from edge to edge. There are a number of other effects too but I wonder if that is one that causes the front end to be harder on tires. My gut feel is that double a-arms will better for a car that's going to do much longer runs on the tires. I also think it's better under brakes especially if you are generating large longitudinal loads. I asked a similar question in the motec seminar because I knew they had experience with the V8 supercars and got a more thorough but similar reply. Cary -
In the past I used delrin and a router to do what you described. You can make different length spacers to mount those on if you want. I saw a really cool set made from aluminum and figured this was worth a shot. Cary
-
Jon's 2 year roll cage saga...
tube80z replied to JMortensen's topic in Brakes, Wheels, Suspension and Chassis
I was curious how you'd do the X given where the bend is in your current bar. That's what all my question was really. Cary -
Jon's 2 year roll cage saga...
tube80z replied to JMortensen's topic in Brakes, Wheels, Suspension and Chassis
So my only question is how will the other bar fit in? Cary -
Jon's 2 year roll cage saga...
tube80z replied to JMortensen's topic in Brakes, Wheels, Suspension and Chassis
I'm all about easy -
Jon's 2 year roll cage saga...
tube80z replied to JMortensen's topic in Brakes, Wheels, Suspension and Chassis
When you put in the tube between the cage legs I would add a tube underneath (say 5/8 ID) that allows you to slip in a remote jack point. You'll need to notch the rocker and you can then back this up with plates on the inside of the rocker to the tube and on top of the rocker. If this isn't clear I'll attempt some Cary CAD to make a visual version. Just an idea. I'm going to a go a little farther and do this at the ends too so I can put the car on stands with nothing under it very much like a rally car. Cary -
Jon's 2 year roll cage saga...
tube80z replied to JMortensen's topic in Brakes, Wheels, Suspension and Chassis
I would rethink that. I've seen a couple bad accidents and in each case how the driver was hurt was from the rocker crushing between the X and getting to him. While these weren't Z cars they had similar weak rocker areas. If you look at newer cars you'll see these areas have been really strengthened. This is also a good location to create an external jack point, which at some point you'll wish you had. That's one area where the nascar door bars are a little better. For my XP car I'm probably going to do the X too, but I will have a bolt-in nascar type structure for when the car is hillclimbed. If you happen to look at one of the recent race car engineering mags you'll see this is the type of thing the FIA has been testing for rally car side impact protection. Having one tube try and crush through another has been shown to dissipate a fair amount of energy. Cary -
Jon's 2 year roll cage saga...
tube80z replied to JMortensen's topic in Brakes, Wheels, Suspension and Chassis
Good work on those compound tube junctions. They aren't easy and never look right. Cary -
adjustable tie rod end adapter studs?
tube80z replied to lowdown's topic in Brakes, Wheels, Suspension and Chassis
Bridge reamer taper equals ford tie-rod taper. That's what my local hotrod guys do instead of rod ends for their more streetable cars. I'm not sure of the taper. I do know you can get the reamer for about $100 for these, which makes my bridge reamer look like a super bargain. Cary -
HybridZ custom suspension design thread
tube80z replied to e_racer1999's topic in Brakes, Wheels, Suspension and Chassis
As Ron points out you have a lot of options. I gave some basics to get started earlier in this thread. Using Ron's pics and Terry's idea you get what similar to the front end of a Aussie touring car (at least under a Falcon). They are setup with rear steer and a upper arm that goes into pockets welded on top of the frame rail. The upper arm is splayed with equal angles, unlike Ron's arm. This keeps the forces more equal on it and allow room for the coilover assembly. In the Falcon the pics I have show that they use an extender on the shock to tie it into the strut tower that's no longer used. This is the direction I think I'll eventually take with my XP car. Cary -
HybridZ custom suspension design thread
tube80z replied to e_racer1999's topic in Brakes, Wheels, Suspension and Chassis
If you stay with struts that would be one option. You could move the top mount back towards the firewall to increase caster and not have the fender well interference. If you had power steering you could use large caster angles to overcome the large SIA of the stock strut. Ideally you need to run one-half the SIA as caster to cancel the camber loss from steering. You could fab a new cross member to allower you to move the rack towards the axle centerline to help with ackerman. And while you were at it you could put in some vertical adjustment for the lower control arm to play with RC height. A lot of what you want to do is going to depend on your engine and what you have room to do. Cary -
HybridZ custom suspension design thread
tube80z replied to e_racer1999's topic in Brakes, Wheels, Suspension and Chassis
The simple answer for rear steer is that it will probably be the only option for getting 100% ackerman steering. To get it in front steer would probably require that you raise the rack to the stop of the a-arm attachment point and that's probably going to be going right through a frame rail. I don't know how much ackerman is used on the R&S trans-am cars that have a low mounted rack but I can tell you that they have an interesting tie rod. It's sorta S-shaped to allow the wheel to get full lock. For a car that sees track or autox use 100% ackerman would be a good goal to shoot for. The tires that most of us have access to (slicks, etc.) are all designed to respond well to this. Cary