

JMortensen
-
Posts
13742 -
Joined
-
Last visited
-
Days Won
68
Content Type
Profiles
Forums
Blogs
Events
Gallery
Downloads
Store
Everything posted by JMortensen
-

Rear disc bolt-ons - options?
JMortensen replied to a topic in Brakes, Wheels, Suspension and Chassis
It's the later 280ZX calipers that seize. I put the early calipers on my car because a Nissan master tech scared me away from the later ones, and coincidentally my next door neighbor was replacing his 83's rear calipers at the same time. More evidence: http://forums.hybridz.org/showthread.php?t=82790 I sold mine to a member here and I used them for 8 years of street/autox/track usage and never had a hint of a leak or a stuck caliper at all. So the early ZX calipers are heavy and have a small pad and a small rotor, but they are IME and the experience of the people I know very reliable. A good alternative if you hate drum brakes like I do, but not as good a performance upgrade as the 240SX setup with the larger rotor or a full on race style Wilwood setup that loses the ebrake. -
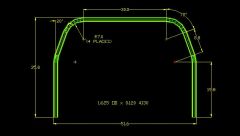 Thank you for posting this. I used your picture to have a local cage builder bend my main hoop. Just for general info, mine was 1.75" diameter so the measurements had to be changed around a bit. Mine measures 51.3" across the bottom of the tubes and barely fits inside the rockers on my 70.
 -
Jon's 2 year roll cage saga...
JMortensen replied to JMortensen's topic in Brakes, Wheels, Suspension and Chassis
Update: Seat is in temporarily anyway and shoulder bar for roll bar definitely does not clear the seat back. So I'll need a curved piece to go around the seatback. It will be easier to accomodate the seat back if I move the diagonal farther away from the bend. I looked in the rulebook and I don't see a max distance from the corner bend for the diag to hit the hoop. Is there a rule? Obviously the closer to the corner that bar connects the stronger the diag will be. Looks like the Autopower bar for 944 connects pretty far away judging by John's website. Any idea how far away that is John? -
first autox complete - where to go from here?
JMortensen replied to heavy85's topic in Brakes, Wheels, Suspension and Chassis
You have pretty close to the same setup I had a few years back. Tires is going to be the most important thing. If you're looking at suspension upgrades, the biggee for me was CASTER. Up the caster and you'll get rid of the plow. Also seems like you might be a little light on the camber. As zguitar says, toe in the back and that will help you stabilize that rear end. Also my MSA rear swaybar was binding really badly and I didn't realize it. You might want to check yours for bind and if you find any switch to a ST rear bar. If you decide to do this get it done before you change the alignment because you have to pull the uprights that locate the rear control arm bushings which will probably throw your alignment off a bit. Sectioning the struts is a good idea. I don't remember which Nissan Comp trans you have. Do you know the ratios? Some of them wouldn't be very good at all for autox because first gear is like 2:1. You'd need a 4.44 or shorter gears to make that work I think. -
200SX/240SX front strut conversion
JMortensen replied to nixcars's topic in Brakes, Wheels, Suspension and Chassis
I seemed to remember S12 struts on 510s for a vented disc upgrade. IIRC if you put the 280ZX or 510 strut on a Z the camber is way screwy, like you'd end up with 3º positive camber or something. Been years so I can't be sure on that, but that is what I seem to remember. Definitely something with the spindle angle being wrong. -
200SX/240SX front strut conversion
JMortensen replied to nixcars's topic in Brakes, Wheels, Suspension and Chassis
I thought the early 200SX was swappable with a 510. But if that's true than it probably has the wrong spindle angle like a 280ZX would. Don't know that for sure, but that's what I seem to remember. -
You're in the wrong forum for one. Try searching for "wiper motor" or "wiper" and you might find something, but there is a HUGE thread on wiper motor upgrades in the FAQ section.
-
In 86 I think you'd be talking 944T, which is a whole other animal (much better car) than the 924T. My favorite is the 88 944 Turbo S, which had 928 brakes, bigger turbo, and a tranny cooler. Nice car.
-
If your clutch isn't disengaging when it's hot that is usually a sign of not enough free play between the pedal and the master. Should be 1/8 to 3/16" free play in there. SWEPCO 201 mixes REALLY nicely with ATF for manual transmissions. I use a 50/50 mix.
-
This is ringing a bell. Haven't we talked this one out before? Maybe on WCZR? Changing the torque on the nut shouldn't really change the drag. The drag is set by the size of the spacer. The spacer is something like .120 thick. It's pretty damn thick. So changing the nut torque would have to either crush the spacer (not likely) or deform the inner race of the bearing (not good) in order to change the preload on the bearings as far as I can tell. Adjusting the preload by adjusting the torque on the nut is akin to setting the pinion bearing preload in a diff with a crush sleeve. In this case where a solid spacer is used it works out in much the same way as a diff with no crush sleeve, but a solid spacer in between the pinion bearings instead. It doesn't matter if you have 80 or 180 ft lbs on the pinion nut until it actually causes either the spacer or the races on the bearings to crush. Until that point changing the pinion nut torque isn't going to change anything at all on the pinion bearing preload. When you want to change the preload on a pinion with a solid spacer, you need to add or subtract shims from between the bearings to do so. Since these are ball bearings and not tapered rollers, adjusting preload seems like a really bad idea, because unlike tapered rollers where you can push the cup and cone together to get a proper fit, ball bearings don't take a side load that well. So it seems to me that what you would really want is the bearings to be tight in the housing and have 0 preload, and for ALL of the drag to come from the wheel bearing seal on the shaft + whatever drag a couple of greased ball bearings have. At least that's the way I understand it to work. Maybe I'm wrong. I suppose the way to find out would be to install a set of bearings on a stub OUT of the strut housing, then torque the nut to 180 and measure the distance between the races, then increase the torque and measure again.
-
how to build a rally car using a WRX
JMortensen replied to JaysZ's topic in Brakes, Wheels, Suspension and Chassis
Check these out and you might change your mind Mike: http://videos.streetfire.net/Player.aspx?fileid=B0528AF8-CCCC-43C9-AFC4-80BE09403EAD&term=rally&p=0 http://videos.streetfire.net/Player.aspx?fileid=32C30C6C-BAEB-450F-BD54-D8EC42BBB32C&term=rally&p=0 http://videos.streetfire.net/Player.aspx?fileid=941BD1C6-1F80-4130-99C9-578B363C46B9&term=rally&p=1 I'd say more is better in rally racing... -
Overtorqued??? I usually put these things on by sticking my impact gun on 5 and hammering the crap out of it. Torque spec is 180-220 ft lbs or something isn't it? Somebody ate their Wheaties that morning... or used a 3/4" impact on the thing. I see what you guys mean though. Usually these get damaged by the flat part not being ground off but this one looks like the threads are a little mushed all the way down. That's a bummer.
-
need some parts for my 280z
JMortensen replied to J__'s topic in Brakes, Wheels, Suspension and Chassis
J___, to answer your other question, here's info on sectioning the struts: http://forums.hybridz.org/showthread.php?t=103860 I believe that's what you meant by "short stroking" them. You just need the right length struts to do this, the 88 Toyota MR2 rear strut works in front, some use VW GTi (not sure what year on the GTi. Then you use the 240 front strut in the rear tube. The tubes get sectioned to fit these new struts, I'm not positive exactly how much that is and you wouldn't want to start cutting until you had them in your hands, but if memory serves it's something like 1 5/8" in front and 2" in rear. On the MR2 strut I know the Illumina part number is BZ3099 so you can use that to cross reference the appropriate Blue strut. -
slotting the strut holes
JMortensen replied to olie05's topic in Brakes, Wheels, Suspension and Chassis
If its uneven side to side you can also move the crossmember Not too much movement there, but it might be enough that in conjunction with slotting the top you could make it even. -
Freakin weird. I guess it's good news though.
-
Jon's 2 year roll cage saga...
JMortensen replied to JMortensen's topic in Brakes, Wheels, Suspension and Chassis
Yeah so today I welded up my angle steel to the square tube and got that all squared away. Problem I'm running into now is that the floor isn't flat. I've beaten the bent parts as much as I can. I think I'd literally have to remove the frame rail from the floor to get it any better. The frame rails are dented and look pretty bad on my car, so I was thinking about doing some subframe connectors or just replacing the stock rail where it is bent. If I could weld this frame to the floor now, but then the floor might not be straight when I went to do the subframe connectors. Or I could tack it in now, make sure I get clearance for the roll bar, then fix the floor and finish welding later. Now that I've typed all that out I think tacking it in and then waiting to finish it is my best option. Got some pics, but can't upload. Is it just me??? -
Love my Millermatic 135. LOVE IT.
-
A die would work great if you could get it started correctly, but I'd use a file and work backwards on those. If you tried to run a die down them your chances of hitting the remaining threads correctly are slim to none.
-
This might help you out too. Before you get into anything else, read about it first here: http://www.atlanticz.ca/zclub/techtips/index.html You've pretty much encountered the two biggies. The spindle pins and the stub axle nuts are the things everyone needs help with the first time IME.
-
Someone didn't remove the peened section of the nut before they hit it with the impact... Don't worry about it, the portion of the threads you screwed up is behind where the nut actually sits when it's tightened down. Get yourself a thread file and spend an hour or two fixing that (yours do look particularly bad, BTW). Think of it as a learning experience, you'll be prepared for next time. To cut off the peened section of the nut use a Dremel with a cutoff wheel. CAREFULLY cut the the flat part off being cautious not to cut into the stub itself. Takes a while to do, but it saves a lot of thread filing hassle later.
-
Jon's 2 year roll cage saga...
JMortensen replied to JMortensen's topic in Brakes, Wheels, Suspension and Chassis
-
I think we should have a completely lame/useless post to good post ratio, and when you get too high on the lame side you get banned. While I have a sense of humor and I'm not offended easily I am getting a bit ticked off at the consistently worthless posts from a few of our newer members.
-
I think you better look a little closer. The control arm is held front to back by the bushings. Your bolt in the front could very well have come loose, but in order for the whole bushing to come out like that I think your crossmember had to come loose, or the control arm had to slide back about 3 inches. It really shouldn't be able to slide because it's held in place by the rear control arm bushing. There are 4 bolts which go through the crossmember and up into the frame. I'd take a real close look at the crossmember itself and the frame there. Other areas to check are the control arm itself, the diff mount, the rear uprights, basically I think you need to go through the whole rear suspension. With the way the control arm is held on I still have no clue how your bushing ended up in the middle of the road... take some pics! EDIT--Thinking a bit more maybe somehow the bushing came out of the front end of the crossmember. That'd be pretty weird, but I suppose that less weird than the above scenario.
-
Rear disc bolt-ons - options?
JMortensen replied to a topic in Brakes, Wheels, Suspension and Chassis
You have a P in the front of that link that shouldn't be there which is why it doesn't work. -
Rear disc bolt-ons - options?
JMortensen replied to a topic in Brakes, Wheels, Suspension and Chassis
That's basically the ZQuip setup that I had for years. Check the brake FAQ. My comments are in there. Basically its nice not to have to deal with drums (I hate drums) but it isn't a great performance upgrade. The calipers are huge but they are much more reliable than the later ZX calipers that everyone wants. To link you cut and paste your link, then put (url) in front of the link and (/url) in back. If you try to just type the tag it doesn't show up so I had to use paretheses instead of the squared brackets that should be used. Or, like this [example]www.link.com[/example] where example is url. One more thing, if you don't want to pull the stub axles to install that brake kit you can cut some of the bracket off and just install the bracket with 3 bolts like the MM or MSA brackets do. Figured that one out way too late.