clarkspeed
-
Posts
878 -
Joined
-
Last visited
-
Days Won
49
Content Type
Profiles
Forums
Blogs
Events
Gallery
Downloads
Store
Everything posted by clarkspeed
-

240z SCCA vintage race car, restoration
clarkspeed replied to AydinZ71's topic in S30 Series - 240z, 260z, 280z
That is a great idea. That would make 50's work on street fairy well. In my opinion only without direct supporting data, think a large TB with a highly ported intake on EFI makes max hp from a NA L6. My intake is ported so much I broke through the walls. I don't think I measured over 6 (in. Mercury?) Vacuum with throttle cracked open. I also highly suggest a VERY OPEN filtration system. Can't be too large. What are you planning upstream of the Jenvey's? I saw Troy Ermish put a 5" diameter cold air on a race 4 cylinder. -
240z SCCA vintage race car, restoration
clarkspeed replied to AydinZ71's topic in S30 Series - 240z, 260z, 280z
50mm ITB's! That will be an on/off switch, but I personally think will make the power. Forget the MAP. Turbos are different. On a NA motor you can kind of sneak up on knock. You will hear and feel it with any muffler at all. Probably without. If unsure you can start with octane boost on top of premium and then back it out. I hate retarding timing on an NA motor. -
240z SCCA vintage race car, restoration
clarkspeed replied to AydinZ71's topic in S30 Series - 240z, 260z, 280z
A lot depends on your induction system. I have 48mm ITBs with a short manifold. There is not enough vacuum to do anything with so no MAP for me. If you are using a 1 into 6 manifold or a stock based manifold, definitely use it. And most of the race guys I know avoid knock sensors. Maybe they are better now but in the past false vibrations would cause them to reduce timing and power. Street car on the hairy edge may be needed. I can't speak for the closed loop tuning stuff. I don't know anyone who has used it to tune a true road or drag race car. I usually tune WOT fuel curves on a dyno. If really stumbling off throttle I might to a 1/2 throttle run. Then fine tune part throttle and throttle tip in based on data collected while driving. Don't think I would spend any money upgrading an SDS. That would not be practical. This thread got me looking at the Speedduino again. I understand sensors, wiring, and Tuner Studio so much better now. -
240z SCCA vintage race car, restoration
clarkspeed replied to AydinZ71's topic in S30 Series - 240z, 260z, 280z
Believe it or not, I am still running a SDS on mine. Plans to upgrade but have not justified it yet. Lots of good systems out there now. I've also heard good things about the Maxx. Haltech has been a solid product for many years. Troy Ermish recently posted he dropped Electromotive because of lousy support. I've tuned Mega's and they are solid too. Speedduino looks really neat for a simple system. Really tough to decide based on features vs. price. I think the higher level stuff gets deeper into traction control, wheel speed sensors, trans control, ABS, telemetry, and other motorsport needs. Top of the line is a Bosch. Most of the pro production race cars run them. I looked into their features 1 time and thought I will never use any of that! Luckily any system that is good for the street is probably way more than you need for a 50 year old race car. https://www.bosch-motorsport.com/content/downloads/Raceparts/en-GB/109903243.html -
Need some more details to troubleshoot. Did it idle good before? What changed? What EFI computer? Do you have an O2 readout? What kind of TB/intake manifold is that? Also agree with your other post.
-
A tale of two Z's - NA vs Turbo
clarkspeed replied to MONZTER's topic in S30 Series - 240z, 260z, 280z
Nice work. That looks like a potential side business. -
There is only so much room to work with. If the inside is a 1/4" or so away from your strut, then the outside edge will fall where it may. I usually shoot for 0 or a little interference on the inside and use a wheel spacer to compensate. Can't give exact numbers because tire size and suspension travel make a big difference. Once you go to a 8+ rim without flares every 1/8" counts. Best to remove spring and jack wheel through full travel. If you already have the Rotas mounted up, you should be able to predict what a change in offset or width will do for you.
-
IMSA GTU vintage racer build
clarkspeed replied to clarkspeed's topic in S30 Series - 240z, 260z, 280z
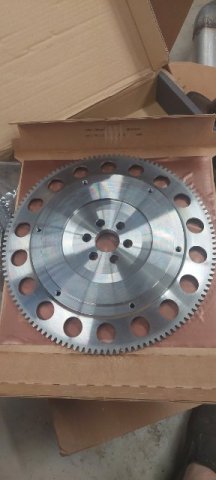
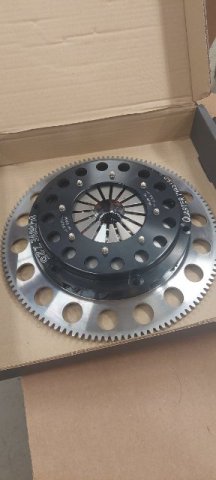
I've been working but not much to show. Dealing with many interferences in the engine bay. So it is all rework at this point. Hopefully some success and photos soon. In the meantime, clutch parts arrived. Ordered the Flywheel from UK and it is a nice unit. Clutch is 7.25 Quatermaster 2 disk V drive. I went with 7.25 because my tranny ratios are soo tall. Pretty sure I would burn out a 5.5, just driving around pits. But not I need to order 8mmx1.25x45 bolts to mount. TTVracing.com
-
240z SCCA vintage race car, restoration
clarkspeed replied to AydinZ71's topic in S30 Series - 240z, 260z, 280z
Pretty awesome. I am going to download your pics and add to my collection! -
240z SCCA vintage race car, restoration
clarkspeed replied to AydinZ71's topic in S30 Series - 240z, 260z, 280z
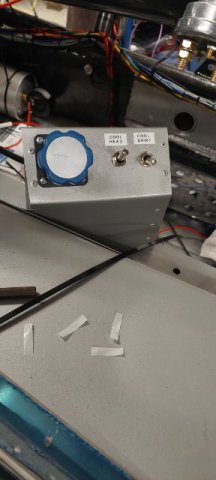
I didn't know anything about this even though I have seen it done years ago. I did some -esearch on the net and this is what I came up with. I make no claims that this is acceptable or best practice. For new sensors you are installing: To describe what I did for analog sensors, first I will describe the cable. It should have 3 small insulated wires, usually a plastic or foil (better) sheath around the 3. Then a braided wire shield around that and an outer jacket. I got confused trying to order but ended up with something that worked off ebay. One wire supply voltage, one ground, and one signal. If splicing something with different colors, keep them straight. I use a lineman splice on each wire with a touch of solder. Then each gets a shrink wrap. If you offset the splices you can keep the final diameter small. See picture. Then I lineman splice the shield and touch with solder. Then a larger shrink wrap over the entire bundle. For the "system" you need to ground the shield on the box end, not the sensor end. You need to solder/shrink wrap a small "pigtail" to the shield. I could only find this picture to show how that is done. In the picture they are using a crimped collar to hold the pigtail. I just twisted the 2 together and shrink wrapped. I then ran the pigtail and the ground wire to the system ground, not a chassis ground. On the sensor side I had 3 possibilities. 1. For the motorsport sensors, I spliced into a connector with pigtails already pinned in the sealed connector. There are only 3 pins so I don't believe the shield continues across the connector. 2. For the 3 wire sensors I have, none of them have a shield. So I ended the shield at the weatherpack connector I installed. 3. For the 1 and 2 wire connectors, I use a 1k dropping resistor to convert the resistance to a voltage signal. I did this at the connector. I think industry uses solder sleeves to do most of this and they even make sleeves with a pigtail built in. I think that is more than what you are asking. For my TPS and tachometer, I just splice into the EFI signal wire and run in a different direction to a data logger. Seems to work ok. For temps I run duplicate sensors. splicing_STP.pdf Shielding_Terminate.pdf -
Stunning. Looks like a modern IMSA car.
-
The latest Grassroot Motorsports magazine did an article on low priced struts that are now on the market. Their already highly developed project car gained time by replacing Koni's with Redshift. Seems these builders are using cheaper manufactured components, but applying modern valving and customization. 2 of the companies mentioned include Redshift and Shaftworks. Both reside in the US and appear to have a weld in application for the S30. https://store.redshiftmotorsports.com/default.asp https://shaftworksusa.com/
-
IMSA GTU vintage racer build
clarkspeed replied to clarkspeed's topic in S30 Series - 240z, 260z, 280z
Shout out for help. Maybe there are some electrical experts reading. I am looking at expanding the capability of my data system. I am using a Race Technology DL1. I have 12 analog inputs which are fully utilized. It also has the capability to log multiple CAN channels on top of the analog sensors. Think connect to an OBD2 and log what ever channels you desire. But my custom race car does not have an OBD2. My desire is to connect a couple CAN multi-output tire temp sensors along with a multi-output RS485 yaw sensor. Seems like Arduino hardware to support this can be sourced easily and I am familiar with using them but not writing my own code. I think this requires setting up my own independent CAN network with H/L output to the DL1. It can be programed to read the CAN configuration. And an Arduino to convert the RS485 to the chosen CAN rates. Seems easy enough for someone who knows what they are doing, but hours of research on the net did not get me there. -
IMSA GTU vintage racer build
clarkspeed replied to clarkspeed's topic in S30 Series - 240z, 260z, 280z
Im guessing the crimper is an Irwin? I have a nice racheting style that is easier on hands and crimps to same force each time. But i have multiple terminal brands so it ends up being inconsistent. I just sourced my battery wire at 4 ga. I had a hard time with that one. Hope its not too small. -
IMSA GTU vintage racer build
clarkspeed replied to clarkspeed's topic in S30 Series - 240z, 260z, 280z
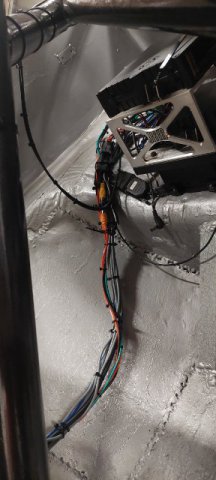
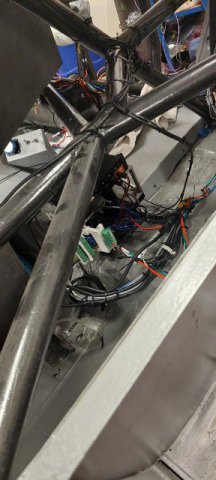
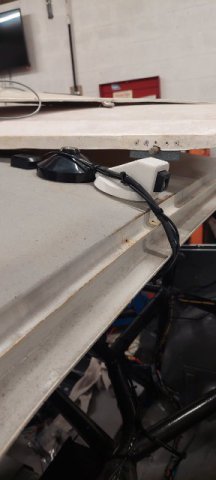
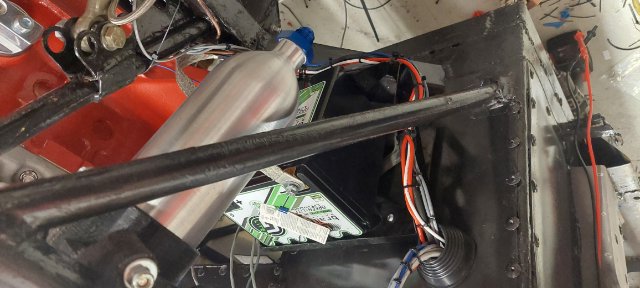
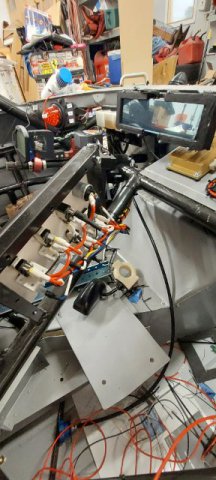
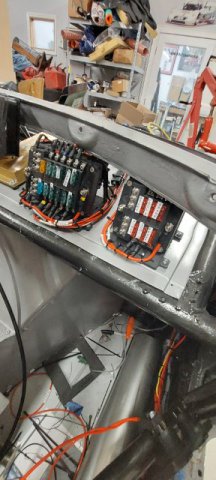
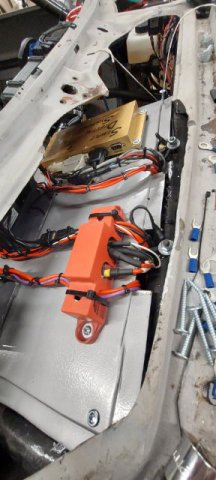
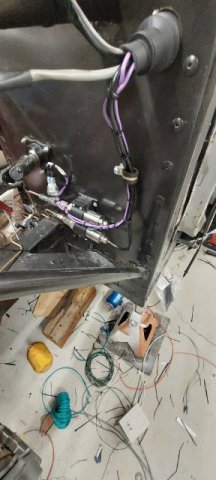
And here are a few more of the final terminations. Maybe 20 into the data/video system. And yes I have 3 things stuck on the roof.
-
IMSA GTU vintage racer build
clarkspeed replied to clarkspeed's topic in S30 Series - 240z, 260z, 280z
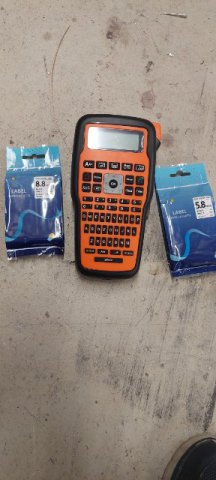
Yea i planned all of the wiring based on how many amps eaxh thing needs. In previous projects I kind of guessed and went oversize on most. Here is a photo of my label printer and the 2 size shrink labels i used. Works great. I purchased all off Ali-express and shipped from China. Maybe Amazon has something similar by now. Here is my favorite crimper. And decent for stripping.
-
240z SCCA vintage race car, restoration
clarkspeed replied to AydinZ71's topic in S30 Series - 240z, 260z, 280z
As far as a visqueen paint booth, i did that once many years ago. Had some fairly heavy translucent stuff and wrapped it over a pvc frame. Overhead lighting was ok but i also used some quartz shop lights on the sides. Plenty of advice out there on web. I was real scared of using fans in an explosive atmosphere. I ended up buying 3 cheap box fans and let them blow into the tent. Put some cheap ac filters on back of fans and put another set on the floor with the garage door open about 1.5ft for air exit and not upset my neighbors. Worked very well and air changed over quickly without creating a tornado. Could not smell it outside. My only advice is: 1.Auto paint is made to lay wet and flow. Slow to dry. Overspray will cover EVERYTHING. So make sure your booth is solid and expect anything inside the booth to match your car after. 2. Make sure you have good lighting. Some of the plastic will take a little of the overspray. 3.dont forget the floor. I usually throw down another piece of plastic or a clean tarp. I tried a wet floor 1 time and the water dries out too fast. -
IMSA GTU vintage racer build
clarkspeed replied to clarkspeed's topic in S30 Series - 240z, 260z, 280z
The damn name is worn off handle of my crimper. It has a blue handle and does crimping and stripping near the handle end. It has a cutter on the forward tip and strips down to a very high gauge #. I think i purchased at Lowes. I have high end ratcheting crimpers and multiple all in 1 crimpers, but nothing works as good as this one. Makes perfect crimps every time. Many of the strip only tools i have work fine. I think consistent (standard) copper diameter and soft insulation made the stripping easy. It looks just like the Ideal 45-778 -
IMSA GTU vintage racer build
clarkspeed replied to clarkspeed's topic in S30 Series - 240z, 260z, 280z
This engine is built at 13:1 compression. I will run 108 octane or better. Yes leaded. -
IMSA GTU vintage racer build
clarkspeed replied to clarkspeed's topic in S30 Series - 240z, 260z, 280z
Yea the tezfel is good stuff. It is not easy to strip. Waytec is a good source if unsure of what to use.. I used standard cheap wire for power/grounds. Bought a ton of colors and gauges off eBay. Diameters were very consistent. I only race this thing 3-4 times a year and it lives in a garage. If it gets shabby 10-15 years from now, you can pull out the harness and build another. I was a little more careful with data wiring. I do plan to protect the wires running near the engine. In my summary i listed the all things I thought werw important. Some stuff I spend the extra $ on, some stuff I dont think is worth it. Just my opinion. -
IMSA GTU vintage racer build
clarkspeed replied to clarkspeed's topic in S30 Series - 240z, 260z, 280z
After wiring 3 cars i finally got the hang of it. Probably a year of planning up front. Read alot of materials and looked at alot of race car photos. At this point, i think it may be my best skill when building/restoring race cars. -
240z SCCA vintage race car, restoration
clarkspeed replied to AydinZ71's topic in S30 Series - 240z, 260z, 280z
Sounds like you got the hang of dealing with polycarbonate sheet. (NOT PLEXIGLASS I HOPE). i follow pretty much the same process but use an old windshield for a template to cut. I apply tape, draw outline on tape and cut thru tape with a jigsaw. Ive never had a problem with shattering or chipping? Cut a little large and work ot down. Sander, saw, grinder, whatever. I use the cheapest sheet I can find. Not optical grade, no special coatings, And i am not restricted to the thickness specified by SCCA. Stuff is pretty much indestructable. Fun to play around with cast off peices trying to break them. Tape it off, little sanding, and spray the border with rattle can flat black on inside. Trick is caring for it after install. Never let a drop of solvent touch it. I use Novus products to clean with paper towels. -
IMSA GTU vintage racer build
clarkspeed replied to clarkspeed's topic in S30 Series - 240z, 260z, 280z
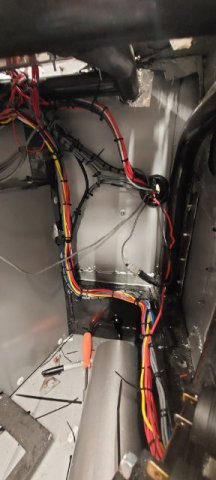
Well this is how you wire a race car. Or any car for that matter. 1. All splices lineman wrapped, soldered, and sealed with glue lined shrink. 2. All terminals crimped perfect with glue lined shrink. Use a good stripping and crimping tool. Does not mean expensive. Look under a magnifying glass that the strip is clean with no wires cut. Crimp based on wire gauge. Pull test after crimp. 3. Use the correct size terminals. Red, blue, yellow for the correct wire gauge. Do not use a larger terminal for a small wire. 4. A few weather-tite connectors thrown in for removable components. Most everything is wired point to point. No break connectors at firewall. No relays currently. 5. All data cables ran with 3 wire shielded cable and aerospace connectors. Very careful with any splices and solder the shields. Terminate shield at only 1 end with a ground pigtail. 6. 3 separate harnesses formed. Power, EFI, and data. 7. Buy a ton of wire all from the same source with same insulation. Limit the gauges to what you need based on amperage. Makes stripping and crimping more consistent. 8. use only glue lined shrink tubing. 9. Buy a wire label shrink tube marker machine. Label all wire ends. I bought a cheap label printer from China and a few cartridges of 5.3 and 8.8mm white tube. Works great. 10. Plan in 3 trips through your harnesses and leave 1 or both ends loose until you get the harness figured out. Then start terminating from 1 end and temp form the harness as you go. Form the harness where it needs to be before terminating the final end. Do not final tywrap until you are sure you have everything included and in the desired route. 11. As I mentioned before, plan everything out before you start. List every electrical component and plan a rough wiring diagram.
-
240z SCCA vintage race car, restoration
clarkspeed replied to AydinZ71's topic in S30 Series - 240z, 260z, 280z
"I'm never doing this again". Ha Ha! -
Thanks for posting!