clarkspeed
-
Posts
878 -
Joined
-
Last visited
-
Days Won
49
Content Type
Profiles
Forums
Blogs
Events
Gallery
Downloads
Store
Everything posted by clarkspeed
-
 This is what I plan to cover in more detail. #1 tire pressure, temp overall, temp across. IR temps of various components. And gauge read outs. Continuation of my last post and JHM post. Video. No data ack system required. #2 Data you need vs. Data you want. Autox, hill climb, rally stages, hot lapping, racing, sim racing, testing. Intro to electronic data ack. How much should you spend? #3 Basic systems. Basic info. What to look for. Car vs driver. Comparisons with self and others. Trends. Consistency. Money trace (speed vs. Distance) G circle. Keeping it simple so everyone can use and understand basic info from any system. #4 Advanced, math channels explanation, braking, kpi's for track, car, and driver. Shock tuning, combined with other chassis analysis. Not too deep here, but awareness of possibilities. My posts will be very generic. No references to manufacturers or systems to get the data. I will rely on the community to fill in the blanks for the best or optimum or cheapest way to get there. I am no expert on everything out there. I have played with AIM, MOTEC, and Race Technology analysis software which are all similar. And I have been studying basic analysis recomendations for the last year which kind of gave me a appreciation for the basics, and triggered me to start this thread. With the exception of post #4, most all data is available from phones, AIM solo, Garmin, or similar inexpensive systems. You guys fill in the rest, which you already are!
 -
My wife says that all the time! . . . (I could not resist) Clark
-
Thanks all for adding to discussion! Very good comments on phone based systems of which I have not played with for 7-8 years. I have been putting off my 2nd installment in this series, but now motivated to type it up. It will be the next step beyond my 1st post. In the meantime, I have an older Race Technology DL1 currently for sale on Ebay at $100 if anyone is interested in moving up to something VERY powerful. I tested it and it works great. Contact me and I will be happy to answer questions about it. For a Hybrid buyer, I will even put some analysis setups in with it. Eventually I intend to make a number of posts with very good primer on progression into data systems.. what you need at what level you are. Just need to get all this work travel behind me.
-
240z SCCA vintage race car, restoration
clarkspeed replied to AydinZ71's topic in S30 Series - 240z, 260z, 280z
Never had a problem with grooves, but I still prefer disks with spring combined with HD pressure plate and lightweight Flywheel for street apps and racing "on the cheap". Feels so much better and can handle anything a NA L6 puts out. -
240z SCCA vintage race car, restoration
clarkspeed replied to AydinZ71's topic in S30 Series - 240z, 260z, 280z
I have found the toughest thing on a 5.5 and smaller button clutch is pulling it on a trailer. Many winch just for that reason. I also found the 7.25" dual clutch set up to be much more forgiving. Virtually same durability and heat resistant as a stock based setup. Can work for street or track. -
IMSA GTU vintage racer build
clarkspeed replied to clarkspeed's topic in S30 Series - 240z, 260z, 280z
Still slow progress. Hurt my back and lost the weekend. Getting really close to having the gnose and fenders fixed. At least I finally have the steering column in. And then found 2 interference points. At least I feel like the week was progress. Slowly chugging along.
-
IMSA GTU vintage racer build
clarkspeed replied to clarkspeed's topic in S30 Series - 240z, 260z, 280z
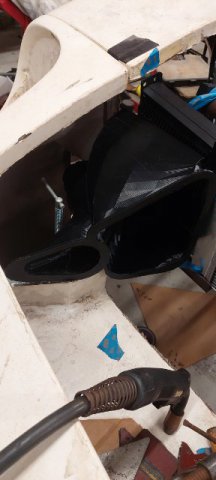
Well, long pause on posts. Spent a week in Germany for work and a week in North Morocco for pleasure. Once again, way behind on progress to where I want to be. So I got the 3d printer back on track on my return. I did some prototypes and then printed a complex duct that routes air from the fiberglass radiator air box (I intend to make next) that directs air from the g-nose inlet to the radiator. The 3d printed part directs high pressure air on passenger side to the brake rotor and oil cooler. I will design another for the drivers side the goes to cold air box and brake rotor.
-
AME complete chassis '77 280Z
clarkspeed replied to lifeprojectZ's topic in S30 Series - 240z, 260z, 280z
Didn’t mean it that way. Just that every problem you run into I think will be ‘unique’ for this forum, perhaps for any forum. I am up to the challenge if I see something familiar. -
That's cool! Pun intended. Also depends on where you take the measurement at. My last car I mounted in oil pan. That seemed to read hotter and had a quicker rise. I center drilled the stock drain plug for a sensor. Another point, as far as I know, on a street L series you should not see anything above thermostat setting running a cooler, even with turbo. It really takes sustained driving wide open throttle for 10+ minutes to make it climb. And if not enough cooler, it keeps climbing. Even still, with 20 min on track, you can live with a 250-275 reading on synthetics. If doing track days, you can actually alternate in a " slow" lap and the Temps will drop quickly with a small cooler. And Aydin, yes a thermostat oil bypass will automatically take car of this. I ran one on 1 of my cars successfully. Most racers skip it because it is just another part that could fail. But conversely, I have never heard of 1 failing. But you would still.want to idle for a few minutes to get oil warm. You just can not head out on track with cold engine and oil. I think that goes for any engine. And again to direct back to Ben's thread. Yes a dry sump makes for a thin oil pan and more mounting options. Also guaranteed oil pressure. Possibly little extra HP from less windage over even a well designed windage tray. The ONLY risk is the belt. I saw one break in a long back straight pull at Mid-Ohio on a friend's car. And reflecting once again to previous post, he had a idiot light on the dash tied to oil pressure. On his video we watched a 5 second delay from when light came on and he shutting down car. There was zero damage.
-
AME complete chassis '77 280Z
clarkspeed replied to lifeprojectZ's topic in S30 Series - 240z, 260z, 280z
Man, you are on your own for this build. But it sounds like you have the capabilities to work through it. The CSK screw solution is fine. You can probably find a good torque number for steel into aluminum on Google. Trust your instincts, they seem fine. -
The brass gear adds “extra insurance”. Hard to say where the break point is. 7500rpm on 90degree oil will probably destroy the brass. 7500 on 150+ degree oil, no problems with steel. All about the viscosity. Good amount of idle time along with a lower rev limit 1st lap usually get you there on a cool day. But on cold days around freezing temps you may need to block some or all air from the oil cooler. I would not run any oil cooler for AutoX. Probably a good question for TonyD unless there is a previous post on it. Again, just my experiences.
-
And more food for thought. When it comes to data, I have 3 contradictory quotes that all apply. They hang on my wall at work so I read every day. "You can't improve what you don't measure" - Drucker "You can't fatten a calf by weighing it" - Anonymous "Not everything that can be counted counts, and not everything that counts can be counted" - Einstein
-
No, THAT IS AN EXCELLENT RESPONSE, and the perfect place to start the discussion. What is data anyway? Facts, figures, numbers, words, pictures, video? It's all of the above. Think of it as something to save that describes something that happened that you can refer to later. So let's start with the bare minimum. A system for collecting data is #1. Pad and pen, track maps, spreadsheets, etc. Whatever works for you and find a way to keep it organized. I still use a notebook with a pen to record everything I can think of of during a race weekend. Weather, Temps, problems I had, what bolts I had to tighten, things I need to pack next time or discard, parts that need to be replaced, parts I did replace, how the car felt, etc. After a few entries, some patterns appeared. I developed a pre race check list, and a maintenance check list from this along with many other insights. And my main focus is creating an action list to implement before the next event. What do I want to change and why. If starting out, I suggest trying to record everything you can think of. How to drive the track, how you were feeling that day, what felt good about car and what did not. I used to scuba dive and did the same thing in my dive logs. Some of my entries are numbers, some look like I am writing a diary. And they reflect other sources that are disconnected, like a note that I took video or recorded something with another system and it was successful. Over time you get a better feeling for what you really need to write down. I review it after the event and address the action items. Then I review it again before next event. I stipulate these are only my opinions, but I say you need to start with the above before you go to step #2, which looks exactly like the picture posted by jhm.
-
My first comments are I posted a primer on analyzing basic data a few years ago but cannot find it on any of my searches. Please post a link if found. Next comment, data collection and analysis should be super quick, accessible, and comprehensible for autox and time trials. Next comment, overall data analysis is 80% driver, 20% car 90% of the time. And finally, if starting out, what data is needed? Where would you start with a new car and new driver?
-
Starting a new topic based on hijack of Ben's FP 280 thread. There are a couple people, including me, building competition cars or running them at this time. Scope of this thread should define minimum requirements of an autox, time trial, or race prepared Nissan Z car along with advanced path for future upgrades. But mostly minimum requirements suggested for competion based applications. Hence the post under the Motorsports heading. First observation, amazing how long it's been for activity on this topic.
-
This was a horrible hi-jacking. My apologies. You car is incredible.
-
IMSA GTU vintage racer build
clarkspeed replied to clarkspeed's topic in S30 Series - 240z, 260z, 280z
Reviewing posts, I think I missed posting the weight. As you see it in pics, with shell, interior panels, most of suspension, missing calipers and front rotors, rear rotors and external shocks. Came in at 834lbs on scales. Nothing else. Not sure if this is good or bad. I started with 500lbs in first pics of thread with no floor, firewall, or suspension. This is the stuff that keeps me up at night. There is an incredible build thread out there for a pink panther MGB built in Canada for D Mod autox. Amazing to follow and many years of work. He ended up rebuilding 3x to get a decent car out of it. His first shot with similar fab to mine was like 3200lbs or something for final car. -
IMSA GTU vintage racer build
clarkspeed replied to clarkspeed's topic in S30 Series - 240z, 260z, 280z
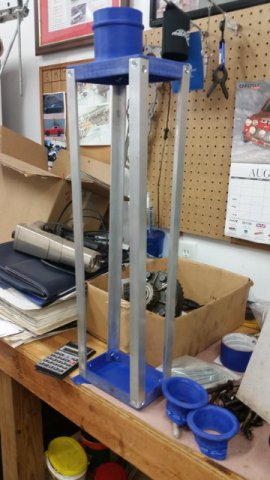
Cheap numeric control changed my life, in the most geeky ways imaginable. I have an engineering background and a natural attraction to building my own parts, so 3d printing opened another world. Basically I noticed the technology getting cheaper and cheaper and after some research, realized I could modify a relatively cheap machine to print final parts in durable, lightweight, and heat resistant materials. It has been a journey, but now just as important as my Sawzall and hammer. I work with guys who design 3d printed parts for a living (metal), have years experience printing, and have multiple hobby machines at home. But none have developed the material capabilities that I have. Printing Delrin is took me about a year of trials. The above pictures represent my first step 4-5 years ago. And if interested in this technology, maybe the only step you need to take. I designed these parts way before I had interest in buying a printer. Just posted them on 3dhub, chose a supplier, and chose material. Local guy who had 20+ machines and was very easy to work with. After I made a couple of orders with him, I would receive new parts in mail before I even paid him. So to make a long story short, designing in CAD is the first skill you need to master, and the hardest. The parts above cost around $100 maybe. If I printed myself, maybe $30 in material. Now I have my own home built CNC mill I am playing with (separate post) for $500. Building up aluminum and steel capability for decent size parts. And there are DIY designs for CNC laser cutters and plasma cutters also. And to wrap all this back into original thread, I printed the hood supports just to check dimensions. After verification, I will print the final versions in ASD I think. And I have a design for a multi-port NACA duct that pulls air out of the tiny Gnose opening and directs to the oil cooler and brakes. I will print pics of that once I print the prototype. I have many printed parts in this car I will post as I install. I designed my own cool suit cooler with helmet cooler I am quite proud of. Necessary for racing in Southeast. Judging by the length of this post, can you tell this topic is interesting to me? I really need to go into production with some of this stuff. -
IMSA GTU vintage racer build
clarkspeed replied to clarkspeed's topic in S30 Series - 240z, 260z, 280z
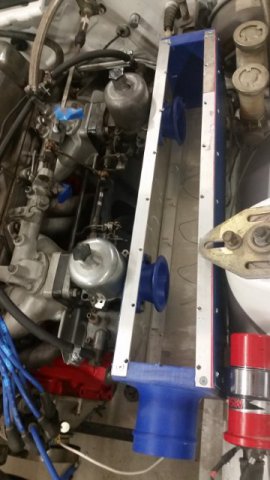
And speaking of old photos. Here is the cold air box I made for the last car. I 3d printed the ends and air horns. Then used aluminum angle and sheet to complete. I got a lot of requests to buy this part. I may do something similar for this car, but not sure yet. Not positive it will make a power difference on this car. So I will most likely fab one up after it is running and then test to see if it makes more power. I am working on the radiator shroud right now and adding a NACA duct for pulling air to a box. I plan to use 4" hose on this car instead of 3".
-
IMSA GTU vintage racer build
clarkspeed replied to clarkspeed's topic in S30 Series - 240z, 260z, 280z
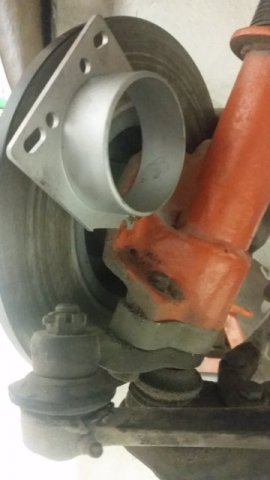
Here is a shot of the cooling on my last car. I use an inlet flange for a Mazda MAF attached with the existing threaded holes used for the backing plate. Shown with stock rotor. I noticed the ones I purchased are not available any more but this looks the same: https://www.amazon.com/Filter-Mass-sensor-Adapter-plate/dp/B07F7QC9N5/ref=sr_1_19?crid=2RAHB1KPVS2ZW&keywords=1986-1994+Mazda+323+1.6L+1.8L+Air+Intake+MAF+Sensor+Adapter+Plate&qid=1662394870&sprefix=1986-1994+mazda+323+1.6l+1.8l+air+intake+maf+sensor+adapter+plate%2Caps%2C136&sr=8-19
-
All my previous cars I ran a pressure gauge on dash, gauge on the Accusump I could see from my seat, and a pressure switch wired to a big yellow light on the dash I could not miss. On the new car I will have a programmed readout/warning as described above, but will still have the Accusump gauge as a redundancy reading. And if I dry sump, I will add back the switch/light.
-
IMSA GTU vintage racer build
clarkspeed replied to clarkspeed's topic in S30 Series - 240z, 260z, 280z
I don't a clue how these will cool. Maybe a little better due to more air fanned around. But I personally think cooling is mostly influenced by mass of the parts. Pretty simple heat transfer problem. Friction from pad generates heat, heat transfers through conduction to pad, caliper, rotor, hub, and on. Air blows on rotor to remove the heat with convection hopefully before parts get too hot. Ducts in the headlights works well. You need to direct the air centrally to the rotor so the cool air moves radially outward through the vanes. I will post a pic if I rember too. -
IMSA GTU vintage racer build
clarkspeed replied to clarkspeed's topic in S30 Series - 240z, 260z, 280z
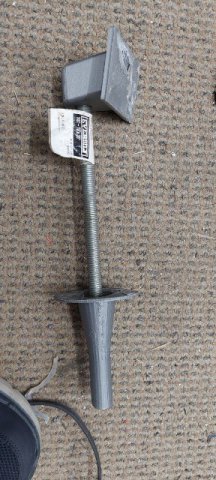
Prototype for my hood pins. 3 of the brackets with 1/2 round aluminum pins will mount on underside of hood by firewall. 3 receptacles will mount in firewall. Hood slides in, then latched at the front.
-
Not familiar with AEM. But if it runs ok when driving, take a look at the cold start settings. The EFI needs to shoot a little extra fuel to start, but not too much, and dependent on engine temp.
-
Thats a good idea to add another safety feature when using a crank trigger. I will think about that for my car. I had a drive gear shear off like that 1 time. I attributed it to hitting the track full steam before the oil was warmed up. Cooler the oil, more torque required to turn pump. NISMO used to sell a brass gear substitute for the crank gear to prevent failure on race cars. Since then I have always made sure the oil temp was over 140 or so before doing high revs.