

Bartman
-
Posts
2048 -
Joined
-
Last visited
-
Days Won
3
Content Type
Profiles
Forums
Blogs
Events
Gallery
Downloads
Store
Everything posted by Bartman
-
From the album: Autism Awareness 570Z
-
From the album: Autism Awareness 570Z
-
From the album: Autism Awareness 570Z
-
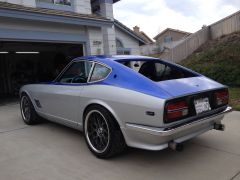
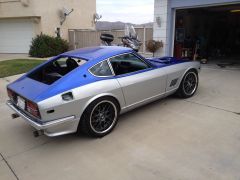
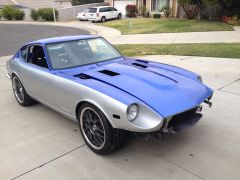
Widest wheels without flares
Bartman replied to rich280zxt's topic in Brakes, Wheels, Suspension and Chassis
Here is my setup: 18x8.5 +10mm offset with 245/40R18 on the front, 18x9.5 +19.125 mm offset with 275/35R18 on the rear. Fenders are rolled and the front airdam had to be trimmed to allow the tires to clear when steering is at full lock. No rubbing whatsoever through full range of suspension travel, but it is extremely tight - and yes I am using coilovers. http://mysite.verizon.net/ress1lhb/barts570z/id19.html -
If you're not going to use them - How much do you want for your OEM (new) vents?
-
I am running a 280Z hood on my 240Z. It does help cool the engine compartment, but the vent studs seem to be easily broken off. I've tried to restud mine a few times - but it's still not holding. If you like the look of the aftermarket vents you can go that route - but I prefer the look of the original vents. As you stated - you really don't have to worry about keeping the car original - so running a 280Z hood on a 240Z is a good upgrade.
-
I'm running a staggered setup with18 x 8.5 up front and 18 x 9.5 on the back. No flares, but I did roll the rears and had to trim my spooler on the front to prevent rubbing when the wheels are turned to their maximum extent. http://mysite.verizon.net/ress1lhb/barts570z/id19.html
-
There are several Tension/Compression Rod Bearing Kits on eBay and they sound good and are relatively inexpensive. So what's the bottom line as these kits? Are they worth installing and as good as the descriptions on eBay? Which one is better - Experimental Engineering or G-Machine? You can search for '240Z T/C kit' oneBay, but here's some current links: http://www.ebay.com/itm/DATSUN-240Z-260Z-280Z-T-C-Kit-2851610-by-G-Machine-/260818283646?pt=Motors_Car_Truck_Parts_Accessories&fits=Model%3A240Z&hash=item3cb9fb2c7e&vxp=mtr http://www.ebay.com/itm/T-C-Kit-for-Datsun-240Z-260Z-280Z-/171008922985?pt=Vintage_Car_Truck_Parts_Accessories&fits=Model%3A240Z&hash=item27d0ed1569&vxp=mtr
-
You can remove the bolts that connect the hood to the hinges on the front of the hood and lift it enough to release the latch manually. You may have to remove the grille, but it's not difficult to do.
-
Here's a link to a thread that includes pictures of my Vintage Air installation: http://forums.hybridz.org/topic/42270-vintage-air-install-update-2
-
Looking forward to seeing them David. Here's my current ghetto solution - it's flexible molding from Pep Boys!
-
Good luck, good ones are harder to find than lenses. Some people have talked about recreating them - but I haven't seen anything so far.
-
I'm using this air dam with 18's: http://www.kaminari.com/nissan-240z-260z-air-dam-frp It does require some trimming to prevent rubbing when the front wheels are turned to their limit.
-
I installed a very simple, but effective, toggle switch on the power to my electric fuel pump. It is hidden, but of course I don't want to say where. I like that if someone wanted to steal it I would hear the engine start and then die shorlty thereafter. As loud as my car is it's like setting off an alarm.
-
LATEST info on Headers For SBC - YES I searched...
Bartman replied to Mikelly's topic in Gen I & II Chevy V8 Tech Board
I bought the engine and tri-y's from Tim many years ago. Although they were nice, they were too low for me and I sold them to someone else on eBay. -
what to do? re: window rubber on door chrome
Bartman replied to scooterhulk's topic in S30 Series - 240z, 260z, 280z
I don't see them at this site. Are you looking at the inner door glass fuzzy seals? -
You need to slide out a locking plate on the rear side of the lock. To access it, just remove the upholstered panel on the lower back side of the hatch. It's just a fairly small piece of sheet metal that slides around the lock cylinder. It has small bends in it that help hold it in place and provides a place to push it on and off. Hopefully that helps.
-
I'm afraid it's not quite that simple. Even just doing a standalone engine harness will require multiple feeds and fuses based on the various loads that need to be supplied to the various engine components. I know it's not cheap, but if you want a standalone engine wiring harness ready to go, you can use something like this: LT1 Standalone Engine Wiring Harness
-
Yes, essentially that's it. You probably want the Factory Service Manual or something similar to help decipher what all the wires are, but it's not that difficult - it just takes some time and effort. If it winds up to be too hard, you can always purchase a ready to use engine harness that includes fuses and relays and just requires you to hook up positive, ground, and ignition hot.
-
JTR mounts on mine.
-
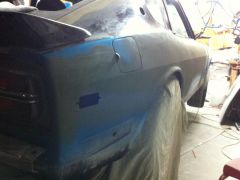
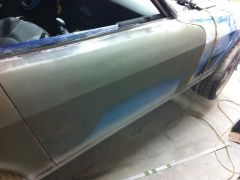
So I resolved the body line issue where I thought it wasn't straight. I just thought it was an issue because of the way the rear of the car tapers in. From some angles it looks like it angles down towards the back, but it does in fact stay horizontal. I made very good progress this weekend and am quite happy with the results.
-
From the album: Autism Awareness 570Z
-
From the album: Autism Awareness 570Z
-
From the album: Autism Awareness 570Z
-
I think this is a great product, but there are obviously some issues. The good: The plates that mount the lower ball studs appear to be of very hiqh quality and strength. The design appears to be well thought out and executed Seller is easy to work with and friendly The bad: Installation instructions could use some improvement The installation templates don't seem to be accurate The installation seems overly difficult - especially having to center drill and tap the existing bushings to install the upper ball stud. (I got Jerry to do this for me since the delivery took so long). I think most buyers would wind up having to use a machine shop for this. Quality control - sending out the wrong shocks appears to have happened more than once Specific problems with my order: Delivery time Wrong shocks Template for slot needed to allow shock travel didn't line up correctly I was sent upper ball studs that were supposed to be long enough to allow them to be installed using a nut instead of being welded on to the bushings, but they were still too short to allow the nuts Jerry included in my kit to be used (I purchased longer ball studs myself).