NewZed
Members-
Posts
6700 -
Joined
-
Last visited
-
Days Won
72
Content Type
Profiles
Forums
Blogs
Events
Gallery
Downloads
Store
Everything posted by NewZed
-
A diode isn't going to change output.
- 15 replies
-
- Alternator
- Pulley
-
(and 4 more)
Tagged with:
-
280z 5spd motor swap with 280zx turbo motor auto trans?
NewZed replied to ericp501's topic in Nissan L6 Forum
It will be the same nightmare for you regardless of transmission. It's just a plain old turbo engine swap with all of those agonies. Just remember to remove the spacer from the end of the crankshaft and install a pilot bearing. Read the EFEC chapter and check the wiring diagrams if you want to be 100% positive. They mark auto versus manual functions on the diagrams. -
Depending on who the builder is and how extensive the rebuild was you could have a very good deal. But if the engine builder is the seller's neighbor, and the shop is his backyard shed, and rebuild means only new gaskets, maybe not so much.
-
Nice find, nice work, and odd that it's a direct fit. How did you figure that out? Maybe we should start a list of CAS mount dimensions.
-
280zx turbo ignition control module swap
NewZed replied to rickyellow zee's topic in Ignition and Electrical
-
You haven't really said how it runs now, if it's low on power everywhere or just on the high end. Who knows, you could have a clogged air filter, a rich EFI system, or a tiny 1 1/2" exhaust pipe. There are a few lists out there of the things that give the biggest bang for buck. You might do a bit more reading and measuring to see if there's any easy-pickin's. Try the FAQ's.
-
280zx turbo ignition control module swap
NewZed replied to rickyellow zee's topic in Ignition and Electrical
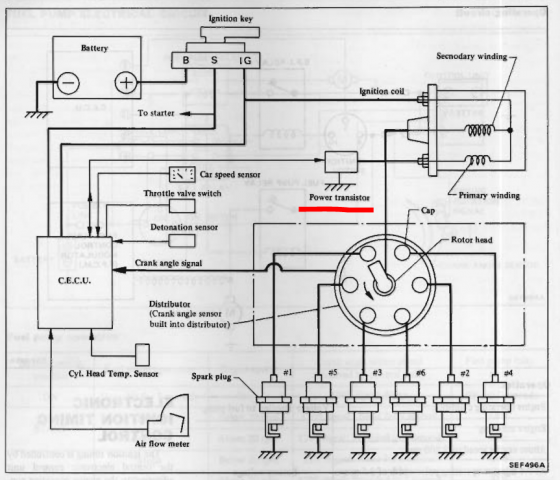
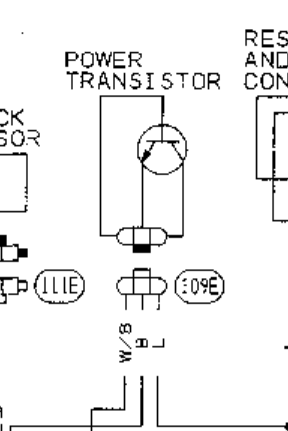
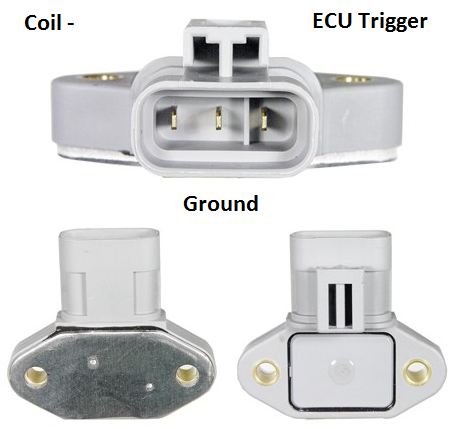
Here's a scheme that should work to use the PRW-2 in place of the ignitor. Copied from the 1995 PF FSM, page EF&EC-8, and Rockauto.com. The PRW-2 is about $60-100 on Rockauto, but only $25 plus at PicknPull. About the cost of an HEI module. No guarantees, I just followed the lines of the wiring diagram. L = coil negative W/B = ECU trigger B = ground -
Even the stock 280Z L28 engine is known to run out of breath between 5000 and 5500 RPM. Probably never feel like a Honda without work.. You can do a bunch of small things but each one will probably only have a small effect. Really, you should have done the research before you did the gasket refresh, you might would have made different choices. Good luck, most of the guys on here will say go big on the cam, and the head work. I was just reading one of jmortensen's old posts on big cams. Search around.
-
280zx turbo ignition control module swap
NewZed replied to rickyellow zee's topic in Ignition and Electrical
The 78 module might work. Or it might have the same problem as the HEI. Actually, considering the original design intent of the HEI it's kind of surprising that it works as an ignitor. The PRW-2 is designed to work like the ignitor does. But you might get lucky with the 78 module, and it is a "high-energy" system, using no ballast and .040" spark plug gap. Good luck. -
280zx turbo ignition control module swap
NewZed replied to rickyellow zee's topic in Ignition and Electrical
It might. Seems like Red should be grounded though. But Chickenman was right, the 77 is a low current system. It still uses the ballast. Considering that and the fact that it's 38 years old, the odds of rapid module failure are high. Why not use the HEI module? It seems to work. http://www.zdriver.com/forums/240z-280zxt-s30-s130-tech-tips-275/turbo-ignitor-swap-upgrade-chevy-hei-27569/ Or use the same logic you just showed, identifying the trigger wire, on the PRW-2 module. Just figure it out. The Pahfinder wiring diagrams are on the nicoclub web site. -
Speed bumps have nothing to do with the engine. The Honda is probably a buzzy little high RPM engine. I asked what you were expecting because there are things people do to move the torque curve up or down the RPM range. Plus, the MN47 comes from a Maxima, which is a passenger car. Already tuned for mid-range power. If somebody put your cam sprocket on the #2 position you might have the perfect truck engine. Plus what jmortensen said about small valves, which will choke flow at high RPM. But, basically, it's not a "stock" 280Z engine. So, in addition to all of the little tuning things, you don't really know what you have, if it's more power than stock or less. Pick up a used 280Z or 280ZX L28 and runit while you play with the modified engine. Sorry jm, didn't mean to overload your conversation. My stock 1978 N42/N47 engine with stock EFI system feels like it has plenty of power.
-
What does it not do? Burnouts, wheel-stands, 140 mph...?
-
It bolts on but there is some work to get the pulley aligned correctly. The pulley it comes with is for the ribbed belt and the replacement v-belt pulley needs adjusting, using spacers The 300ZX with the v-belt pulley is probably the easiest, assuming the pulley is already aligned. Just figuring out wires. There's only two. Were I starting from scratch I'd probably go that route. Odds are the few extra amps, 60 up to 70, are enough.
- 15 replies
-
- Alternator
- Pulley
-
(and 4 more)
Tagged with:
-
280zx turbo ignition control module swap
NewZed replied to rickyellow zee's topic in Ignition and Electrical
Here's an option. A more modern transistor in a nicer package. Same function. http://www.xenonzcar.com/z31/prw2.html Many people use the HEI module in the place of the ignitor. It has a better writeup, easier to get installed. -
I've seen a lot of variance in output at idle among different alternators. The auto store reman I had was weak up until it died after 9 months. The two old junkyard Nissan alternators worked fine at idle, although I do have my idle speed up by about 100 RPM. The Maxima 90 amp alternator swap is popular, it bolts on but needs a pulley swap and wiring change. That 300ZX 70 amp swap looks good, I've not seen it before. Looks like just a wiring change, if the pulley lines up. Hard to tell what you'll get at idle though, the maximum output doesn't always follow idle output. The 10si curve shown in this link gets around the internet. http://corvaircenter.com/phorum/read.php?1,572964,573043
- 15 replies
-
- Alternator
- Pulley
-
(and 4 more)
Tagged with:
-
Interesting unexplored topic. Share what you learn, nobody has really discussed this before.
-
There's a letter stamped in to the back. A, B, C, F, K... That's the info mark.
-
Imagining will cost you a lot of money, AFM's are expensive. Check for vacuum leaks, check the PCV system. Turn the idle speed adjustment screw. The ECU is designed for injectors that flow a specific amount. It doesn't adjust for low flow. If they didn't flow at all before it's unlikely that they're flowing the proper amount now. If you let all six injectors squirt for the same amount of time in to containers they should all squirt the same amount. If there's an imbalance, you have cloggage.
-
The good guys will have to buy more guns now just to keep things even.
-
If you take the black cover off of the side of the AFM and look closely you'll see the tiny contact points for the pump switch. A metal rod closes then when the vane opens. You can bend the rod to adjust it if it's off. But if you have a hotwire with a switch, it's irrelevant at this point.
-
Off centered 75 280z steering rack....hmm
NewZed replied to marinez's topic in Brakes, Wheels, Suspension and Chassis
The next owner is going to be so confused... -
The 10 seconds then die behavior is actually typical of the AFM fuel pump relay switch not making contact. It's bypassed during Start if you're using the fuel pump relay circuit as it was intended. You can short it or bend the control rod in the AFM to fix it.
-
I forgot that the 280ZX companion flange has the same 25 splines as the 240Z. That looks like the 280ZX flange swap, there are writeups out there on it. Still worth keeping.
-
The 240Z's rear hub companion flanges either have adapters or are modified to use those CV's. Don't throw them away.
-
Just guessing, but the CV shafts are probably worth more than the diff, if they have the right spline count for a Z R200. They're hard to find anymore. Measure the length and count the splines, somebody will probably take them. Call them 3x2 CV shafts. Here's some ratios if you want to get closer to what car the diff came from. Good luck. By the way, you can't post a For Sale ad until you donate a few dollars. It's a site rule to keep out the scammers. http://www.nissansilvia.com/forums/index.php?showtopic=337751


