-
Member Statistics
32459
Total Members2093
Most Online
All Activity
- Today
-
Heavy Duty frame rails and connectors
christianmoller replied to toolman's topic in Gen III & IV Chevy V8Z Tech Board
Nice job you are doing👍, not close to that. I,m looking at your frame rails and probably going to do something similar, seems to be a good idea to extend them all the way back. /Christian -

Heavy Duty frame rails and connectors
toolman replied to toolman's topic in Gen III & IV Chevy V8Z Tech Board
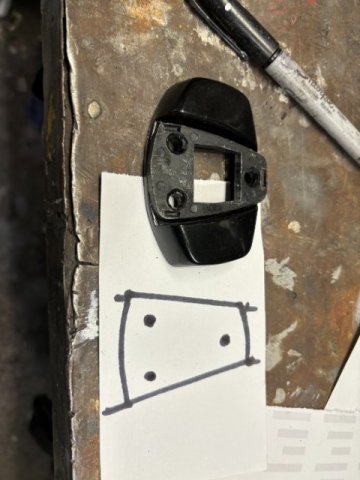
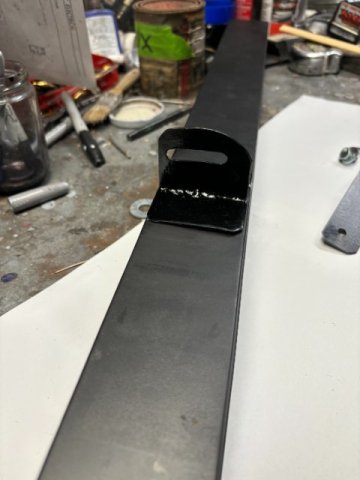
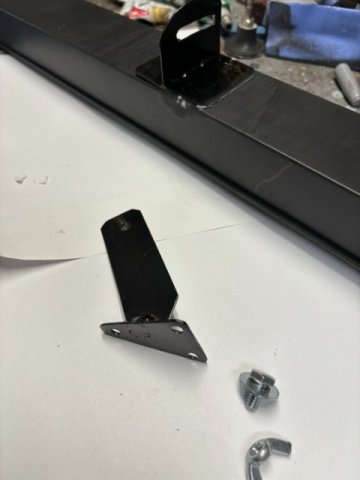
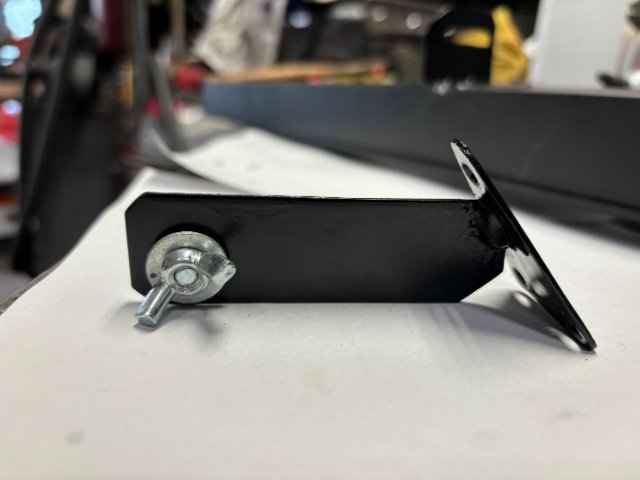
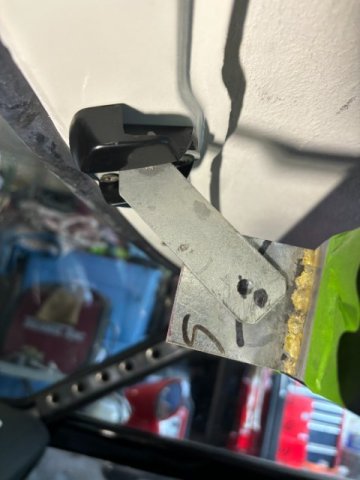
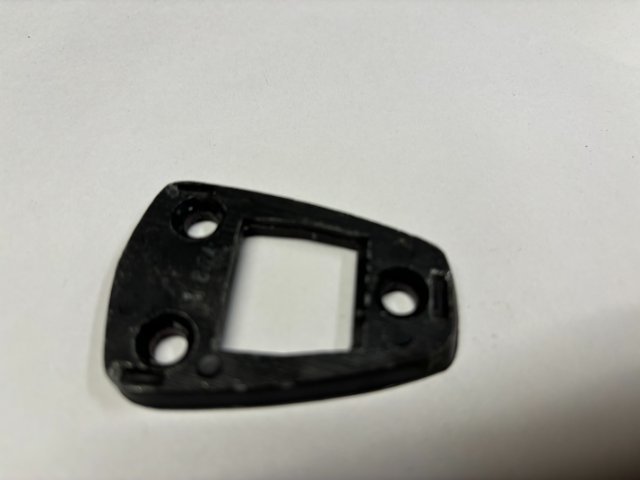
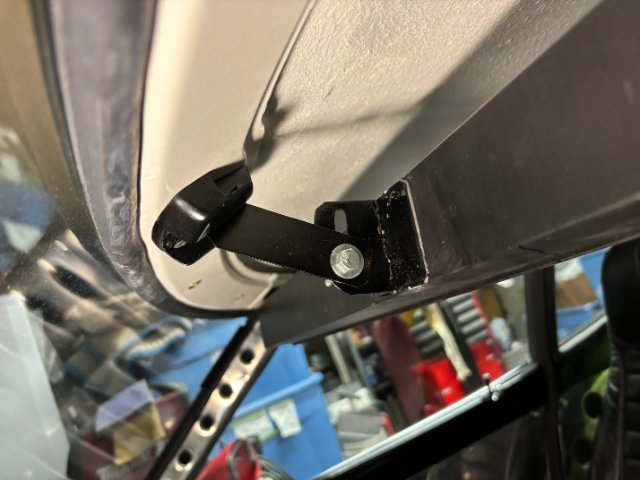
Modifications to the New Rear View Mirror- After driving the car, I found that the new rear view mirror was vibrating making viewing difficult If, however, I would hold the mirror in the center, the viewing improved greatly. The solution was to provide additional support to the mirror. I would use the original rear view mirror mounting screw holes to mount a additional center bracket. First, a Template of original mirror base (consists of three screw holes)was created. The base mount would be constructed from 16 gauge steel plate. Another 3/4" x4" rectangular piece were created to make the Pivot Arm for the mirror. This plate would welded to a base 2" x 4" which would be epoxied to the back of the mirror. Mirror Mount Note- A 1/4" Pivot Hole was first drilled in the top section of this arm. This Pivot Hole will enlarged after the Mounting Bracket and Mirror Bracket are test mounted together. Then, a felt pen is inserted into the 1/4" Pivot Hole and the Mirror is turned to create its "curving path". This path will used to create the slot that allows the mirror to be adjusted when necessary. Drilling many 1/4" close together then hand filing created the arch path. Note-Arch created by Felt Pen Pic shows Arm and mounting base tack welded together for testing only until alignment is completed. Bracket angle will determined with Two small card board 1" strips- one is simulate the bracket arm and the other to stimulate the bracket on the mirror. pic showing !/4" Pivot hardware(1/4 bolt, washer and wing nuts) Assembled Version of Base Mount The Original Mirror Spacer was not used to allow sufficent thread engagement. Completed Modified Rear View Mirror Left Side View Right Side View
- Yesterday
-

1979 ZX Brake Booster on 78 280Z
tim78zt replied to Jyarb's topic in Brakes, Wheels, Suspension and Chassis
Has anyone found a source for the 10 1/2 inch booster? -
Awesome, congrats!
- Last week
-
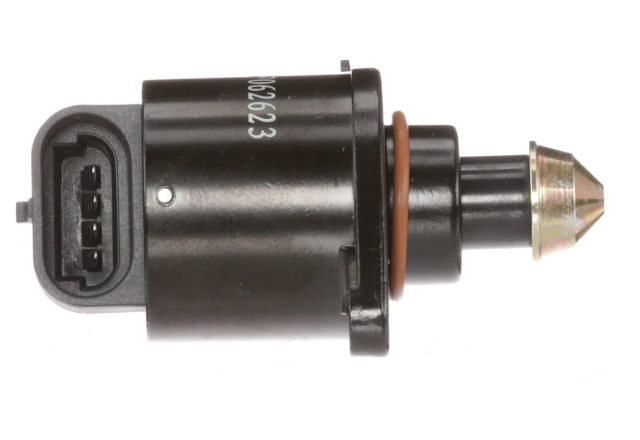
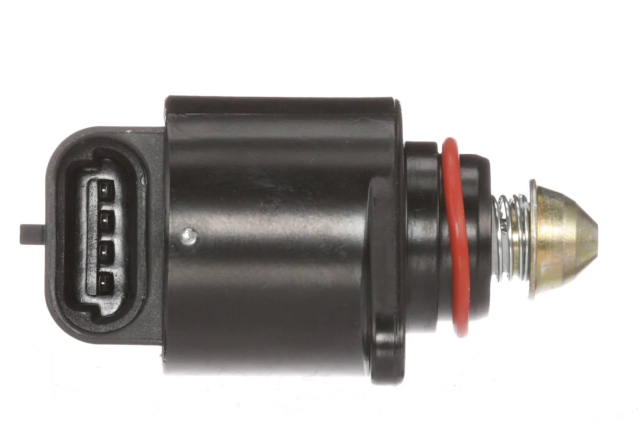
The actual bolt spacing is different too. The Jeep has a more narrow bolt spacing. Ive been reading up on some EFI support pages and I guess I need to actually watch the valve open and close to get the total steps correct . Not sure what your total homing steps are
-

cant figure out steering clunk/pop
kaibiagi replied to kaibiagi's topic in Brakes, Wheels, Suspension and Chassis
Awesome, thanks. I'm pretty sure I actually already have a poly one that came with my complete bushing kit, so I'll just pop that in at some point. -
Here's your Jeep Stepper And a GM Stepper If it's any help this is the one I'm actually running, which looks closer to what Protunerz lists on their site. The one with the black housing I took a screenshot of technically only shows compatibility with V6 engines but I'm pretty sure it's functionally identical, just has the pins facing a different direction?
-

cant figure out steering clunk/pop
JMortensen replied to kaibiagi's topic in Brakes, Wheels, Suspension and Chassis
Yeah, that needs replacing for sure. Think you probably found it! If you don't mind the vibrations, get a poly or plastic one. People have also drilled hockey pucks and used them, if you happen to have one. -

Early 1974 260z build
juggernautjoee replied to juggernautjoee's topic in S30 Series - 240z, 260z, 280z
It's been awhile. A lot of back and forth with Godzilla to figure out what was going on with my ECU. RPM signal was not coming through. A 10k resistor was the culprit. Got everything hooked back up, configured some base settings and it finally fired up. First time in almost 2yrs. That's exhaust smoke in the picture. I really need to get it turned around so I can run it for longer to tune this thing. It smokes like crazy right now lol. Probably doesn't help that I have flex pipes and random loose clamps holding the exhaust together as well. It runs like shit, and I need to hold the throttle down a bit to keep it going, but it's a start. I can't wait to start digging into tuning and learn this stuff.
-
Mine just refuses to open sometimes . I’ll try a GM before I go to a AAR
-
I've compared them side by side and it's important to note that the Jeep stepper won't open as far as the GM one based on its design. On cold starts it won't bypass nearly as much air. I have a GM stepper on my protunerz manifold and after re-pinning for it everything has been much better.
-
Agreed! I did this about a week ago, no more exhaust rattling on the diff. I've also filled the transmission with AC Delco GM friction-modified synchromesh gear oil, as recommended by the internet. I need to put some hard miles on the car to see if it helps smooth out the shifts a bit, namely, aggressive 4-3 downshifts had been a bit scratchy if not done patiently. I've also installed Keith Franck's W65 jets in place of the W60's. Tractability is now near-perfect, fantastic throttle response with surprisingly good fuel economy. I'm wondering whether this engine is better suited to yet another step up in size to W70 but I'd like to put some more miles on this setup. I'd love to finally fit those new OER's I bought a while back but there's a good chunk of work to do before that happens. Namely, port-matching and pinning the manifold as well as Rebello did with the TWM. With the Webers working quite well, I'm not feeling the most urgent motivation on this... Then there's the adjustable cam gear to install, ensure no valve-piston issues, and go have another tuning session. Step-by-step, I'm getting ever closer to where I've been wanting the car to be! IMG_8737.HEIC IMG_8736.HEIC IMG_8729.HEIC
-
We did it (finally)! We have lift off. Not able to hit boost yet, but I can drive it again. A weird problem I had today was my fuel pump relay would turn on-off randomly. This caused the car to buck, and when I backed off the throttle, it stopped. It happened both on faster acceleration and braking normally. Going to replace my fuel pump relay tomorrow and keep on tuning. Thanks to all you fine folks. I'll post when I finally dip into boost, and my msq when I get things running decently.
-
Not a final version , but this is where I left it last run . This eliminated all pinging . I just started to dial in more fuel to see if I could raise timing . I also having trim tables to isolate #6 if that’s the offender
-
Can you share your ignition timing chart?
-
cant figure out steering clunk/pop
kaibiagi replied to kaibiagi's topic in Brakes, Wheels, Suspension and Chassis
Here is a video of me moving the steering coupler bushing thing around. Is this amount of play normal or should I investigate further? Sorry about the stupid questions, im fairly new to this still. IMG_8654.MOV -

Speedhut speedo/fuel gauge combo- please help!
calZ replied to jersey280's topic in S30 Series - 240z, 260z, 280z
https://forums.hybridz.org/topic/131611-speedhut-fuel-gauge-and-metermatch/ -
 Gents, Own a 76 280z w/ the full speedhut gauge suite. Issue specifically is with the combo speedo/fuel gauge. Cant seem to get it to give me any fuel reading after following instructions. Just wondering if anyone had this same issue with speedhut fuel gauge or struggled with it before. Some added info. Originally when I purchased the vehicle, the tank was in unservicable condition and I went the fuel cell route for a temporary solution. Recently came across a 78 brand new replica tank for a steal so I grabbed it. Spare tire well already removed, so currently fabricating it to fit. I did have to go with a oem 78 top mount 3 wire fuel sender to make it work. Any suggestions would be great! Thanks ahead.
 -
Still no luck with the stepper IAC . I am going to get a used GM style to replace this Jeep style I have now to see if that helps . It seems that it just decides not to work sometimes . I get zero air at start and have to use the throttle to modulate . I am about ready to ditch the stepper all together and go ole school with a AAR Bosch valve . I have 3 of them laying around . I use them on my truck and never have a start issue .
-
Update : I had been fighting an erratic wideband on the rear collector -cylinders 4-6. Well it turns out I still had a leak at the collector which is before the O2 sensors - dammit . This is a Z story header and collector . The collector pipe was modified for my exhaust and I thought I had the flange true , but it still leaked . This time around I eliminated the gasket all together and used Red Loctite only . At the same time I had a new O2 sensor installed since I was that deep into it . I DID see evidence of a leak but changed the sensor anyways . FIXED! This change helped so much with the tune and you could hear it ! I was able to get the banks to harmonize much better with AFR’s and sound . This helped to mitigate the drone I was getting at low rpm cruise . I thought this would also fix an issue I’ve seen on every intake I’ve used where the AFR’s between the two O2 sensors would be different during high vacuum running - light cruise . Megasquirt didn’t seem to be able to compensate in those scenarios though I had two separate O2 sensors dividing the banks . I ended up going into the injector trims and adding fuel to 1-3 since they ran really lean under high vacuum . Maybe they suck all the air out of the plenum before it reaches the last 3 cylinders . I added almost 20% to 1-3 . At this point the AFR’s evened up and you could feel and hear the difference . This is probably the best I’ve had my L running . Happy guy right now
-
stanceautomag joined the community
-
cant figure out steering clunk/pop
kaibiagi replied to kaibiagi's topic in Brakes, Wheels, Suspension and Chassis
Can't imagine its that, since I torqued them to spec and used blue thread locker when I was replacing the ball joints and tie rod ends, but ill give it a look for sure. -
cant figure out steering clunk/pop
JMortensen replied to kaibiagi's topic in Brakes, Wheels, Suspension and Chassis
I just remembered a clunk I had, and turned out it was the big bolts that go through the steer knuckles and into the strut. Might check those and make sure they're tight while you're under there. -
cant figure out steering clunk/pop
kaibiagi replied to kaibiagi's topic in Brakes, Wheels, Suspension and Chassis
Gotcha, I'll try removing one end link tomorrow and see how that effects things. I've removed it before when I was replacing the bushings and there is no damage to the frame where it attachs, rust or rips. Not sure if its an aftermarket bar or not. For some reason I only have a front sway bar, no rear. As for the rag joint, I believe its been replaced with polyurethane by the previous owner. I'm not 100% sure its poly, but the rag joint is definitely in good condition just from looking at it. All good, im not too worried about that but I figured I might as well ask while im here. -
cant figure out steering clunk/pop
JMortensen replied to kaibiagi's topic in Brakes, Wheels, Suspension and Chassis
You can just remove one sway bar end link and then it will flop along and not be doing anything and shouldn't make any noise outside of maybe bushings squeaking. Easier than removing the whole thing. If it stops and you think it's around the bar/frame mount, pull it all the way off and inspect the frame rails where it bolts on. Aftermarket bars tended to rip up the frame rails when these things were new and not rusty. How about the rag joint in the steering column? OG rubber, or did you upgrade that one too? Sorry, can't help with wiring part. -
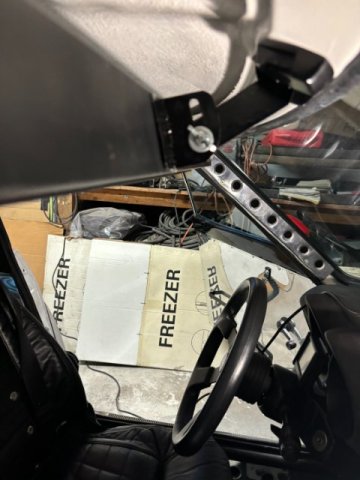
cant figure out steering clunk/pop
kaibiagi posted a topic in Brakes, Wheels, Suspension and Chassis
Hey everyone, just looking for some advice on this problem my cars been having. 1976 280z, the steering will make a pop/clunk noise when I turn either right or left. Sometimes I dont have to turn too much to get it to clunk, and sometimes I have to turn the wheel almost completely over. It will only do this when the car is moving, and only at low speeds as far as I can tell. (It totally might do it at high speeds but i havent turned the wheel enough for it to do so at high speeds). If I turn the steering wheel from lock to lock while the car is not moving, there are no problems and everything functions normally, no matter whether the front wheels are on the ground or in the air. I have already replaced front wheel bearings (NTN), outer tie rods (Moog), ball joints (Moog), sway bar bushings and end links (poly), tc rod bushing (rubber) all other bushings are poly and in good shape. I don't think its the inner tie rods because it only happens when the car is moving. I'm thinking maybe I could have somehow fucked things up on the swayer (although it looks fine), so I might try to take that off completely and see if that affects anything. The other thing i could see it being is a loose bolt or something somewhere causing this, because there have been many other things loose on my car causing me issues. Anyone got any other ideas/advice? It could totally be something obvious that I'm just overlooking somehow. Other random thing: does anyone know where this blue wire plugs into and what the fusible link looking things are for in this picture? They are under the driver side dash and I can't find where to plug them in. My dash lights don't work and I'm guessing this is probably why. Can't seem to figure it out by looking at the wiring diagram.IMG_8650.pdf Thanks for the help! repost since I accidentally posted in faqs


.jpg.5f14f8088381f84fc15baae88d755af3.jpg)


-
Who's Online 3 Members, 0 Anonymous, 209 Guests (See full list)