Leaderboard


Popular Content
Showing content with the highest reputation since 07/23/26 in Posts
-
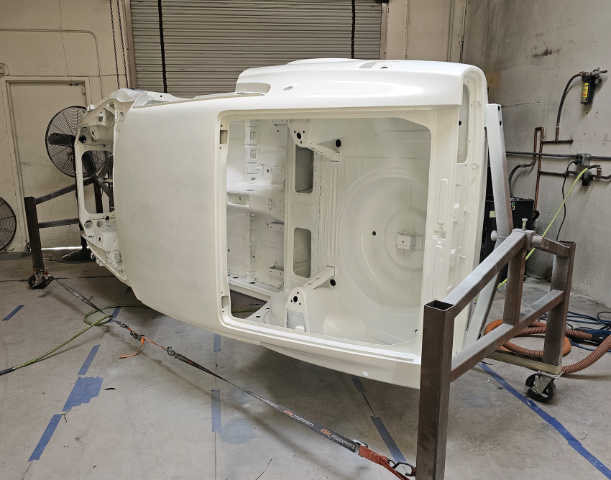
Got a little more work done. Started getting the front end together. headlights wired up. have new corner markers on the way and need to come up with a grill and turn signal. Bent up some brake line templates and headed to the parts store to try and get some pre bent heater hose. was a successful journey. got a u bend that worked for both hoses perfectly. Got the hoses on. pressure tested for leaks. found one small one at the turbo. fixed it. filled and bled the cooling system. Got the fan hooked up to the ECU thru PWM, and man does this fan flow some air. turned all the way up it might move the car like a fan boat. haha. I had it running while playing with the tune at 35% duty cycle and it CLT stayed at 172ºF when it was 85ºF in the shop so i was happy about that. will play with setting once i can get it on the road. I made the alternator bracket to move it to the driver side but having a little issue with belt routing. Currently did get a belt on but the tensioner doesn't have enough movement to work how I'd like so I'll reevaluate this later. Belt is tight and spins everything so I can run it this way for now and figure something else out later. I have the same alternator on my other car but on the passenger side so worst case I can probably get away with moving it back over there. just was trying to avoid the heat from the turbo. Also got the brakes bled. I'm real close to taking it for a spin around the neighborhood. Going to try and get the edged around the windows sanded and buffed this week so i can put the glass back in.
 2 points
 -
1 point
-
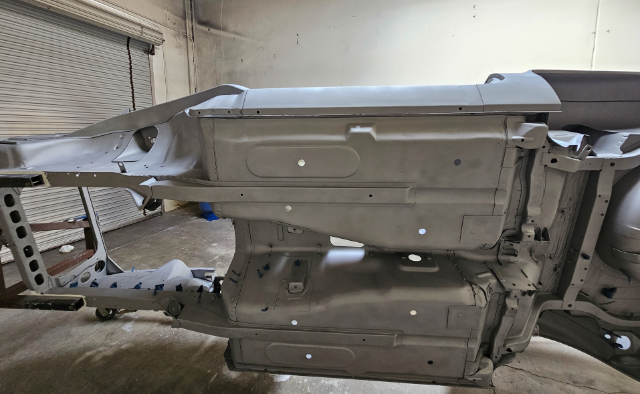
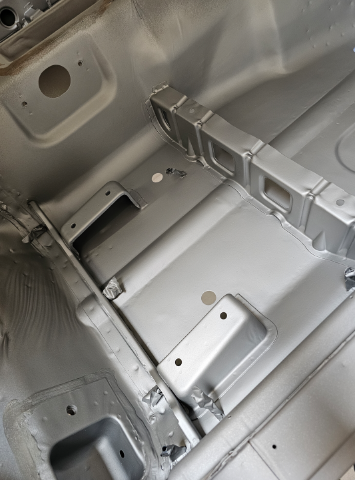
Its been an exhausting month of hard work getting the chassis in Epoxy to move it back home before the end of the month. Here is the process. 1.) strip all factory sound deadening/undercoating with a scraper, heat gun, wire brush. 2.) clean any residue with paint stripper and after-wash solvent. 3.) strip original paint from body with Citri-Strip paint stripper - again clean with after-wash 4.) remove interior tar paper with dry ice and liquid nitrogen. 5.) wash and clean entire body with Mastercoat metal prep - phosphoric acid rust neutralizer https://nomorerust.com/collections/metal-prep-rust-remover-products 6.) sandblast all seams and overlop joints. 7.) brush Mastercoat rust sealer primer into all seams and nooks https://nomorerust.com/products/mastercoat-ultimate-permanent-rust-sealer-silver-primer-original-sprayable-slim-quart 8.) lightly blast the floor pans with white aluminum oxide until white metal 9) brush 3 coats of Mastercoat rust sealer primer on to floors 10) blast the internal frame chambers clean and blow out any sand 11) spray the internal cavities ( rocker panels, rear fenders, rear internal quarter, and front internal cowl area with Matercoat using a 18 inch long extended tip spray gun https://paascheairbrush.com/collections/extension-spray-guns?shop_consented_scopes=email%3Averified+openid+pay%3Asession_token+profile+shop%3Aaccount_uuid&shop_sign_in=true using a 360 degree spray tip to coat all surfaces 12) sand the entire body removing any Mastercoat not reaming in pits or detents 13) sand the entire external body shell and underside with 180 grit and clean with wax and grease remover 14) lightly blast entire body inside and out until perfectly clean and lightly textured to promote adheision - holding the blast nozzle 12 to 15 inches away at 60psi with white aluminum oxide 15) hours blowing out the remaining grit 16) again using 360 degree long extension spray gun, paint all internal cavities and under sides with DPLV Epoxy Primer 17) Spray entire body inside, outside, underside with 2 coats of Epoxy Ridiculous amount of hours https://www.youtube.com/watch?v=y-kogRrJYJU
1 point
-
I haven't noticed much difference but i generally refresh the page and then flip off it and do something else while it loads.1 point
-
260Z Seatbelt Interlock & Starter Circuit Troubleshooting I’m working through a starter‑circuit issue on my early 260Z and wanted to document everything I’ve done so far to bypass the seatbelt interlock system. I’ve followed the factory service bulletin step‑by‑step, but I’m still running into problems and hoping the electrical experts here can help me figure out what I’m missing. What I’ve Done So Far (Following the Nissan Service Bulletin) Nissan • Disconnected the seatbelt control module under the dash Removed all three harness plugs from the module. • Unplugged and removed the wiring distribution block on the firewall This is the multi‑connector block tied into the interlock logic. • Removed the red reset button on the passenger fender Pulled both connectors and jumped the Black/Yellow (start signal) to the Yellow (starter output) per the bulletin. Result: Even with the entire interlock system removed and bypassed, I still hear a click under the passenger‑side dash when turning the key. Also, when trying to start, the starter solenoid spins but the starter doesn’t engage. Second Approach: Installed a 4‑Prong Starter Relay Since the jumper bypass didn’t solve it, I tried a more direct method: • Removed the jumper at the reset switch. • Installed a 4‑prong relay on the firewall. • Wired it as follows:• Pin 30: Direct feed from the battery positive. • Pin 85: Trigger wire tapped from the Black/Yellow ignition START wire just below the ignition switch plug. Clean start signal. • Pin 87: Dedicated wire straight to the starter solenoid spade. • Pin 86: Grounded to the firewall. Result: The car does crank with the direct battery feed. But a new issue appeared: When I turn the key back to ON after START, the starter continues to crank nonstop. The only way to stop it is to disconnect the battery cable. I tried a relay with a resistor thinking the solenoid might be back‑feeding the relay coil, but the problem persists. --- Where I’m Stuck I’m not an electronics expert on the 260Z, but I’ve done plenty of wiring work on 60’s cars. I’ve searched all over the web and found bits and pieces of info, but nothing that fully explains what’s happening here. Autos& Vehicles At this point I’ve: • Removed the entire seatbelt interlock system • Bypassed the START circuit per the bulletin • Tried a modern relay setup • Still have a mystery click under the dash • And now have a starter backfeed issue where the relay won’t release I’m clearly missing something in the early‑260Z wiring logic, possibly a hidden splice or secondary circuit feeding the START wire. I’m reaching out to the experts here who have more experience with these cars. Any guidance, diagrams, or known trouble spots would be greatly appreciated. I’m stumped and would love to get this resolved. Thanks in advance for any help.1 point
-
I still get a site not responding when I go to it and have to wait more than 30 seconds for it to load. Clicking among sub forums takes a while as does loading threads. Whatever he's doing isn't working ..0 points