kj280z
-
Posts
539 -
Joined
-
Last visited
-
Days Won
1
Content Type
Profiles
Forums
Blogs
Events
Gallery
Downloads
Store
Everything posted by kj280z
-
We should probably start a different thread under paint and body for this, but real quick - it sounds like a combination of too much reducer and that nozzle is very large! I have a SATA 3000 RP and use a 1.3 tip for sealers, singlestages, bases, and clears(sometimes I will use a 1.6). I have a SATA KLC RP with a 1.8 tip for high build primers, and epoxy primers. I have never used the prime you're spraying but I suspect a combination of gun settings, a smaller tip and less reducer will improve your results. I checked the manufacturers website on that prime and did not see that they required reducer, so this is usually left to judgement to get the consistency correct and also on your climate/conditions for dry times...
-
What size spray tip are you using? If it's too large it will spray too much material... Also, if you thinned it down too much it will run and not cover well... If you need some guidance, share some more details about the product you're spraying and your equipment etc etc etc and maybe we can help you tweak things Also shar gun pressure pressure and whether its an hvlp gun would be good to know as well
-
Sanderson Shorty header (JTR) interference
kj280z replied to kj280z's topic in Gen III & IV Chevy V8Z Tech Board
Zgeezer - Mind sharing what you did with your oil pressure setup? I will be working on that next now that I'm past the header clearance challenge -
Sanderson Shorty header (JTR) interference
kj280z replied to kj280z's topic in Gen III & IV Chevy V8Z Tech Board
Quick update - I have solved the problem... 1. The motor mount needed to have 3/8 grinded off the corner 2. There was an issue with the tranny mount where it had the motor too far towards the drivers side - had to modify it to correct the alignment 3. There was one spot where the tranny was hitting the tranny tunnel - it was hard to spot but I finally was able to resolve it by trimming a piece off the passenger side of the tranny housing With all this done, the shifter centers PERFECTLY in the stock opening. Note to all those that I have seen with their shifters coming up through the hole with it biased towards the driver side - look for issues with your tranny mount and/or clearance issues on the passenger side of the tranny tunnel... Mine was biased towards the drivers side as measured by the shifter about an inch - I have seen a bunch of you trimming the shifter opening which is not the greatest way to address this issue. One inch of misalignment in the drive line may just be enough to create some minor drive line vibrations (I don't know how many degrees of misalignment this translates to) - I did a search and found at least 5 examples of LS1 Z's having the drive shaft bolts come loose. I suspect in some of these cases you'll find that your shifter comes up through the opening on the drivers side... 1. Fix the tranny mount so it it aligns correctly 2. Relieve the tunnel and/or cut un-needed protrusions off the tranny so that everything clears properly After doing all this, even my steering shaft has much better clearance... Thanks for everyones help! Much appreciated! -
Looking good - What rims are those? I like them!
-
Sanderson Shorty header (JTR) interference
kj280z replied to kj280z's topic in Gen III & IV Chevy V8Z Tech Board
Joe, In that last picture you posted, it's hard to tell, but it appears the left side of the collector also touches your motor mount... same as mine I have gotten mine to fit but it now just barely touches and I don't see any other choice but to relieve the JCI bracket above the TC cup... I am starting to conclude that the bracket fits higher on the 280Z than the 240Z (I took a look at my 240Z a few minutes ago) and thus with the ZERO amount of room that these headers provide there is no margin for error. With a VERY slight modification to the design of the header it would fit MUCH better... Seems like JTR is trying to hit a broader market with these so they don't care to tweek them to be optimal... I hear the JCI headers fit much better and move the collector back a little bit... FYI JCI is out of their headers and is switching vendors so they will not have any headers available until the new vendor gets rolling -
Sanderson Shorty header (JTR) interference
kj280z replied to kj280z's topic in Gen III & IV Chevy V8Z Tech Board
Thanks - I did raise my tranny as well tonight and noticed the same thing on my T56... The pictures were helpful - much appreciated, but I'd love to see some closer detail on how much room is down there... It appears thatyou have about a 1/2" of clearance if I am interpreting the picture correctly. One other thing - Just a comment, but after having taken that header in and out at least 20 times now, it would sure had made life easier for all of us if they had relocated the collector back a little further - there is a TON of room and it appears they still could have achieved equal runner lengths - I'm not a big fan of the design for several other reasons as well... having a flange in that location will make it a total PIA once the exhaust is in... Anyone else have a different style of header that they would like to trade for these? (as long as they are a proven design that will fit with no headaches) - I'm all ears! Until then I will continue on to mold these against their will! <grin> -
Sanderson Shorty header (JTR) interference
kj280z replied to kj280z's topic in Gen III & IV Chevy V8Z Tech Board
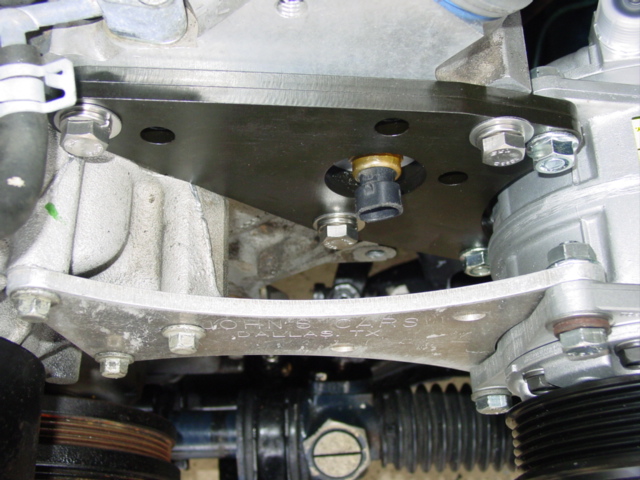
I know the entire history of the car and have also had all measurement points confirmed on a laser frame machine - it is perfectly on factory spec... I have gained some ground on this problem - I found the the JCI mount wasn't clearing the small hump on top of the TC reinforcement. I had taken an air hammer to it but there was more to go... It still hits, but now it only requires a 1/2" of material to be relieved off of the corner of the mount... I am finished for tonight and will continue tomorrow... If anyone has any pics taken from the top down towards the corner of the JCI bracket with these headers installed, please share! Also, I really appreciate all the responses and suggestions! please keep them coming! I gotta get past this issue so I can finish this project up before the convention!!! -
Sanderson Shorty header (JTR) interference
kj280z replied to kj280z's topic in Gen III & IV Chevy V8Z Tech Board
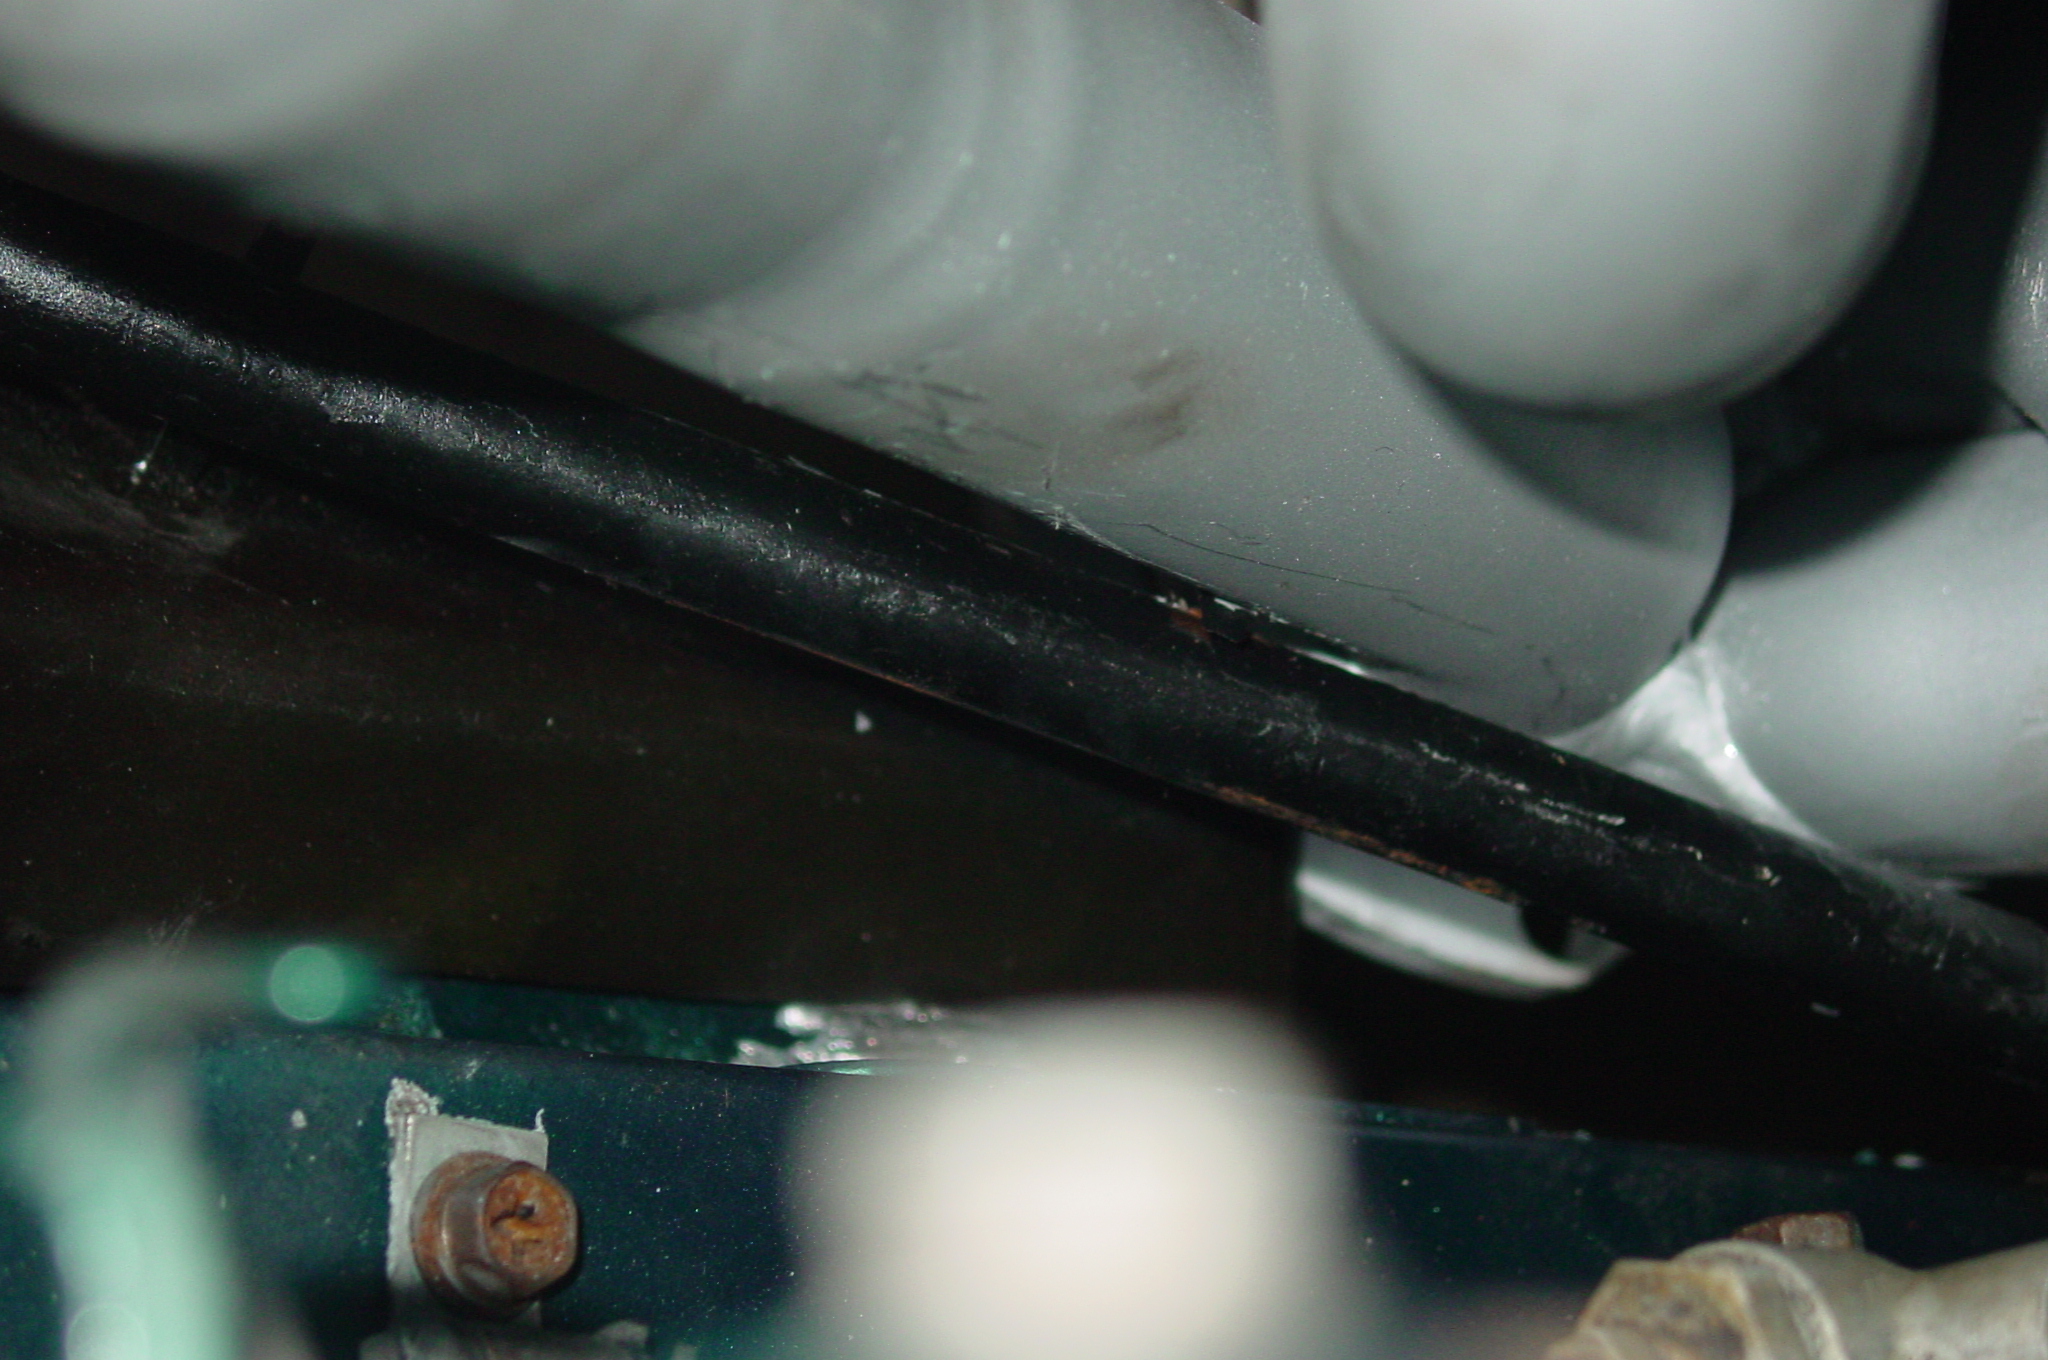
The bottom one in the picture is the drivers side - unless you put that on the passenger side and have it point toward the front of the car... I've been out there trying different things for an hour and getting real frustrated... I have a set of stock 2002 Camaro cast iron exhaust manifolds and with a little massaging to the flange I believe it will fit better than these headers!! (I've only looked at the drivers side... no idea on the passenger side yet.... Anyone have some pics of these headers installed in their car? How much clearance do you have at the corner of the drivers side motor mount? Here's some pics: In this pic the section that I marked with a black marker would need to be cut off (the headers are 1/2" away from the head due to the clearance problems I can't get them to mount up close yet) Another pic from the top for reference:
-
Sanderson Shorty header (JTR) interference
kj280z replied to kj280z's topic in Gen III & IV Chevy V8Z Tech Board
Mine are identical to the ones in the picture - What else could it be? -
Hey all, I have a set of the headers pictured below - The website states: The LS1 shorty headers are designed to fit into the 1970-1978 Datsun Z cars using the LS1 engine. These headers will work with the John's Car LS1 mounts. The primary tubes are 1-3/4" and the collectors are 3". The fit on the driver's side is very tight. The header on the driver's side requires trimming one of the bosses on the engine block. The header on the driver's side must be installed from underneath the car. The spark plug wires need to be changed to 90 degree boots. 90 degree boots are used on LS2 engines. My comments: 1. No they do not fit (haven't even tried the passenger side yet because the drivers side isn't even close to fitting) 2. I can't see what they are talking about with the instruction of "The header on the driver's side requires trimming one of the bosses on the engine block. " Maybe its because mine interfere with the motor mount so this has not become apparent yet??? 3. Further on number 2 - the headers interfere significantly with the JCI motor mount near the TC cup - fixing it to make these work will require removing the mount, cutting a larger section of the corner off, making a new section for the portion of the mount that will be weakened and welding it all back together. 4. The header comes way too close for comfort to the steering rod I'd LOVE to hear some suggestions and solutions that any of you have implemented to work around this!! Please enlighten me! http://jagsthatrun.com/Pages/Parts_DAT-Z_LS1-Headers.html
-
I have been looking for those flares for a long time! Anyone know what they are/who sells them?
-
Here's a link to them - but I have still never actually seen a picture of them molded in - would be curious to see one... http://www.thezstore.com/page/TZS/PROD/50-1565
-
I agree - the Z32 tranny with adapter and shifter stuff is a good swap - I've done 2 of them and they are awesome... If you don't have the bucks to do that conversion, you can do a T5 and they hold up OK if you take it easy on them - unless you make a ton of torque they seem to be just fine... A good B&M shifter is a great additional as well...
-
Well, speaking from experience, I've had turbo L motors, a supercharged L motor, a few built 3.1 NA L motors - and several (probably 20+) other NA configurations... After having gone down the road of transitioning to LSX stuff, I'm very mad at myself for not doing it sooner... The old L Motors are no comparison... The LSX motors have a ton of R&D, great after market support, no issues with parts availability, and are a far superior design in every aspect. The best part about it, is you can pull up to any shop, open the hood and say "pretend it's a Camaro" and any mechanic can work on it... You no longer need to seek out competent mechanics that know the old L Motors AND parts are becoming more and more difficult to find for them... The icing on the cake is the fuel economy - Driven mildly you can get 30+MPG out of an LS1 Z... Forget about those second thoughts! You made the right move!
-
Making LS temp sensor work with stock guages
kj280z replied to Pop N Wood's topic in Gen III & IV Chevy V8Z Tech Board
I would like to resurrect the original question on this thread which was - "Has anyone tried to utilize the LS1 temp sensor with the stock gauge"? The reason I ask is that even with the supplied adapters which put the sensor in the location behind the alternator, the stock sensor shoulder does not allow enough threads to bite and thus it does not work... This seems to have resulted in all kinds of ways to "adapt the adapter" which seems kind of silly when there is a perfectly good sensor already mounted on the LS Motor... Seems like splicing into the wire to get the temp gauge working off of the LS sensor would be much easier and a more efficient way to do it... Alternatively, to round out this thought... if the LS sensor will not properly operate the Datsun gauge, I'd love to see more ideas on you have adapted John's adapter to work correctly... The shoulder on the stock sensor only allows for 2 threads to make it into the adapter... It seems it was designed for one specific sensor in mind which is not the one that came on my 75 280Z -
I have a lead on a few from Japan, and you can also get your name on a waiting list at MSA, they will get a bunch in August, I just need one faster than that...
-
Somebody needs to take advantage of this SWEET DEAL, right now!
kj280z replied to Ineptitude01's topic in Non Tech Board
if that is worth $1000 any other running Z must now be worth well over $45,000 with his math... -
Thanks, but mine is in the same shape... I'm looking for a new one... I know they are hard to find but they are out there
-
I just did a search and found this thread - since I'm having a similar problem... Unfortunately it's not as easy as just trimming and a hammer - especially with the JCI 280z mount since it fits between the frame rails... With the way it works out, the motor is angled too far toward the drivers side - this causes the drivers side header to interfere with the JCI motor mount near the TC connection point (in some cases) AND the shifter doesn't come up through the hole correctly (if the shifter were the only problem trim away, but it's not). Obviously this also creates drive line angles that are not optimal. In this case, no amount of hammering will suffice... There are only 2 options... 1. Make your own tranny mount (easier in the long run as it is not a complex part) 2. Cut the JCI mount and try to make it work and then weld on a new section which rectifies the issue which causes it to pull the tranny/motor toward the drivers side... I also have a 240Z JCI tranny mount which mounts through the floor which I'm considering using instead of the 280z mount... It appears that the bends/jig on the 280z mount are not all that exact so folks will have some fab work to do to get it right... In other threads I have read that several have experienced the driveshaft bolts (4 bolts that bolt the DS to the Diff) coming loose.... I suspect that this is partially due to the tranny mount pushing everything towards the driver side thus creating drive-line vibrations causing the bolts to loosen... This can be a dangerous problem so let's work together to share experiences... I'd like to hear more and also have a few of you take an angle finder and share some results - based on what I'm seeing with mine I'd bet there's more LS1/T56 Z's with this problem... I'm working on it now and will share more as I get further along...
-
I am getting close to finishing my ls1 conversion and would love to get 30+ mpg as some have stated they are getting. I will certainly share my findings as things progress further
-
 Can you provide some details on those wheels? Nice Z!
 -

-
Nice Z! Can you provide more information on those wheels?
-
My Kit fit much better than all the others that have been posted here... A picture is attached. Are we supposed to relocate the idler pulley??? Mine seem to be fine in the stock locations... Also, that round plate that fits in where the freeze plug was fits kinda loosey goosey - I permatexed it in there, hopefully it'll be good. I also had to go and buy some hardware as there wasn't any bolts in the kit to bolt the 2 black plates to the head. One last note - I did not have to use the 4 gold thick washers, and I checked the belt alignment and it's perfect without them... So that long bolt with the machined aluminum piece seems to be for applications that require relocating the idler pulley along with the gold washers????