Zmanco
-
Posts
1568 -
Joined
-
Last visited
-
Days Won
1
Content Type
Profiles
Forums
Blogs
Events
Gallery
Downloads
Store
Everything posted by Zmanco
-
Last summer I spent a lot of time looking at every "brand" I could find and concluded that most brands were really the same fan underneath the labels. From the picture on their website I can't tell if the proform is the same as the ebay fan, but my suspicion is that they are from the same manufacturer. Look at the back of the motors. I did notice that the proform has straight blades vs. "S" blades for the ebay fan. I had a set of 10" straight blades previously and they were louder than the 12" S blades. The 10" wasn't too loud, but you couldn't miss it when it was on, so if you're concerned about the noise, you might want to stay with S blades.
-
I understand the theory here (similar to the 2 speeds on the Taurus fan), but I think you'll find it overkill with these ebay fans. From inside the car I don't hear them, even at idle, and outside they're barely audible as well. I'd suggest you start with both of them running together and see if you really need to add the extra cost and complexity of 2 controllers.
-
FWIW, these fans pull less than 10 amps each (IIRC, they're rated at about 8 amps) so running both off a single 30A relay should be fine. Evan, I'm going to guess that you had bigger fans or a lower rating on your relay. Also, unless this ebay seller is different than mine, all you get is the fan. There is no install kit so you'll have to set that up yourself. That's not hard to do, a 30A relay is ~$5 at radio shack, and a 30A fuse holder is ~$2. Make sure you use heavy gauge wire (at least 14 gauge) and make good clean crimps (connections). The low budget method is to use a switch in the cabin to turn them on manually. I'm not a fan of that since it's easy to forget and then bad things happen. But it is cheap!
-
I put the fans in at the beginning of last summer and they've been fine. The main problem with the way mine are mounted is that when the car is stationary, the air only flows over the fines directly in front of the fans. A shroud could significantly improve that. But that kind of metal fabrication is beyond my skills and tools. Please post pictures of yours.
-
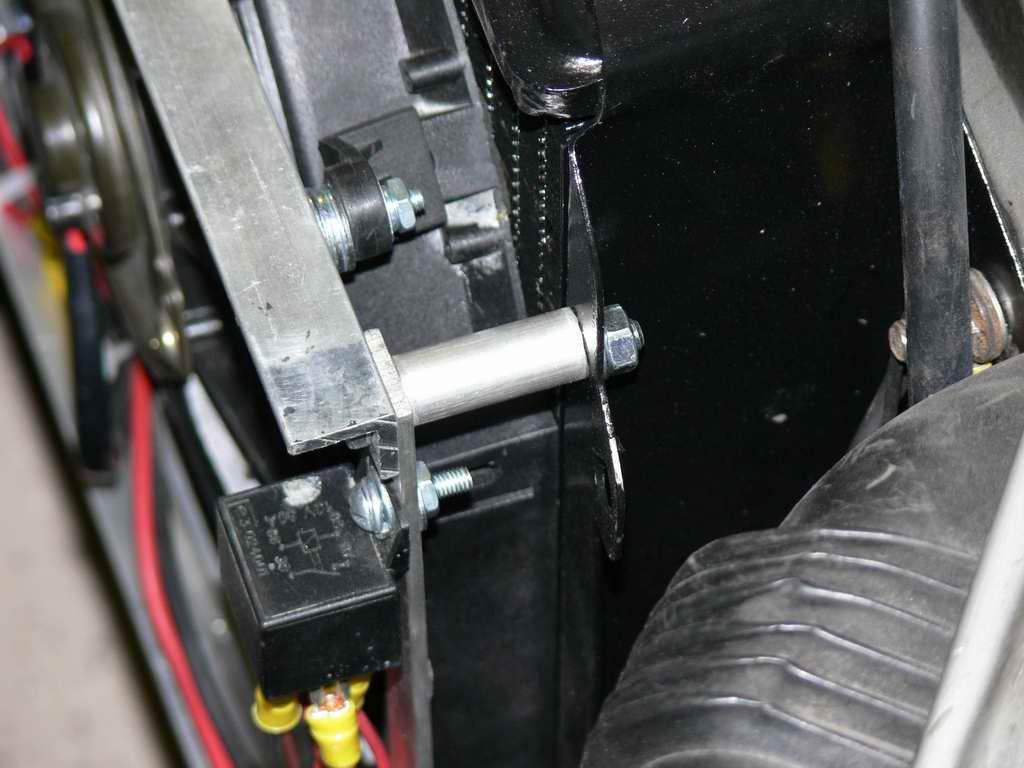
That's the same fan I am using, just from a different seller. You can control both fans from a single controller. You wire them in parallel which means the red wires from both fans are connected together and then to the relay, and the black wires are also connected together and then to ground. Before I switched to megasquirt which can control the fan by itself, I used a Hayden 3651 controller which includes a sensor that mounts in the thermostat housing and allows you set the temperature at which the fan turns on. I prefer that to a sensor that mounts in the radiator fins as that's not as mechanically secure. I still have the Hayden controller - PM me if you're interested. I'd be careful about using the plastic ties that come with the fans. They place the weight of the fans onto the fins and tubes of the radiator which aren't designed to carry a load. I did that when I first mounted mine and 6 months later I had 2 leaks. This is on an MSA 4 row rad that is now about 3 years old. 2 of the ties had come loose which probably contributed. I just had it fixed and changed the mounting arrangement as you can see in these pictures. I used this approach earlier with good success. The load is carried by the aluminum angle bars and the fans are held snug against the radiator. The spacers were cut from some aluminum tube I found at home depot.

-
I had similar issues with inconsistent idle (speed and roughness) on my NA until I: - switched to a PWM idle valve - set the min rpm value for O2 correction to 600 rpm - set the AFR target for that point on the map to 15:1 It took a lot of trial and error to get PWM control to keep a stable idle, but it works pretty well now. The idle is very consistent across a broad range of temperatures, loads (headlights/fans on/off) etc. Even if you don't have a PWM valve, you might try an experiment and lower the rpm for the O2 correction to begin working.
-
I'm with Olie05 in that a more aggressive cam will lower the effective CR some. However, my own experience with max advance is that I'm limited to the low 30 degree range before I can hear detonation (flat top pistons .030" over, N42 head, 284 degrees and .480" lift Delta Cams regrind). I remember a thread where BRAAP said that he would rather see the CR lowered in order to run the full (~35 degrees) advance. Perhaps he will see this and weigh in on this again if my memory isn't quite right.
-
I'm running 2 12" ebay fans side by side without a shroud and unless I have the AC on in summer stop/go traffic, they move enough air to keep things cool. I initially used 2 10" fans, but they were marginal on a warm day. I went with 2 smaller fans instead of 1 larger for 2 reasons: 1) if one failed, at least I'd still have some cooling. 2) with the 4 core radiator, the space between the 16" fan and the front of the engine was marginal. (I have the AC compressor on the lower left side so I couldn't fit the Taurus fan at all.) I would not bother with the 9 or 10" fans. The 12" ones fit well and cost just a bit more.
-
What do you mean by "efficient"?
-
Here's a thread I started earlier this year about my experience with cheap wire... http://forums.hybridz.org/showthread.php?t=125898 lammbn's source looks like a good deal and appropriate for use under the hood.
-
FWIW, I'll share my own experience in tuning the F/R brake bias. On my 73 I have the later Toyota 4x4 calipers that can take 300ZX pads and the 240SX calipers in the rear. I am running 84 300ZX Raybestos PG Plus rotors all around and have an adjustable prop valve for the rears. I initially used PBR Metal Master at all 4 corners and while I had no fade issues, even with the prop valve all the way open the fronts always locked first. After getting some advice on pads with a higher coefficient of friction http://forums.hybridz.org/showthread.php?t=121024 I tried the Hawk HP Plus in the rear and solved the problem. I now can fine tune F/R balance with the prop valve and was quite surprised how much of an improvement I felt from just getting the rears to do their share of the job. I know some here are not fans of the Metal Masters, but my own experience with them has been very good. While this is definitely not my daily driver, I do drive it just about every chance I get when the weather is good (~5k miles per year) and find these pads to quite acceptable for street use as well, even when cold. The 2 tracks I have used this combination on do have some tough braking points, one track where I was dropping from 115 mph to 70, and the other where I was going from 100 to 35. I have not felt any fade with this setup. I'm not saying that these pads are the right ones for you, just pointing out, as others have, that a little experimentation with pad materials can have a big impact on your braking performance. I'm often surprised to see members here put so much effort into bolting on big brakes, but using generic pads. Same thing with suspensions and wheels, and then choosing tires based on size, not the brand/type of compound etc, but that's a topic for another day ...
-
Some of you may remember that my crank damper came loose and damaged the keyway. http://forums.hybridz.org/showthread.php?t=127217 Last weekend I finished the repair and after a few drives so far all is well. In brief, I followed the repair as suggested by the Miata guys: http://www.mx5.net/garage/hsue/LoctiteCrank1.html Instead of loctite 242, I used 243 which is rated for exposure to oil. Also, I had to do a fair amount of filing of the crank around the keyway so the damper would fit over it. I bought some small files from HF and just went really slow to avoid taking off too much. I ordered the longer crank bolt 12309-V0800 that Slownrusty had suggested, but the hole in my crank was not drilled far enough to use it. I didn't want to reuse the same one that had previously come loose, so I stole the one from the original L24. If there's a lesson in this it's I wish I had used the loctite 243 on the crank bolt right from the start. Others had recommended it, but for some reason I didn't follow that advice. As you might imagine, I would STRONGLY recommend that anyone who happens to have their damper off use loctite when reassembling it (use it both on the crank threads as well as between the damper and crank snout). I'm guessing that while I had R&R'd mine several times before with no issues, the last time I did was to install the new cam. I'm thinking that regular trips to 7k rpm may have been the issue this time.
-

240z rotors on ebay...
Zmanco replied to Astral Ace's topic in Brakes, Wheels, Suspension and Chassis
Am I missing something? The stock rotors on the S30 were solid so I don't see how these could fit. Perhaps that is a generic picture and what they are selling are solid rotors that are drilled and slotted. If they can't get the picture right, I'd stay away. -
Jon, what is it about a very high compression engine that shortens its life so much? Is it that they also run big cams making power at very high revs? Or is it something else?
-
You MAY be able to switch the plugs on the cap. The issue is if the range of adjustment for the dizzy mount will allow you to turn it far enough to set your timing properly. You can try it and see. If it's out of range you'll have to drop the oil pump and do it right.
-
Pop N Wood, I know there are many who have done this fix using either Loctite 660 or Lab Metal to build up the space between the key and the keyway. There's also Loctite green to help hold the damper on the crank snout, and Loctite red for the crank bolt. I've already sourced a new damper as well as ordered the longer crank bolt from Courtesy Nissan (thanks Yasin!). I know it will be a much quicker fix to go the Loctite/lab metal route, but only if it holds. I've "cheaped out" in the past, and nearly always regretted it later. Hence I'm trying to better understand how big of project replacing the crank is going to be. My question at this time is if I decide to go the conservative route and replace the crank, do I have to replace the rings (and hone the block), or can I just put the pistons back in again? BTW, here are the relevant links: http://forums.hybridz.org/showthread.php?t=115687 http://www.mx5.net/garage/hsue/LoctiteCrank1.html http://68.72.74.113/PRODUCTS/660.htm
-
I haven't had time to work on the Z lately, but have been thinking about options. If I was to take the conservative route and replace the crank, I'm wondering if I can reuse my rings? I know I'll have to push the pistons out, but can I reuse them when I reassemble? The block was bored 30 over 15k miles ago with new pistons and rings. If I can, then I'll just need a new gasket set and bearings for the crank and rods. It will be a lot of time spent to do this all again, but I suppose I can find time over the holidays. What do you all think?
-
If you've read some of the previous posts on IAT location, it's kind of like discussing politics: everyone has an opinion and there isn't a lot of objective data. That was why I asked that this thread not get tied up on that. Actually, I posted just to share my experience and wasn't really looking to fix a particular problem. I figured others might be experiencing the same thing I was.
-
Am i crazy?! I want to get rid of the turbo!
Zmanco replied to proxlamus©'s topic in Non Tech Board
Ryan, not trying to talk you out of it (you know I'm NA), but at our altitude, you just gave up ~20% compared to sea level. Turbos let you get that back and more. Just something to keep in mind. But if you decide to "come back", it will be fun to compare notes. -
I guess everything I learned in my physics classes was wrong. Thank goodness for HybridZ and Braap! J/K, at least about the physics classes. Thanks Braap and Ron for a good laugh!
-
There's a guy from an email list that I'm on named Kim Blough who is in Idaho and has a Z business, I believe it's mostly used parts. You might contact him and see where it leads. Kim Blough Idaho Z Car 2913 Garrity Blvd. Nampa, Idaho 83687-2629 1-208-466-0004
-
I believe their primary function is to insulate the carbs from heat transfer from the intake manifold. I'd guess the thicker ones insulate better. When I still had SUs I sometimes I'd get fuel percolation in the floats. I switched to the thicker insulators but that didn't solve it, so I don't know how much better they really are.
-
I think these really are flat tops with reliefs cut to allow the valves to open farther with a high lift cam and not hit them. Domed pistons have a portion that sticks up into the combustion chamber to increase the CR.
-
LEngine says that with flat top pistons and a felpro gasket, the CR is 10.3, so I don't think you're going to see 10.6 with those reliefs cut into the pistons. Why did your mechanic choose those pistons? Is he worried about interference between the valves and pistons? From what I can see on the Isky website, the L490 has a lift of 0.490". Unless you are going with oversize valves, I don't see why you can't use that with an N42 head and flat top pistons. That's about what I did (not an isky cam, but otherwise about the same).
-
Here's a discussion how BMW attaches aluminum to steel. http://www.i-car.com/pdf/advantage/online/2003/111003.pdf Looks like it takes special preparation of the surfaces along with special rivets and tools.