
Zmanco
-
Posts
1568 -
Joined
-
Last visited
-
Days Won
1
Content Type
Profiles
Forums
Blogs
Events
Gallery
Downloads
Store
Everything posted by Zmanco
-
Dayz, you're correct: I googled steel aluminum corrosion and found a lot of info on the corrosion to be expected with steel and aluminum in direct contact. If the boundary between them can be kept dry, then it's ok, but that's not likely on the floor of a car.
-
I'm reading this thread with a lot of interest because I need to replace the front half of my passenger side floor pan. I do not have a welder nor welding skills, and had just assumed that welding was the only option. But I think I'm reading here that using aluminum which is riveted and bonded is an acceptable, maybe even stronger alternative? Does this require others special tools and skills? I'm thinking this might be a better way for me to make this repair in my own garage with my own hands. Or am I missing something.
-

Anti-roll or Sway bar survey
Zmanco replied to 1 tuff z's topic in Brakes, Wheels, Suspension and Chassis
When I read John's comments I was thinking the same thing: that as you are able to go with stiffer springs, you can also go with softer bars (kind of like how the more you get the suspension set up correctly, the lower air pressure you can run in the tires). What I'm wondering is how to balance this move to stiffer springs against keeping the car drivable on the street. Is it safe to say that by the time you have spring rates high enough so that the bars don't need to be as stiff, that you are on the edge (or perhaps past) where the car is still streetable? -
Crankshaft Bolt Ever Back Out...Consider This. Pic
Zmanco replied to slownrusty's topic in Nissan L6 Forum
Yasin, do you know the part number at Courtesy? I can only find a bolt/washer for $40. -
Anti-roll or Sway bar survey
Zmanco replied to 1 tuff z's topic in Brakes, Wheels, Suspension and Chassis
Front: 1" MSA Rear: 7/8" MSA mounted in front of rear axle using factory mounts (my 73 had them even though no bar) Springs: Tokico red Struts: Illumina Front adjustable camber bushings for lower control arms Camber: Front: -0.6, Rear: -1.5 Power brute LSD For street driving, the car's cornering limits are too high to find without risking my license and others' safety. On the track in 2nd gear it is very neutral - I'm at altitude and can almost rotate the car with gas pedal (I think it would be easy at sea level). On the track in 3rd, on the gas there is still a small push from the LSD locking up, and when I lift, the expected looseness is there, but not so bad that it has scared me yet, at least too much So overall, it's pretty balanced with mild understeer. A little more negative camber in the front is next on my list. -
I just had a flashback and went out in the garage to check and I was mistaken above. The A/C pulley IS ATTACHED via the crank bolt. Sorry for the mistake, it has been a few years since I touched that engine. Edit: added picture

-
My L24's pulley had the third groove bolted on via 2 bolts in the front. I believe it was added by the dealer during the A/C install. The main bolt into the crank doesn't have any affect on the outside pulley. My guess is that it hasn't been off in more than 30 years and will need a little help to come off. Puller?
-
With the crank still in the car, I'm having a hard time seeing how I'll be able to grind the crank keyway. What's the best way to do this? Find some small files and just go really slowly? Also, here the info on Lab Metal: http://www.alvinproducts.com/Products/Products.asp?ID=1 Looks like it has aluminum in it. I'm still concerned that any of these fillers will hold up at sustained high revs.
-
Thanks guys, I'm encouraged that you think I can fill in the keyway and not have to tear the engine down. dexter72, is a "mini file" a specific type of file, or just one that is small? I haven't heard that term before.
-
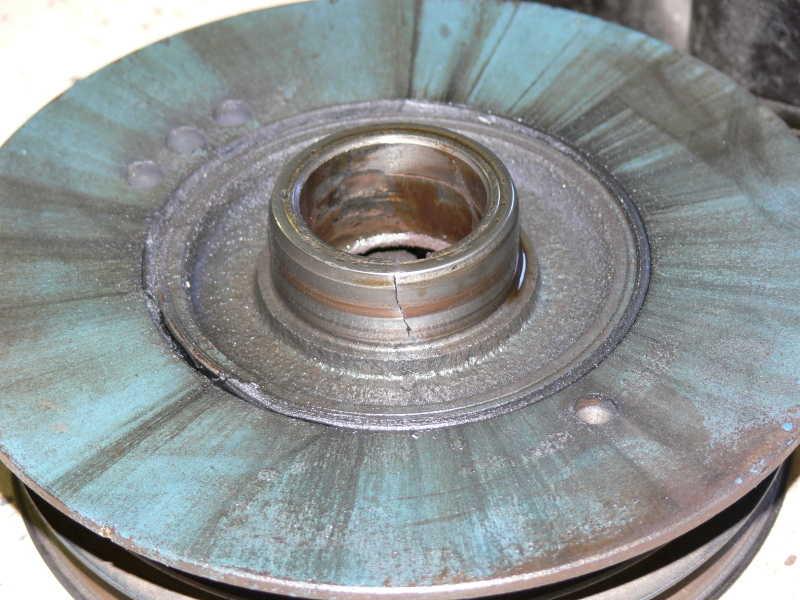
My front main seal began to leak and after pulling the harmonic damper off, here's what I found. Obviously the damper and the woodruff key are scrap, but I'm worried about the crank, specifically the hole for the woodruff key. It looks enlarged which isn't surprising given the condition of the key itself. The oil scraper (I think that's what it's called) behind the seal should slide over the crank and come out, but it's hanging up on the enlarged edges of the key hole on the crank. I really don't want to tear the engine apart given I just rebuilt it about 13k miles ago. Suggestions?
-
Where to get 60mm Throttle Body Adapters?
Zmanco replied to palauoriginal's topic in Nissan L6 Forum
The spacer is used so that the stock throttle linkage can be used. Without it, you need to convert to cable linkage. The issue of porting the intake manifold has nothing to do with the spacer. The issue is that the inlet to the stock manifold is a lot less than 60mm, so unless you open it up, there's little point in converting to a larger TB. -
interesting strobe light video ov valve float
Zmanco replied to grumpyvette's topic in Gen I & II Chevy V8 Tech Board
I was thinking the same thing. If it was a real engine running under its own power, wouldn't there be oil flying all over the place? I saw it more as an example of what it might look like. I'm sure there would be differences between specific types of engines/valve trains as well. Still, it was pretty clever how they kept the speed of the strobe JUST slower than the speed of the valve train so that we could see the full range of motion. If it had been exactly the same, the valve train would have appeared stationary. -
http://apnews.myway.com//article/20071025/D8SGCRL82.html It will be interesting to see how this plays out. While logging the GPS data might seem like an invasion of privacy, it could have its benefits as well.
-
1 person brake bleeding the easy way!
Zmanco replied to hondabait's topic in Brakes, Wheels, Suspension and Chassis
Good idea, sounds just like Speed Bleeders. -
I can't go wrong for $100 can I?? 240z on e-bay
Zmanco replied to big-phil's topic in Non Tech Board
That's probably true for some people, but even here in Denver, there are no more early Zs in the JYs. Now and then one comes in, but it's not often and they're usually in horrid condition. And Denver is not exactly a small town ... -
My 240SX TB had both a 2 wire and a 3 wire connection. The 3 wire is the potentiometer and what I used for MS. The 2 wire was a simple switch that was closed when the throttle was either wide open or closed - don't remember which as I didn't use it and removed it.
-
I think Tony D. is a little dyslexic today. It's 25.4 mm/inch, not 24.5.
-
I went this route but had the shop stop at 16 lbs as that is all they felt they could safely take off using a lathe. After that, they would need to use a mill and the $$$ would go up a lot faster. I think I paid about $125 plus another $30 or so to balance it. This was a few years ago when the cheapest aluminum units were over $400. Today they're a lot less and I think I'd just spend the extra and buy one of those. As for driving it, like others, I have no issue with starting up, even at my altitude where I loose ~20% torque/hp. 82 5 speed + 4.11 rear end helps. Taken all together (L28 w/flat top pistons, N42 head, Megasquirt, headers, tranny + diff), it's just a lot of fun to drive. Not the fastest, but very satisfying!
-
Thanks Spotfitz, that's just like mine. My SS lines must be a little longer because they lightly touch the strut when the car is on the road so I just put a few inches of fuel line around the SS hose and used zip ties to secure them.
-
When I installed them on my 73 I saw that there might be contact between the brackets if the suspension was fully compressed. So I cut the tab that mounts the hard line to the SS line off, bent the hard line around in a circle so it would finish up more to the center of the wheel, and mounted it up there. I think I used an L bracket from the drums I had just removed. I also put some fuel line hose over the SS line where it might rub against the strut. 1 year later all is still good. If you need pictures, I could probably pull the wheel off and take some tonight.
-
Today I installed the fuel injector resistors. I changed the PWM current limit to 100% and increased the injector opening time from 1.2 to 1.5 ms. I'm continuing to tweak the VE table as I drive and see areas that are way too rich or lean, but all in all it drives just like before. Of course, without a track I can't test for overheating of the drivers/injectors. Have to wait for next spring I suppose Having tried both approaches now I'd suggest that as long as you have some place to mount the resistors, it's no big deal to do it, and I don't think there is any appreciable performance hit (other than it appears to take a few more tenths of a millisecond for the injectors to open - something that makes no difference on my mostly street driven car.)
-
Exactly. Everything involved in modifying your car is a trade-off with pros and cons. Since only you know your goals, only you can decide what you should do. There are many paths you could take in adding a turbo. If you search and can come up with 1 or 2 paths that meet your goals (budget, time, skills, etc) and ask the group for inputs on them, I think you'll find people glad to help. But the general question of "What do you think I should do?" has been asked and answered so many times that no one wants to do it again. Hence the advice to search.
-
70 240 -next upgrade rear sway bar?
Zmanco replied to 24ounce's topic in Brakes, Wheels, Suspension and Chassis
I went with the MSA kit on my 73. But mine already had the brackets to mount the rear bar in front of the axle so I can't help you with the completeness of the kit. I will say that they were willing to make up a custom kit for me since I wanted the 1" bar for the 73, but the 7/8" bar from the '74 (to use my existing brackets). I've had them for 3+ years now and have been very happy with them. Everything has held up well including the mounting hardware. -
Another location you might want to try is the passenger side window. I have a similar mount and here's a video from that position: http://s88.photobucket.com/albums/k172/dbailin/2006-11%20PMI/?action=view¤t=PMIon-track.flv
-
I've been carrying a small general purpose fire extinguisher under the driver's seat for a while, but am thinking it would be a lot faster to get to it if it was somewhere more in the open. But at the same time, I'd like to mount it somewhere that's not in the way of the driver and passenger either. I really don't want the passenger to have to put their feet over/around it, etc. I'm also concerned with it becoming a missile in the event of an accident. Where have others mounted them in street-driven cars? And what type of mount did you use? (The plastic ones supplied for home use don't look like they'd keep it attached in an accident.) Pictures would be great! Note: I am not trying resurrect the debate IF an extinguisher should be carried in a street car, nor what type is best. I found a few really good threads on those topics while searching for mounting ideas.
.JPG)


.JPG)
.JPG)