
bfg
-
Posts
198 -
Joined
-
Last visited
-
Days Won
1
Content Type
Profiles
Forums
Blogs
Events
Gallery
Downloads
Store
Everything posted by bfg
-
~ Left for Dead - Triple Carb'd 73 ~
bfg replied to ~KnuckleDuster~'s topic in S30 Series - 240z, 260z, 280z
I wish I lived in California purely for stuff like this. Looks great, especially compared to a New England car like mine. -
Fatlace AME wheels, anybody Interested?
bfg replied to JPN_Garage's topic in Brakes, Wheels, Suspension and Chassis
I would be interested in a set depending on my financial situation when the time comes. -
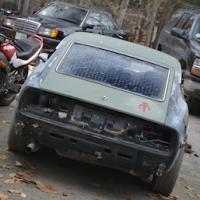
I design in solidworks and have been printing in ABS as well. I have access to the ninja flex stuff and have been curious to try it out. I'll let you know if I do. I just printed some fuel/brake line insulators and am having them cast in a durable rubber so we'll see how that comes out. I love that hatch vent idea. I have a set of the oil bottle looking things. I can probably have them 3D scanned if you want a CAD model to work off of. It would be cool to have the solar panel replace the chrome vent grill. My main goals with printing are to print sand casting molds. With the printer I can make a part in two separate halves which makes making the aluminum casting mold much easier if it's a complex part.
-
Blower fan blades would be an epic undertaking. I'm sure it would be a long build and It might be questionable as to the durability but it's an idea. I just got a Makerbot Replicator 2X at work. I'm hoping to find a few things to print for the z as well. I have the beginning of the FairladyZ emblem but I need to model the letters. If I make anything else I'll let you know. I can send you the CAD files for anything I come up with if you want.
-
My findings were based on one wheel well so I would imagine you are correct Socorob. I got hit in the nose and it was not a pleasant feeling. However that is to be expected of any wire wheel and safety precautions should always be taken. I would also recommend always buying quality tools when you can. It just so happened that I came accross these wheels at HF and figured I would give them a try.
-
I would assume a HF one would work fine. Mine is a DeWalt though.
-
Buy a couple sets of these: http://www.harborfreight.com/3-in-twisted-wire-cup-brush-60482.html http://www.harborfreight.com/4-1-2-half-inch-crimped-wire-bevel-brush-96191.html Use the 3" twisted cup first to get the majority out, then use the regular wire wheel for a cleaner result. I tried the paint stripper method on one wheel well with a friend helping and it took half a day. I went and bought the above and got the other wheel well done by myself in less than 2 hours Wear masks and safety glasses. Those wires shoot out occasionally and prepare to get super dusty.
-
Same thing happened to me when I picked up two used transmissions. I put them in my trunk thinking they were sealed but after an hour long drive home there was trans fluid everywhere. Smelled like trans fluid for months. They both had all necessary seals.
-
Cutting wheels will probably work on either a dremmel or grinder. You could also drill a hole in the center of the hole and use some sort of fine tooth saw to prevent it from chipping so much. Wear gloves and a mask. That stuff gets itchy and you don't want sharp carbon shards in your lungs
-
Looks great! How much does something like that cost to get done if you don't mind he asking?
-
That build thread is amazing!^^ I spent 3 months abroad, Mostly in Berlin, Germany, and I think I only saw one 280zx
-
I was able to sort out all the lines for the most part. It's not the prettiest thing but it will work. The brake lines were leaking at the brass T but I tightened them a bit more and they seem fine now. I haven't checked since going down the road a couple times. Fluid in the reservoir hasn't gone down from what I can tell but I'll double check this weekend after I get it aligned. Images from the weekend: I'm pleased with the outcome of using the lowering springs and 240z rear insulators. I haven't driven too hard, however, as I would like to retorque everything after the alignment to make sure nothing is going to come loose (as well as make sure the brakes aren't going to fail)
-
Does anyone have any info on this car or its wheels?
bfg replied to sky40z's topic in Brakes, Wheels, Suspension and Chassis
Might be able to get some info from their youtube channel: -
I also have one. I can get pics tonight if you're interested
-
I went ahead and tackled the brake and fuel lines last weekend. What a pain that was (and still is) I managed to bend and flare everything with only one kink that I'm hoping won't effect the fuel delivery. In the process of mounting the lines and making them look good starting from the front, the last couple feet look like absolute crap. I might just cut off the last sections and run fuel hose instead. Then maybe it will align and clamp to the underbody better. The whole weekend was a lot of cursing and frustration and I have to say it took a lot of motivation out of me. On Saturday the house next to the garage I'm working in is getting rented for 7 straight weeks which means no working on the car during that time. I have until 12 noon on Saturday to get her running and stopping or else I just give up for the next 7 weeks. And I don't even know if all my brake line flares are actually going to work or if they're going to leak like crazy. Here are a few Before and Afters, Some are just Afters: My nightmare of an alignment issue:
-
KBS RustSeal and Blacktop is yet another equivalent to POR. Similar amount of prep but I found it to be fairly forgiving. Just finished brushing it onto my suspension parts and front wheel wells. I'm very happy with the outcome but we'll see how it holds up over time. Driving in New England should be a good test for it.
-
I have nice one if the 2+2 one doesn't work out.
-
It's awfully close to a couple fuel lines. I was going to torch it but it was terrifying trying to weave the torch through to that spot. I may try a heat gun as suggested by someone else. I'll definitely check out those stores. Thanks for the info! I have gotten the pre flare brake line before but I feel like the line running from the front of the car to the back is longer than anything they would have in stock. I'll ask around about fuel hard lines as well. Edit: Just Ordered some Copper Nickle brake line and Stainless fuel hard line. I'm going to rent a flaring tool and try to go through all the systems.
-
Got the car Running! I think the Fuel pump just needed a kick start. After trying several times to start and swapping out the fuel pump I eventually hooked up the original pump directly to the battery. The pump started making noises like it was working so I reinstalled it and the car fired right up. Here's a quick clip of it running: https://www.youtube.com/watch?v=ptGBi2MjsMI I I got everything set up except for the brakes and got her to sit on 4 wheels for the first time since last fall. Unfortunately when I went to install the LAST SS brake line I ended up kinking the line between the brass "T" connector and the old rubber line. I Bought a new hard line to replace it and went to remove the kinked line and with my luck it completely stripped. Not even my giant pair of vice grips were able to budge it. To make matters even worse, the bracket that holds the brass T (as well as the hard line that goes to the front end) are bending very easily when trying to unscrew the line. So it's likely I'll have to go in and replace the rest of the brake lines. I'm thinking since I'll be undoing all the brake/fuel line insulators it would be worth it to do the fuel lines as well. I just need to figure out where to get the longer brake line and the fuel lines. Searching online is a slow process and Fuel line is literally the only thing I've never looked into before so I'm pretty much flying blind. I was so close to driving it too But at least she's running. I Shouldn't complain.
-
Earlier this week at work someone showed me this 280zx police car transformer: http://www.amazon.com/Takara-Transformers-Masterpiece-Nissan-Fairlady/dp/B00FFXBJ66/ref=pd_bxgy_t_img_z I don't know why I never knew about them before. (I work at a toy company) Upon further investigation they also have a couple variations including a bob sharp racing livery. There are 3 in total and I may have to acquire them all at some point. The price is a bit steep but after holding them they are noticeably top notch. Here are the other two: http://www.amazon.com/Master-Piece-MP-Streak-Completed/dp/B00BQRKX76/ref=pd_bxgy_t_img_y http://www.amazon.com/Takara-Transformers-Masterpieces-MP-19-Smokescreen/dp/B00DDE09AQ/ref=pd_bxgy_t_img_y Complete with fender mirrors!
-
I'm interested in the raffle as well...
-
The Passenger side front is almost complete. I just need to mount the hub and mount the battery shelf again and I should be able to drop the front on wheels. Both sides of the rear suspension and differential mounting points are all mounted. The only thing that needs to be done is assembly of the brake components. I also hooked up the gas tank but I still need to make straps. I'm still waiting on dimensions but those will hopefully be done soon. I attempted to start the car but the fuel pump doesn't seem to be working. While looking at the clear inline fuel filter before the pump, I can see that when the engine first turns over a very slight amount of fuel begins to flow. But as the engine continues to turn over it comes to a stop. I tried a couple cycles but the inline fuel filter began to leak on me. I tried tightening the hose clamps around them but one snapped. I have about 30 hose clamps in my garage and every one of them was either too big or too small This was at 8:30pm on Sunday so there was no place to go and get a new one. In other news I've aquired quite the collection of slotted mag rims. In total I have 3 sets of 4. Two sets have bad tires: More to come this weekend I hope.
-
Rolling with the punches a 75 280Z v8 Refresh
bfg replied to hwvigo's topic in S30 Series - 240z, 260z, 280z
I never noticed how different your front air dam was compared to what is usually out there. It's pretty cool looking. Wish I could help identify but I've never seen it before. -
Tried starting my 75' 280z for the first time since last fall. Just finished cleaning out the gas tank and reinstalled it last night. Fuel would start to flow very slowly upon first turning the key and soon would stop flowing all together. Even if the issue isn't the pump or relay I'd still like to have a spare. I haven't had much luck with fuel pumps it seems. I'm also in need of the lengths of the two gas tank straps for the same car. Mine where half rotted and riveted together and I got rid of them before thinking to measure them. I have a set from a 77 Z but they are not the right lengths. If you have a set you're willing to sell I might be interested. Thanks!
-
Suspension Bolts - Inventory
bfg replied to Lazeum's topic in Brakes, Wheels, Suspension and Chassis
I had downloaded a copy of one of the Excel files a while back. I wanted to add torque settings and part numbers as I am replacing as much as I can. I used the Car parts manual website for part numbers: http://www.carpartsmanual.com/datsuns30/DatsunZIndex/tabid/1543/Default.aspx And the Courtesy Nissan site for ordering most of the stuff. A few of them are not available unfortunately. http://www.courtesyparts.com/240z-260z-280z-parts-s30-1970-1978-c-7724.html I have the mostly full spreadsheet available to anyone who wants to pm me their email. Unless I figure out how to link it to the forum. I hope it helps! I'll be making use of it this weekend.
