Zetsaz
-
Posts
943 -
Joined
-
Last visited
-
Days Won
34
Content Type
Profiles
Forums
Blogs
Events
Gallery
Downloads
Store
Everything posted by Zetsaz
-

A musician's therapist (The $300 Z)
Zetsaz replied to Zetsaz's topic in S30 Series - 240z, 260z, 280z
True, but at least it makes me feel better while I work on other things haha. I drove a BRZ exactly once and it was ... disappointing for a modern sports car. Being comparable power with more torque and lighter chassis I think I'll be satisfied for now. Did a few more small things this weekend. -Fixed a short in the rear right side-marker -Swapped all the cheap spade connectors on the sidemarkers with weatherpaks -Replaced burned bulbs in the rear housing -Got tachometer working (it was turned off in my tunerstudio settings... 🤦♂️) -Got an improved fuel map and corrected my VE table a bit. -Cleaned/degreased the bell and tail housings on the 5 speed. Still debating replacing the bearings for security or just running as is until something goes wrong. -New wheels and tires should be here tomorrow or Tuesday -
Just read the meter match description. That same function is built into the speedhut fuel gauge. Meter match looks more like it's for adapting a different sender to an oem type gauge.
-
A musician's therapist (The $300 Z)
Zetsaz replied to Zetsaz's topic in S30 Series - 240z, 260z, 280z
Weight is definitely a downside. I don't think I'd go that deep into the interior without going the turbo route first to compensate for extra weight. Speaking of power. I've been fine tuning some things and getting feedback from people familiar with the engine and megasquirt. Just saw someone with a nearly identical setup to mine dyno their car with a comparison on the same dyno to the stock efi. About a 9% increas in whp, and 11% increase in tq. Not. Bad. Was about 158 whp and 178 ft/lb of torque. That's without an upgraded cam and stock compression. That's very similar hp to dyno charts I've seen for stock BRZ's and FRS's, but with noticeably more torque and a few hundred pouns ligher (more considering how empty my interior is and the weight I've shaved from stuff in the engine bay). I think I'll be pretty satisfied with that for now once I dial things in. -
New Techno Toy Tuning Micro Rear Brake kit
Zetsaz replied to Miles's topic in Brakes, Wheels, Suspension and Chassis
Haven't purchased it, but I'm slightly jaded as Derek is but only from reading others' experiences with kits. Literally every time I read about brake upgrades and swaps it comes with a miriad of comments from people trying to balance or something along the lines of "well to balance it, you'll need this booster with unobtainable master, but if you get this other booster from this other vehicle and use this adapter from this company to pair this other master cylinder, you can run it, but mine still seems to bite to much from the rear brake so I bought this other thing, or this other guy said his worked well by purchasing this brand of pads for the front and this other type for the rear..." Not worth the headache. When that time comes I'll probably just use the Z Car Garage kit that's designed to be balanced to the stock components from the start. I love DIY, but there are some areas where I have to concede to the expertise of others. -
Impressed as always! Love that engine in my G37s, can't imagine how fun it'll be in the old Z.
-
A musician's therapist (The $300 Z)
Zetsaz replied to Zetsaz's topic in S30 Series - 240z, 260z, 280z
Ahhhh, I was thinking of something totally different I wasn't familiar with this. Thanks for the link! -
A musician's therapist (The $300 Z)
Zetsaz replied to Zetsaz's topic in S30 Series - 240z, 260z, 280z
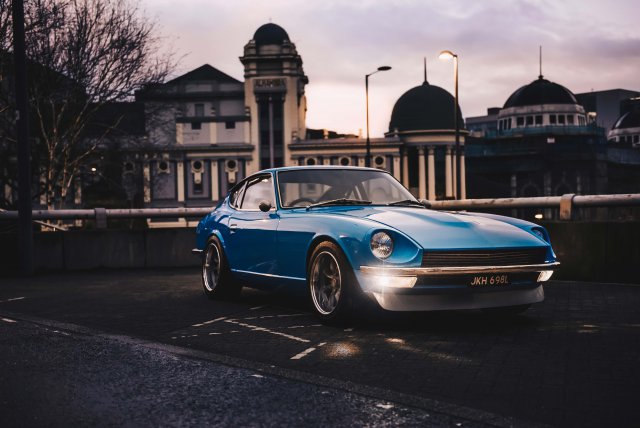
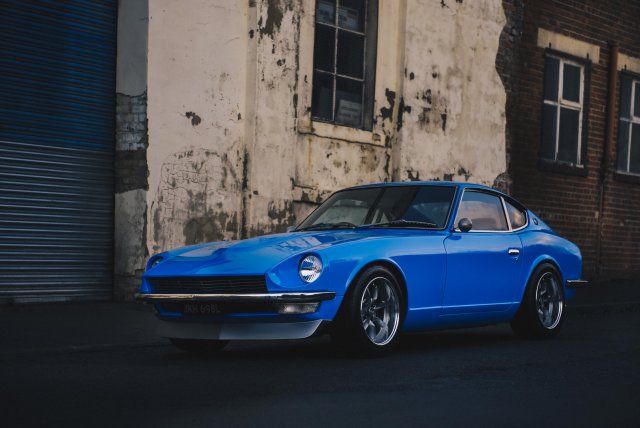
The pictures only show the best stuff haha. The front definitely looks nicer than the rear (patched holes are uneven and still just primered, and there is some masking tape over the pin holes and mounting holes for a spoiler in the hatch) old wheels with skinny worn out tires are probably detracting the most from performance and looks even with the old mismatched paint right now. Got some quotes on paint and it's a bit painful to say the least, but I want it to look great. I want to end with a car I'm happy to show off and can drive any day the weather allows. The MZR Sport is kind of my visual motivation right now. If I could somehow perfectly match that color I would. Not totally sure It would flow, but that blue color paired with their brown/tan interior would be a dream. I'm not sure there's a way to do what you're suggesting. the connector right now is what splits the controls on the steering column from the dash sub-harness. I think I found the culprit, it's a connector with two grounds going in. and on out to the dash harness. Haven't had issues with it yet now that I got them to plug in fully, but hopefully it stays that way. I've avoided installing any interior panels and trim like the column cover so things are easy to service. Still a long way to go before I can just reassemble everything and enjoy driving it.
-
I envy how clean your car is. I love the focus on the small details that make it as drivable and practical as it was when new! That's honestly eventually my goal. I'm a lot farther into the modded world, but still a standard L28, and hopefully once it's painted my only goals will be updating hardware and rubbers back to form and making it a car I'd be happy to use any day of the week.
-
A musician's therapist (The $300 Z)
Zetsaz replied to Zetsaz's topic in S30 Series - 240z, 260z, 280z
The pigtails I made for the early turn signal/halo (don't mind the mismatched plugs... I ran out of 3 pin weather pack connectors and those were the last two I had with 4 pin. Repinning when more connectors are shipped will take maybe 5 minutes) Wiring under dash in progress. Still don't have an ideal location and routing for the O2 sensor. Was thinking of expanding the original speedo cable hole and running it through there since that's the only way to avoid drilling new holes. It's still just running through one of the old AC holes until I pick which AC I'm going with. Honestly, even without HVAC and the center console installed, this is a cleaner and straighter interior than I ever dreamed I'd have. Best phone pic I could get of the lights. Went for a drive and everything is going great but the bullet connector for the wire that powers the lights at the combination switch seems to keep coming loose or is making poor contact. Lights will sometimes not turn on and even touching the bullet connector will suddenly make contact. Might have to get a new connector or make use of the excess single pin weather pack connectors I have. Went for a long-ish drive and the engine is feeling great! Even with the 4 speed it's fun to drive. Highway cruising is a bit annoying but surprisingly still doable even with the 3.9 rear. Week links are starting to show themselves starting with my old roller tires that only mostly hold air. Next big money items will be: -Commit to a wheel/tire package -Order lighter flywheel and new clutch to put in the same time as the close ratio 5 speed I have going in -Pick modern AC and install at least the cabin stuff so I can stop pulling the dash repeatedly. -.... Get a quote on paint???
-
A musician's therapist (The $300 Z)
Zetsaz replied to Zetsaz's topic in S30 Series - 240z, 260z, 280z
TONS of progress on big and small things the last few weeks. Will try to give more of a list form in no particular order than excessive details on each. Pictures to come, I haven't been taking many -Ceramic coat applied and cured -Most of the bits that had stuck to the windshield scraped off -Leash relay board fits almost perfectly where the old ignition box used to be, just needed to notch the ends to get the bolts 1mm inward -Removed and tucked away most excess wiring on the chassis harness -Wiring back in the car, mostly mounted where it will be -Rear wiring tucked into frame around wheel well where it belongs -Headlight issue power issue solved -Dapper lighting LED Sevens installed (went for chrome housing with "OE" glass to make them look close to original when turned off) -Custom pigtails for the headlights and front turn signals made (with LED halo tied to the front signals as daytime running light and redundant turn signal) -Dash, seats, and tail lights back in -Hazard switch cleaned and repaired so it's not finicky -Rear coilovers lowered by 1.5" to sit more level. Double function was getting rid of the slight positive camber in the rear (when I first installed them I measured everything to factory lengths. Kept things even left to right and allowed me make more accurate adjustments without going back and forth) And.... That's it I think. I think. I'll add some pictures to this post when I sort through some stuff on my phone. -
I'm all for propulsion heads. Some people get weirdly elitist about having a big V8 for some reason. I think you can appreciate the sound of old cars and appreciate that objectively speaking electric is faster and more efficient.
-
A musician's therapist (The $300 Z)
Zetsaz replied to Zetsaz's topic in S30 Series - 240z, 260z, 280z
It's only mostly back on the road haha. I tidied up the engine wiring just slightly to get an idea of lengths before taking things apart, but my interior was held together with lik a half dozen bolts haha. I tore out everything yesterday including the steering rack and pedal assembly to finally spray lizard skin. This stuff is messy! I had some tape lift that I didn't notice until I went to check on how the sound deadening was curing this morning and unfortunately got some splatter on the windshield and a couple other spots. I can already notice it's not fully adhered to the harder to reach spots I couldn't scuff up, so hopefully it's not too hard to clean off the glass once it's hardened, even if it'll be a bit tedious. -
A musician's therapist (The $300 Z)
Zetsaz replied to Zetsaz's topic in S30 Series - 240z, 260z, 280z
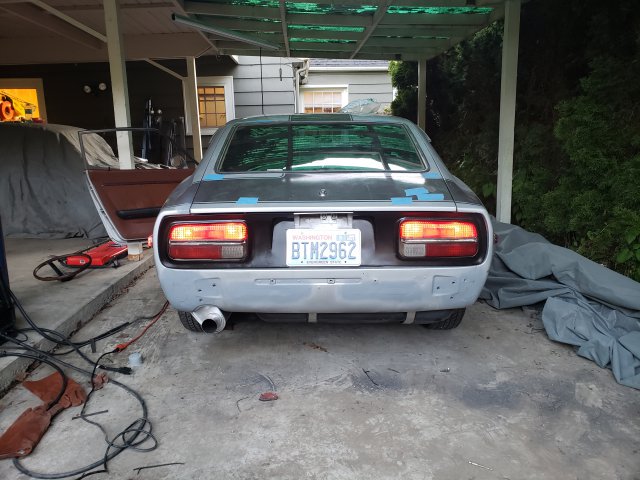
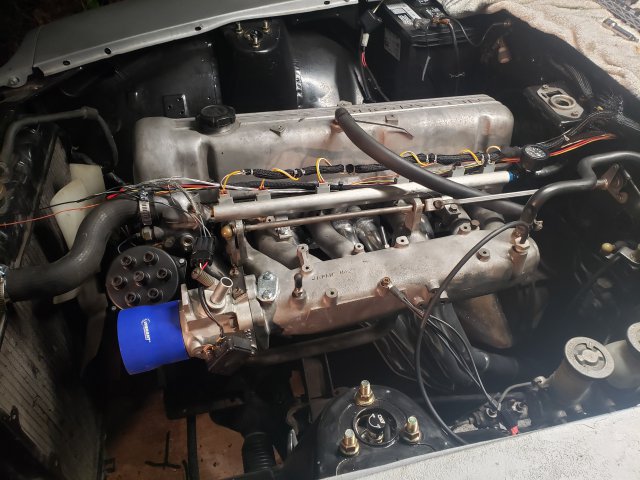
Oh here are a few random pictures since I haven't been posting many. The engine is actually even more tidied up than the pic shows. Bundled the sensor wires a little better. Didn't really have to cut much, just route them to the firewall then alongside the injector harness. My intake piping is slow to ship so I just had a mesh filter tied over the throttle with the intake temp sensor just hanging off the front. Today I welded the rear valence and test fit the 240z lights. Looks MUCH cleaner than with the holes since I don't have the rear bumper. Picture makes it look much neater than it is though. Will need to be properly prepped and evened out before paint.
-
A musician's therapist (The $300 Z)
Zetsaz replied to Zetsaz's topic in S30 Series - 240z, 260z, 280z
Thanks! The debate between the two gets annoying. By any objective measure, the s130 is the better chassis. The early hard tops were even lighter than the last 280z. A 280zx turbo in a junkyard when I was a kid is actually what first led me to discovering Datsun Zs. First car I drove was a 620 when my dad taught me before getting my license. This thing will be fun, but right now the exhaust leak coupled with the serious drone from the empty and un-deadened interior is driving me crazy. Want to do more work but sometimes I'm just tempted to have someone take care of the bodywork and paint already so I can move on with more mechanical things and just enjoy driving it. -
A musician's therapist (The $300 Z)
Zetsaz replied to Zetsaz's topic in S30 Series - 240z, 260z, 280z
Car is now registered! Took it on a slightly longer drive yesterday and did some more tuning and tweaking. Feels good at cruise, but on acceleration I'm hearing a ticking or tapping sound. I know the valve train is a bit noisy on these, and it doesn't sound like knocking. Seems like it might be an exhaust leak at the manifold gasket or the Y pipe into the 02 sensor not seating properly. Today's job is swapping over the 240z tail lights, welding the rear valence. Already pulled the rest of the unnecessary interior, will tape things up and scuff and clean the interior for lizard skin tomorrow! -
A musician's therapist (The $300 Z)
Zetsaz replied to Zetsaz's topic in S30 Series - 240z, 260z, 280z
Car officially drove around the block today! Interior is still just a mess of wires, but everything is now functional. Finally swapped over the clutch slave cylinder I had on the old shell and bled the system again as well as bleeding the brakes (again). My tune is VERY rough and it seems like I have a charging issue. Likely a blown alternator/ignition fusible link, or the light in my voltmeter. Swapping over to a maxi fuse block this week and maybe bypassing the stock voltage regulator to one with a digital readout that fits almost perfectly in the old fuel warning light. It's incredibly nice to have new hardware everywhere underneath the car. Not dealing with corroded bolts when working on things and rust falling on your face. It was so easy to drop the tank down when I decided to redo the fuel pump and ditch the o-ring plate and just use the foam gasket for the extra 1/4" of clearance. Now in tank pump sits 1/4" above the hard rubber isolator that's still left on the top side of the tank and it took maybe 10 minutes of my time. Sadly, my d sub connector tool broke first time trying it. Still have a bundle of spare wires hanging out and the mount I had made for the ecu won't work since the DB37 connectors in the back are barely too wide to slot farther back. -
Some confusion here... -Grey 5v+ Vref isn't what powers the board. It's a sensor output -You should be getting power to the board from pin 35. I don't know if it's the same for ms3pro but every megasquirt diagram/pinout I've seen shows it as a red wire. *TunerStudio will ONLY recognize megasquirt if it's powered up. Your computer might make a sound showing usb connection and you might be able to get a comm connection showing up in your drivers, but TunerStudio won't pick up anything if there's no power being supplied to megasquirt. If you have power and it's still happening there are a couple other possibilities: -Comm drivers not installed -Faulty board (very unlikely but not impossible I guess) -Faulty or incompatible usb cable. Some people with other versions have poor luck with the usb needed to connect and end up sticking to the DB9 cable with an adapter.
-
A musician's therapist (The $300 Z)
Zetsaz replied to Zetsaz's topic in S30 Series - 240z, 260z, 280z
Your goals definitely create space constraints. If I swapped, I'd probably choose a VVTi 1jz or maybe even a UZ engine. I've always preferred high revving or smooth torque and power delivery over raw torque and numbers. For now, I already have a turbo manifold and oil pan which are the parts I can't just get in the aftermarket short of making custom. My big concern trying to go turbo right away was small costs were adding up and I just want to be able to drive and enjoy it for a long while while I do things properly. I didn't want to risk breaking half shafts or transmissions and having to wait on fixing them or upgrading them at an inconvenient time due to budgeting and have the car just sit another while. Even if I went for turbo and babied it, I'd still have spent my budget on power instead of the sorts of things that make me enjoy driving it every day. So instead I'm going to build it from the rear end forward for reliability once it's a bit more presentable then upgrade the power later. When I sort of have an interior back together and it's getting me places I'll start with CV joints. The 3.9 R200 clsd will be far more than enough for my goals. -
Very jealous of the carbon fiber! Have always wanted to focus on weight and drivability over power. those nice tight bends against the engine bay on the intercooler piping look really satisfying.
-
A musician's therapist (The $300 Z)
Zetsaz replied to Zetsaz's topic in S30 Series - 240z, 260z, 280z
Honestly I overthought the whole process for so long while I accumulated all the parts I needed, and now that I've done it once I could probably do another one within a week as long as I had all the parts ready. No guarantees on how well it'll run though haha. I keep thinking "what if I'm not satisfied with the power" since I didn't go with a turbo, but honestly, considering how rarely I wind up even the g37 I'll be fine for a long while while I make it the sort of car I want to drive regularly. Plus the costs for small things to get it running in a state that I would enjoy driving add up fast so i'm not worried about it. -
A musician's therapist (The $300 Z)
Zetsaz replied to Zetsaz's topic in S30 Series - 240z, 260z, 280z
I don't run any pages for the Z, I just meant people that follow my personal account on instagram or facebook. Feel free to find me though - Omar Ordonez. Timing is tricky one since it's tough to properly dial it in for the best power without a dyno or some variety of knock sensor. I went through some shared maps from different people, but this is a less common mod for an NA car, so there were only a handful of close setups. Went with those for now and turned timing down slightly everywhere to avoid potential damage. TunerStudio's autotune will adjust VE tables, but I think that's not very helpful without the car moving. Once the rain stops again I can probably get the tank fitted and see what I can do. For now it's some fine adjustment settings like learning more about target AFRs and making sure the VE map is referencing them. Whole lot of new stuff to learn! -
A musician's therapist (The $300 Z)
Zetsaz replied to Zetsaz's topic in S30 Series - 240z, 260z, 280z
Forgot to update here, but we got a first start! #1 tooth angle was way off at the time I recorded for those who are friends on social media and saw my video. Got a timing light and was able to get the fixed timing within a few degrees so it wouldn't bog down and nearly shut off if I touched the gas. I have all my sensors calibrated, but the general timing map that tunerstudio loads in seems reeeaaally high. Low to high 30s almost everywhere. I'll try to run autotune today to at least get a closer idle and see if that helps, but I think I'm also pulling in more air than expected from the valve cover breather to intake. Seems like I'm getting some oil drawn in from there as well. Next steps before it drives will be -Trimming fuel filler neck opening (Is a couple mm from fitting through right now now matter how hard I try. -Tool finally arrived so I can depin the wires I'm not using and clean up the harness -Daisy chain the sensor grounds better than the previous owner had them, which was probably going to work for the way he planned it, but really far off for my plans. -Pull interior once I finalize wideband location to spray in lizard skin. When It's all moving I'll throw some plain carpet in to avoid flattening spots on the lizard skin, but the interior will stay mostly empty while I strip out excess wiring from the stock body harness -
Wow, that is looking GREAT so far. I have a 75. Engine questions you probably have figured out, but I might be able to help on chassis related questions. They're all pretty similar though, this is likely the same as your 75 260 in australia other than the bumpers. I'm not sure how many of the chassis changes we dfferent between countries. We only got the 280 to compensate for emissions regulations that bogged down the power. I started with a 76, have a 75 now, and have completely cut apart a late 70/early 71 model, but others here have even more experience with the changes.
-
A musician's therapist (The $300 Z)
Zetsaz replied to Zetsaz's topic in S30 Series - 240z, 260z, 280z
Thanks! It's satisfying. I've been in front of screens way more than I'd like for work, but I've committed so spending any time I'd normally have an evening commitment or performance to working on the car instead so there are a lot of hours available to me that normally would have been spent with students outside of the regular school day. I figured out the problem (I think). The last owner mostly had things set up on the board, but I'm missing the resistor on R57 of the 3.57 pcb. I don't have surface mount resistors on hand and would have to wait for delivery on them since every electronics supply store around me is closed. I have some pth resistors I can put on the harness by the distributor since i have more room for error there and still have lots of wiring slack, but the way this is phrased on the diyautotune page for the trigger disk I can't tell if the option in parentheses only applies to the 3.0 board or both. Not sure why it wouldn't work for the 3.57 board I have as well, but I'm also a novice with electronics. I've built my own computers, but that's basically just big boy legos by comparison. -
A musician's therapist (The $300 Z)
Zetsaz replied to Zetsaz's topic in S30 Series - 240z, 260z, 280z
I am so. freaking. close.... I now have rpm signal, accurate air/coolant readings, fuel pressure, and confirmed that the injectors are firing (somewhat by accident, the o ring wasn't totally sealed on one of them and I saw vaporized fuel coming out around the o ring every time it fired). I think it's a timing issue right now. My timing might be off, or the trigger disk isn't set up right. Will confirm tomorrow. Should have figured my roommate had a d sub pin tool. Mine is on the way but I was able at least get the fuel pump to work. Still want to remove the unused wires to tidy things up even while I'm working. Only downside right now is my starter solenoid is a goner. Was cranking okay until last night when suddenly all I got was a click when I turned the key. Bridged the posts with a screwdriver and It cranked, but would occasionally slip, so I think the gears aren't always engaging properly either. The thing was super crusty and old and probably on it's way out anyway, so it's a good thing I'm replacing it now before the car is moving, but still slows things down more. Might just get the engine fired up for the first time in almost 2 years before next week!