Zetsaz
-
Posts
943 -
Joined
-
Last visited
-
Days Won
34
Content Type
Profiles
Forums
Blogs
Events
Gallery
Downloads
Store
Everything posted by Zetsaz
-

A musician's therapist (The $300 Z)
Zetsaz replied to Zetsaz's topic in S30 Series - 240z, 260z, 280z
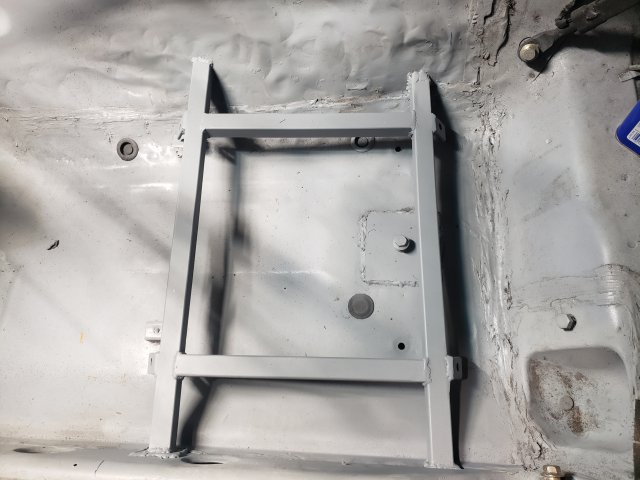
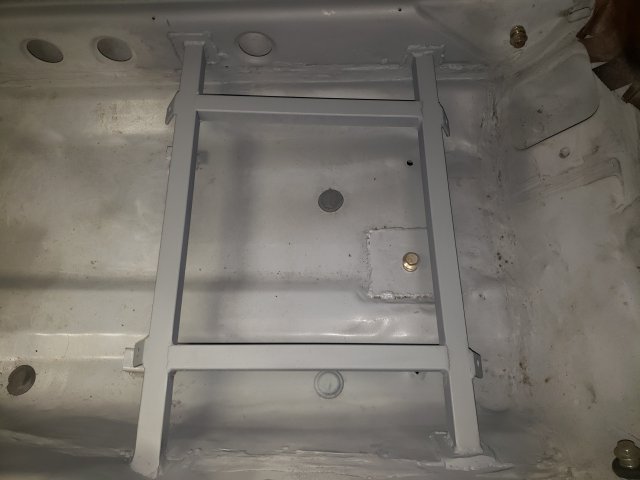
Thanks! Added pics. They're at slightly below stock height, but a similar angle front to rear. Driver side trans tunnel looks more banged up than in person due to lighting I think. It was bashed in slightly for whatever racing seat the last owner had intended to use. Maybe when I'm swapping to 5 speed I'll even it out slightly, but I'm not terribly concerned since it'll be covered eventually unless space underneath becomes an issue down the road. -
A musician's therapist (The $300 Z)
Zetsaz replied to Zetsaz's topic in S30 Series - 240z, 260z, 280z
Spent a bit of time this weekend cleaning up some poor work I'd done on the seat rails. I was working in poor light and pretty tired when I first "finished" them and didn't clean them properly and couldn't see some pieces of the welds. Wire wheeled a lot of spots where some surface rust had devolped in the shape of my finger prints and over welds. I spent a long time cleaning them, then I sprayed them with etching primer to seal. The welds are still not great considering I rarely weld anything, but a bit of grinding to clean up the worst offenders for bad looking welds and some test hits with a mallet to make sure they're holding strong gives me comfort they'll at least be functional for now and if they really bother me down the road it's always possible to redo. Whatever seam sealer was used over the redone floors was either not very good, or the seems weren't cleaned as well as they should have been before it was applied. I wire wheeled some seam sealer off and sprayed those areas with heavy surface rust as well. Still not sure how I want to seal them. Will post some pics soon. Currently debating if I want to bother with turbo stuff, or just put a 2.5" exhaust to the stock exhaust manifold and focus on everything but power. For the time being the next step will be installing the fuel hardlines and getting the tank in.
-
@seattlejester, update your thread! The car sold, we were just talking about it in December.
-
A musician's therapist (The $300 Z)
Zetsaz replied to Zetsaz's topic in S30 Series - 240z, 260z, 280z
I'll be running the fitech 340lph that came with the kit. I think the Bosch 044 is 320lph? 300? Details get foggy on parts that aren't specific to the S30 since, as a hobbyist, this is the only car I've worked on to this extent. Yes, stock fuel sending unit. I did a bit of measuring and eyeballing to make sure that where I placed the pump wouldn't interfere with the OEM floater. I bought a new one that isn't 280z specific since the old one was very worn out and rusty, so it doesn't actually have the third wire for the low fuel light that the 280z had. Doesn't much matter since I still have Speedhut fuel gauge from when I was running the F body tank in the other shell. -
What was the solution you found for the rubbing issue? Even if you figured it out, it's nice to have certain problems that can come up for others archived in case someone else has the same issue.
-
A musician's therapist (The $300 Z)
Zetsaz replied to Zetsaz's topic in S30 Series - 240z, 260z, 280z
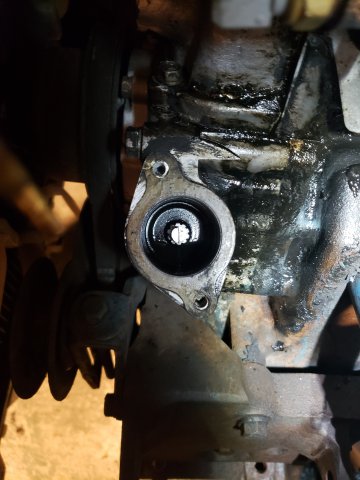
Had a small burst of motivation today since some plans got cancelled and I took the time to finally swap the oil pump and spindle to the ones I need to run the turbo distributor for MS3X. Got the engine set at TDC on the compression stroke, but I think the spindle might be one gear/spline offset clockwise. Will retry tomorrow in better light by using vise grips to hold it in place since I did most of my work in the dark today. I have a nice carport, but no garage and poor lighting along with early sunsets in the Pacific Northwest make for difficult time working the way I'd like. I have a decent LED work light, but I think my next paycheck I'll be buying the strongest work lights I can get on a budget.
-
A musician's therapist (The $300 Z)
Zetsaz replied to Zetsaz's topic in S30 Series - 240z, 260z, 280z
It's not impossible, but currently Utah isn't a great place to teach. Varies greatly district to district though. More likely I'd switch to a middle school job closer to Seattle where I'd have more evenings off. I did my student teaching with middle school and loved it. The combination of band camp, football, basketball, extra rehearsals, split concerts due to how many groups we have that already double my concert load compared to other music teachers, and spring trips/tours all start to wear you down. Middle school job and getting my master's degree would be a lot of personal time gained and a huge bump in pay. -
A musician's therapist (The $300 Z)
Zetsaz replied to Zetsaz's topic in S30 Series - 240z, 260z, 280z
Also, currently reflecting that I have more than $300 dollars into just the fuel tank right now haha. I need to drop that part of the thread title. -
A musician's therapist (The $300 Z)
Zetsaz replied to Zetsaz's topic in S30 Series - 240z, 260z, 280z
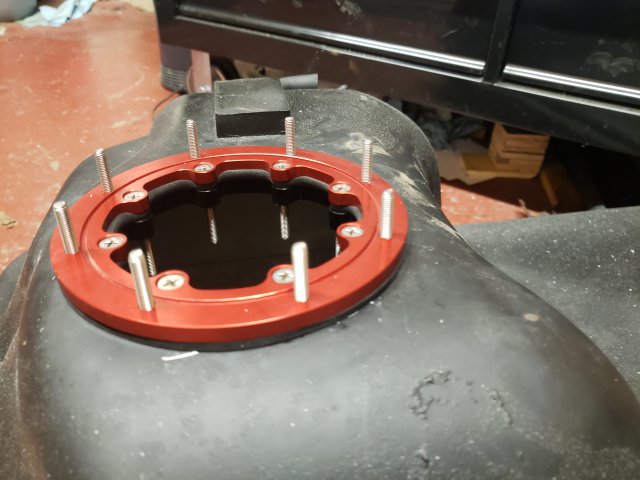
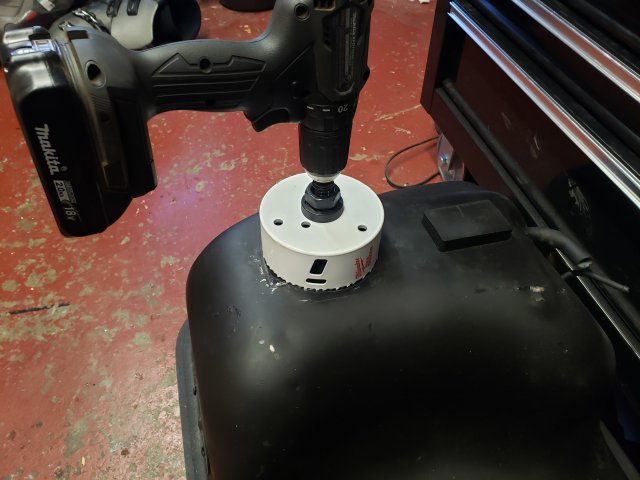
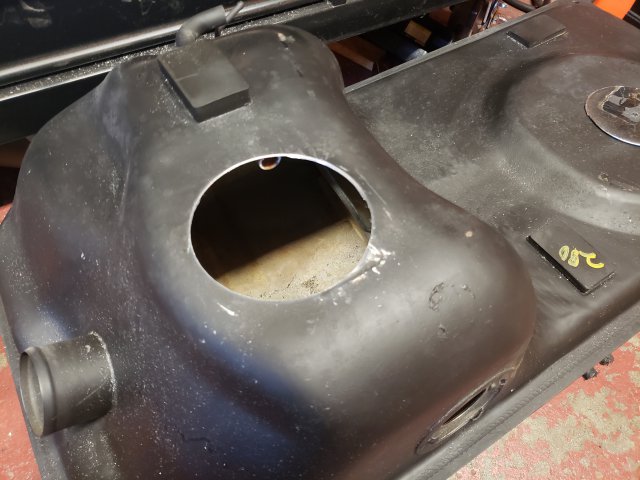
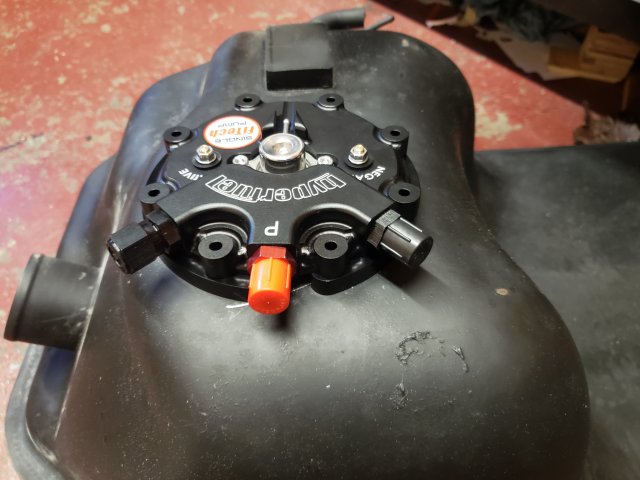
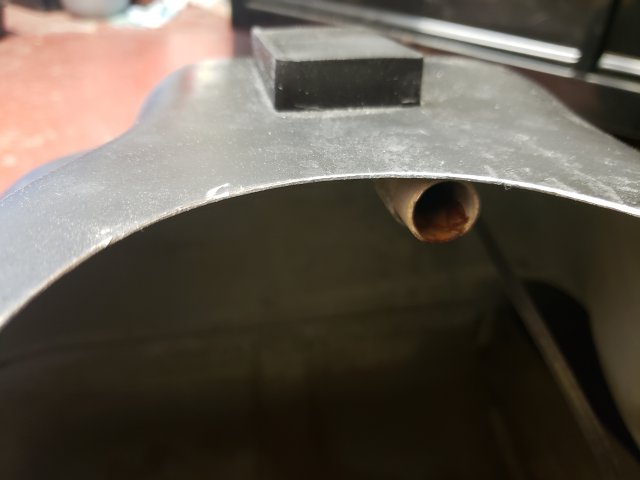
Have been seriously slacking. This isn't a "woe is me" sort of post but the community here has been seriously helpful so I figured I'd share an update. TL:DR - I've had some personal struggles that have held me back from getting anything done. skip past the following block if you just want to read strictly car stuff. ---------------------------- I started going to therapy (the real one!) back in September. I was having serious issues with motivation, sleep patterns, feeding myself properly, etc... Was diagnosed with adjustment disorder related to some events in my personal life/relationships, and borderline clinical depression. Therapist is fairly confident neither will last forever, but they've been seriously holding me back in terms of doing anything other than things I'm scheduled to do for work and for my students. Fortunately with the help of therapy and an effort to socialize to avoid feeling isolated since I'm far from any family, and my town doesn't exactly have a lot of young people I can make close friends with, I've been able to slowly get better. Some days are harder than others but in my personal journal I've made it a goal to get at least small projects done weekly, even if it means something as little as turning a screw. ----------------------------- Latest baby project is moving forward on fuel system. A while back I bought an in tank pump. I don't have the heart to cut into the good metal on my "new" shell so I've been trying to keep as much as possible stock and practical for a daily long term. I went with a Hyfuel instead of the more popular Aeromotive Phantom due to cost (the Phantom is $150-$200 more at a minimum). Quality on the Hyfuel seems great, whether or not I regret going with it in the future remains to be seen, but for now I'm happy. Decided not to cut and weld the tank, purely due to practicality and cost savings. For now I just drilled a hole in the top. The guys from Mighty Car Mods used a phantom but placed it on the hump on the low side. I figure since my location original had a pad on it, it'll prevent me from having to drop the tank as far. I'll have to measure this for anyone interested. Note that one of the vent tubes is pretty close to where I cut. I actually had to grind the end to allow the inner pump plate to mate flush to the surface. Luckily the opening you have to cut is 4.5". Guess what else is 4.5"? Standard size flap wheels and cut off disks. The pump is fairly low profile (the wide angle phone lense makes it look a lot taller than it is in the pic) so at worst I'll be lowering the tank about 1/2". Still debating using the red ring which will allow me to use an O-ring so I don't have to replace the "gasket" every time I have to pull the pump which might be frequent when I'm first putting things together, but adds 1/4" to the height. Bellow is the red ring and my test fit with just the pump. That's it for now! Next step will be running fuel lines to the engine bay, which fortunately I now have a better idea of how I want to do. Might not get to that for a while, since I'm also debating pulling the engine to make the things I need to do on it a bit easier. Baby steps, folks. Baby steps. Current motivation levels in general will probably make this a much longer term project than I had ever wanted, but between focusing on using my money to be with people I care about, and being a music teacher that does this purely as a hobby on a budget, I have to be okay with making small steps at the quality that I want.
-
R200 is an R200. Some years/options had different gearing when you get into the ZX especially, but if your car is manual you already have a 3.54 ratio R200. If you're looking at making it a limited slip that's a different question, but as far holding the power in something that will just be on the street, you're already there. R200 holds plenty of power. The T3 conversion is mostly for folks with a 240z which all came with an R180, or those looking to use a short nose R200/R230 and make it bolt in from Silvas/240sx or later 300zx cars. R230 is probably overkill. For reference, 230mm is just over 9" which is even more than some guys with dedicated drag setups run. Unless you're planning on going turbo, your best bet is to just find an R200 LSD to bolt in in place of your current one, or doing an OBX or Quaife LSD. Both you can find plenty of info on by searching the site. Honestly sometimes more than you'd care to know. See chart: http://www.zhome.com/ZCMnL/tech/GearRatios.html
-
Your car should already have an R200. What do you mean by conversion for the diff swap?
-
Skillard has 15% off. I think you have to use a checkout code
-
Did they sell off their molds to you after the fire? Are you now manufacturing their parts or just running the business side to allow them to focus just on manufacturing in a timely manner? Not sure you'll have a very enthusiastic response related to Retro-Spec. Lots of people have been disappointed for a long time about overly long lead times and very poor communication.
-
I'm with cgsheen on this. The AFM works reliably when properly set up, but will always be antiquated and hold you back. The best solution is to go to a standalone ecu so you don't have to deal with it
-
Spend minimal effort thinking of any of this for now, and focus on finding a clean shell with minimal rust first. Take it from someone who's had to go through it a bit and had to do a lot of work twice... just pay more up front for a cleaner starting example. Fortunately you have more of those in California. Once you have a clean car I would focus on brakes and suspension before swaps. Once that's done you'll quickly get an idea of how much things are really going to cost you down the road. Smog laws will affect your options in CA unless you plan on buying a California EO approved Chevy crate engine if you end up with a later car. LS with a 6 speed and low gearing, or an SR20 will get you the best fuel economy compared to other options if you actually care about that sort of thing.
-
Where did you take it to have that work done? What was the estimate? Mine is in decent shape but has some gunks. I'll have to live with some of the dents since I don't want to crack it open.
-
Later cars had larger lines. Also, that tank is so damn clean. Hoping mine turns out half as good.
-
Separate from any sort of brand loyalty and just plain really loving the combination in my G37, this is the biggest reason I would consider the VQ over an LS in terms of costs. I'm not drag racing and don't want a cheaper auto just to have the LS power.
-
-
The big cost differences are going to be transmissions. Everyone seems to want $1500 for even used T56's with unknown history. It's absurd quite frankly. I'm a huge fan of the throttle response on my G37s. That engine and 6 speed in an S30 would be a fun combo. VQ35 is cheaper, but I like the VVEL and dual intake. You can make about 350whp NA on the VQ37 with an intake/headers/exhaust/tune, but I don't think many people have actually done that. LS will get you more torque in low RPM as well as better cruising MPG. Either will be a riot, but with the prices everyone seems to want for a proper aluminum block LS and the inflated prices for GM 6 speeds the VQs might become more appealing swaps. All that being said, I still think an aluminum LS with a 6 speed would be better and more easily upgraded, but everyone boasting about cheap LS swaps seems to be running iron block truck engines for boost with an auto and they lean towards drag racing setups for raw speed.
-
https://autoweek.com/article/empire-hill-climb/datsun-280zmercedes-v12-empire-hill-climb-engine-swap-update-tick-tick?fbclid=IwAR0GrrK-sfLo7qu3FImL8ibjSX6_KM4EJwWikC5LxF8HbgybPvIdhc98QEg
-
Every time I see your car and those ITBs I want to sell all my car stuff and just start with a super clean earlier model and go ITBs. Speed be damned. It's looking real good!
-
I still have full vinyl and most of the interior pieces from the series 1 I scrapped. Really only good for patterns for people looking for a restoration sort of job, but most of it is pretty okay. Was gonna sell for like $50 plus shipping. You can have it for the price of some tasty tacos next time you're around and we hang out. Also, for this interested in the car. I've driven it and can confirm that it's a pretty excellent ride. More well sorted in terms of function that most of the Datsun I come across. Period.
-
Had one similar that I stripped for parts and then scrapped. As much as some might complain, I don't see anyone stepping up to actually save examples in such dire condition. Better to sacrifice usable parts so as many others as possible can keep running.
-
@jpndave, see Gollum's comment