rayaapp2
-
Posts
994 -
Joined
-
Last visited
-
Days Won
5
Content Type
Profiles
Forums
Blogs
Events
Gallery
Downloads
Store
Everything posted by rayaapp2
-
And then stuff started going off to the body shop! over a year later... I picked it back up! And I slowly put it back together! I sold the 96 Burb and got a 01 Yukon XL... mistakes... About this time I was moving up to Sacramento... and I finally realized I had all new suspension and could start going through the engine! OMG, the OVERSPRAY! At its new home at Fitted Garage in Sacramento! Cleaning the Overspray One of the significant changes... Yellow Octopus Pioneered this for me. 96 Mustang GT Hydroboost First Wash
-
The Next phase was obvious... Deal with the Body. The paint was rapidly peeling and rust bubbles forming! So the engine came out! I purchased a rear sill plate from Motorsports Auto! I knew I should have removed those front fenders.... what a mistake! Always clean these out!
-
Project: Chuck Norris 1971 240Z Scarab Kit What a MESS! The car consists of some Weld Racing Drag Light wheels, Konig Rewinds, R200 rear end with cardan joint axles, a TH350 Automatic transmission with a shift kit and a stall converter, a 010 4 bolt main 350 sbc with some of the Scarab parts like the Hooker headers, a roll cage with pigeon shit welds, 1 plastic bucket seat, gutted gash with minimal gauges, no sway bars, mismatched springs and shocks, a driveshaft loop, stock brakes, a Northern Radiator with an electric fan, and some old safety harness belts. First get it to run! The Accel Distributor hit the trash can first off. I ordered up a cheap Chinese HEI knockoff! Much cleaning! The Alt Belt was having a hard time staying on. But at this point I knew the engine was still good and in fairly good shape. Turned out I had a raelly healthy 5.7 with a Holley 480CFM 4 barrel with vacuum secondaries! It was a fresh carb too! The original exhaust though was a simple Collector DUMP! So off I went to get exhaust done. It wasnt ear deafening now! Change the oil time... Shit that filters a bitch to get to... remove #1 header pipe which slip fits as 2 pieces and the original header has a slip fit collector as well!. I purchased a cheap oil filter re-locator kit. What a mistake. That thing was a leaky SOB! I ended up going to CAT and having O-ring faced Parker lines made up, and chasing all the cast aluminum housings before it would seal... It ended up being close to $300 in total for oil line crap! And then it was time to make it streetable again, as this was setup as a cheap 1/4 mile car, probably because the last time it was registered it had to be smogged and well... there was no BAR label so it went off highway use only. Heres the old converter! Here comes a 4L60e! I purchased the Holley carb TPS kit, a TBI ECU wired up as a TCU only, and all the associated sensors including a DRAC module. I also painted components under the car as well as the cleaned and painted the underside of the car! Enjoy the wood props No stinkin telescoping transmission jack!... and engine held up with 2x6 boards. I man handled the TH350 out... um... well that 4L60e was a bit to much for me to man handle in! So I opted to use ratchet straps! While it was down, I also pulled that 3/8" aluminum hardline dragging on the bottom of the car and installed a GM hardline with GM filter from a 94 Burban! Oh Yeah, I did! Once in I had to make a new mount! Turns out old Bronco Spare tire holder parts make good scrap for mounts Note that I added a Full Boar Single Chamber muffler in the center as well as a flex coupler! I also installed GM horns, and a brand new XENON air dam. The Exhaust required modifications after this though With the 4L60E I also changed out the rear drums for disc brakes And some Toyota 4 piston calipers Wiring up a 4L60e Also the engine bay was sprayed with flat black! Very busy in there now. And then it was time to install Autometer Sports Comp Gauges. Not all of these were electric, and it took me some time to switch them all over to electric. The Hood had to go! I found a nice cowl hood! Then I was off to the HybridZ BBQ put on by Gollum at San Pablo Dam Recreation Area and found another Scarab! You know, one with a number plate and the "special package parts" No sooner than I have the whole 4L60e in and running well than a T56 plops in my lap for $125! CLEAN IT! I mean do I really have a choice? I pose it that I do not! Parts gathering phase initiated! Tilton Clutch Master, Tilton Starter, Centerforce Flywheel, MacLoed Clutch disc, GM pressure plate, 3AN SS braided hydraulic line with all the related fittings, and a stock LT1 Slave. Out with the old! Using wood again... super janky I know Man that is close! More Bronco Spare tire carrier scrap put to use! Fords are good for something... hehehehe It was time for seats! BMW Recaro with Thigh Bolsters. I love these seats! Back to the Exhaust Shop Ready for Marina AutoX! One of the last few UFO AutoX meetups. It was my first ever AutoX driving. It was a BLAST! I spun out on the 3rd run after greasing the tires up... man... the car was called "The White Pig" by TonyD! Chuck Norris AutoX Run 1 Chuck Norris AutoX Run 2 Chuck Norris AutoX Run 3 Chuck Norris AutoX Run 3
-
I am considering using these mounts Response Type rt.trackpro
-
DatsunMotorSports Project Persephone This is Nathan's (AKA Gollum) old 280ZX. I purchased the car from him back around Nov of 2014 and have been caring for it since. The timeline here will be a bit fractured but hopefully not disorientating. I came with a few buddies, and we shoved an L28e in it, and drove it back the same day! Ive made progress, and stepped backwards more than a few times, and I dont expect that, I will find myself on the same path I am on now in the future with this car. Though the point of this car is that I have a backup car of sorts. But being one of my cars, I tend to go overboard. The car is still in the smog system here in Ca so I am also limited by that factor. I got as far as to get the L28e in and the car smogged, and then the head gasket on the L28e blew out. The engine had been sitting for many years prior to me using it so it was not unexpected. So I installed an L28et. Smog Regulations allow me to install an 81 turbo as a replacement in an 81 car that had that option! I also installed a Chinese Aluminum radiator and dented my hood! I converted the car to a Z31 ECU at some point in time, I dont recall exactly when, but it was maybe 6 months after the L28et went in. I was having nothing but issues with the first turbo engine, and I was beginning to suspect a bad hole. I lost power and #5 went dead prior to the big turbo swap. After moving to Sacramento I just assumed the engine had had enough abuse so I installed a second engine I had around and it ended up being a mistake! I had installed a set of Doctor Injector Flow tested and cleaned injectors Thanks to Marc Pickering for this Wonderful Writeup for the Z31 to a L28et 280ZXT TO Z31T ECU SWAP GUIDE.pdf Turns out #5 injector took a dump, so it was off to Doctor Injector under warranty. But it was time to escalate again! NISTUNE! I opted for a Nistune with an 89 Z31 ECCS ECU and the Feature Pack to include E85 Flex fuel as here in Sacramento Ethanol stations are everywhere! Yes, I installed a front mount intercooler! Many other small changes have been made. You will note the TechnoToyTuning camber plates, you will find T3 coil overs and adjustable tension rods under there as well. The lack of a power steering pump should also be apparent. A 78/79 S130 Manual Rack has been installed. It was interesting to note that a S30 RHD rack is the same part number! However S130 rack bushings are extremely difficult to find! A 1" Nissan BM50 MC has been installed to replace the stock 15/16" MC unit. The Ignition Coil and Ignitor will also stick out, but this last picture still shows the NGK plug wires which ended up being a huge source of ignition headaches! The coil is a GM HEI from a 96-99 Chevy Votech Truck engine, and the ignitor is a Nissan PRW-2 ignitor. "For the 280ZX Turbo dead ignitor: Here's a better ignitor upgrade than the now common Chevy HEI swap. The non-Z31 VG30 and VG33 (Maxima / Pathfinder / Quest / QX4) engines use a PRW-2 ignitor that wires up almost the exact same way as the 280ZX Turbo and Z31. These can be easily found in the junk yard (in front of the distributor base) or parts store. Step 1: Run the 280ZXT BLACK WHITE STRIPE wire direct to the coil positive. Step 2: Run the 280ZXT YELLOW wire (ECU signal PIN5) to the right wire on the PRW-2 (GREEN RED STRIPE). Step 3: Run the PRW-2 GREEN left wire to coil negative. Step 4: Run the PRW-2 BLACK center wire to body ground. Alternatively you can use the Z31 ignitor, the only wiring difference is the ground and ecu input signal wires are swapped. So on the Z31 ignitor the BLACK ground wire is on the left and the GREEN BLACK STRIPE input signal ECU PIN5 is in the center. XenonZcar PRW-2 " Credit to Marc Pickering I Had Troy Ermish machine the stock 5spd Bell Housing for a KA transmission, modified the stock mounting member, and shortened the driveshaft. I installed the tripod axles, and eventually pulled the whole sub frame out for a later 83 turbo with the late model brakes and control arm geometry prior to Z31 initial EFI swap. Upper is 82-83 Lower is 6/78-81 And Eventually Z31 CLSD went in just after NISTUNE was installed. Keeping an old L28et working well on a stock stuff system was becoming a royal pain the butt. With the Z31 ECU swap in place and NISTUNE on the way it was time to address the TURBO! And honestly the Garret T3 I was using was from a 85 Z31 with water cooling and it was starting to show its age. But when you have a HKS GT3037 (a big compressor version of the Garrett GT3076R) just laying around because it was too small for another project, why not use it? I got online and went to ATP and ordered up a .48 Turbine housing with a swing gate housing and a few other mockup parts. I plan on Changing the Turbine housing out once more to a .83 as of current. A stock T4 housing next to the big one. Mocking up the turbine housing, I was forced to use a 1" SS spacer. The manifold was ported, and the studs removed. Notice the stock down pipe is still on there. Next was the Fuel System Palnet was kind enough to put a rail together to my specifications. Dual Feed in and center out on Denso 440cc Injector 11mm O-ring. This was mocked up on a spare L28et. I have 5 of those for this one car. Accell 9.5mm custom wires with MSD ends. The stock FPR wasnt doing it. Nismo FPR! It was here that I finally realized that the stock fuel pump was hitting a wall at 4500rpms at 10psi of boost. So while in Perris Ca while down for the 2016 MSA Show I located a Bosch 300LPH@5Bar fuel pump and hunted down all the needed hardware with some help from TonyD, JeffP, Frank280zx, and Silvano! A couple pictures at Tony D's Driveway On the way home from Tony's place though trouble struck. The car was having heat issues on and off even on the E85 the whole time I was down in socal. It pegged out on the grapevine. 230F. I was able to slow down and coast it cool, but by the time I hit the bottom of the grape vine it was 110F outside and the car was refusing to cool below 210F. I cruised the whole way home(hours more), making only one stop in Kettleman city for food and to attempt to cool down again. It did cool down, but it was for a but a few miles and the car was back at 210F. The plan was to use this engine as a mule anyway so I was not concerned to much. It would be a few more weeks before I was able to figure out that the radiator had plugged up with rust from the block! I ended up flushing everything and installing a new radiator. The cars normal temp with 100%Dexcool is about 165F under load and it was finally back there. Sadly the engine survived but 1 more week and one trip to work 2 miles out and the head gasket blew and shoved all 2.5gal of coolant through 3 and 4... that was a smelly cloud! The coolant system was under 25psi of pressure! I cleared the cylinders out on the side of the road, and limped the car back to the shop! Turns out all that extra heat and a sub par block decking took its toll. The bearings, pistons, and head all checked out fine amazingly. Well except this quench pad That damn coolant port in the center got me good. So Im prepping the next engine It was time to modify the coolant passages in the head though. Yep drilled down through the flash casting! I warped the old exhaust manifold so I started working a new one. The car as it sits for now. The Engine components are all at my machine shop currently for a fresh build. I have many more plans, I just bought a S13 rear sub frame, S15 front spindles and a some cheap mockup coil overs. Stay Tuned for some epic disaster or lots of fun!
-
Thats really sad news. RIP John
-
L28et Z31 EFI suddenly running poorly (LONG)
rayaapp2 replied to rayaapp2's topic in Trouble Shooting / General Engine
After getting back to the car today, I think Ive found the big problem. I checked the fuel in the tank, checked plugs, compression checked, back flushed the injectors once again to attempt to get any residual that might have been left from the bad filter... Then I checked timing again. And then I saw it. Something simple and stupid. The distributor hadnt moved. But timing was 18* out... 0TDC from my setting after I max the adjustment on base of the distributor. I spun the distributor shaft gear. Retarding the timing 18+ degrees. I changed the shaft out for another I had and verified it had spun. Im dumbfounded it pun, but its pressed on without any pin. -
L28et Z31 EFI suddenly running poorly (LONG)
rayaapp2 replied to rayaapp2's topic in Trouble Shooting / General Engine
Im sure I have bad connections and thermal issues handled. I run Audi/VW type sealed quick disconnect ends, a nearly new harness. I run a 23psi stant cap, with the system tested to 25psi. I might not be able to control the fuel or timing map directly by plugging in numbers, but I have control of the fuel map with a SAFC as stated above. The analog unit allows me to modify currently signal, vs emulation of the signal within a set range like I suspect new SAFC versions do(unconfirmed and maybe wrong I just simply havent done the testing on newer units to see if it will pass the 2-7v range). The old school Super ITC will also work just fine with the optical L28et sensor... The same sensor it was designed for was used through like 2002 on most nissans, until they finally went a magnetic pickup system. So assuming I can find one, and I am able to get control of the issues here, I should also be able to modify the timing map to a point. The z31 is close, but not perfect for the L28et, and thats what those 2 devices were designed for. Trimming in close to better. So though I understand they have their limitations on how they affect mapping, they should be up to getting the job done... in theory. I am nearly done setting up Microsquirt(Microsquirt v3) on my sbc. Microsquirt is nice, I can hide it inside a stock eccs box... and the only sensor I need change is the VAFM(which I have a VAFM housing with a modern MAF inside), add in the Flexfuel sensor and its set. without taking anything apart it looks stock. Which on a '81 S130 in Ca is sneaky... amongst other things. But we have a Mandate coming in 6 years. Alternative fuels mandate, so while Im building my projects Im keeping this in mind. Edit, I know it has it limitations. It was totally designed for exactly what you suggested, but it can totally handle a good old L28 or SBC. There is no reason it cannot handle boost. By that definition, the ECCS system is to low grade for a L28et, as its less capable. But yes there are better systems out there. I actually have a APEXi PFC and a harness that is plug and play for the L28et. I made it from scratch using an RB25det system. My biggest issue was programming the EGR and Air controller into that. I used the output for VCT for the EGR and tweaked the setting, but the idle air signal is incompatible. Actually that wasnt even the biggest hurdle. The system was designed for COPs, which I have, but I have the need to go back to single coil, so I had to make a signal modifier to take the 6 drivers and make 1 signal using, for lack of a better description, a self designed rectifier. -
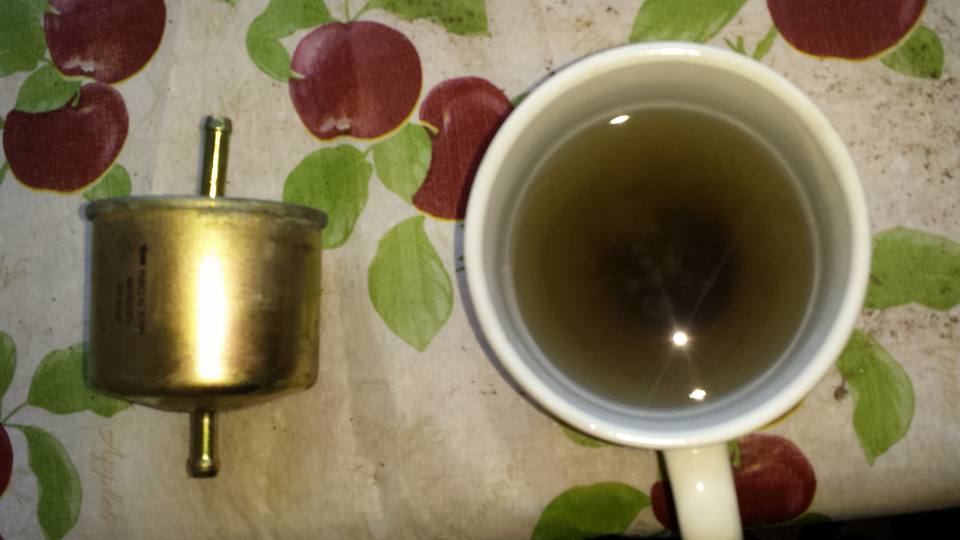
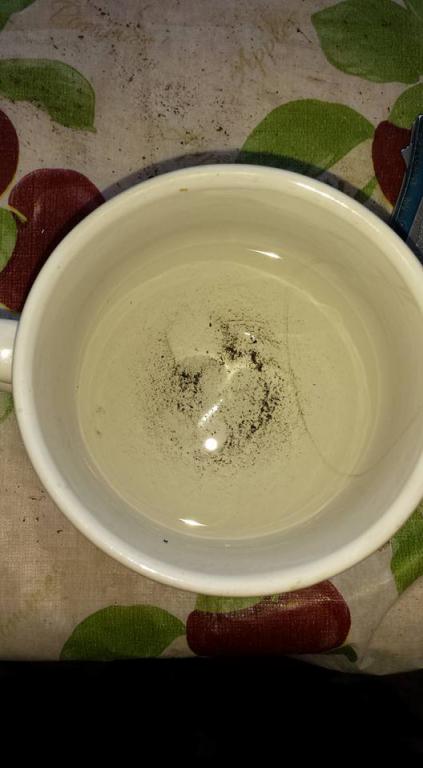
I know its usually bad when I need help, but often when I need help its some small minor detail that's obvious staring me right in my face that just cannot seem to see. This will be long! My S130 is running a L28et with a Z31 EFI system(1984 T) installed on an 82 harness). I have a 5 knob apexi SAFC installed. The z31 efi was on this car and running for ~20k miles without issue. Ive been hunting down problem after problem for the past few weeks. I am having the hardest time with this thing. Mechanically the engine is sound. Its a fresh setup and Ive confirmed integrity(pretty much every other day at this rate). With the new engine, the Following changes were made I add about 40% E85 to the tank(E85 being min 70% at the pumps). The rubber lines have all been changed and I dont let the car sit. A large intercooler was added with associated piping I installed a APEXi 5 knob analog Super Air Flow Converter I went from a stock F54 bottom to a NA F54 bottom end(so Im running flat top pistons set loose) I purchased a set of flow rated 310cc(stock) injectors and drove them around for 30k miles. One went out and thats when all of this started. It turned out at this point, that something wasnt right still. I replaced the #5 that went off for warranty with one from my stash of other injectors of iffy conditions. The next day the engine during cruise felt un-even. I had a listen and sure enough #4 and #2 injectors had soft hits, letting me know they were flowing but likely low flow. I finally found a set of injectors in like 5 dozen sets that I have around that were good enough for use and installed them. Meanwhile I dropped all my old injectors off for warranty and I am still awaiting them to be returned currently. I spent a number of days also dealing with IC piping blowing off! I finally broke down and replaced the offending clamps with T clamps. I made sure boost leaks were NOT an issue! lol It drove fine for a day at this point. Now from this point on the car always idles 800-1000rpms perfect no matter how crappy the engine runs above that! No idle misfires, in fact it runs extremely well at idle for an L series. Maybe 2 days of good driving goes by. Then without warning it started running poorly again one morning. It runs like all cyl are leaning out bad. Again idles perfect! But it coughs and runs like dog poop above idle. At this point I discover the fuel filter that has about 10k miles on it took a giant crap! The filter element dislodged from the housing at some point. Being frustrated with premature failure of the filter and knowing what I then had to do I went at it. All the injectors came off, and I had to back flush them all to dislodge any crap that made it through/dislodged from the filter. I actually got a LOT of crap out. This is what came out of all 6 injectors after back flushing them. This is what was left inside the filter and the filter itself that failed. I replaced the filter with a WIX unit that night, and replaced that with a OE Nissan filter the next day. However little improvement was made. The car still did not run perfect. It was only marginally better than the day before. During that day I decided to check the rest of the entire fuel system... again. Fuel Pressure checked 38/51psi which is spec idle/boost wot I removed the fuel pump and checked the screen on the inlet and it was clean. At this point I am baffled so I check everything starting with basics. Spark and Fuel time. Turns out I lost a ground at my ignitor, I was entertained by this one. My RPM gauge, didnt show an issue, but the APEXi SAFC 5knob has a cool feature. It lights up green, but each knob turns red as the rpm range passes through the knobs adjustment range. Well at about 4k+ rpms the knobs would light red like a blinking chrismas tree... randomized. That was how I tracked down the ignition issue. So I grounded the ignitor to the intake manifold where the EFI grounds as well. It drove well at this point! infact it pulled well into the upper RPMS. Next day it starts to run like crap, once again. WOOT! Big surprise right!? So back through the ENTIRE fuel system again as its just leaning out after 2500rpms. Fuel pressure checked again, Pulled the injectors off and check filters... Everything looks good. At this point it gets worse! It starts to lean out even sooner. Its barely driveable. I start checking signals, I double check all my ecu pins arent loose or have bad wires. Im honestly grasping for straws at this point. After spending pretty much 6 hours checking crap I determine that the MAF or ECU is FUBAR. The MAF is a 2V-7V range, and the MAX V I could get out of the MAF was 5V and the min was 1.2V so it was safe to say it was out of range. I busted my wad on a $260 reman MAF with a 1 year warranty. Suddenly the car is FIXED! Its driving GREAT! Full RPM range, pulls nice and even. No signs of problems at all! It drives ok the next morning to work!(yesterday), which is the only time Ive started it in the morning without issue after sitting overnight! I get to work and decided that Id change the MC out while I had a chance as it was due for its biannual brake fluid flush anyway. I worked late. I left at like 10pm. I made it about 2miles. Above 2500rpms, under load, I get a double misfire(at least 2 cylinders just cut). I pull over and its obvious this time that the fuel is going straight into the turbo... as the turbo is GLOWING! So I let it cool down idling the engine the whole time(without any sign of misfire perfect idle I even checked RPM drop per inj perfect). I drove it back attempting to stay out of the misfire area. Which was hard as that was 2miles of freeway driving back to work. I get back, let it cool down, then I shut it off and pulled the plugs. SUPER lean condition. Ground straps were CLEAN! ceramic was bright white! 2 cylinders show slight variance with a slight tan spot where I assume the intake valve was pointed. I swapped the plugs out with some plugs that I had put some color on prior and pulled for fresh plugs. This made a slight improvement but the problem was still there. So I parked the car at my work and took my truck home last night at 11pm. I find it hard to believe that the MAF went out of again, esp when this feels like a 2 cyl miss... but then this could still be a compound issue! My best guess... MAF is leaning out. I do not have a burnoff function for the MAF, but I shouldnt need it after only 50miles of driving. The Z31 EFI requires the speed sensor for the burnoff function to work(my 81 has no speed sensor). And maybe 2 of my old used injectors are just not up to par. However I cannot account for plugs with tan marks as being misfire plugs. Its more likely the other 4 were misfiring but that's NOT what I felt so... bangs head against wall! And WHAT are the chances that a MAF would work great for 50miles and then suddenly take a dump on me? BANGING HEAD AGAINST WALL HARDER! There is ONE common theme here I did notice, It doesnt go from running decent or great to bad while its running! Nearly every time the car started to run bad, it was the next day after it was shut off... so overnight something changes. The car would drive and be fine until the next morning. Maybe thats just random, or maybe there is something else at work here. Now in the future I have the warranty injectors coming back, I also have a set of 440cc injectors flowrated coming and a custom fuel rail in the works. And the Z31 efi just needs to get me around for another year as I plan on doing a microsquirt PNP next year. I also plan on popping the tank open tomorrow at work just to be sure the fuel isnt spiked or something. Maybe Ill get lucky and Bernard or one of the other Z31 ecu experts might chime in here and see some pattern that I do not understand.

-
Hydrobooster Application
rayaapp2 replied to yellowoctupus's topic in Brakes, Wheels, Suspension and Chassis
Want to use aftermarket lines? Here you go for Hydrobooster side: Russel part numbers High Pressure IN 18x1.5 oring to -6AN 64808 with 620421 90 crimp High Pressure OUT 16x1.5 oring to -6AN 648060 with 620421 90 crimp This will delete those fitting you had problems with Phill. Mine is finally coming together. -
Twin cam head for the L6 from Derek at Datsunworks
rayaapp2 replied to Derek's topic in Nissan L6 Forum
So what are you doing for cams then? RB stuff is stupid expensive for no real reason. RB cams are spaced correctly for the L6 though. But there is little support for them. Id love to see where your going with that, cause I cant imagine one off custom cams are any cheaper? As far as cheap, I think building the intake and exhaust using an existing intake(example from the L series, or RB series) would have been easier and cheaper than all your time into a custom unit? Or at least as tony suggested the mirrored ports so one app could have the exhaust on the pass side and another could have it on the driver side, but then your back to custom manifolds. Excuse all the curiosity. I am really interested in watching the progress, but sometimes I like to prod just to figure out what the path of logic was to the result they got, you know? -
Twin cam head for the L6 from Derek at Datsunworks
rayaapp2 replied to Derek's topic in Nissan L6 Forum
I would have donated an RB head to you, had I known. I recycled it instead. Why didnt you make the intake and exhaust mirrored like Tony suggested? -
LT1 T56 clutch will not disengage fully
rayaapp2 replied to rayaapp2's topic in Gen I & II Chevy V8 Tech Board
Im running the z31 turbo cv axles. Nice and thick with the large ball cage. I only worry about the 29 spline outers and my drive shaft u joints on this car. I have a VLSD that could also be a weak point, but when it goes out... its just an open. NP NewZed. Yep that is exactly how it goes together! Odd yes, and why it was done that way and not made to be simple like the RB25 or VG30dett I dotn know cause that clutch setup is plenty strong and simple. -
LT1 T56 clutch will not disengage fully
rayaapp2 replied to rayaapp2's topic in Gen I & II Chevy V8 Tech Board
No, the contact only occurred when the pedal was full depressed. As Rebecca pointed out the flywheel can warp...well it was warped and on that end of the clutch fork as you depress the pedal it moves toward the pressure plate as it is on the outer end of the pivot point. I double checked the clearance before I fully assembled it this time. It turns out between the warpage and the TOB being wasted that created my problem. Everything seems good with the new clutch in on my test run. Matter of fact the transmission shifts easily into all gears and better into reverse than it ever had before! I ordered up some new tie rod ends and next Im getting an alignment then its off to see what autox events are coming up! -
LT1 T56 clutch will not disengage fully
rayaapp2 replied to rayaapp2's topic in Gen I & II Chevy V8 Tech Board
No that side faces the pressure plate. I have the pressure plate turned around from the way it would be installed in relation to the transmission in the picture. Just got back from the machine shop. They took .020" off. There was a bit of warpage. So the old pressure plate is junk for sure with that kind of a deal... it will chatter if I try and use it again, but it is a stock pressure plate. The new pressure plate is another GM unit... its amazing how many places use the OE pressure plate for this setup and re-brand it, but it has all the factory casting numbers on it! I bought a "HD" friction disc. The old McLeod friction disc had ceramic pucks on one side and the other side looks like regular clutch material. The new one isnt ceramic at all. -
LT1 T56 clutch will not disengage fully
rayaapp2 replied to rayaapp2's topic in Gen I & II Chevy V8 Tech Board
The TOB itself doesnt look great. The bearing is smooth in action, but its oscillates a little. -
LT1 T56 clutch will not disengage fully
rayaapp2 replied to rayaapp2's topic in Gen I & II Chevy V8 Tech Board
Wow. thanks for the input folks! Gotta give Hybridz some time to respond back. My clutch came in yesterday so I put it on the rack this morning and pulled everything. I found that the clutch fork is hitting the pressure plate! The flywheel doesnt seem to be warped, but Im having it surfaced in a few hours. The friction disc looks fine. Other some heat scoring so does the pressure plate. Im replacing them anyway, because its out and I have the parts so why not. Right now though I am concerned about the clutch fork and T pin. Is my T pin the wrong size? The clutch fork looks cast... I would not think that it could "bend" before it would snap. Its almost like the T-pin is to long? Let me know if the pictures show up. -
LT1 T56 clutch will not disengage fully
rayaapp2 replied to rayaapp2's topic in Gen I & II Chevy V8 Tech Board
The Throw Out Bearing on this is the pull type not the push type like the LSx setups. So there is no seal to leak at the TOB. The Slave is external to the bellhousing. And there are no leaks or seepage signs. From what I read this problem happens when the friction disc is too thick or either the TOB collar that the clutch arm attaches to fails/clutch arm pivot T fails. I have full movement up to the clutch arm and I can over adjust the clevis at the clutch pedal to get the TOB to bottom out(which makes me cringe a little) and still it does not dis-engage. This clutch setup has a mere 4000 miles on it, and it worked perfect until recently. Im going to order up a pressure plate and friction disc and have them on hand for when I take it apart. But since I do not have a lot of experience with this type of system Im having a hard time grasping the failure... Hopefully its something easy and cheap to replace being as I have so much money into this clutch setup already! -
Here is the run-down on my setup. early sbc 2 piece rear main seal Centerforce flywheel McLeod Friction disc OE pressure plate LT1 T56 transmission (96 camaro) Titon 1" master OE slave The clutch setup has 4000miles on it, and is impossible to get into reverse without shutting the engine off. It also acts like it isnt fully disengaging when the pedal is depressed fully through the other gears. This started happening recently! As in this setup worked fine until a few miles ago! So I figured Id clean the whole hydraulic system out and bleed it. I did that and still no change! Then I checked the adjustment on the clutch pedal clevis and it was set correctly! Here is where things became interesting. The TOB sounds like it is working properly and I can adjust the clevis on the pedal to nearly bottom out the TOB against the transmission... which leads me to think that the clutch has had a failure. I have not had time to pull the transmission out, but I dont have a lot of experience with these kinds of clutches and I am hoping someone here will read this and be able to tell me what kind of failure I am expecting to find and maybe the best way to address it. I did some googling and found similar problems where spacers were used, but that doesnt sound like a fantastic idea and Id be worried about slipping the friction disc and burning the unit up.
-
Makes me wish I had never bought a love fab... maybe I should sell that sucker and buy Ricky's new manifold for the GTX35
-
1800-2000rpms @70mph sounds about right with the T56. Which is right out of my cams healthy spot(with carb) so Im constantly using 5th in slower traffic. The cross member will need to be about 4" farther back for the T56 than the 4L60E/700R4(which is another inch or so farther back than a TH350). It also depends on which T56 you use. There are at least 4 length options in the US. Im using the LT1 style from a late 90's camero. There was a picture somewhere showing the different lengths that helped me a lot when determining if I needed to build a cross member while the 4L60E was still in the car. The common LT1 and LSx are the same length(different shifter location) but since I didnt use the LSx one with the adapter bits, I couldnt say how much longer it will be. This covers just the Chevy options I think.
-
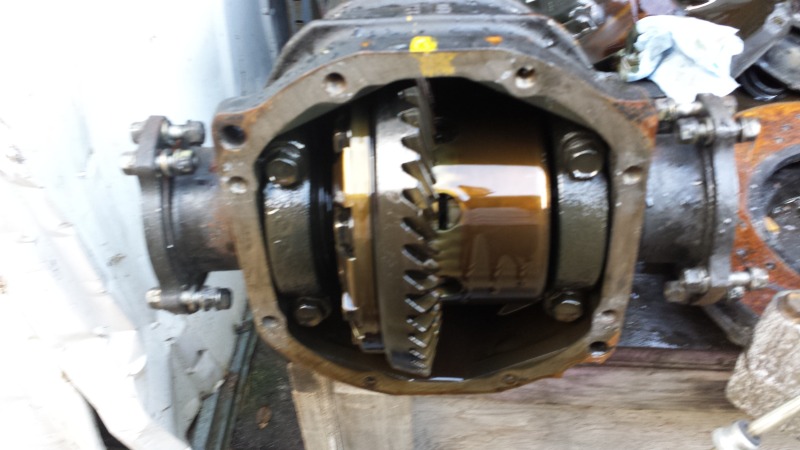
KAAZ 2 way LSD short nose R200 center into Long Nose
rayaapp2 replied to rayaapp2's topic in Drivetrain
The Google search feature works better than the hybridz search function. No idea why, but I completely missed any threads related to the KAAZ. I found some information on it at Ratsun, but it was not clear and the thread died before any progress was made. Vindicare: What do you mean harsh? I had this rear end in the S13, it never made any of the clatter everyone always complains about. Also why were you killing control bushings and why do you think it was the rear end? I have several S30's with LSD rear ends and Ive never had that problem or at least Ive never attributed it to the type of LSD I had. As for the bearings the pinion bearing seems hard to get or is really expensive when you can find it. Most places cant find the bearing. At least that has been my experience. -
I have one of these units right now. I took a quick peek at it and it looks like it could be used in a long nose. I did some google searching and most guys say it will not work, but the reason why they said it wont work is because the axles for the short nose are like the VLSD long nose axles, but mine are not. The 280zxt cv axles have identical ends and so do the 280Z R200 stubs for U-joint shafts. So other than finding the bearings I dont see why one couldnt use the KAAZ LSD for the 240sx in a long nose. Before I start pulling things apart and end up learning the hard way why this wont work, I was hoping someone on here had done something similar and could possibly help me out. If I can use the KAAZ, there is no point in me searching for the R200 clutch type and then going through that unit and getting the extra clutch packs I should be using when the KAAZ is rated for my power goals. EDIT: I do know about the 2 different size ring gear bolts.
-
Hydrobooster Application
rayaapp2 replied to yellowoctupus's topic in Brakes, Wheels, Suspension and Chassis
Ive been diligently working on this on the side for the SBC guys. I am nearing install! So far I have figured out most of my problems. I ended up keeping the V belt style setup. A serp belt would be nice, but with a basic setup like mine it would require that I go fancy and buy ALL new accessory brackets to clear the belt and either use custom idler and tensioners, or buy a really expensive kit to make it all work. I like the really basic look I have going on in my engine bay. I want it to appear old school and simple so V belt it is. This is the ALT bracket kit I used: Its really simple... but one of the allens is hard to tighten properly and the adjuster joints are a little big for my particular alternator The Saginaw PS unit is pretty universal. GM and a few others all used the same unit... ON EVERYTHING! The reservoir housing was the biggest change through all the units out there! The only other change that I noted was the pulley attachment. I prefer the press on type, but there is also a cone style one with a woodruff key. GM made V belt pulleys for both style pumps though. The Corvette in particular used the V belt and a press on style. The Vortec/ TBI sbc units would not work with the V belt setup! The reason is the belt alignment and the back low pressure line do not physically work out with any standard brackets offered. But that is only the reservoir that is the issue. Housing options are abundant! 03-05 GM unit with remote reservoir. This style works as well... see the low pressure line is near the edge... It just cannot be near the center of the pump with a V belt! Here is an example of one that WILL NOT WORK with a V belt: This is the PS brackets I went with. The TBI mounting bracket was for the serp belt and it sits out from the block which will not allow me to run a V belt on the correct axis. This explains why the low pressure line hits the block with the above pictured mount kit. This is the pump I went with. I have a brand new re-manufactured pump I will install in this new housing. For the Hydrobooster setup I would recommend seeking out a pump that has 2 low pressure return ports! The remote reservoir type works perfectly for this as well. Most of those reservoirs have a low pressure bung and the pump has one as well. This is why I went with the pump housing with 2 low pressure ports. There are 2 low pressure returns from the booster that need plumbed as outlined in this thread. AS you can see the pump knocks out from the reservoir housing. Replace the seals! These are notorious for leaking! They always leak!... Did I mention they leak? LOL Remove item 27 and items 28-33. Thread in 2 longer bolts were the studs were for 27 and work the pump out of the reservoir with a rubber mallet. Moving on to the fun parts which I have planned out but not executed as of yet. The lines! So the 2 low pressure lines can be installed to your reservoir or pump with hose clamps after properly trimming them to length. The High pressure line though is a bit harder, but do not fret! There are places in most major cities that can make lines from scratch. For instance here in Salinas Ca I have CSC... which is also in Gilroy. They are local only though. Or you can find a local John Deer or CAT and have them do this as well! Its really simple. You will need the high pressure line from the GM PS unit though. Its the same size line as the Mustang! The best way I can figure doing this, but not the only way, is to remove the hard line off the end of the GM line that would go to the PS box. This leaves you with the hard line threaded into your PS unit and a bit of rubber line. All you have to do is measure the hard line from the booster to reach that rubber line and then have the 2 hydraulically crimped together and your plumbed! Im gonna walk mine into QUINN CAT and pay them to put it together. They have the collar to do it in stock. -
http://community.ratsun.net/topic/56765-cause-6-dat-projects-werent-enough-510-2-door-ca18det-rhd/page-3 I have a build thread over at Ratsun with a ton of pictures for anyone that is interested in checking it out