
74_5.0L_Z
-
Posts
1194 -
Joined
-
Last visited
-
Days Won
30
Content Type
Profiles
Forums
Blogs
Events
Gallery
Downloads
Store
Everything posted by 74_5.0L_Z
-
My student license for SolidWorks expired, so I no longer have access at home. I do however use Creo Pro/Engineer at work. I would need some very specific information to make a usable model for someone else. I might be persuaded. The headers have 1.75 inch diameter primary tubes with an average length of 26 inches from flange to where they enter the slip-on merge collectors. The shortest tube is 23.75 inches and the longest is 27 inches. I was initially going to try for a longer primary tube length (29 - 32 inches), but packaging drove me to the shorter length. I purchased the merge collectors on eBay about five years ago (I've been planning this project for a long time).
-
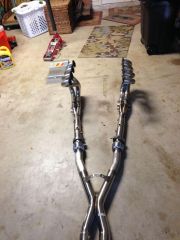
One of the few things that I ever paid someone else to do on my car was the exhaust system. Eleven years ago, I bolted on my Dynomax block huggers and drove to the local muffler shop to have an exhaust system built. It was made of crush bent 14 gage aluminized steel and had a pair of Flowmaster mufflers at the back. I was never happy with it. It sounded alright, but the poorly made headers and even more poorly made exhaust were not something I was proud of. So last year I decided to do something about it: I removed the old exhaust and cut it into pieces so that I could not possibly reinstall it, then I built myself a set of custom long tube, stainless steel headers. The process was a serious pain in the rear, but it is now finished. To start the process, I carefully measured the front of my chassis and the engine to determine where all of the important features are in relation to the engine. I established a coordinate system with 0,0,0 at the back of the block, the x axis aligned with the centerline of the crank, the y axis to the driver side, and z up. In the process of taking measurements, I determined the critical dimensions necessary to route the primary tubes from the exhaust ports to the collectors without contacting the steering shaft, block, frame, driveshaft tunnel, and other things that get in the way. The critical dimensions include the position and orientation of each of the exhaust ports relative to the crank centerline. The dimensions were used to generate a SolidWorks model of the headers. Here are some images of the SolidWorks models of the chassis and headers. The routing of the tubes was calculated using a computer program that I wrote which takes the following parameters as input and gives the following values as output: Input: L1 Length of first straight section of tube exiting port S Desired length of Header tube Xp X Position of port relative to centerline of crank Yp Y Position of port relative to centerline of crank Zp Z Position of port relative to centerline of crank Orientation of port Xc X Position of collector entry relative to centerline of crank Yc Y Position of collector entry relative to centerline of crank Zc Z Position of collector entry relative to centerline of crank Orientation of collector entry Bend radius of mandrel bends used to make header. Output: Lengths of straight sections and degree and orientation of bent section required to route the header. The calculated header dimensions were put into the SolidWorks model. Many iterations were tried until I had models with which I was satisfied. Once satisfied, I made a fixture to build the headers using a junk engine on an engine stand. The fixture allowed me to rigidly place the flanges and collectors into their prescribed positions and to assemble the pieces into position for welding. The images below show the passenger side header pieces assembled and ready to weld. The hose clamps were used to hold things together for tack welding. The headers are now complete and installed, but here are some more pictures of the assembly on the garage floor prior to installation. I now have an exhaust that is all mine and of which I am not ashamed.
-
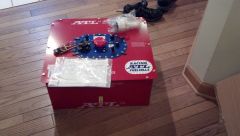 Hey Branden, I like the new cell. Is that an SP112 or SP115. I have the SP112 in mine.
 -
From the album: Creation of New Headers
Rear View showing the Passenger Side headers . -
From the album: Creation of New Headers
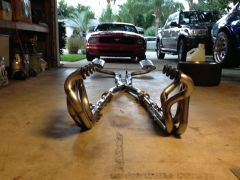
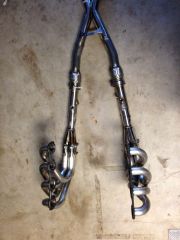
Front View showing the driver side and Passenger Side headers . Headers are 18 gage 304 Stainless constructed from 1.75" mandrel bends. All bends use 2.5" centerline radius. The provision for the steering shaft through the driver side header is visible. -
From the album: Creation of New Headers
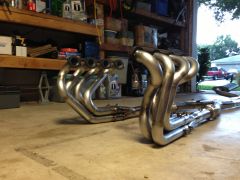
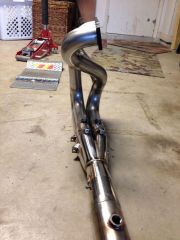
Three Quarter View showing the driver side and Passenger Side headers . Headers are 18 gage 304 Stainless constructed from 1.75" mandrel bends. All bends use 2.5" centerline radius. The slip on merge collectors are shown. -

From the album: Creation of New Headers
Driver Side View showing the driver side and Passenger Side headers . Headers are 18 gage 304 Stainless constructed from 1.75" mandrel bends. All bends use 2.5" centerline radius. The slip on merge collectors O2 sensor bungs and wing tabs are shown. -
From the album: Creation of New Headers
Top View showing the driver side and Passenger Side headers . Headers are 18 gage 304 Stainless constructed from 1.75" mandrel bends. All bends use 2.5" centerline radius. The slip on merge collectors, V-Band clamps, flexible couplers, and X-Pipe are shown. -
From the album: Creation of New Headers
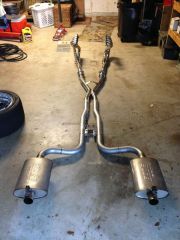
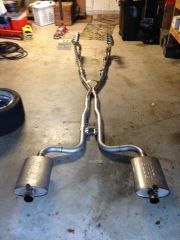
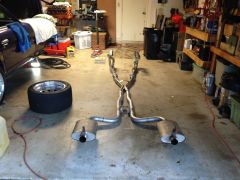
Rear View showing the driver side and Passenger Side headers . Headers are 18 gage 304 Stainless constructed from 1.75" mandrel bends. All bends use 2.5" centerline radius. The slip on merge collectors, V-Band clamps, flexible couplers, X-Pipe, and Borla Pro XS mufflers are shown. -
From the album: Creation of New Headers
Top Side View showing the driver side and Passenger Side headers . Headers are 18 gage 304 Stainless constructed from 1.75" mandrel bends. All bends use 2.5" centerline radius. The slip on merge collectors, V-Band clamps, and flexible couplers are shown. -

From the album: Creation of New Headers
-
From the album: Creation of New Headers
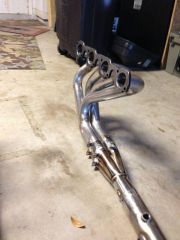
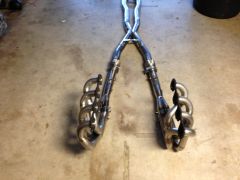
Driver Side View from behind: Headers are 18 gage 304 Stainless constructed from 1.75" mandrel bends. All bends use 2.5" centerline radius. The gap between the inboard and outboard tubes is for the steering shaft. -
From the album: Creation of New Headers
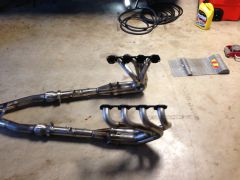
Passenger Side View showing the driver side and Passenger Side headers . Headers are 18 gage 304 Stainless constructed from 1.75" mandrel bends. All bends use 2.5" centerline radius. All tubes were constructed using the output based the output of the computer program that I wrote and from the Solidworks model which was used to verify clearances. -
From the album: Creation of New Headers
Front View showing the driver side and Passenger Side headers and the X-Pipe. Headers are 18 gage 304 Stainless constructed from 1.75" mandrel bends. All bends use 2.5" centerline radius. -

Biggest wheel/tires with no power steering
74_5.0L_Z replied to redlinevo7's topic in Nissan RB Forum
I run 275/35-15 Hoosier A6 on all four corners. I also run 6 degrees of caster. Turning the steering wheel when stopped is a challenge, but is no problem while moving. That being said, I feel like I've had a good upper body work-out after a day of autocrossing. I would love to install a power rack and pinion set-up with a quicker ratio. Often my speed through a course is limited by how fast I can turn the steering wheel. -
I would be really concerned with the structural mods that were performed to compensate for the removal of the roof. As a minimumum, this thing needs a roll bar that ties into the strut towers, the rocker panels, and has a diagonal door bar to the foot box area. Also, no rust is allowed in the floors or rocker panels since these areas are all that are hold the car together. Just my opinion, but what do I know.
-
New wheels are on. What should I do about fenders?
74_5.0L_Z replied to Nismo_Gizmo's topic in Body Kits & Paint
Actually, the perfect offset is somewhere between a red **** hair and and gnat's arse. My front wheels have about 1/8" clearance and there is no evidence that they have ever rubbed. -
I made it from some 1/4" 6061 T6 aluminum that I had laying around (about ten years ago). It's amazing what you can do with a hole saw and some drill bits.
-
I have the stock master (15/16") cylinder and no booster. My car stops great, the pedal effort is not too heavy, and I have great modulation. That being said, the master cylinder is the only stock component in the brake system. 11.75" x 0.081 Coleman machine vented rotors Outlaw 2800 series 4 piston calipers (1.75" pistons) Hawk HB237 HP-plus pads On the rear, I have 1985 modified maxima rotors (10.75" x 0.81) Outlaw 2800 series 4 piston calipers (1.38" pistons) Hawk HB237 HP-plus pads In the picture below you can see the adapter plate that bolts where the booster would have been and has provisions for the master cylinder.
-
I agree! Offset is a relative term that is specific to the centerline of whatever width wheel you have. Backspace however is an absolute value that is independent of wheel width. Once I find a backspace that clears my struts, I can then vary the width to clear the fenders.
-
I ran 245/45/16 when I had the stock bodywork. Check your front tire clearance at full steering lock in both directions. Mine would rub on the frame rails near the sway bar mount. I had to limit the rack motion to prevent contact.
-
KONI 8610 with shorted strut tubes help
74_5.0L_Z replied to Nismo_Gizmo's topic in Brakes, Wheels, Suspension and Chassis
Thanks, I was going by memory, and I am getting a little older.... -
KONI 8610 with shorted strut tubes help
74_5.0L_Z replied to Nismo_Gizmo's topic in Brakes, Wheels, Suspension and Chassis
Yes, that nut must be tight as well or else you will have slop in the strut during its motion. What you can do though is to put a tubular spacer between the shoulder on the shaft and the isolator that attaches to the strut tower. Just make sure that you have full engagement of the threads and that the nuts are tight. The 225/50-15 will fit much better 24.7 tall rather than 26 " tall.