-
Posts
1193 -
Joined
-
Last visited
-
Days Won
30
Content Type
Profiles
Forums
Blogs
Events
Gallery
Downloads
Store
Everything posted by 74_5.0L_Z
-
Yet another Rear control arm design
74_5.0L_Z replied to tholt's topic in Brakes, Wheels, Suspension and Chassis
I have had great luck with the control arms that I built. They are light and strong. My control arms, the stock control arms, and the ones sold by AZC are all examples of an H-arm strut (Milliken pg 641). The other option would be an A-arm and toe link strut. Each has their advantage and neither is meant to resist the twisting moment applied to the rear suspension when the brakes are applied (That function is performed by the strut). The H-arm strut has a limitation that is described by Milliken, "...the inner bushing pivots must be perpendicular to the axis of motion of the strut at all times or bending of the strut will occur." What this means is that as the control arm rotates about an axis, and the end that attaches to the strut follows the arc of a circle. This is true for all rigid parts of the control arm. With our control arms (H-arm), the entire control arm is rigid and the bottom of the strut is rigidly captured. The strut tube is (supposedly) perpendicular to axis of the spindle pin. So, if the axis of the spindle pin is parallel to the axis of the inner pivot, then the strut will always be perpendicular to the axis of rotation and no binding will occur. Now lets try a mental experiment. Let us adjust the heim in the front to get some toe-in. We have now turned the axis of the spindle pin so that it is no longer parallel to the axis of the inner pivots. This rotates the strut housing by a small amount and because the strut tube is angled away from the center of the hub, the top of the strut will try to rotate toward the back of the car. Well guess what: The top of the strut is captured by the bearing in your camber plates. You just put your strut in a bind. If you have rubber isolators and bushings you will probably get away with this. The rubber will compress before the strut bends. If you have spherical metal bearings everywhere, you will see evidence of the strut binding (springs hitting threaded collars). Interestingly, those cheesy aluminum/delrin eccentric bushings don't cause the same problem because the axis of the spindle pin and axis of rotation stay parallel. Now for the other option: What are the advantages of the A-arm toe link strut? The A-arm, like the H-arm is constrained to rotate about an axis fixed to the chassis. The A-arm however only has one point forced to follow an arc. That rigid point connects to the strut and forces the attach point to follow the same arc. The link between the strut and A-arm is spherical and as such has two degrees of freedom. The connection is free to rotate about the axis of the spindle pin and to rotate about the axis if the strut housing. We need an extra constraint to control rotation about the axis of the strut housing. We need a toe link to do this. This is the important part: The toe link should only control the rotation of the strut about its axis. The toe link MUST only add one constraint. To accomplish this both ends of the tie link must be free to rotate in all planes, both ends must be heim joints. Allowing the toe link to rotate freely allows the strut to rotate about the rigid end of the control arm and prevents binding. If either end is constrained to stay in plane (clevis connection), then we are back to a H-arm and its limitations. Every control arm that I have seen made for a Z of this type was made wrong. So lets try the same mental exercise with the A-arm toe link strut. We adjust to toe link to add some toe-in. We'll use the toe link in the front and the rigid link in the back. The spindle pin is again rotated so that it is not parallel to the axis of the inner bushings, and the top strut tube tries to moved slight back on an arc, but it is constrained at the top by the camber bearing. What happens? The whole strut rotates around the pivot at the rigid point on the control arm. As the strut compresses, the strut houing tilts further and further forward to keep the axis of the strut housing aligned with the bearings at the rigid end of the control arm and the camber plate. Because the toe link is not constrained, the strut housing is not in a bind and the control arm sees no torque. So, after all of this I have come to a couple of conclusions: 1. If you have an H-arm set-up, keep the axis of the spindle pin parallel to axis of the inner pivot bushings. 2. I will only adjust the toe of an H-arm set-up using the inner bushings. 3. I am going to build a set of A-arm toelink control arms so that I and have more adjustment possiblility without binding. Damn it, I used to be satisfied with my control arms. Oh well, back to the drawing board. -

another brake bleeding problem!
74_5.0L_Z replied to 240zwannabe's topic in Brakes, Wheels, Suspension and Chassis
Actually, you've got that backwards. AN uses a 37 degree flare, and SAE uses 45 degree. Either way, If the flares were the issue you'd have visible leakage. Did you bench bleed the master cylinder? -
OK, The new struts arrived today, and I have some more questions: First, I think I need to acquire some gland nuts. The struts that I removed from the rear were the old Koni sports (8641-1032). The gland nuts from those sat around the top of the strut insert and acted to center the insert in the housing. I assumed that koni would use the same gland nut for the 8610-1437, but it appears that I am wrong. Second, the box had a bag of parts. Some I recognize and some I do not. The ones that I recognize are the four nuts and rod end spacers. The ones that I do not recognize are two large OD steel rings, and two slotted plastic discs. The purpose of these last items is not immediately obvious. They were not included with my 8610-1149 struts that I put in the front a few years ago. Any help will be appreciated.
-
Thanks for the replies. I had to deal with the alignment issue when I did the front struts. For that I did as John suggested and made a mandrel to assure squareness and concentricity. I still have the mandrel and will use it for the rear. I guess my real concern was with losing too much droop travel in the rear. I have read somewhere on here that insufficient rear droop travel can create a snap oversteer situation. I obviously want to avoid that. Ideally what I'm hoping for is a very light preload of the spring at full droop. With my current set-up, The springs are unseated at full droop, and I have to guide them onto their upper perch when I lower the car off the stands. If all else fails, I'll come up with some droop limiters that are set at the point where the spring uncouples.
-
johnc put together a great write-up about sectioning struts about three years ago in the following thread: http://forums.hybridz.org/showthread.php?t=85960&highlight=section I followed his directions to the letter for the front struts, and everything worked perfectly. I am in the process of sectioning my rear struts for Koni 8610-1437race inserts, and I have a question regarding his write-up concerning the rear struts. Here are the instructions for the rear from the original write-up: The problem that I am having is this: The write-up suggests shortening the rear housing by 2.25" and then using a spacer below the insert of 2.25". The unmodified length of my housing is 16.75". If I remove 2.25", the inside length will be 14.5". From the Koni catalog the length of the 8610-1437race housing (Dimension A) is 13.07 inches. Also they suggest that the housing length is 0.04 to 0.16" shorter than Dimension A. Using 13" for the desired inside length (13.07 - 0.07). If I section my strut housing 2.25" and subtract 13", I get (14.5 - 13)= 1.5. So, here are my choices. 1. I can section the rear housing by 2.25" and use a 1.5" spacer below the strut. 2. I can section the rear strut housing 1.5" and use a 2.25" spacer below the insert. 3. I can section the housing some dimension in the middle and make up the difference with an appropriate spacer. johnc (and others), What is your suggestion? Have I made an error in my math?
-

Question about Cleaning the inside of Mild Steel piping
74_5.0L_Z replied to LamboZ's topic in Fabrication / Welding
When I was preparing the tubing in my cage I did as Johnc suggested. I would soak a rag or paper towels in solvent, and push / pull it through the tube until it came out clean. This worked well to remove the cutting oil and chips that accumulated during tube notching process. If you are using DOM mild steel or 4130 tubing, then there is going to be a thin coating of mill scale (inside and out) that cannot be wiped off with a rag and solvent. This coating needs to be removed in all areas that are going to be welded. To do that I used 80 grit paper, and then acetone. -
The process you describe will probably work. The problem that you may encounter will be clearance for the header bolts. They are usually pretty close to the tube to begin with.
-

Whats one thing thats makes your Z different from the rest....
74_5.0L_Z replied to a topic in Miscellaneous Tech
I still can't quite come up with anything... -
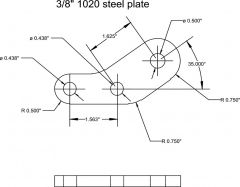
Jon, Your weld on bracket will make the connection plenty strong enough. However, I think you may still have trouble with your tire hitting the T/C rod when the wheel is fully turned. Here is an image of my set-up and a drawing of the bracket. The dog leg in the bracket serves two purposes: First, it moves the T/C rod back away from the tire. Second, it aligns the force from the T/C rod with the rear most bolt on the control arm. This minimizes the bending moment seen by the dog leg of the bracket. The bracket is secured using 7/16" grade 8 hardware. The clevis is from QA1 (3/4-16 with 3/8" slot and 1/2" hole). I reamed the holes in the control arm and ball joint to match the holes in the bracket and get a close tolerance fit with the fasteners. The tube is 1 1/8" x 0.058 4130 with tube adapters from "ChassisShop" TIG welded in the ends. Dan
-
-
Jon, The design will work if you redo the plate on the control arm such that it also captures the outboard bolt on the ball joint. The current design places that bar in bending when you apply the brakes. The other issue that you may encounter is the tire rubbing the T/C rod when turned fully to the left or right. As you know, I had an issue with my T/C rod a couple of years ago. As part of putting my car back together, I reengineered my T/C rods similar to what you have. The plate that I use on top of the control arms uses the same two bolts as the stock T/C rod. A third hole in the plate lies on the line drawn between the rear-most bolt on the plate and the T/C pivot on the frame. I'll have to borrow a camera, so that I can post a picture.
-
If you look at the pictures that I posted above, you will see that the 245/45/16 tires have lots of clearance. This is on 16x8" wheels using a 5 inch backspace. So obviously, the 245 fits easily on the front. This same tire and wheel combo rubbed the lip of my stock fenders. Here is a picture of the car before the body kit: With the SubtleZ kit, I have about 1.5" clearance up front and 1" in the rear. With the extra clearance available, I lowered the car 1" up front and 1/2" in the rear. The 275 could be made to work on a 10" wheel if you use the correct combination of wheel diameter, backspace and spring. A 17x10" wheel with 5.5" backspace combined with a 8 inch coilover will allow the tire to fit inside the wheel well with the SubtleZ flares. The key is to get the spring perch above the widest part of the tire. For now, the 245/45/16 tires fit in such a way that I can lower the car onto the bump stops without fear of the tires rubbing.
-
My car has the SubtleZ fenders and quarter panels. The hood and front air dam started life as the SubtleZ pieces, but I modified them just a bit. The tires on the car are 245/45/16 Hoosiers mounted on 16x8 wheels with a 5" backspace. As you can see, I have room for wider tires. I'm wanting to try some 275/35/15.
-
Great write-up!!! I think that you give the wrong length for your driveshaft. Mine is 19.25 from center to center, and you quote yours as 28 1/4. But still, great write-up.
-

Jon's 2 year roll cage saga...
74_5.0L_Z replied to JMortensen's topic in Brakes, Wheels, Suspension and Chassis
By the X in the main hoop, I meant where the horizontal and diagonal intersect. The other X is the low one behind your drive shaft tunnel. But again, I will not push my ideas as right and yours as wrong like some on other sites seem so apt to do. And yes, there are some very knowledgable guys over there. Unfortunately, you have to wade through the flames to get an answer to any question. -

Jon's 2 year roll cage saga...
74_5.0L_Z replied to JMortensen's topic in Brakes, Wheels, Suspension and Chassis
Jon, I watched in horror as the guys over there "critiqued your work." That why I only lurk there. I have a question though: Why didn't you route your new bar going forward from one of the existing X's (The one in the main hoop or the one that ties you strut towers to the main hoop. I don't mean to be a critic. I think you are doing a great job. Dan -
Pete, It was great meeting you. I didn't realize while we were talking that you were a member of HybridZ or that you were so far from home. I have some pictures of the tube chassis in my album on this site. Justin, Thanks for the compliments. It feels good to get some compliments on the car now that it is back together. The week in Daytona was the first outing with the car since I wrecked it at the 2004 Bay Bottom Crawl. In that time, it went from being wrecked(and ugly), to a car in a perpetual state of body work (and ugly), to finally something I can take pride in. There were many other beautiful Z cars in Daytona and an equal number of great people. Wherever the event is held next year, I have to make the trip. Dan
-
It was indeed great to meet and hang out with you and the other HybridZ members at the convention. I hope to do it again soon.
-
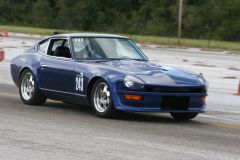
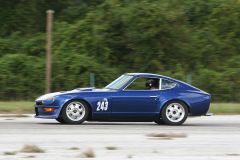
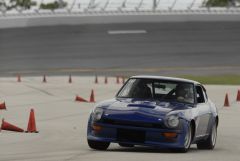
I just got my CD with the photos from Daytona. There are ~1200 great images. Here are a few of my favorites: These photos and the other 1200 photos from the convention are available on CD from Steve Rossini at http://http://www.highlanddesignstudio.com/...on07-home.html
-
-
-
-

HybridZ custom suspension design thread
74_5.0L_Z replied to e_racer1999's topic in Brakes, Wheels, Suspension and Chassis
bjhines, I wasn't offended, just surprised. Why do you say that it is necessary to go with rear steer? Achieving 100% Ackerman is not one of my goals. There are many options as far as uprights that will work with a front steer set-up.

