

80LS1T
-
Posts
2545 -
Joined
-
Last visited
-
Days Won
3
Content Type
Profiles
Forums
Blogs
Events
Gallery
Downloads
Store
Everything posted by 80LS1T
-
This probably isn't the right forum for this question, you might get a better response in the "Electrical" forum. I just bought a 18 circuit painless harness but I don't know if I'm going to install it this summer or wait till winter when the car is no longer on the road. I would be interested in the feedback on this too. I figure the wiring can't be that bad just time consuming. It's got to be better than the crusty ol' factory wiring! Guy
-
-
I really like the tail light and the rear panel! VERY CLEAN! I'm not sure what your talking about with the PCV pipe though? Guy
-
What lenses are you running a6t8vw? Is the light beam scattered like everyone says it will be with out proper lenses? Basically I want Xenon's but don't really want to shell out $850+ for a real set if I dont have to! LOL Guy
-
81 280ZX SBC 400 V8 conversion questions
80LS1T replied to BigDaddyJC's topic in Gen I & II Chevy V8 Tech Board
That tranny is not ideal for a street car unless all the driving you do is in town. No overdrive is a real downer on the highway and you'll be reving the motor in the 3500 RPM range while cruising at 65-70MPH. I would go with a 200R4 built up or even a 700R4 built up. The 200 has better gearing from what I have read from other members. I don't know if you'll need to modify/beat the transmission tunel with a TH350 tranny but you will have cut the ears off the tunel. Are you going to make your own mounts or buy them? The MSA ones are overpriced if you ask me. You can build mounts for a 280ZX V8 pretty easy....all you have to do is make a mount that adapts the chevy 3 bolt pattern on the block to the 2 bolt pattern on the datsun mount and bingo your done. Just have to add the right amount of space on each side. I have the rough dimensions on my website for how high then need to be. Welcome aboard by the way! Guy -
So what is junk about them? Obviously you don't get real Xenon projector headlights for $40. Is the actual housing junk? or are you just not happy with the light output? Also what are teh BD ones? Guy
-
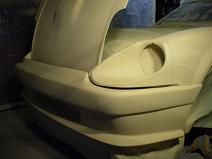
VinhZXT's front MSA type II bumper mod progress!
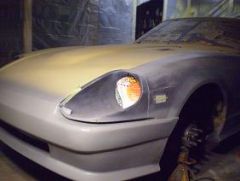
80LS1T replied to 80LS1T's topic in Body Kits & Paint
Ummmmmm...pull up on the back of it......LOL :lol:J/K! The hood actual sits under the lip so how it opens hasn't changed at all. I think my car is going to be in 100% primer by tonight! Then I have to start blocking the whole car! Oh boy oh boy! Guy -
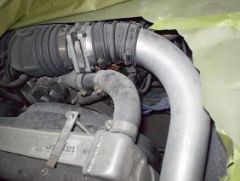
I forget what GM calls that throttle body elbow, 1LE or something, but it does not have the hole in the bottom for the resonator pipe. Oh thats not alluminum, it a steel pipe that I painted that color! LOL The piping is 3". Guy
-
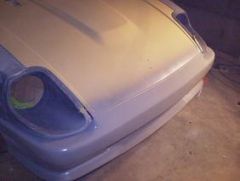
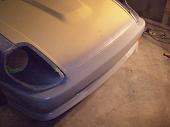
VinhZXT's front MSA type II bumper mod progress!
80LS1T replied to 80LS1T's topic in Body Kits & Paint
Here's some updated pics! It was a pretty easy mod even with filling in my blinkers. The only tricky part was getting the new part of the spoiler straight but it just took some time that's all. I can't even explain how much better this spoiler looks with this done to it. That big gap that was there really sticks out, makes it look like somethings missing if you ask me. This mod was pretty straight forward and with a little time and effort can be done by even a rookie like myself! Guy -
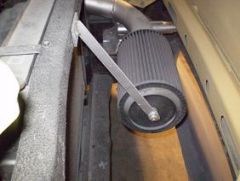
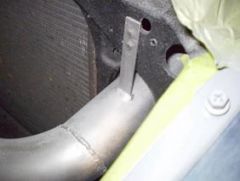
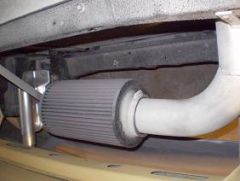
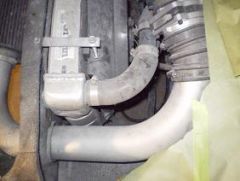
I didn't want to hijack "piston's" thread about his car so I'll make a post for my CAI set up on my LT1 powered 280ZX. I made a cold air intake just like "piston's" out of a 3" u-bend that I bought from summit. I just cut the pipe in half and positioned it where it needed to be and welded it up! For the pipe to MAF sensor I used a coupler from a 98' Dodge Caravan airbox(cheap!) and then slapped on a K&N. I also made a bracket that goes from the pipe to the radiator support for extra strength. Then I drilled a hole in the end of the K&N and ran a bolt through it to a bracket also mounted to the radiator support. The only significant cost for this was the filter! The pipe was less than $20 and teh coupler was like $12(new) and then it was just my time to put it all together! The dodge caravan coupler, from the MAF to the 3" pipe. This is where I welded on a bracket to the pipe and mounted it to the radiator support. You can also see where I welded the pipe back together after cutting it in half and positioning it as needed. Here you can see the other bracket that I made and bolted onto the intake end after drilling a hole in the filter and sliding a bolt through it. Guy
-
-
-
-
-
-
-
-
-
-
latest lt1 swap pics...56k beware
80LS1T replied to piston's topic in Gen I & II Chevy V8 Tech Board
NICE JOB so far! Looks very clean! Might what to think about a heatsheild fo the PCM since the header is only a few inches away. I made a cold air intake just like yours out of a 3" u-bend that I bought from summit. I just cut the pipe in half and positioned it where it needed to be and welded it up! For the pipe to MAF sensor I used a coupler from a 98' Dodge Caravan airbox(cheap!) and then slapped on a K&N. I also made a bracket that goes from the pipe to the radiator support for extra strength. Then I drilled a hole in the end of the K&N and ran a bolt through it to a bracket also mounted to the radiator support. The only significant cost for this was the filter! The pipe was less than $20 and teh coupler was like $12(new) and then it was just my time to put it all together! I can get pics if you guys want them.... Guy -
lt1 fan to relay wiring...relay pin#
80LS1T replied to piston's topic in Gen I & II Chevy V8 Tech Board
The LT1 PCM relay wiring is deffinetly confusing. I didn't wire my up right the first time either. Here's how it should be though if I remember correctly.... PIN 85- Comes from pin A11 on PCM(ground through PCM) PIN 86- is power from IGN 12+ (10A fuse) PIN 87- is the power feed wire for your fan PIN 30- is power through a fuseable link from BATTERY+ Then all you need to do is connect a ground wire on the other side of your fan wiring.(This is for a single speed fan by the way). Here's some good info for LT1 wiring and relay wiring.... http://www.the12volt.com/relays/relays.asp http://www.datsun-280zx-lt1.com/LT1_WIRING_INFO.html Guy -
Just send me the $94.00, I promise the $5000 check is in the mail...... Guy
-
If you run a 30mm offset you will have to run spacers. I run a 42mm offset and I have to run the Modern Motorsports spacers to use my 17x7's. Someday when I grow up I want to run something like a 10" tire in the rear, sure would be nice for more rubber and I think it would look better! At this point though I just want my car back on the road so new wheels arent't in the budget at this point! Guy
-
350 to original 3 speed auto.possable, yes/no ?
80LS1T replied to a topic in Gen I & II Chevy V8 Tech Board
How many times is this questoin going to get asked? I'm sure it can be done but you would have to have a custom bell housing made and even then the tranny wont last. Besides the 3 speed auto had horrible gearing if you ask me! Guy -
If you save the picture you should be able to zoom in on it with "paint" or other picture viewing software pretty easy. What I'm saying is that the PCM grounds the injector. There is no ground wire running from the injector to the battery or engine. The PCM is grounding the wire internally. If you grounded the injectors they would run fully open all the time(100% duty cycle). That's not what you want. Now with the PCM and injectors disconnected....Check your wires on the ground side of the injectors from each injector to the PCM with and ohm meter, they should read less than 1 ohm(usually .3-.5 ohms). Also check for shorts to power and ground. What you do there is run one wire of your voltmeter to the + side of the battery and take your other lead and run it to the wire, if you have any significate voltage you have a short to ground. Now to check for a short to power, you run one lead of your voltmeter to the - side of the battery and run the other lead to the wire, if you have any significate voltage you have a short to power. If you have either type of a short you will have to trace out the wire and find the pinched or rubbed through wire. Are you sure its an injector? How old is your OPTI? Did you check for spark at the bad cylinders? Guy