-
Posts
629 -
Joined
-
Last visited
-
Days Won
2
Content Type
Profiles
Forums
Blogs
Events
Gallery
Downloads
Store
Everything posted by beermanpete
-

Not running after rebuild
beermanpete replied to IncompetentOne's topic in S30 Series - 240z, 260z, 280z
The factory service manual is available at http://www.xenons30.com/reference.html It sounds like you have the timing off 180 degrees (at the distributor). Check to be sure you have the #1 cylinder at TDC on the compression stroke not the exhaust stroke (valve overlap). Once you are sure about this make sure the #1 plug wire is placed in the cap at the position that is in line with the rotor tip. Next, verify the firing order is correct, 1-5-3-6-2-4, counterclockwise looking at the distributor. -

Nissan Project 370Z vs 1970 Datsun 240Z with RB26 Track Battle!
beermanpete replied to 283VZ's topic in Non Tech Board
Great show. Awesome cars. I found it interesting that they featured Gordon through the entire video but hardly mention the guy who built the 370Z. -
That kit does not include the o-rings and seals for the speedometer drive and the striking rod and guide. Also, the pins for the shift-forks should be replaced. You could also replace the shifter dust-boot and clutch release fork dust-boot if needed while you are at it. All are still available from Nissan.
-

We don't need no stinking fusible links!
beermanpete replied to Warren's topic in Ignition and Electrical
The 73 has one fusible link at the starter solenoid to protect the car wiring. The alternator output is not separately protected by a fuse or fusible link. If you add a fuse to the alternator output use a fuse that is a bit bigger that the alternator's current rating. For a 60 amp alternator a 75 or 80 amp fuse is about right. -
The line with the Tee in it you mention is the float bowl vent. If fuel is coming from the vent your float and/or float valve needs attention. Since your car has been sitting for a long time it is likely a good cleaning is all that is necessary. A gasket kit wouild be a good idea to have on hand but the that cause the leak are the float and float valve. The float valve will likely come with the rebuild kit. If the float is bad you will have to get one separately.
-
I used a 36mm crow foot wrench. You can use it with a torque wrench but need to calculate the affec it has on the reading due to the length of the crow foot wrench.
-
We installed a new trans output shaft seal and trans mount. We also worked on developing a front brake mod to allow using vented rotors with the stock calipers.
-
It does net seem likely all the wheels would be bent. Are the mounting faces smooth, or are there burrs or signs of damage? Is the run-out axial or radial?
-
The fuel pump in the 73 does not get power through a relay. Look for an in-line fuse holder near the fuse box with green wires. The fuse should be 20 amps. The car will run without the electric fuel pump if the mechanical pump is working.
-

Removing Crank Pulley - World's Longest HG Replacement
beermanpete replied to Soup's topic in Nissan L6 Forum
Yes, unless you have a bushing to place in the end of the crank shaft for the puller draw bar to sit on. Make sure to thread the screw in most of the way and to stop when the damper hub gets near the screw so you don't damage something. Loosen the screw a bit more to get more room to finish removing the damper. The small bolts in the hub are 1/4-20 on the 3 dampers I have. Others could be 6mm, I don't know. If you removed screws from there it is simple enough to ID the thread size. If there are no screws in there then clean the threads and try various screws to see what fits properly. Be sure to use the correct size thread and that there is plenty of thread engagement. There is a lot for force involved and you don't need the headache of repairing those in addition to the work you are already involved in. -

Removing Crank Pulley - World's Longest HG Replacement
beermanpete replied to Soup's topic in Nissan L6 Forum
You should not use a gear puller to remove the harmonic damper (crank pulley). It stresses the rubber material in between the inner and outer parts of the damper and could damage it. The damper has 2 holes in the hub section with 1/4-20 threads for pulling it off. Use a harmonic damper puller to remove the damper safely. See this website for an example of the puller: http://www.autozone.com/autozone/accessories/OEM-Harmonic-balancer-puller-kit/_/N-2640?itemIdentifier=555524_0_0_ You might need to remove a pulley from the front of the damper first to reveal the removal holes. Some (all?) of the Zs have pulley bolted on using the removal holes. Apply penetrating oil to the crank/damper and let it soak in for a while. It also helps to grease the draw bar threads. The puller will last a lot longer and you won't have to use as much force to turn it. -
the Flowbee would
-
The next morning
-
Just then a
-
out popped a
-
He must not be an AAA member.
-
The first thing you need to determine is where the brake fluid went. Why is out of fluid? If it is the master cylinder there will be brake fluid in the cavity between the master and the booster. If that cavity is dry you should check the wheel cylinders, hoses, fittings, etc. You will have to open the master and compare the old parts to the new parts to verify if your kit is correct.
-
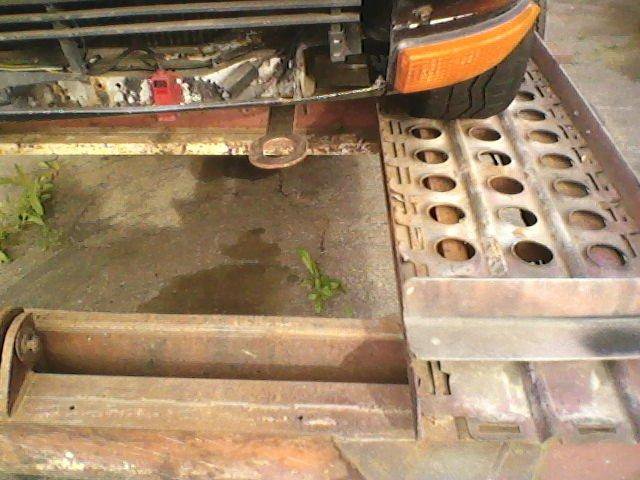
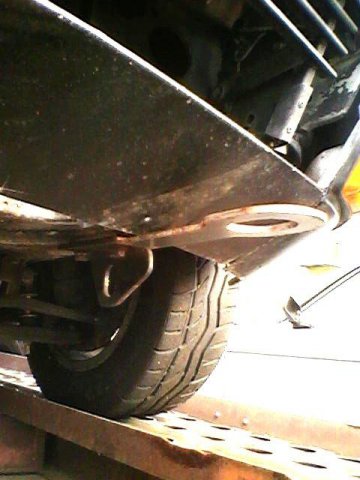
I made a tow hook that bolts to the frame where the factory tie-down hook is. It is lower that the ZCCJDM hook and horizontal but fits without cutting the valence and does not require any new hardware. One of the there days I will take it off and paint it.
-
Have headache now.
-

First Z(280Z), new to the threads, need some advice
beermanpete replied to iDev's topic in S30 Series - 240z, 260z, 280z
From what I see in the photos the car is not a 9/10 on the body. Are you up to a blind engine install? If not don't do it. -

erratic fuel air ratio readings
beermanpete replied to wickiewicked240z's topic in Trouble Shooting / General Engine
Exhaust leak? Does the car run well? -

First Z(280Z), new to the threads, need some advice
beermanpete replied to iDev's topic in S30 Series - 240z, 260z, 280z
I recommend getting the car with the engine and transmission so you will have less unknowns about how to rebuild or replace the engine. $800 is a lot for a know bad engine however. For $2200 you can find a running car that is in decent shape. Unless the body is in VERY good condition you might want to keep looking. Certainly you need to look at the car in person in the daytime and take a good look at it. Check for rust. -
You said you replaced the "oil driver and gear". Does this mean you took the oil pump out? I suspect you have the timing wrong, as New Zead has already said, due to installing the oil pump gear out of time. If this is the case, you can fix it without retiming the gear. Put the engine back at TDC in the #1 cylinder (compression stroke) and look at the distributor rotor. Put the #1 plug wire in the cap at the closest position. Install the other plug wires following the firing order (1-5-3-6-2-4) in an anti-clockwise direction. If still does not start up try turning the distributor while cranking. Make sure to loosen both adjusting clamp screws so you get the full range of adjustment possible.
-
Does the shift lever move the normal amount, or does it stop short of the normal positon for a particular gear?
-

76 280z brake upgrade issues
beermanpete replied to HaxMcJax's topic in Brakes, Wheels, Suspension and Chassis
Yes, you need to make the push rod shorter (inwards). You can pull the push rod out a bit but this is how you get into trouble with the reaction disk. If the reaction disk falls out the pedal will be low and the brakes will feel really odd. It is probably better to remove both the master cylinder and MasterVac and set the push rod length while holding the MasterVac with the push rod pointing up. There are 2 push rods. One between the brake pedal and MasterVac and another between the MasterVac and master cylinder. Both push rods require free play. Push the brake pedal carefully with your hand and you should be able to feel 2 distinct changes in the feel. One when the brake pedal and its push rod begin moving the MasterVac and another when the MasterVac begins moving the master cylinder. The service manual specifies the measurement for how much the MasterVac push rod should protrude past the flange where the master cylinder attaches. Up to 74 the length is 3.5 to 4.0 mm. For 75 and on the length is 9.5 to 10 mm. If you have parts from mixed years you might need to use something between these values. My car ended up at about 7 mm if I recall correctly.


