ZHoob2004
-
Posts
321 -
Joined
-
Last visited
-
Days Won
2
Content Type
Profiles
Forums
Blogs
Events
Gallery
Downloads
Store
Everything posted by ZHoob2004
-
Alright, list incoming. I'm by no means experienced with turbo swaps, but I think I can get you on the right path to identifying everything you have and what it does. First thing, I see a mostly stock 280zx turbo swap dropped into your 280z. This is pretty good, because it means you only really need to look for information about those two cars. Manuals can be found here, here, and here. (plus more, google '1977 280z service manual'). Now the list: 2, 25 - This is your antenna cable 3, 30 - Duct for one of the vents (I think that's the driver's floor vent, if I'm not mistaken) 9 - You're probably right about it being boost gauge. The plates aren't stock. The one towards the firewall is EGR delete, the other is likely related though I'm not familiar. You may or may not need to "fix" these, depending on local regulations. I can also see your valve cover breather is venting to atmosphere through a filter, which is creating a large vacuum leak. The breather should be connected to filtered air from a pipe downstream from your Air Flow Meter (AFM - see pic 20) 11 - Yes 14 - Lucky for you, whoever did the swap decided to connect the heater hoses, so that's nice. On these cars there is a vacuum-operated valve just inside the firewall that prevents coolant flow to the heater core if the AC is running. It also prevents flow if the valve loses vacuum for any other reason, which I suspect is your problem. These valves are expensive. 15 - The silver box is a mechanical voltage regulator. A common mod is to remove this and swap the alternator for an internally regulated model, such as the one that came stock on the 280zx. Since this is a 280zx swap, it is possible the alternator mod was done as well and the old regulator was simply disconnected and left in place. 17 - The "pill" looks to be a condenser (capacitor). Ordinarily it is located next to your coil to help reduce the voltage dips and spikes the coil causes as it charges and fires. I'm not sure what it's doing over there. 18 - Those connectors are for the vacuum tank solenoids from the stock AC system. The vacuum tank was a chamber to "store" vacuum (can you store the lack of something?), this was to help the smoothness of the vacuum operated vent system (all the blend doors are operated by springs and vacuum). Not expressly necessary for vent operation the solenoids are only useful for the stock AC system. Without the tank, your vents will just move back to their default position when the engine isn't running (and go back where they were when you start it). 19 - Those fuses aren't actually for the sound system! Originally, the car used 4 "fusible links" for the main fuses, which were just special wires that are supposed to melt at specified current ratings (this is exactly what fuses are). A common mod is to replace the fusible link system with something more durable, hence the maxi fuse block you see here. 20 - This is your AFM (air flow meter). It uses a flap and springs to measure the speed of passing air, then uses this to guess how much air has passed. Think of a fairly primitive mass air flow sensor. 21, 22 - These knobs control the fresh air vents in the footwells. There are openings in the body under the fenders by the occupants feet with flaps controlled by these knobs. Pull to open to get a flow of fresh air into the car, especially at higher speeds. Also useful in hot weather to let the car breathe while parked. 23 - I'm not sure what those wires do, but there's an ABSOLUTELY AMAZING wiring diagram for the 77 280z available. (as well as some others) 24 - Yes 26 - These are the plugs for the lights and switches that go in the center console, which you appear to be lacking in these pictures. The hazard switch mounts in the console in front of the shifter. 32 - That's a vacuum actuator for one of the vent doors. I think that one is the recirculate door, but I'm not 100% from just pictures. An additional note on the heater system, there is a vacuum line that runs from the engine, through the firewall near the heater connections (almost behind glove box) to the vacuum valve under the dash. I would start my search there, since on my car that hose was simply cut off and that is why my vents did not move. You may also want to add a check valve to this connection so that your vents don't move whenever you have low engine vacuum (such as when you're on boost) I ended up writing a lot more than I planned to, so I hope it's helpful. If you have any more questions I'll try and answer them as best as I can, and I'm sure some other members will be here to chime in as well.
-
Electric pump only. I don't think it ever ran very well with this setup, the pistons were caked in carbon and the carbs frozen. And in response to that other thread, it can't be an earlier cam because it's internally oiled
-
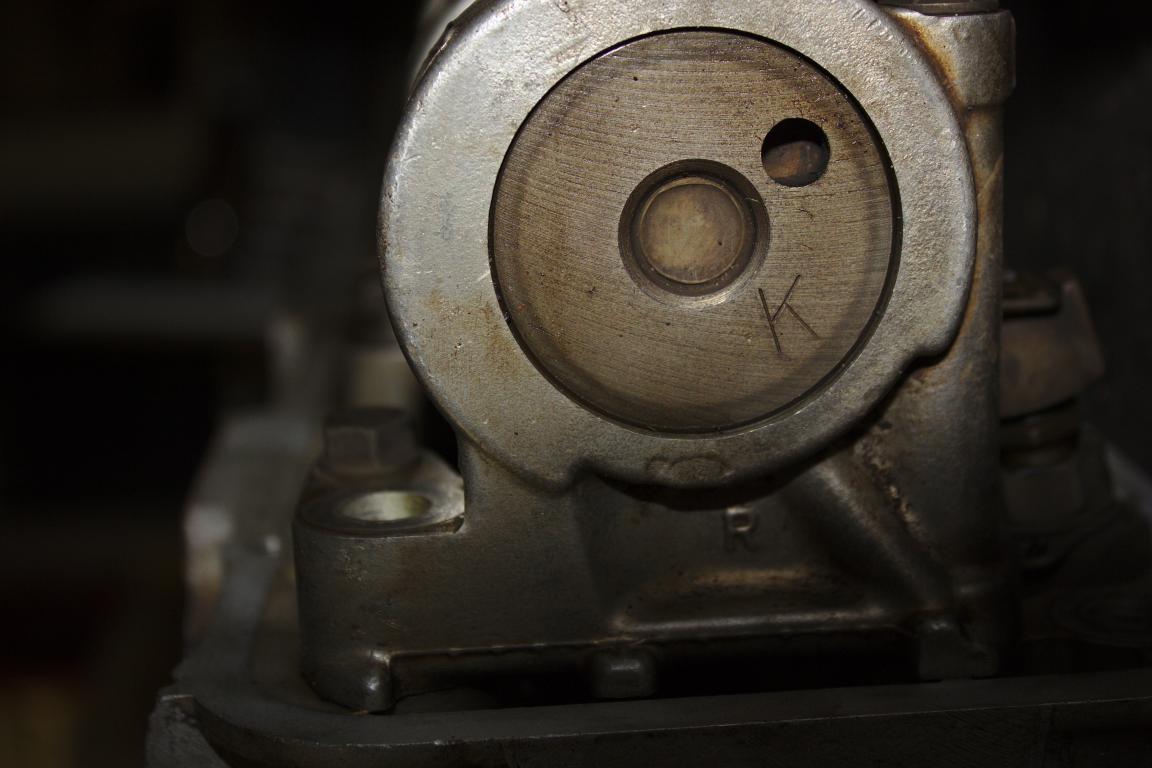
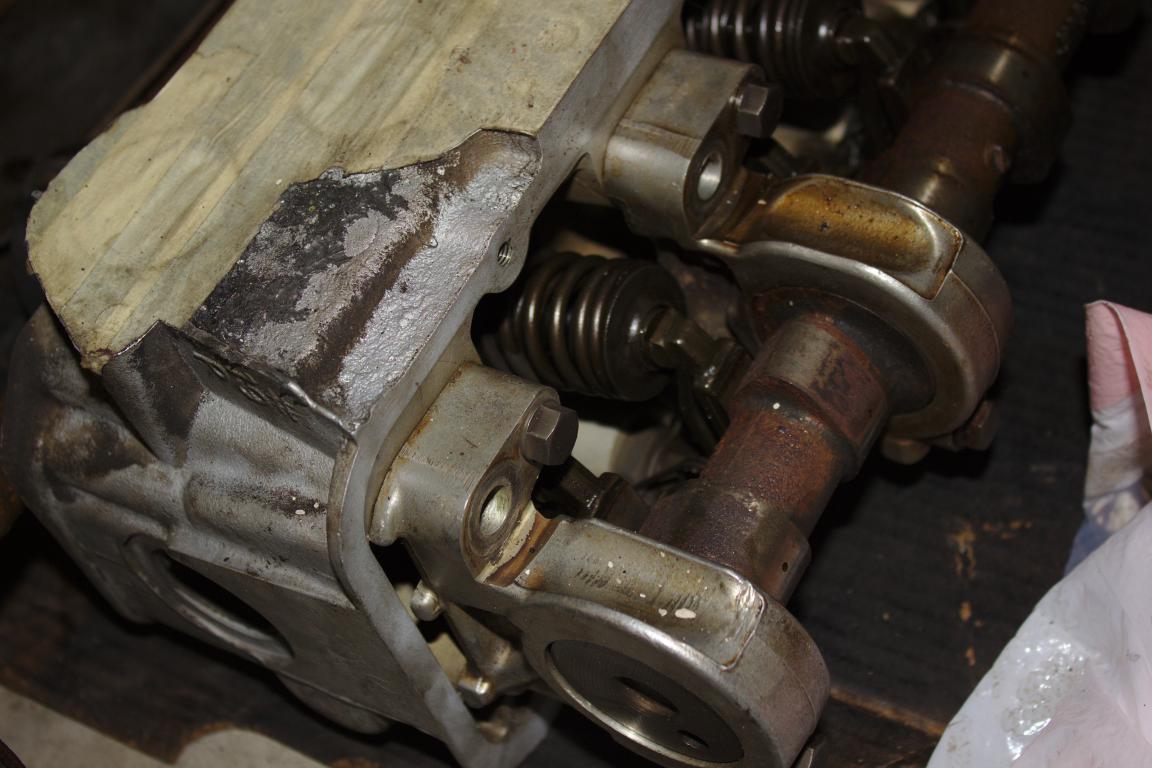
I recently purchased an F54/P79 motor that is presenting me with a few mysteries and I'm wondering if I can find any insight here. Here's the story so far: The motor was pulled from a 260z with a pair of flat-top SUs and a complete factory smog system (air pump and all) Was the p79 tapped for carbs still? The inside of the motor, aside from some significant carbon on the pistons, is like new. All bearings check out, the crosshatching is still present, no sludge, it's perfect. The cam has a "K" stamped in it, clear as day, and I've never heard of a K grind. Oh, and it has an elephant oil cap. Does anyone have any info about the K grind, such as where it comes from or what it is? I've seen a few mentions online but nothing substantial.

-
Chris Rummel's easy follow RB into Z wireing guide
ZHoob2004 replied to Rumnhammer's topic in Nissan RB Forum
I checked archive.org for this thread and it has a few pictures cached, but not all of them. I guess it's better than nothing, right? https://web.archive.org/web/20160822221212/http://forums.hybridz.org/topic/50138-chris-rummels-easy-follow-rb-into-z-wireing-guide/ -
You want to lock the distributor if you are using some form of electronic timing control, such as a megasquirt. You can run megasquirt with a single coil and a distributor, much like the stock system. In this configuration, you would disable the mechanical and vacuum advance on the distributor to not change your timing since it is being controlled by the megasquirt instead. Later distributor motors, such as the Honda motors I'm most familiar with, do not have any vacuum or mechanical advance because it's all controlled by the ECU.
-
There are a few sources for stronger stub axles, and I've also seen a number of people weld stub axles and companion flanges. Anything is possible as long as you're willing to put forth the time and/or money. http://www.modern-motorsports.com/stub-axles.html https://whiteheadperformance.com/product/whp-billet-chromoly-stub-axles-27-spline-datsun-240z-260z-280z/
-
I wouldn't be surprised if one or both of your front lower arms are just barely tweaked. I had to replace a bent arm when I got my car, and a lot can happen in 40+ years.
-
Self tuning will only get you close. There's more to tuning than maintaining afr and advancing ignition until it pings.
-
You can attach pictures directly to the forum by clicking the "attach files" button at the bottom of a new post. No more photo hosts to hold your pictures ransom.
-
Looking for New Steering Rack Feedback
ZHoob2004 replied to Samurai7one's topic in S30 Series - 240z, 260z, 280z
Let us know what you find when you install it, I'm extremely interested as well. My rack needs replacing and I think I'd prefer a modernized replacement than to rebuild the original. On another note, that tube on that rack looks very similar to the unit installed in my 1991 Honda. Is there a weird plastic bushing just inside the passenger end of the rack? -
Coolant overflow tank for 1972 240z
ZHoob2004 replied to princejqman's topic in S30 Series - 240z, 260z, 280z
Mishimoto has one that looks nice, but they're a little pricey (cheaper elsewhere, such as amazon) https://www.mishimoto.com/aluminum-coolant-reservoir-tank.html -
3D printed sr20 cas pedestal for the l/z engines
ZHoob2004 replied to spiff's topic in Fabrication / Welding
A lot of plastics under the modern car's hood are ABS, but it should be noted that ABS for 3D printing is formulated to soften at lower than normal temperatures, and is probably right on the edge of what would be tolerable in this application. 3D printed ABS should tolerate up to ~105c, which I think is a little low, but maybe passable for something in contact with the engine block. At the same time, it's on a corner of the block without a lot of material to move heat to it, so it might work as is. One workaround here is to use a spacer or gasket (distributor gasket?) to keep the heat from moving too readily to the adapter. I believe a higher infill percentage can also help with the strength in heat. Nylon should work great in this application, with a melt temp typically higher than 200c (and no glass transition, so it doesn't get soft before then), but nylon sucks to print, so it's harder to find someone to make it for you. (requires all metal hot end, heated bed, saint-like patience) If I get a chance this weekend I might print out a rough analog in PLA, ABS, and PETG and zip-tie them to my distributor and see if they melt. I can stuff a few under the hood of my honda as well and see how they fare. I've been meaning to try out 3d printed engine parts for a while, just haven't had a realistic enough application. -
If you set the timing mark and used a tool to keep the timing chain tensioner in place you could theoretically assemble everything without the head. Personally I don't really think it's worth the risk to go out of order on the assembly and not be able to properly check it.
-
$150 each seems a little steep to me, especially for 40 year old pieces of plastic that I can only assume would be just as brittle. At that price I could buy carbon fiber. Does anyone make a fiberglass version that is cheaper, or will I have to try out my custom idea after all? I'm not going for original, just something that doesn't look like trash.
-
What do people usually do for replacing/refinishing the tail light panels on a 280z? Mine are pretty thoroughly destroyed, cracked in multiple places and very brittle and porous. I tried to repair them by adding some bracing over the breaks and glueing them back together, but they just break somewhere else if you look at them wrong. Does anyone have a source for decent replacement panels? I've seen used ones for sale as well as carbon fiber, but they're all a little expensive. Right now I'm thinking of cutting a piece of black ABS to fit around the tail lights such that I can still use the chrome trim ring, but I'm not sure how it will look.
-
What does your differential mount look like? With the torque that LS is putting out, I wonder if it's moving the nose of the diff enough to misalign your driveshaft and that's where your noise is coming from. I know a lot of people switch to the Ron Tyler style mount to cope with the added torque.
-
Just from the picture the triangular piece is broken at the mount, so that's probably not helping anything.
-
Shaved & Shimmed P79 - use 300zx springs? No Spring shim needed?
ZHoob2004 replied to turbogrill's topic in Nissan L6 Forum
I believe what is meant is the idea of shave the head, shim the towers and use n47 valves. the valves are between .080 and .100 longer (depending who you ask) and thus people say to shim the springs that same amount to keep the pressure and installed height the same. I'm also curious about this, could one get away without shimming the springs by using stiffer valve springs they were going to use anyway? This will give pressures slightly below advertised specs, but I don't think it'll make a huge difference. Theoretically this could also give another .080-.100 of clearance for additional lift (unless the inner spring binds first) -
Need guinea pigs for 240Z rear coilover adapters
ZHoob2004 replied to G-E's topic in Brakes, Wheels, Suspension and Chassis
The hub stays basically in the same place, since it's held in by the control arms. The adapters are pushing the strut inboard, and changing the angles a bit. -
1. I've considered the idea, but heard it's quite detonation prone so I'd rather go with the better chamber design for not much more effort. 2. Programmable fuel would be nice, programmable ignition even nicer. I hope to have both eventually, but we'll see what comes first. 3. The springs sound like a good idea to look into. I'm not planning to shim the springs, so I'll have to ask around and see how that will affect the spring pressure. 4. I'm planning to rev to ~7000 so not too crazy for the stock bottom end. Can selection is a whole topic in its own right but that isky .540 is looking pretty good at the moment. I have a few cams I can send to be reground so that should save me a bit. 5. I do have a set of headers on the car right now, just forgot to mention them. I believe they're msa 6-1 from pictures I've seen online. 6. Based on a few other builds I think I can get away with a stock clutch or just slightly stronger, so that's what I'll start with. I appreciate the offer, but shipping will be the killer on either of those. I think running the p79 is the way to go for me. Way I see it P79 needs shave, shims and maybe valve swap (can be done with lash pads) MN47 needs valve seats replaced, valves swapped. When changing cams, both will need a valve job, rockers, lash pads and springs It's not different enough one way or the other to justify not using the parts I already have.
-
Is swapping the valves really necessary, or could that height difference be made up with really tall lash caps? I think I want the p79/valve swap route anyway since that theoretically gives me another .080 of lift before coil bind and stem seals become an issue, correct?
-
I'll keep an eye out. I may end up taking my time to do the bottom end a little nicer than originally planned and I can find a maxima head, though I don't know how much that will save me versus just making the p79 maxima-like.
-
I would love to go that route, but the mn47 is proving a bit hard to source. I stumbled across this motor on Craigslist for $400 so I figure I'll give it a shot.
-
When I say "Stage 3" I'd say it's about equal to or maybe a bit less intense than the cam you described. The plan of course involves speaking with a few grinders and picking out a profile. If I do go standalone (probably not happening for a bit, but we'll see), I'll most likely be going COP at the same time, so I should have timing under control. I'm trying to keep within a bit of a budget right now but am willing to stretch if that proves necessary. I'll read up on your engine build and see if anything there catches my eye. So based on you and Leon, I think I might be better suited with a more conservative cut on the head (at least to start out with), shim the cam whatever I cut out to maintain valve timing, swap the cam and springs and see how that makes me feel. When I decide I want even more, I can up the compression again, add an adjustable cam gear and mess with the valve lengths as necessary.
-
To start off, I already typed this once and lost it, so think of that if this seems at all incoherent. I'm planning an l28 build for hot street/ very mild race. I'm currently running a stock n42/n47 and I want a bit more. I recently bought an f54/p79 and think it's a good base for my future plans. Anyway, the plan: F54 with flat tops. Probably keep the stock bottom end for now, unless there's a good reason to change something. Lightweight flywheel Decent clutch (stage2?) P79 head, shaved .080-.100, shimmed cam towers, adjustable cam gear, performance valve springs, n47 valves, mild porting, and a stage2/stage3 cam. I have a pair of flat-top su carbs or i might switch to megasquirt 280zx distributor Questions: am I correct in understanding the main problem with shaving the head is not the valve timing, but the excess chain length? Will I have any problems running this combo on Arizona 91 octane? Will I need to do anything about piston-valve clearance? Is a stage3 cam too much, or am I being too cautious? Sorry for so much at once, I've seen a lot of this information around the site but never all in one build with a conclusive yes/no