tube80z
-
Posts
1402 -
Joined
-
Last visited
-
Days Won
31
Content Type
Profiles
Forums
Blogs
Events
Gallery
Downloads
Store
Everything posted by tube80z
-
Dan would have to answer but we're missing the spam plugin. It appears this software has a license fee that isn't trivial that Dan has been paying. I'm not sure how much the spam plugin costs but there may be other reasons it stopped working I don't know about.
-
Also removed. I try to make sure I check the site a couple of times a day but it doesn't always work out that way. I appreciate the extra help in getting rid of these.
-
These are all flagged as spammers.
-
The main reason was weight. Moving to 15 inch wheels in the combo I was using added almost a hundred pounds to the car. This was an autox/hillclimb car and not a road racer. I wouldn't have used 13s on those.
-
Heavy Duty frame rails and connectors
tube80z replied to toolman's topic in Gen III & IV Chevy V8Z Tech Board
If you like I can add these as an FAQ. I'm going to link to these for now from your other message. Cary -
Thanks NewZed. Those and a bunch of others have been flagged as spammers. I've also removed from bot posts and topics from the forums. I've been away for a few days and unable to do my daily patrolling. We seem to have a lot more spam activity lately and it will take the village to fight them. Thanks for all the help, Cary
-
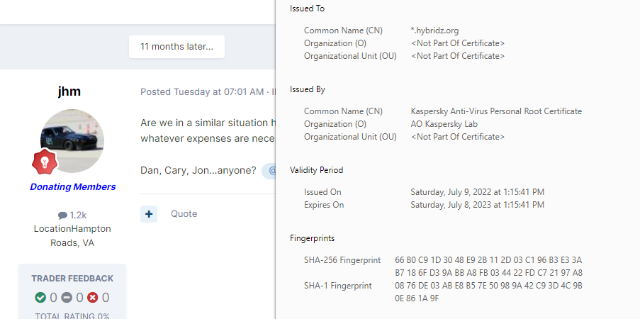
Hi JHM, I'm not sure why you are seeing this. When I look I see an updated certificate. The only issue I think might be an issue is if your browser doesn't consider Kaspersky to be a safe certificate authority. What do you see for the certificate details? Thanks, Cary

-
I sent Dan a DM to look into this. I don't have access to these functions. Sorry, I'm not more help. Cary
-
Yet another Rear control arm design
tube80z replied to tholt's topic in Brakes, Wheels, Suspension and Chassis
All in on sounds easy from the office chair I don't think I'd make a spacer myself but just move the entire plate over and weld up the old holes. That way you can still check on things easily and, if needed, doe some basic adjusting. And since you are rebuilding think about making an end stop that would allow you to easily measure or drop spacers for pre-aligned camber. -
You can weld to it fine. Greg most likely was worried about distortion. What I found when doing my brakes (remember 13 inch wheels) is that the original ears the caliper bolted to will interfere with the new caliper as you try and bolt it up. So you need to remove some section of these in order for everything to align. As Clarke mentioned this is some really tough steel. I milled one side of the bracket and it took a few days of working on it in the evenings and ruined a couple of cutters. Next side was sliced off using a fire axe (cutting torch) and then ground smooth. New bracket was welded to the old base.
-
Yet another Rear control arm design
tube80z replied to tholt's topic in Brakes, Wheels, Suspension and Chassis
The 0.120 DOM is going to be stronger than the the rest of the components you are bolting into. If you every get a large lateral hit (curb/pothole) what is the fuse that will blow? I'm not sure how you are welding studs to the strut but I'd personally weld on brackets that allow me to bolt to the strut using a much smaller (shorter and smaller diameter) bolt that is in the same orientation as the strut tube. These can the connect to a monoball or the rod end as needed. Another variation is to weld the monoball cup to the strut tube and use a clevis on the control arm to bolt to the strut. -
These accounts have all been flagged as spammers and I have removed the posts that were made. I allowed one to stay that was indicated as a bot but have sent them an email asking them to respond on why they are not a bot and should be banned. Thanks for all the help everyone, Cary
-
I have been very aggressive at banning accounts and hiding posts/threads from spammers. It's possible this is related to me but when I look at the post I don't see the info mentioned. Another mod may have already deleted it. Thanks for reporting, I can't get them all. Cary
-
Link works fine for me. Link works fine for me.
-
To answer the first questions, yes and yes. You will need another joint and a intermediate shaft support. Do you also have clearance around the engine? When I mocked up mine using a similar rack with the L-series block I had a small interference with the lower corner. I had to slide the entire rack to the driver's side to clear. The shorter V8 block didn't have that issue.
-
Cool additions. I was looking at some similar models too then a friend bought some and I wonder how often I'll do this versus stop by his shop. If you don't mind my asking what drove the purchase decision in your case?
-
Yes, on my old F2000 and a friends FA car. What kind of floater are you using? Is the floater also sprung or is that mounted solidly and only the disk floats? If you're using bobbins those should allow for a little of each. There's also the t-nut style and fancier stuff when you go up in dollars. I've had both bobbins and t-nuts and on each they were torqued to spec and not safety wired. Did any spec come with the new hardware? I can give you my advice but since it's 25 to 30 years old I'm not sure you'd want to trust it Prepare to Win claims 0.002 to 0.004 radially and 0.006 to 0.008 axially. When putting these together I'd check the hub, then with hat mounted, and finally with the disk mounted. The floater to floater plate will wear over time and you need to make sure none of the floaters get too loose. That's about all I remember except for having to crack open PTW for actual numbers. Hope that helps, Cary
-
I was going to do a lot of replies but I'll just distill my relationship with data and how I've found it useful or not useful if that's the case. I mostly autox and hillclimb, but I help friends at circuits and have been exposed to really high levels of DA through my professional work. I've taken a ton of data classes over the years like Claude Roulle's optimumG training, John Block's excellent data courses, a number of race engineering vehicle dynamics seminars, etc. I also have an excellent collection of well-used books into what's needed. For me this is something I like and enjoy learning more about and digging into. For a lot of people this is considered too technical and all they want to do is drive and have fun. If you fall into the latter category you can quit reading :-). Please keep in mind this reply is for people with older cars that don't have CAN/ODBII. The single most important thing you can do is to keep records. At the minimum you want to record the course, lap times, basic weather info (warm dry vs wet cold) time of day/date and what needs to be fixed so you could drive better or make the car faster. If you have an event or option to do practice or fun runs you can use those to make changes and then see if that helps or not. How to make easy adjustments to your car to figure things out could be its own thread. It also important to get pictures from the event where you can see your car loaded up in a corner as well as those that are faster than you or in the same class. There's a lot that can be learned from these photos. And ideally have someone take video of the same cars and if possible use a tripod so you can tell what are and are not trying to see if the car is hopping or the camera operator(phone owner) had too many lattes. These days almost everyone has a camera and most of these also capture video and those get shared on social media, which makes it easy to collect this info. One really cool trend that I think helps is the emergence of many packages that merge data and video. There are now packages that exist that let you use nothing more than a GoPro camera as a data logger and you can get some very basic info. As @Ben280 mentioned for autox there's solostorm, garmin's catalyst, Aim's solo, Apex Pro, phone apps, etc. There's no right answer for what is right for you. I would say it helps if you have the same thing as other people and you have a way to sync the data to video. The latter is extremely important if you want to know why a run was better or worse. The hard part is getting feedback on what you need to do to improve/go faster. For autox it's impossible to read a dash on most courses, but a green or red graphic or LEDs is something you can see if this is important to you. I can also tell you that many apps that use GPS as the main source of data often fail when hillclimbing. Here in the PNW a number of events are remote (no phone service) and have full growth over the road so no GPS. Circuit lapping (HPDE, races, time attack, etc.) is often where you'll see the mid-range systems used. It's still possible to use a number of the same autox systems they usually don't capture enough data. These are where you normally see the squiggly lines that make some people so excited. The good news is the low end has been pushing the middle tier options to include more video capabilities. My experience here is mostly with Aim systems and some of the older Race Technology systems (like the one @clarkspeed has that @JMortensen should buy :-)) If you're just looking to get better and do HPDE then the garmin catalyst and similar competitors will be helpful. With any of these systems the challenge is how to use the data to get better. In autox you don't have much time between runs so any analysis has to be fast, which a few of these systems are better at. For circuit racing if you're a one-man show then you often have a lot of prep between runs and data still needs to be quick but you will have a little bit more data to you should look at like engine/car health. And above these are truly fancy systems that often have a single person looking after them and helping with the analysis. I'm not going to mention these as there are probably 5 people that would be interested. So if you're still hanging in there here's what I think will be the most helpful. Starting out and I want to get better (most basic system) 1. Video pointing out of car that captures run and the main driver controls 2. Second video source capturing feet on pedals (or the BS on being flat in that corner show) 3. Speed captured against distance travelled (not time). This is important for comparisons. 4. Lateral & longitudinal acceleration. Consider adding steering, and brakes to the above list. On the brakes side it can be done one of two ways. You can look at the pedal movement and/or you can add in brake pressures. If you go for pressure make sure you are measuring caliper pressures and not master cylinders if you use a proportioning valve. This will give you a system you can use to learn to go faster. If you are thinking about doing any of this it pays to educate yourself on youtube or take a class about the system you have. A few of the companies offer webinars and paying a couple hundred for a course can put you years down the road from what you'd learn on your own. Unless you have a friend that is into this and can help. Being this is hybridZ there's still one important topic we need to discuss. @Ben280 mentioned additional sensors and the costs associated. I have some great news. You can use stuff from a JY for a lot of this and it's just a matter of calibration that you need to do. Here's a handy list. For distance (shock pots, steering, throttle, brakes -- you can use a throttle position sensor. When using with shocks, steering, or other linear source you will need to create a linkage that rotates the sensor. RC parts often are very useful. For pressures you can use JY sensors (Bosch) from any of the newer cars that have ABS. There are a lot of cars using these today. You can also get another cool part called an IMU. These are often used as part of the vehicle stability systems that all new cars are required to have. Time to stop until there's more interest. More later ...
-
240z SCCA vintage race car, restoration
tube80z replied to AydinZ71's topic in S30 Series - 240z, 260z, 280z
My friend has an EP car and they raced a dual-disk Tilton all year and we measured the disks and floaters after a couple of events and they had hardly any wear. It raced all year and had some wear on the floaters but was still in spec to be used. He then moved to a 4.75 triple disk. It's really cool to hear an L6 rev like a superbike. The EP car did have a dog box in case that matters and it's driven like Jon mentions using small stabs to get moving from a stand still. Quickest way to kill it is try and drive it into the trailer. I've seen that done a few times. -
240z SCCA vintage race car, restoration
tube80z replied to AydinZ71's topic in S30 Series - 240z, 260z, 280z
On your button clutch are you using the rally disks? I converted my 3-disk quartertilton (yes mix and match parts) to a 2-disk rally version. We have a local CP guy using one behind a 377 LS with a dog box and he's been driving on it for a year and a half at autocrosses and hillclimbs. I think Jon may have a similar setup or perhaps the grabbier metallic disk version. -
I'm looking at the new BTR rocker arms and shaft mounting kit, https://briantooleyracing.com/btr-ls3-shaft-rocker-kit.html. They use stock style rockers that I'm looking to upgrade to their new rockers.
-
Always happy to burn other peoples money
-
I don't think you'll gain too much going down this road. If you start tilting the engine you don't have much room until the balancer hits the steering rack. Even with my motor brushing the firewall I still have little clearance on the motor front drive. Another option I have seen on some of the GT cars is they use a much longer transmission input shaft and have a spacer between the bellhousing and the transmission. This wasn't done so much for dropping the transmission but to move the main weight back and help the car rotate faster. The main problem Is the height of the input shaft. If the transmission could be rotated or turned upside down you can drop a lot more. The problem is the mounting tabs at the front of the transmission. This is why I was thinking of using the spacer because the transmission side of the spacer doesn't have same problem. So now you can drop a little more. Still not easy to pull all this off and no over the counter parts you can use unless you happen to find one on ebay or some other auction site. Another crackpot idea that came to me is to faux convert this two-shaft transmission into a three-shaft version with a low input shaft. You can buy these if you have an extra $20K sitting around. I think the way Ben is spending he'll probably do that next year :-). All kidding aside, you could do this and make a drop gear setup that would mimic have a quick change rear end. I think you might even be able to use normal quick change gears. That's a lot of custom parts but this is HybridZ after all.
-
My bad, it's actually a powerbond crank damper. It's SFI certified and is 25% underdrive. I picked the small diameter balancer for the under drive but it gave me more room for the rack housing. It's similar to https://www.competitionproducts.com/PowerBond-25-Underdrive-Race-Series-Harmonic-Balancer-for-Chev-LS-Gen-III/productinfo/PBDPBU1117SS25/. It used to be $100 but now seems to have gone up to $225. There are some cheaper versions you can still find for a little over $100. I think I got mine on sale from Summit or maybe Jegs. The three bolt spindle drive will bolt to this balancer and that's a key to make it work. By the spindle used and save $$. Here's an example of a new version from Allstar https://www.ebay.com/itm/384486498045?hash=item59852e5efd:g:M0MAAOSw3MVhhqTS&amdata=enc%3AAQAHAAAA8F4bqIC%2BDvZQgMzlOkkjSXdk13YtepU0NwS6lsxh8c1jGteULvFYFK0POgUlEJYyAAbUIOa9QGKnFqTNIdbmIzoCfmcVTQM1zRSn51mCqTO0ESfd7pnWHuJuOZUDfZ8TzzEaDlY%2F3iE%2FouAqdwJ1S3bEumCbujZcqdyCjCtEjZW9ofVG9qwi%2FIwXGfPJEh5%2B3insi5NOnKiVIcWEAZVaP9WyCURR2xMuddMniRxgjToxq0Wrwx38Um00cFo2jsLW7tYRMkSZ58MjEeyFHBE8ejMerz96yBbUHvs1894%2FQcFgps8U5irwMKwrPQnnFqyFkA%3D%3D|tkp%3ABk9SR7SVnvPoYA. These usually come in a couple different styles and you need to pick one and stick with it. There's the keyed version and the other is pinned design. Here's a cool version built by CV and you'll find a lot of variations similar to this from Nascar teams, https://www.ebay.com/itm/363954963537?hash=item54bd680451:g:I2MAAOSw~0hjBB6Q&amdata=enc%3AAQAHAAAAoF1hs1m6he7XtSjsk64H%2Fecpd7DwTU0f65uRR%2FZE0WO0lsEjOEc3L5j4Dv8dQTn0RJqER%2BGlrI1Qs4HLULORZaqbAdVDI9U3ZWzwoM6aIX6mWDXkXUPnbghc9bWtpoPSinTPWMDM1PhrgX8I0e0YZ7wZDmHPtK%2FmbOaxq1Oi3MaIOxk4djBidcbE0u0tpGqJ2dirj3u5dMETsVecA6gdvAY%3D|tkp%3ABk9SR_DJj_PoYA. For the clutch you can buy these used and convert from a 3-disk to a two disk by replacing the friction disks with a thicker cerametallic versions. If you compare the stack heights between these versions you'll see what you need. The clutch you pick doesn't matter but from here on it will. When you get a LGC bellhousing they will mount the reverse starter so the ring gear either needs to be on the crank hub or can be mounted to the clutch cover. You'll need to use a hydraulic throwout bearing that is for the bellhousing you get. Tilton or Quartermaster are slightly different in one often uses a 3-bolt mount and the other is 4-bolt. For the LS engine you'll can pick the Chevy or Toyota bellhousings as both will mount up. Quartermaster: https://www.ebay.com/itm/195030378315?epid=2168467634&hash=item2d68b7674b:g:mEQAAOSwPHRidCrI&amdata=enc%3AAQAHAAAAsK%2BT7IHloyA4QBuQKYVTxqDpEq3Y2f4R%2FqID3jYexvxRteyr6veiJL5h5cdAJdLT3LirTM5snf%2BpHpsNev02ocsnUVSRfnwa%2F4L83Li%2BVwP0F%2F7RZNk8gq%2FpLQNRFj6%2B3yGMW9kTZ0bh97uBpfepvl9oPyGZkSdb2kT1GRGtzGBKWd%2Bn9nVir0vYRHT59uv%2Fi6UtTe9l5E2y5HXzS%2FklmCtgJe19EpZI7DFrikO1qo%2Bb|tkp%3ABk9SR9SR0PToYA Tilton https://www.ebay.com/itm/185468160405?epid=803202272&hash=item2b2ec38995:g:kkAAAOSwvYdirI3s&amdata=enc%3AAQAHAAAAsI%2Bt4O5%2FXxC7Kh87PPstWD5xxiHUwioLilbefIFNBDpAPTZKJ8dM2SuvgeWjSOa%2BUpFCeqpNMbRMOXKFxKXpS2mP6VkrNjH8G1ZVfqYXIuAIhUwYSUhsgZgHfZqvK6XG8KTkJS4%2FM%2BMSGX6oBJUONKYKgmLeBWkE9FZSUVBZSz%2BhMLVzMOEDgT%2BNUo7SUFYDVvlIzPqztQ3%2BHhgNaMK67w9nzuKhbvYDLRr4rRaxsZ3V|tkp%3ABk9SR9SR0PToYA In case you're curious the entire flywheel, clutch, and cover weights about 13 pounds.
-
I have a dry sump for my LS engine. I did this setup on the cheap using mostly recycled Nascar parts and have a few pointers to pass along. I saved a ton of money on the drive system. Most people opt for the ATI damper ($495) and special hub ($125) that has the belt behind the damper. This is a great setup but adds to the cost. Instead, I used a Aussie CAT damper ($100) and bought a used BBC pulley drive ($25-50) that mounts to the CAT damper. This places the dry sump belt in front of the damper rather than behind like the ATI version and is how the pumps intend to be mounted. This is a common mounting method used by both Chevy and Ford. You'll find a ton of drives on eBay and I bought from a Nascar supplier of used parts. Mine comes from Hendricks Motorsport and included ARP studs for the damper and 12-point jet nuts. It also included a 24-tooth pulley and looked like it was never used. Most of the Nascar parts are based on an HTD belts rather than a Gilmer. I went for a 50% drive reduction on the pump (another eBay part). For the pump, I ended up winning two Auto Verdi pumps (roots blower type $600 for both) in both 5 and 6-stage configurations. The lines that came with each won't work for me but I'll re-use the fittings as they are special for the Auto Verdi pump. Pumps have increased in price but are still much less than a new one. I have about $250 in BMRS AN lines and fittings and will be able to do the entire car and my street car project too. A lot of the Nascar AN lines are Brown and Miller (BMRS) or the lightweight Aeroquip variety. You'll need to pick a brand and stick with it as the hose diameters are not interchangeable. I chose BMRS because the AV pump came that way rather than anything else. I scrounged around for BMRS hoses that had replaceable ends that allowed me to use the AV pump side and a screen pickup, which is needed on the roots/rotor style pumps as they don't handle debris very well. The other plus is you can take apart crimped BMRS hose ends and reuse them by carefully removing the crimp ring and then getting them re-crimped using a new ring. I bought some super long dash 16 and 12 hoses so I can mount the tank at the rear and send the scavenge lines to this. I'm using a 5-gallon tank that I'll fill partially fill and see how it works. I also have a smaller 3-gallon that I picked up later that I may use if the 5-gallon isn't cutting it. The oil supply then leads to the water-to-oil heat exchanger and then goes into an AN fitting for the LS block. I can find the part number for that part if you'd like. I went for a cheap steel version rather than alloy. It bolts into the driver's side of the block where the current plug sits. I was originally going to use a CX dry sump pan until a friend bought one and had to change how it was made. The stock one is highly overpriced and fits like crap. You can easily make a similar pan from a stock oil pan that you partially cut the sump out (Camaro pan for me). and weld a new bottom on. You'll then need to make a channel to be the low point for the oil or just make the floor of the pan aim down towards the pickups. And that's a copy of the CX version for a lot less. You can probably do the same thing with the truck pan but I've never seen one close up. I should mention I went to all this trouble to have rock solid oil supply to the engine and less worry. But more importantly to drop the motor about 3 inches compared to stock Camaro mounting. I'm using a 7.25-inch Quarter master rally clutch (2 thicker discs but a standard 3-disc item when stacked). This was also courtesy of some Nascar team and was almost new. The starter rear mounts from the bellhousing and it will require some massaging of the tunnel. I have essentially the same transmission as you. Oddly the gearbox is the part that ran into ground clearance problems before the engine. I still could drop the latter another inch and have room. So how much did all this cost? About $1200 all in. Some parts have gone up but Nascar is changing things this next year so I expect to see some extra parts flooding eBay. You can probably do this for $1500 to $1800 very easily. If you price out an ARE 5-stage setup you'll find they are a lot more expensive. One thing I forgot to mention (actually two) is that the pump will draw a massive vacuum if you get it into its working range. You will need an air bleed to manage the internal engine pressure and high vacuum seals. There is one expensive part I bought but did not include in the total. It's the Russell air bleed/backfire prevention unit and is around $400. I don't need a separate breather/catch tank as that came with the 5-gallon tank and is mounted off the side. The part I haven't finished is the mount but it will be a spacer off the front motor plate that I'm using. I'm using this to build a bulkhead across the strut towers and the bottom will connect to the crossmember and its braces. My low ground clearance bellhousing (LGC) came with a really interesting machined bulkhead for allowing AN hose to pass into the firewall but stay attached to the engine when you pull it so you don't have to remove any lines and you have Wiggins connections at the firewall. I still have to finalize how some of the lines will run and where I want the oil heat exchanger. I'm seriously looking at moving the radiator to the rear of the car so I can close off more of the nose for downforce although that decision may come back to bite me. I'm running the manifold on backwards and pulling in air from what's left of my cowling. I would recommend you pin the damper as you don't need it spinning on you. The tools to do this are pretty cheap and it's really easy to do (says someone who hasn't done it :-)) Cary