
clarkspeed
-
Posts
878 -
Joined
-
Last visited
-
Days Won
49
Content Type
Profiles
Forums
Blogs
Events
Gallery
Downloads
Store
Everything posted by clarkspeed
-
Alright, I couldn't resist this thread one any longer. "Is it too much horspower to drive?" was asked the great Mark Donahue about driving Porshe 917 Can-Am cars with about 1200 Hp, and still considered one of the fastest race cars of all time. "No, When you can leave a black mark down the longest straight of the track, that's when you have enough horsepower."
-
As stated earlier, polishing the chambers and breaking sharp edges helps. Some octane boost also, if your right on the edge of pinging.
-

Any of you with Dynomax Bullet mufflers? (Jersey you around?)
clarkspeed replied to a topic in Turbo / Supercharger
I've ran that muffler on a couple of NA cars. I doesn't do much really since it's very short and open. I was able to set off car alarms when driving through the parking lot with it. Might be enough on a turbo though. My favorite set up on a NA L6 is that muffler by the transmission and an ultraflow at the back. It doesn't look that good. You can see the welds in it. You'll want a tip. -
I've also used Schneider cams in NA engines for years. I've used .460, .480, and .495 lift on the street. My favorite street engine was a .460 lift with the 240 duration on a stock flat top motor with N47. Loads of torque. The .480 and .495 cams tend to suck out a little bottom end torque for higher end HP. Depends on what you like. Cam change is fine for NA FI engines although may require some fine tuning. Will run rich at idle though. Don't change the cam without some added compression over stock (flat tops, head swaps, etc.) or you will lose more than you gain.
-
The Eastwood stuff looks almost as good as Jet-Hot and lasts a long-long-long time. Jet-Hot has better insulation properties. Choose based on budget and application.
-
My best luck has been sandblasting the header then applying the Eastwood manifold paints. Looks almost like a jet hot coating when complete. Lasts forever. I think the directions say crank the car within 24 hours after applying, so I typically do it last thing on an engine rebuild. Best header paints I've ever seen.
-
New paint job with pics, something different
clarkspeed replied to clarkspeed's topic in Body Kits & Paint
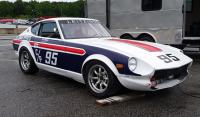
I lean toward the dark colors on early Z's but the white really covers up all the flaws I didn't feel like working out. Should be really easy to repair too. The down side is I need to be careful about using fender covers or this thing will look like the shop floor at Pep-Boys. The wheels are CCW single piece. He only made them for a couple of years. I'll post again when I get the graphics on. More to come..... -
I thought I would post some pics of my fresh driveway paint job. Normally I wouldn't paint outside but this is a race car and I wasn't really too concerned with a few flaws. With this car I'm sticking with the "looks good from 50 feet at 50 MPH" rule. I basically cleaned, wet sanded down entire car, hammered out a few dents, filled cracks with fiber reinforced filler, filled small chips with glaze, one shot of primer, and sanded down. Shot it under an EZUP canopy. The final coat is a change for me. I used an industrial coating instead of automotive paint. Paint store suggested it. PPG ALK-200 acrylic modified enamel with ALK 201 Polyuerthane enhancer. I guess many of the racers use it. It has no UV protection so extended time outside will cause fading. With shade, shine should last 1-2 years. Comes in a gallon ready to shoot. No reducer needed. Just add hardner for shine and durability. The best part, gallon was $25 and $14 for hardner. They can color match also. I was afraid the paint would be slow to dry but it flashed quicker than most all automotive enamels. "Driveway job" turned out pretty good, bugs and leaves didn't mar the paint at all. I did the entire car in one careful shot. I may be sorry later, but for an indoor kept beater or race car, this looks like a nice alternative. Finish is excellent, flow was good, easy to shoot, has polyurethane, and quick flash to keep the bugs out. Should get the vinyl graphics later this week.
-
I think a lot depends on how your car is set up. You need quite a bit of camber to really use any radial tire to it's fullest on the track. When you drive on the street with Kumho/toyo/hoosier tires and 2-3 deg of neg camber they will wear quite quickly on the inside. If you put them on the track without enough camber, they will wear quickly on the outside. Especially the Hoosier. For street/autocross another tire worth mentioning are the Falkens. I drove on some 2 weeks ago and was surprised how sticky they were and should last longer than toyos.
-
I agree with Randy, Ground Control is a reputable company, and supports their products. The camber plates are high quality and they can set up suspension "kits" taylored to what you intend to do with your car. Although coil-overs are a little overkill for a pure street car, they do allow you to custom offset the wheels more and get that big/wheel tire under the fenders.
-
I'll vouch for the 10000RPM. It's a beautiful piece. I have the 2 plate set-up and would guess the flywheel, clutch, and pressure plate all together weigh around 10 lb. Amazing. Again, not for the street.
-
Congrats, Ken took me for a ride in it 2 weeks ago. That car is sooo nice.
-
Post your upgraded brake setup here
clarkspeed replied to Toysport's topic in Brakes, Wheels, Suspension and Chassis
Hi Doug, nice meeting you in VA. Car is keeping me busy. I had to rebuild the clutch, and I'm installing a new fuel cell. After some baseline testing, I plan to upgrade the brakes along with a few other goodies and reshoot the white paint. Saw the pictures of yours, very nice. -
The last one I installed by cutting out the tire well and welding in a plate to fill. I then cut out a square hole to fit the cell into. To meet SCCA requirements, I built a sheet metal cover over the rear section with a hinged door for access. I copied the idea from a fellow Z racer. The one I am installing now will be supported underneath the rear deck with the filler also below the deck and a small trap door for access. Rear deck will be the bulkhead between cell and driver. Copied again from another racer. I don't think I can get my discount on custom cells.
-
Post your upgraded brake setup here
clarkspeed replied to Toysport's topic in Brakes, Wheels, Suspension and Chassis
I run the Arizina Z car Wilwood setup front and rear with the larger ZX master cylinder. Hawk blue pads. AP fluid. Not for the street. I've thrown this out in Hybrid Forums before. Big brakes don't always make you stop faster. I upgraded my set-up because I can get replacement parts cheap, and they last much longer longer on the track. Seemed like a long term cost savings. A front toyota caliper/rear drum set up with fresh hi-po quality pads and shoes, hi-temp fluid, and set up correctly will pull your eyeballs out when riding on sticky tires. Friction between tire and road is limiting factor. Bigger brakes are easier to modulate and disapate heat better. Kind of like increasing your gas octane on a low compression motor. Don't do it unless you need it. -
Guess there's not too much interest on this one. Anyway, let me know what you need Mike and I will get you a quote.
-
I've negotiated some decent pricing from a local circle track supplier on fuel cells. Both ATL Sport Cell and Fuel Safe Enduro Cells are available. Both of these cells are FIA FT-3 approved, designed to withstand impact, steel container, foam filled, and legal for most forms of road racing. Check your rulebook for legality. These are NOT the cheap rubber or plastic cells many of the drag racers use. Check out: http://www.atlfuelcells.com/ http://www.fuelsafe.com/ I can get the Fuel Safe Enduro, ED115, 15 gal for $450 ATL Sport Cell, SP115, 15 gal for $430 I willing to pass along my savings if anyone is inerested. Price does not include any shipping charges or tax if you live in FL. Other sizes are available. Some sizes they keep in stock and others would need to be ordered from the factory. Any interest? Clark
-
That's interesting on the PVC. I thought my sch 10 bowed a little too much. I assumed if I ever did this again, I would use the sch 40 to strengthen. By your notes I will stick with the thin stuff, just add more braces. It's cheaper too.
-
John, What changes will make them expensive to update? The only only thing I've seen is the weight penalty for IRS. I was thinking about picking up a GT-2 Datsun if one came up in my price range.
-
I don't need a system but I thought I would post an endorsement for anyone sitting on the fence. I've been very happy with it. The company stands behind their product and it is a quality product. I had a key on the programmer crap out and had the new one in about a week. For the price, SDS can't be beat. Laptop is not required, and you can program while driving. I honestly think the thing is better than most OEM systems through the 80's.
-
I did similar deal. I "encapsulated" the entire car, floor and ceiling, with a big roll of plastic ordered from McMaster Carr. Hung it all on PVC frame. Use at least 1/2" SCH 40. I also ordered a stack of cheap AC filters. I stacked 3 $10 fans in the side doorway blowing through the filters into the "booth". I raised the (2-car) garage door up about 2' and lined filters across the opening for the outlet. I figured it would keep the neighbors from complaining. Sealed everyting with duct tape and put halogen lamps around the perimeter. Worked great. Paint came out perfect, I just wish my body work was better. I tried this one other time a few years ago and wet the floor down. When I was on the 2nd coat the floor dried out from the fans and 3 months of bondo dust came up out of my concrete which I had scrubed clean. I also had a dozen or so bugs fly in. Such is life in Florida.
-
Maximum power: 108,920 hp at 102 rpm Maximum torque: 5,608,312 lb/ft at 102rpm These pictures are cool. You gotta like an engine with ladders into the oil pan. http://www.bath.ac.uk/~ccsshb/12cyl/
-
I just had a set of Brute Force installed at a local driveline shop. They gave me the old set in a box with part number 1-0029BF
-
Hope you FL guys make it through Charlie ok
clarkspeed replied to wigenOut-S30's topic in Non Tech Board
Whew! I can wait another 40 years before that happens again. I was very lucky through all of this. Didn't even lose power. Spent 2 days cleaning up the yard though. Lost my DSL. Seems the storm was so compact, moving so fast, that West Orlando didn't get any more than 50-60 MPH winds. I couldn't have been more than 10 miles from the eye. The east side of a huricane is always more brutal. If any of you Florida dudes need help, let me know. -
To each his own. I guess everyone has a different view on what a street engine should be. Personally, I've never liked driving a race engine on the street and consequenty never liked racing a street engine. Anything in between is a compromise. You can tune the trips for a good bottom end torque also. A friend of mine, best webber tuner I know, built an excellent set up street 10:1 L28 240 recently. I know he choked down the carbs some. He ended up with around 480" lift. Good gas mileage, and instant power off idle. Waste of good carbs? It still looks, drives, and sounds cool to me.