TimZ
-
Posts
2521 -
Joined
-
Last visited
-
Days Won
6
Content Type
Profiles
Forums
Blogs
Events
Gallery
Downloads
Store
Everything posted by TimZ
-

CS144 Alternator is not charging battery
TimZ replied to tamo3's topic in S30 Series - 240z, 260z, 280z
Yes - the warning light should go off once you start the engine, and you should observe something like 13.8V (or whatever your regulator is set to) at the battery. -
CS144 Alternator is not charging battery
TimZ replied to tamo3's topic in S30 Series - 240z, 260z, 280z
Yep - sorry I missed where you pointed out the possible burned out lamp. Also, in tamo3's video above it clearly shows a voltage gauge with a warning lamp, _not_ an ammeter. So, I would suggest wiring the lamp as it shows in NewZed's wiring diagram - ditch the diode and the inline resistor and just use the lamp (after you make sure it isn't burned out). Wherever you connect the "S" terminal will become the point in the harness where the voltage is regulated to the regulator's setpoint. As NewZed mentions usually you pick the positive battery terminal for this to keep the battery voltage constant regardless of load. You want to run a separate wire for this, so that it isn't affected by the current draw through the main battery cable. -
CS144 Alternator is not charging battery
TimZ replied to tamo3's topic in S30 Series - 240z, 260z, 280z
Come to think of it, you should also check to make sure that the warning lamp isn't burned out. A voltmeter should measure close to 0 ohms across it if it's good. I would also advocate for using the "S" input - this is the regulator's "sense" circuit, and it represents the point that the regulator regulates its voltage to. If you leave it as is the alt will work but it will just regulate its voltage directly at the alt output. If you run a wire to the "S" input, the alternator will adjust its output voltage to achieve the proper voltage at whatever point the wire is connected to, which compensates for any voltage drops you might (will) encounter in the harness. -
CS144 Alternator is not charging battery
TimZ replied to tamo3's topic in S30 Series - 240z, 260z, 280z
When you say "remove the diode", did you just remove it or did you short across it's terminals? Just removing it will not work. Also try reversing its terminals to see if it was just backwards. -
Building a race car.. looking for advice!
TimZ replied to jsausley's topic in S30 Series - 240z, 260z, 280z
...Or "skimp" Scrimps are delicious, though. -
CS144 Alternator is not charging battery
TimZ replied to tamo3's topic in S30 Series - 240z, 260z, 280z
That's a good point - you should probably ditch the resistor, too. Try shorting across it as a test. -
CS144 Alternator is not charging battery
TimZ replied to tamo3's topic in S30 Series - 240z, 260z, 280z
Does the charge warning lamp come on? If not, are you sure the diode isn't backwards? I'm pretty sure you need a voltage at the "L" terminal to excite the field before the alt will start charging - if the diode is backwards then you will get no voltage at that terminal. Maybe check your voltage at "L" to confirm. -
Those are going to look great! That's a really tight fit - does that tire really clear the flare on full bump? Also, it sounds like you are already on it, but you're probably not going to want that much camber back there. Make sure that the arms that you get will have enough inboard adjustment to allow you to pull the tire inward to get closer to zero camber - don't know about the two that you are looking at, but they are often more focused on increasing track width than reducing camber (most setups have more room to spare in the wheelwell than you are going to ). You're likely going to want to do the adjustment at the a-arm rather than via a camber plate, since adjusting it at the top of the strut will push the tire even farther outboard.
-
-
FWIW, here's my sub-optimal N42 combustion chamber and one of my pistons: https://photos.app.goo.gl/EvpWubniTt2smYJy2 https://photos.app.goo.gl/MRZ79Ao3knWvuioi2 CR of 7.5:1, and I can run 26psi on 93 octane. What can you see here? Also, a high efficiency modern compressor design will do wonders for keeping your intake air temps down - they are more expensive than the garden variety T3/T4, but worth the money.
-
Sounds like the head is coming off anyway, but before you do that, do a leakdown test on #2 to narrow down where the compression loss is coming from.
-
Have you checked to see that you are actually getting vacuum inside the car anywhere? The vacuum solenoids can go bad, or the solenoid might not be getting power.
-
http://www.nicoclub.com/FSM/280z/1975/1975_ 280z_FSM.pdf
-
N42 block on my 78 as well.
-
Stance coilover kit, front woes :(
TimZ replied to sileightygx's topic in Brakes, Wheels, Suspension and Chassis
I guess I'm not sure what you are saying here. I was pointing out that given the short travel of the spring it is very likely that with the strut has considerably more travel. So, fully extended you will end up with an inch or two of free space between the spring and the perch, and that's just the way it works. You don't have to screw the perch up until it touches the spring before installing, and unless your strut has a really short stroke you probably don't want to do that. It's probably going to flop around at full droop and that's just the way it is. Like I said, the spring is only going to compress by ~2" so if you screw the perch all the way up until it touches the spring, your ride height will be 2" from full droop, which is what it sounds like you've got. That's just how the physics works. Yes that was why I said you need to pay attention to which pair you put in front. They are not interchangeable. The fact that they are the same length is irrelevant. -
Stance coilover kit, front woes :(
TimZ replied to sileightygx's topic in Brakes, Wheels, Suspension and Chassis
Okay, just stop for a minute. You are making some dubious assumptions. First thing - your springs only have ~ 4.25" to 4.5" of travel before they bind. That is very likely less travel than your shocks have. You could very easily end up with 2" or more of strut travel before the spring touches the lower perch. Next, assuming your car weighs ~2600lb with you in it and 50/50 weight distribution, you can assume that you will have ~650lbs on each corner. So, the fronts will be compressed by ~1.9" (650lb divided by 336 lb/in), and the rears will be compressed by ~2.3" (650lb divided by 280 lb/in). So, Your front springs will be ~5.1" long when the car's weight is on them, regardless of ride height. Your front springs will have ~2.5" of travel left before binding at that point Your rear springs will be ~4.7" long when the car's weight is on them, regardless of ride height. Your rear springs will have ~2.2" of travel left before binding at that point Now to the strut. You want to have the strut near the middle of its travel at your desired ride height, and it would be nice if it didn't bottom out before the spring does. Actually it would be nice if you had some bump stops in there to try to keep either of them from bottoming out. Anyway, with the car on jackstands, take the springs out and verify that the stroke of the strut is longer than that of the springs (i.e., the stroke should be 4.5" or longer). Then reassemble the strut without the springs, mount the tires and use a jack to put the suspension at your desired ride height. Once you have done this, check to make sure that the strut is within an inch or so of the middle of its travel and that it still has at least 2.5" of travel before bottoming. If you can make these three things happen at once (strut near the middle of its travel while at the desired ride height and >2.5" of travel left) then your strut length is okay. If you cannot make this happen then you need to revisit the strut length. Now, with the suspension at your desired height and still no springs, take the tire back off. Your front lower spring perch should be set 5.1" below the front upper perch Your rear lower spring perch should be set 4.7" below the rear upper perch. Reassemble the struts with the springs in them, put the tires back on and you are done. Do actually make sure you have the correct springs front and rear - 6kg/mm is not the same as 5kg/mm. -
Stance coilover kit, front woes :(
TimZ replied to sileightygx's topic in Brakes, Wheels, Suspension and Chassis
You said earlier that they were 6k front and 5k rear (336lb/in and 280lb/in respecitvely), so which is it? Length has nothing to do with "sameness". If those are pics of your fronts as installed, it looks like you have at least 3 inches of adjustment left on the spring perch. Screw it down until you have the strut in the middle of its travel when loaded. Stiff 7 inch springs will likely not have preload at the ride height you want. -
I'm having the same problem on this thread: I can't respond, and the "report" link doesn't respond either. Was trying to use it to point out that I couldn't respond, not to complain about the post itself, btw.
-
EZ POWER STEERING works great!
TimZ replied to Smyrna388Z's topic in Brakes, Wheels, Suspension and Chassis
They claim to have a TUV safety rating, so this would imply that they retained the collapsible feature. -
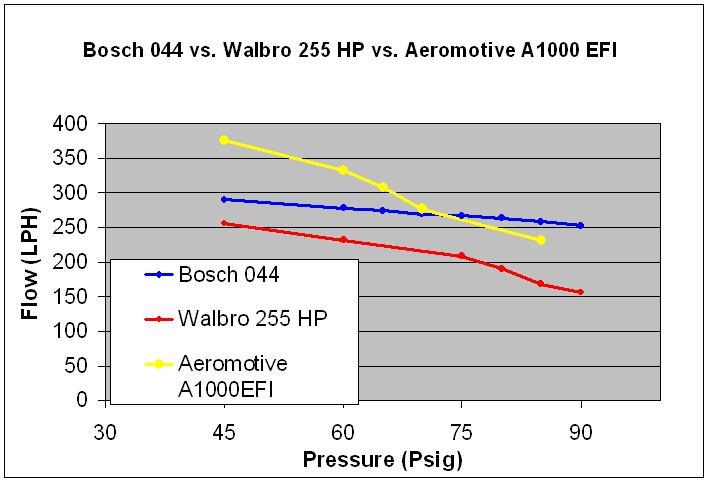
You can run higher base pressures, and it can have some benefits for the spray pattern, but in general increasing pressure has a negative effect on the pump's ability to flow fuel: Also, as others have already noted the stock na fuel pump has an internal pressure relief set at roughly 55psi, so increasing the base pressure will directly limit how much boost you can run with that pump. As I recall the stock turbo pump's pressure relief was set to ~65psi.

-
Have you looked through this post? It's not exactly what you are describing but lots of related info. Also as I recall the same guy cut up some scrap heads for visualizing the internal structure in this thread. Might also be helpful.
-
This is at/near idle, so most likely no. At full power with properly sized injectors the injector is generally open much longer than the intake valve and the dwell time is generally much shorter due to higher rpms, so timing is less important there. Probably some effect but it should be much less dramatic. At idle/low power the effect is more pronounced due to the short injector open times still being able to "fit" within the intake valve open period.
-
Here's a thought: Find a used HY35 for a reasonable price, get a rebuild kit: https://www.ebay.com/itm/Turbo-HY35W-HE351CW-Rebuild-Repair-Kit-for-Dodge-Ram-5-9L-Holset-Diesel/131974262328?hash=item1eba476e38:g:SncAAOSw-CpYBdYz&vxp=mtr and then get a Taiwanese billet extended tip compressor wheel (essentially the same tech as the Garrett GTX series): https://www.ebay.com/itm/Turbo-Billet-Compressor-Wheel-For-Holset-Cummins-5-9-HY35-55-96-78-5-5/262952991370?hash=item3d39383a8a:g:YPwAAOSw-FZXkJJm&vxp=mtr https://www.ebay.com/itm/Turbo-Billet-Compressor-Wheel-For-Holset-Dodge-Cummins-HY35-55-96-78-8-8/262538447760?hash=item3d2082cb90:g:KE8AAOSwZVlXkZiR&vxp=mtr There are some other brands out there too, but I can vouch for the Mamba wheel - I'm currently running one in my GT4294R, and the results were VERY impressive. I had already bought, installed and tuned a brand new GTX4202R (not cheap!) and was just going to refurb the old GT4294R and sell it. The old turbo had a nick in the compressor wheel so I figured what the hell and ordered one of these Mamba wheels. The new wheel was taller AND lighter than the stock cast wheel, and happily I decided to swap it back in just to see how well it worked. It not only spooled faster than the old GT4294R, it out-performed the GTX4202R on the top end as well! I sold the 4202 and never looked back. Full disclosure - I also replaced the turbine wheel/shaft with a new stock replacement, so I was certain that everything was properly balanced - they both come "zero balanced" so you can safely just assemble and go. I've had zero problems with this setup. I believe that this is also the case with the "stock" turbo wheels, so you should just be able to install the new compressor wheel on the old turbine wheel/shaft and go, but I won't swear to it. https://photos.app.goo.gl/rhwEbYNkPDfo6ML02 https://photos.app.goo.gl/G3jFQFgc9333kyw32 https://photos.app.goo.gl/St0IJGOMuDYytcRw2
-
Looks like me too...
-
This is what I've been getting at - yes increasing the stroke DOES alter the rod/stroke ratio, but by itself it moves it in the wrong direction. The only two ways to compensate for this AND to get to your desired ratio are: 1) increase the deck height (this is why Dave is collecting diesel blocks) 2) decrease the piston's compression height (i.e., raise the pin location) The L24 rod is already requiring this, since it is already longer than the stock L28 rod. If you want to achieve increased stroke and a rod longer than the L24 and keep the stock block, your only option is to modify the compression height of the piston, and this is definitely what Dave is doing here. If he's doing a really long rod then he's likely having to resort to some tricks like letting the pin bore impinge on the oil ring groove, like this: FWIW, I'm currently running 5.3" (134.6mm) rods with an 83mm stroke, and the pin bore on my pistons is pretty much as close to the oil ring as it can get without resorting to the above. A 1.7 r/s ratio with an 83mm bore dictates a 141.1mm rod, which would require the pin bore to be 6.5mm higher than mine. Sorry, couldn't find a pic of my pistons that showed this, but they look pretty much like this: