-
Member Statistics
33042
Total Members2523
Most Online
All Activity
- Today
-

Turbo Guru's, T3 question(s). Please advise
A to Z replied to A to Z's topic in Turbo / Supercharger
oh yeah, perfect size for teh engine. Thanks a lot for your help. -
yeah, I'm happy with it. Thanks for all of your help.
-
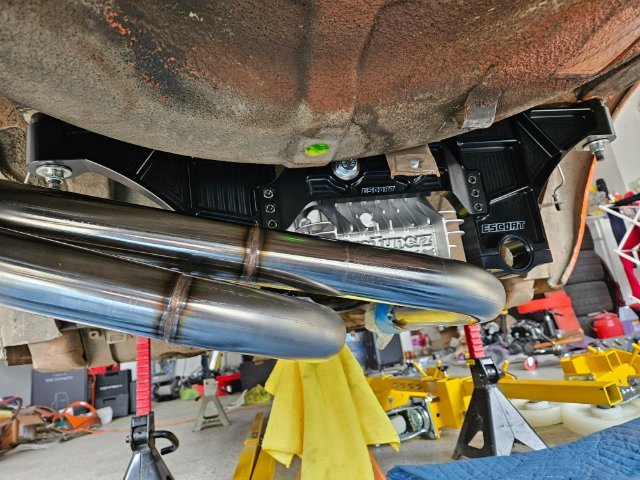
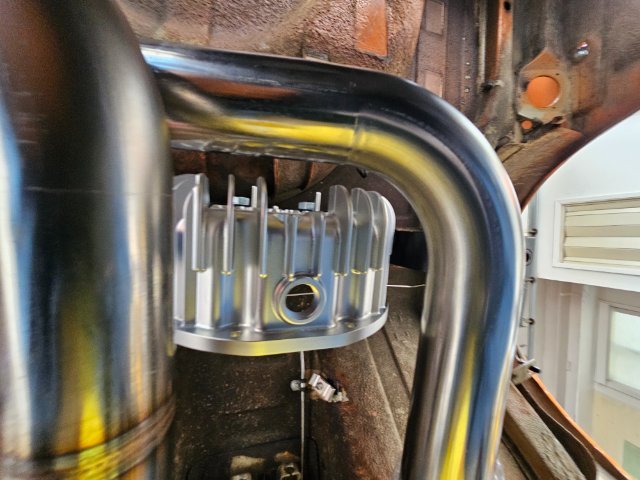
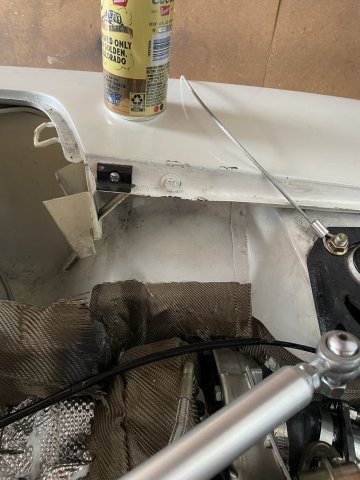
Some quick photos of the Nissan comp OE type roll bar test fit to determine the final position of the trunk floor plates. The roll bar is an absolute work of art made by Romas at DCW Classic. I've definitely learned a lot about the racing history behind the s30 and am grateful to have made many new friends all over the world this past couple of months, exchanging notes with experts in the community such as Romas, Alan T, Kats, Chris, Florian, and many many others. This build definitely would not have been possible without the support of the community. I started flattening the trunk floor for welding yesterday but I think I'm going to take a break for a day to fully prepare the welding areas and work through the interior overall which is covered in old sticky adhesive/tar remnants.

- Yesterday
-
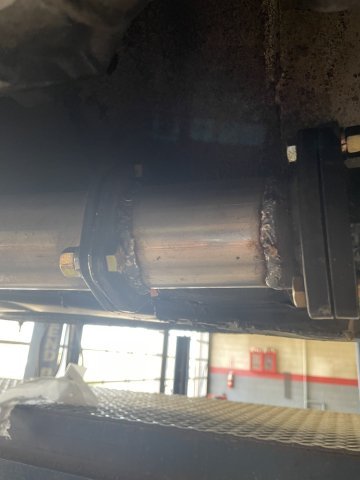
Continuing on chassis reinforcements, the Nissan comp OE type rollbar will be delivered later today. The OE type rollbar bolts to the existing m10 captive nuts above the rear tubs and also to the trunk floor straddling the reinforced u-channel between the rear shock towers and rear suspension/driveline mounting points. For the floors I've started fabricating some 6"x6" 1/8" steel doubler plates which I will weld some captive nuts as they do in the JDM then stitch them in with the tig. In preparation for this, I bolted in the Escort 1 piece rear end which will stay in place for fabrication. Given the reinforced structure of the rear suspension points, I don't think things will move around but just for peace of mind that everything bolts up properly before and after welding. I've learned my lessons over the years from welding warpage and fixing my mistakes with blocks of wood and BFHs 😂 I also decided to mock up the PTZ cover one last time to verify dimensions before machining and I'm not sure how I got this so wrong but everything fits. I was under the impression that the Escort geometry was the same as OEM so maybe the T3 geometry is different. Not a big deal either way, as the front diff mount needs a bit of refabrication for the exhaust and shortening the AL driveshaft is straightforward. I also have some spare Q45 diffs I could blow apart and check for fit, but I'm running out of time and need to do some other welding and misc. chassis work before it goes on a bodycart for transport next week.
- Last week
-

Turbo Guru's, T3 question(s). Please advise
Brad-ManQ45 replied to A to Z's topic in Turbo / Supercharger
Good to know I was close. Glad you got what you wanted! -
Forgot you have the stroker when estimating spool - sounds like you got what you wanted!
-

'77 280Z Track Car Father & Son Project
RCVTR replied to RCVTR's topic in S30 Series - 240z, 260z, 280z
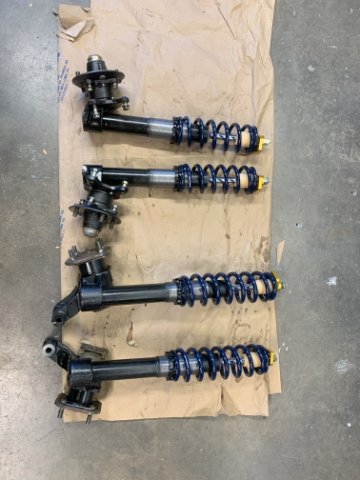
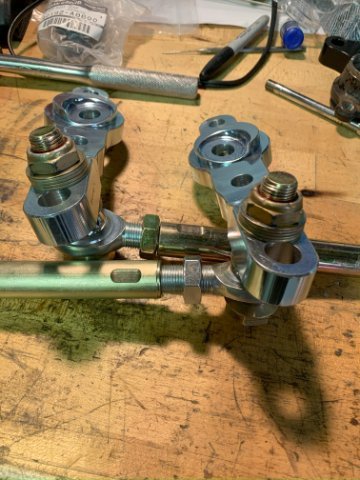
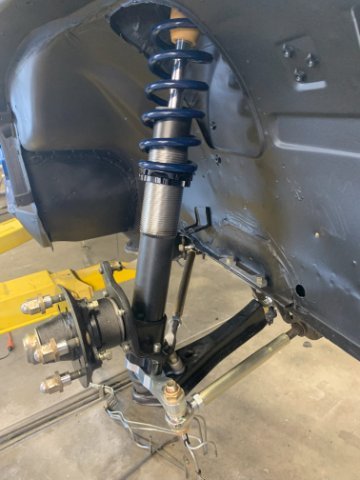
Can't be tired yet! It finally got to the point where we were building a car. We decided early on to go with vintage Datsun race suspension mods,parts and brakes from Design Products (dpracing.com), the super trick front crossmember from Apex Engineered and camber plates and Evolved steering knuckles from TechnoToyTuning (T3). As it turned out, when we got the rear struts installed the car was squatted in the rear. After taking some measurements, the struts were shortened to 240 length! After a night of tossing and turning, I did some research and discovered that T3 has a problem solver for that in the form of a riser block that works with their adjustable camber setup and it was problem solved!!
-
No problem, have a blessed night Sir.
-
 Blocked them. Works like normal now. Thanks
 -
very nice. You don't happen to make a vacuum line distribution block do you? I have 3 items needing vacuum supply, and they don't like T's in the line.
-
1980 280ZX Brake lights will NOT turn off - battery dies
A to Z replied to PhilbertZ's topic in S130 Series - 280ZX
do you have a pic of your Ace Hardware stopper? Thanks. -
The ads on the site are loaded by the site admin, and are ads that have been paid for. In your situation you are going to have to block the ads on your end. I am a moderator, but I can't access or change that. Sorry Sir.
-
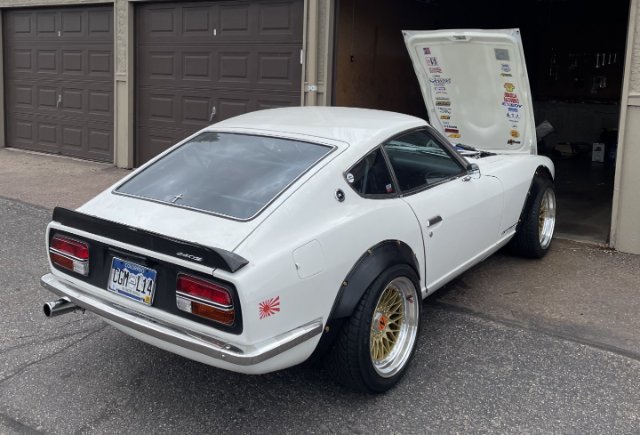
Just an addendum. Now DYNO is next. "4-22-2025. Things came into the right alignment today, and I was able to get the exhaust tied together at Bud's Muffler here in Colorado Springs, and get a final tune on the Z car. The exhaust threw all the tuning I had done before out the window. My pilot is now at 50, my needle is on the notch above the bottom groove, so more fuel, and 2 turns out on the air screw. washers are no longer under the choke, running just on the intended circuits. She is VERY quiet now, and the added backpressure seems to have made a difference, she acts better now. here are some pics and a walk around video of it all done. I would like to get a DYNO sometime. Now it's back to washing and cleaning and waxing, etc. pics follow. Cheers and God bless." Click below for video: (9) Facebook
-
Ads popping up continuously make it impossible to read Hybridz on my Android phone. They pop up with every selection while trying to navigate to a post. They pop up after selecting a post to read. It has become like an advertising link farm. Do I have to install an ad blocker to read posts on my android?
-
It's a longshot but...Does anyone have a Apex Engineered front crossmember with LS mounts that they would like to part with ?
-
Turbo Guru's, T3 question(s). Please advise
A to Z replied to A to Z's topic in Turbo / Supercharger
UPDATE: Spool starts at 2600 RPM AND FULL SPOOL BY 2900-3000 RPM. Great turbo for a street Z car S30 IMHO. -
ALL DONE, PROJECT LENGTH, 5 MONTHS, 20 DAYS. I WILL POST DYNO RESULTS HERE, OTHERWISE, THAT'S IT!~
-
UPDATE: she starts spooling around 2600 and fully spooled by 2900-3000 RPM. I will have to wait to see the dyno graph, but it seems to be pulling to 6K RPM no problem.
-
3 layers of insulation brake master hovers around 200 degrees F. No issues. Couple years when I bleed the system I will go to the Motul 600 degree F brake fluid.
-
04-21-2025 TURBO PROJECT UPDATE. Well she is done. A 5 month project and it fought me all the way, but she is drivable and just needs to go down and have the exhaust tied in.....but she is running and driving. The HSR carb, being a Motorcycle Carb has a very short throttle when used in a car. I have a 1 inch to maybe just short of 2 inches of travel, but I think it's more like 1.5 inches of travel. So, you have to ease into the power, if you just mash the throttle, it can overwhelm the setup. Granted, this is a hilly billy built, shade tree mechanic, DIY turbo setup. I started with a very dusty box of worn out crown turbo parts that I had to clean up and then order parts that would bolt together, and nothing ever went together like it was supposed to in my mind. I went with a Chinese T04/T3 Hybrid Turbo that I then sent off to the "G POP SHOP" to have them put carbon seals in it (mandatory on draw thru turbos) and go through it and make sure everything was good. I then came up with using the motorcycle carb after seeing other Z car builds other builds, even though they weren't turbocharged, but then finding out that Turbo Corvair guys were using them. My 2.9 stroker with a ported head needed a lot of fuel, even at my 6000 ft. altitude! Endless jet and needles changes, and then finally settling on a 240 main jet, a 45 pilot jet, a Y8 needle jet, a stock needle with the clip on the 2nd to last clip, 1 turn out of the air screw and still having a bit of fussiness, so I then thought out of the box....the choke circuit is a separate circuit. When idling, I pulled onthe choke and the engine got REAL happy! to I looked at the distance of the shaft when I pulled the choke knob. I then took 3 washers and ground them open and stuck them on the choke shaftand then pushed the knob down. Now I had a system where by I could, through trial and error remove a washer or "shim" one at a time to find the sweet spot! 1 washer seems to be it, although still a tad bit extra fuel at the top under wide open throttle. I can udjust some of the fuel out by adjsuting the accelerator pump to not pump during htat situation, which will lean it up and make it run even better, jsut more trial and error. I will fien tune it a bit and then take it and get it put on a syno jsut to see for fun what I have. It would be nice to think my homemade deal would give me 40 horsepower, but we won't know until DYNO day. I have added a few pics and 5 video's of driving the car. keep in mind, the exhaust is loud but you can really hear the turbo. Thanks for all the positive comments over the last 5 months.....and the few that told me "you're going to blow up the engine" ......."it won't work" .........."you're just going to destroy it"....."you are stupid, everyone knows draw through systems and carbs do not work." (even though Corvair guys and air cooled VW guys do it all the time, and were a huge source for info)...... .well, it worked so I guess you aren't as smart as you have led yourself to believe. Cheers! Pics and vid's (5) follow click below for video's. should be 5 total, one after another. If it doesn't work, PLEASE let me know. VIDEO link: (20+) Facebook
-
04-21-20205 UPDATE: I went ahead and dropped the needle, went down to a 45 pilot and increased the main jet to 230 from a 210. quick drive, starts and idles easy at 1.5 turns out on the pilot screw now, needle movement was too much, as soon as the throttle rolls into the needle, A/F ratio goes to 16/17 to 1 I managed to get through that and on to the main jet, instead of fall flat, now just pop and sputter....LEAN..... SO......I will richen the needle 1 slot, go from 230 main to 240 and see what happens. I lost the plastic washer under the clip for the needle and installed anyway, seems to have the effect of leaning it out 1 slot, I ordered some plastic washers for it, if they don't come in before I work on it again, will adjust needle and main and see what happens. I can't believe it finally idles on it's own. Once this is better then I can take it down and get the exhaust fixed. 99% done.
-
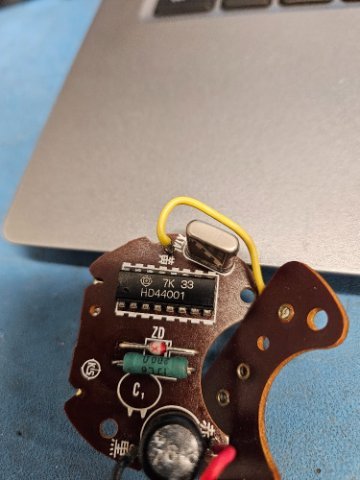
My 1978 quartz clock started losing time last summer. I had a spare, so took it apart to see what could be changed. There are only 5 components on the circuit board as follows: 1. 16v 100uF capacitor (Nippon chemi con CEO4W) 2. 200 ohm resistor. (Cant figure out the exact specs. It has 200 ohms and either I or 1 JL6 printed on it and its green. Its about 11 or 12 mm long, which from read I have read may mean its a 1 watt??? and 3 or 4 mm wide. Under it on the board is printed R for resistor presumably.) Not sure what kind of resisitor it is. 3. Next to that is what I'm guessing is a Zener Diode as it has ZD printed on the board next to it, and has a band on one end. Its white with a red band and has either LX or X7 written on it. 4. I think a crystal oscillator labelled 4194.5 TOYO COM 7C4. It has XTA printed on the board next to it. 5. A 16 pin chip that I think the symbol on it may be hitachi? HD44001 7K 33. The capacitors are all over Amazon, so not a problem to find. Does anyone know if any of these other parts can be sourced anywhere? I would like to replace with new as much as possible while I have it apart.
-
Good news is my exhaust collector is ready for pick up ! Bolt this thing up and ready to fire . Reached out to Chickenman- Richard Boyk - who said he’s done tuning with ITBS before has set me up a base tune . Can say enough how helpful this is since Alpha N is all new to me .
-
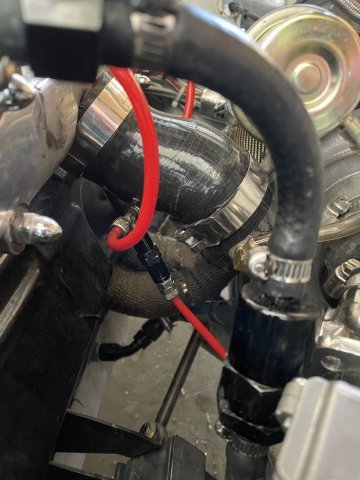
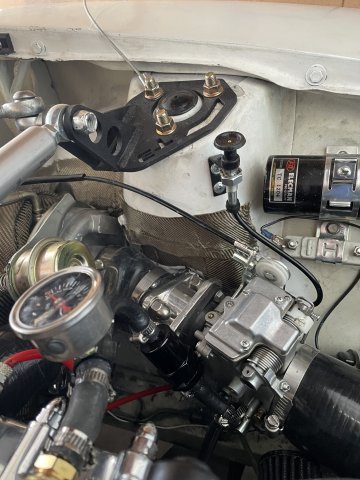
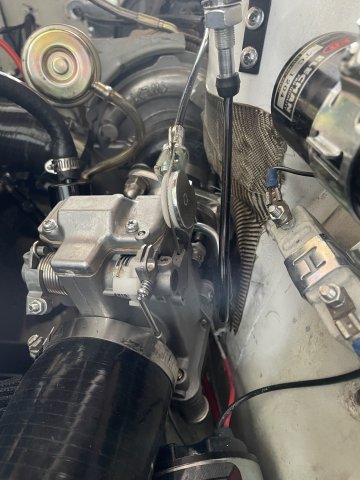
04-20-2025 TURBO PROJECT UPDATE: I replaced the main turbo hose as the original was leaking and causing me to lose vacuum. I cut it off and then held up the replacement hose I got online, made by HPS, it has an offset bend it in, which from the pics, you can see i needed. it is of a much more sturdy design, and I had to take measurements and then wrap it and cut it with a cutting wheel in my Dremel. it is VERY difficult to get on there. you have to remove the manifold and then once together, you have to use a small pipe as a lever to get it started, but then it pops on, saving HOURS of work to put it on without using this trick. After this, I started cutting and installing a piece of carbon fiber I got off of eBay. It is sticky on one side, so it was simply the task to cut and fit, then peel off the back and install. This is part of the final beautification to finish the project off. Then it was time for a drive. I have a weird situation with a hanging throttle, and it allowed me to get it idling and I was able to fine tune the air screw on the carb to make it better, but I think it is too rich. but I am not sure, as it easily dies if you blip the throttle and let it come down on it's own to idle.....50/50 chance it idles or dies, so maybe it needs MORE fuel? this is part of the idle or pilot circuit from idle to 1/4 throttle, the transition to the needle "feels fat".....I think it is just too rich. I had moved the needle up to get more fuel, and now I think i need to lean it out. once I hit 3/4 throttle and go on to the main jet, it reacts like a power band on a 2 stroke engine, night and day performance, it squats the rear and rips up to about 4500 then falls flat, so I guess it doesn't have enough fuel? I will also have to go through my checklist on my ignition knock sensor. A major issue is coming up to a stop, and the idle just hands up at a high RPM until I blip the the throttle and then it falls. Any ideas? Thanks. Pics follow:
-
MannyV280ZX joined the community
-
1980 280ZX Brake lights will NOT turn off - battery dies
MannyV280ZX replied to PhilbertZ's topic in S130 Series - 280ZX
Thanks again this thread and the pics were money, picked up a little rubber stopper from Ace Hardware and worked like a charm. Saw the little orange pieces on the carpet floor, thanks again. Perfect script.


-
Who's Online 4 Members, 0 Anonymous, 375 Guests (See full list)