-
Member Statistics
33150
Total Members5167
Most Online
All Activity
- Past hour
-

Fast Floridian's 240Z Track Build
FastFloridian replied to FastFloridian's topic in S30 Series - 240z, 260z, 280z
Honestly not sure yet on fittings. I’ve only done caliper swaps, this is the most comprehensive brake system overhaul I’ve done. Gonna see what I’ve got to work with and go from there, wish me luck 😅 - Today
-
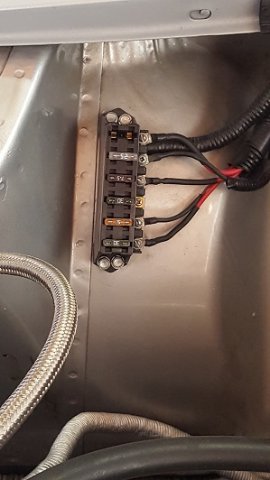
Nice placement in your engine bay. It looks like you just ran a positive off the battery terminal (?) to your box and all the accessories are using the chassis for the negative side. It is B+ only. No ground. It connects to the + terminal of the battery. accessaries draw fused power from the fuse box. Each accessary is grounded to the chassis.
-
Miles: Nice placement in your engine bay. It looks like you just ran a positive off the battery terminal (?) to your box and all the accessories are using the chassis for the negative side. As most of my accessories (radio, windows and A/C so far) are in the passenger compartment, I was planning to put my box on the passenger side firewall and probably run both positive and negative 10 ga. leads to it.

-
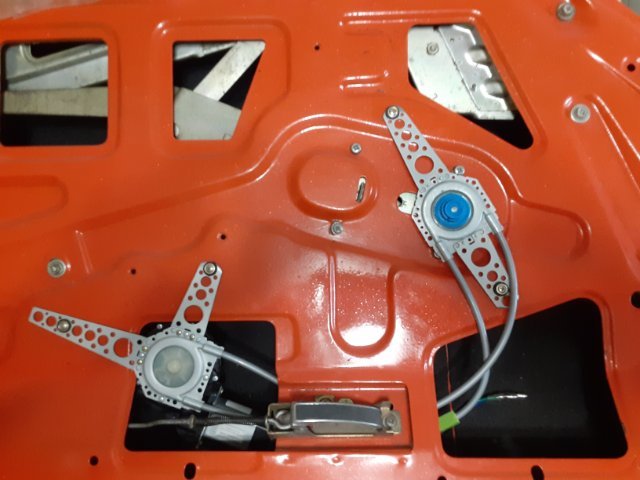
Luigi: I used a $70 "universal" power window kit that can be obtained on Amazon or eBay. A current Amazon vendor is JDMSPEED. This is quite similar to the SPAL that was marketed some years ago. What I found in my research was that several marketers offer the almost, if not, identical units on these shopping sites. As the units are all made in China - perhaps by the same manufacturer - this kind of makes sense. It's like every corner convenience store selling M&Ms. Earlier this year I started collaborating with Dave Irwin (Zs-ondabrain) to update and expand a thread he created in 2006 on the Classic Zcar Club website www.classiczcars.com). I decided to alter the wiring so that just two switches are used and the controls are mounted on the sides of the center console. The article has kind of stalled out as I went on to do other things on my car but I swear I'll get it done and posted there before year's end. In the meanwhile, here's a photo of the drive unit installed in the left door of my car. The drive unit is on the lower left and the "engagement gear" is on the right. It has plenty of power to work the window mechanism but, my goodness, you absolutely must have the window track alignment perfect or it binds up.
-

Fast Floridian's 240Z Track Build
74_5.0L_Z replied to FastFloridian's topic in S30 Series - 240z, 260z, 280z
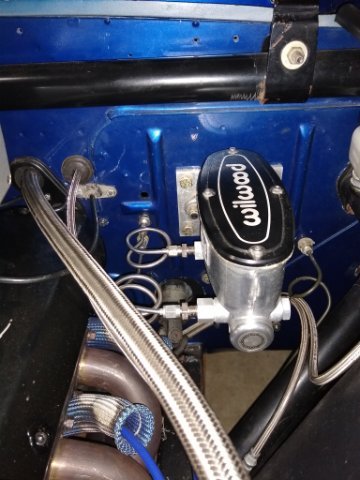
Hopefully you are converting to all SAE / AN brake fittings. It's a real pain to have a mix of metric and SAE. I routed my brake lines inside the cabin to get the brake lines away from heat. I'm running a Wilwood Tandem Master Cylinder (7/8" bore) and use a proportioning valve installed on the drive shaft tunnel.
-
 I have been. And for those searching its nivlac57 on YouTube. I have a 84 maxima wagon and I measurd once when I had my engine out and it was to close to try. I am interested in yhe 5 cylinder though as it would fit under my hood.
 -
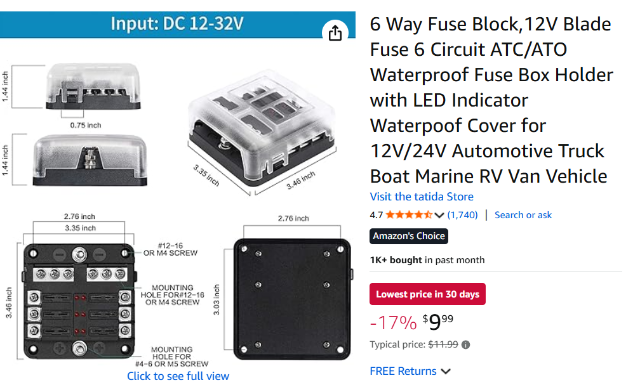
Picked this up from local hot rod shop for my 240z SBC 350 project about 13 years ago. Circuits: Electric fan relay Fuel pump Radio and amplifier Power windows Summit Racing/parts store etc probably have this fuse box.
- Yesterday
-
Fast Floridian's 240Z Track Build
FastFloridian replied to FastFloridian's topic in S30 Series - 240z, 260z, 280z
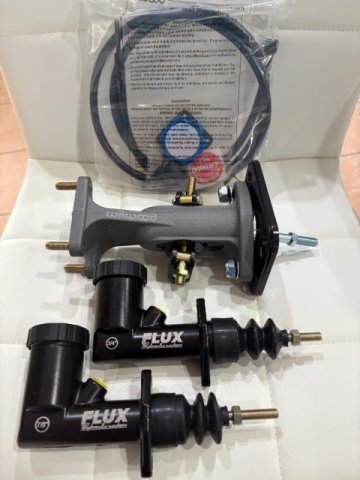
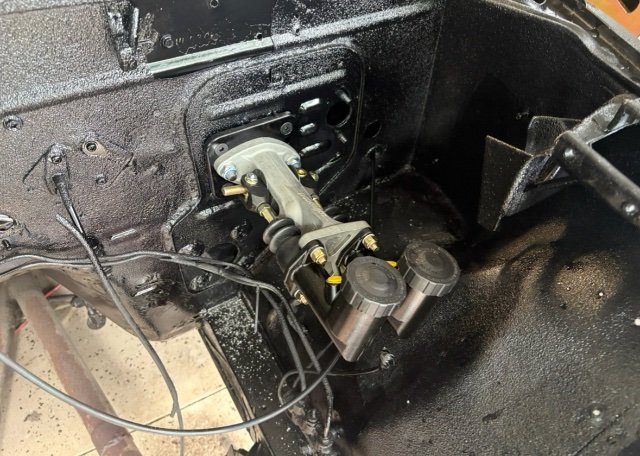
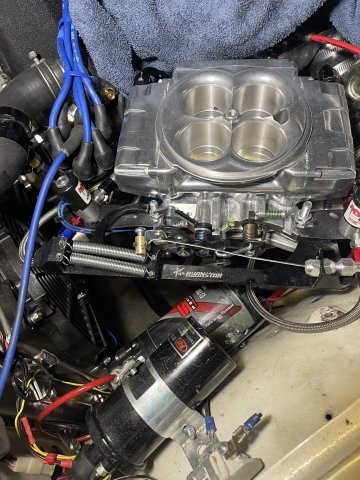
I found it just by digging around online. Wilwood makes the assembly, allows me to run two different sized master cylinders for front and back, and on top of that the horizontal bolt close to the firewall allows me to adjust brake bias between the cylinders, lots of adjustability. It comes with this cable so I can adjust the brake bias from inside the car. Yes, all new brake lines. I bought pre-bent hard lines and some distribution blocks. Once I get the rear suspension off, I’ll replace the lines, then figure out how to attach the cylinders, probably get some flexible stainless steel lines for that.
-
looks like i have to open my steering column next winter, i think i have play on lower splines, upper bearing might have also something going on. anyone has good link for that kind of operation on fresh memory?
-
Seppi72? what power window stuff / kit did you use?
-
I've used these....
-
Fast Floridian's 240Z Track Build
74_5.0L_Z replied to FastFloridian's topic in S30 Series - 240z, 260z, 280z
That is an interesting master cylinder set-up. I haven't seen that before. I assume that you will be running all new brake lines. -
Cut out the indented areas & fabricate new sheetmetal to fill the holes. Personally I like the smooth look. 😎
- Last week
-
It's not uncommon. I added a terminal post near the battery for a few things. If I had a bunch I'd probably just install an auxiliary fuse box. Otherwise you have a bunch of inline fuses to take care of. There are many out there but a trip to the salvage yard would probably find one that is weatherproof and high quality. Depends on where you want it mounted. Looks like I'm on the same page as jhm, who replied as I was writing.
-
It can be confusing when talking about technical areas vs car model areas, but we do have the "Ignition and Electrical" sub-forum here: https://forums.hybridz.org/forum/16-ignition-and-electrical/. Yes, I think it's fairly common to add new circuits/etc to these old cars. I've done it to the last couple of my cars to simplify/improve the electrical capabilities over the stock harness. I've always used off-the-shelf breakers, relays, fuse panels, switches; but there are a bunch of pre-built kits that are available through numerous vendors. I like to use marine hardware if I can find it; as it's typically extra beefy and durable. Good luck with it; and please be sure to post your results once completed!!
-
There doesn't seem to be an electrical forum on HybridZ so I thought I'd put this in the model-specific one. I am in the process of adding several updated accessories to my original-owner S30. In particular: power windows, Vintage Air A/C system and RetroSound Motor 4 radio with quad speakers. I've already installed Dave Irwin's headlight relay system to take that load off the combo switch. I have a rebuilt 280ZX alternator from MSA to supply power once the Optima red top kicks things off. With all these new accessories, it occurs to me that perhaps I don't want to be chopping into the existing dash harness wires to provide them with power. So I'm thinking about installing positive and negative busbars on the interior firewall that I can hook up to as needed. Is this a wise idea? Has anyone ever done this mod and, if so, what parts did you use and where did you locate them?
-
Fast Floridian's 240Z Track Build
FastFloridian replied to FastFloridian's topic in S30 Series - 240z, 260z, 280z
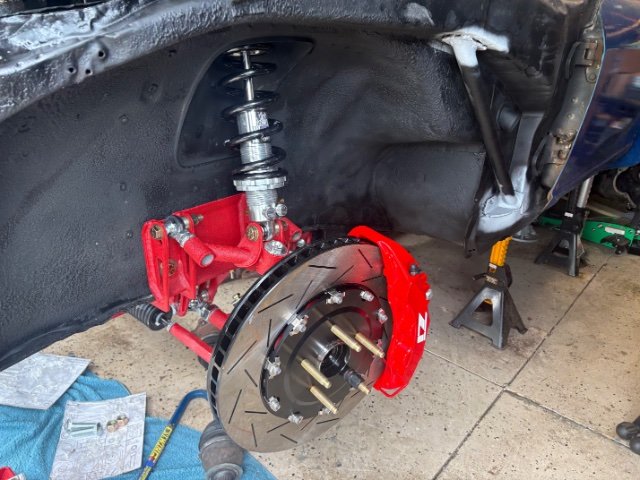
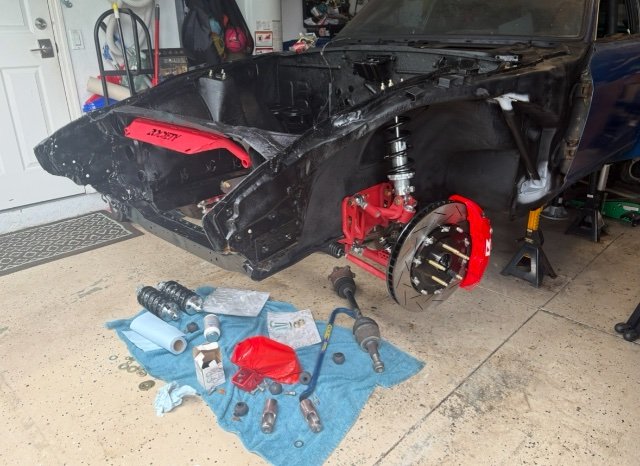
Got the front coilovers and the dual master cylinder assembly on today. Still too hot out for working on the car here, I can’t wait until it cools down. A few challenges with each, but got it on right. Was hoping to start tearing down the rear, but I’ll give that a go next weekend.
-
Fast Floridian's 240Z Track Build
FastFloridian replied to FastFloridian's topic in S30 Series - 240z, 260z, 280z
Nice, I could see building a dart block sometime down the road. Just a cam and twisted wedge heads on the 302 for this build for now. -
 Has anyone been following the progress of these engines? The aftermarket is starting to really grow for this engine. "divlac57" is the guy who has been spearheading a lot of this Anyone else watching any of this come about??
- 1 reply
-
- 1
-

-
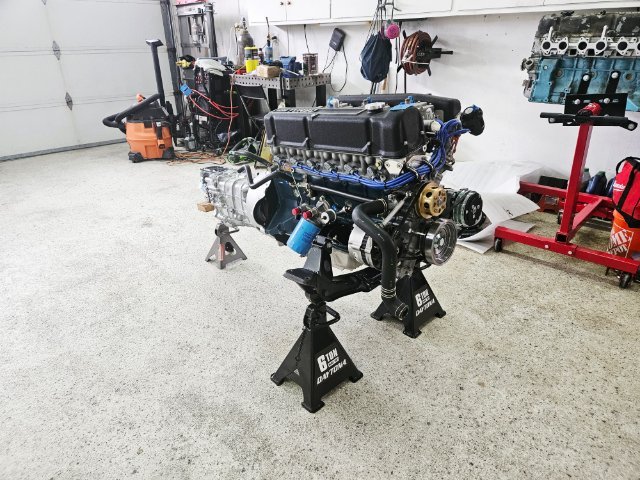
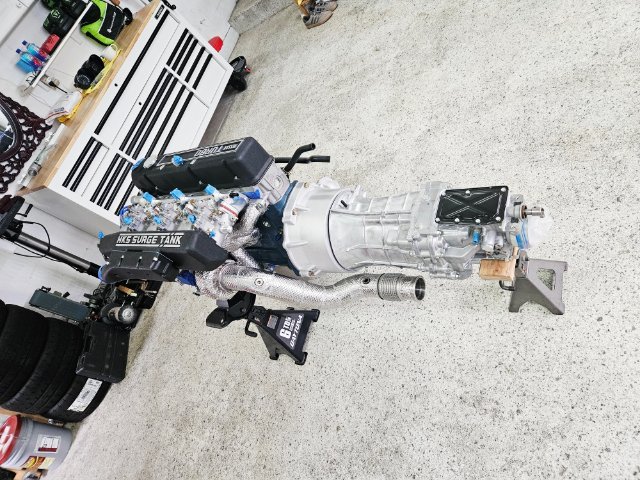
Just some quick updates, after finishing chassis preparations and dropping off the shell for restoration last month I've been organizing my garage and have finally got things in a reasonable enough state to continue work. For the turbo build, the plan is to refabricate all fluid lines as SS hardlines so I've set the engine/transmission to ensure I get all of the angles for drainage and thermal siphon correct. It's really nice to be doing all of this work fully accessible, but I'm going to attempt to ensure the routing I fabricate can be serviced back in the car as well. Also for the driveline, I saw on IG someone had used the same CD bellhousing from Derek which locked up on their clutch when assembled. So I've put in the OSG twin plate and will check if the bellhousing needs any clearancing for the rotating assembly.
-

New to forum - potentially a Z owner soon!
jhm replied to Zappingbaby's topic in S30 Series - 240z, 260z, 280z
First off, welcome to the forum and good luck in your search for a Z car. In our "FAQ" section, you'll find hundreds of excellent discussions on common issues, modifications and repairs on the Datsun/Nissan Z cars. Without knowing the asking price, your mechanical abilities, and your ultimate plans for the car....here are a couple of things to look for: - Inspect the floor pans topside and underside, the frame rails, the rocker panels, and the inner fenders for rust/damage/shoddy repairs/fiberglass/bondo. These are some of the areas most often rotted out and/or poorly repaired. If the car really has "all new metal", it should be apparent via inspection. - Are you comfortable buying a built engine just based on listening to it run for a few minutes? If it smokes heavily, has significant clatter and/or rattle in the valvetrain; those are just a couple of signs that the internals are suffering. Visually inspect the oil, trans fluid, coolant, and brake fluid to ensure they all look clean, fresh, and uncontaminated. The car looks neat from those couple of photos; but unfortunately, people often buy someone else's unused "toy" only to find that it doesn't live up to their expectations for one reason or another. Do as much research on old Z cars as possible before buying anything, to ensure that you don't fall into this trap. Looking forward to you joining us as another proud and happy Z owner! -
Fast Floridian's 240Z Track Build
74_5.0L_Z replied to FastFloridian's topic in S30 Series - 240z, 260z, 280z
The dyno chart for that was from my old 331 stroker: Stock Roller Block (4.030" bore) Eagle 3.25" stroker crank and rods Mahle 4.030 Pistons Custom Hydraulic roller cam (.571" lift) AFR 185 heads 1.75 Long Tube headers 30# injectors I scattered that engine at Daytona My new engine is a 347. Dart SHP Block (4.125 bore) Scat 3.25" stroke forged crank and H-Beam rods Custom Hydraulic roller cam (.625" lift) AFR 185 heads Long Tube headers 42# injectors I use Megasquirt MSPNP 2 to tune both engines. -
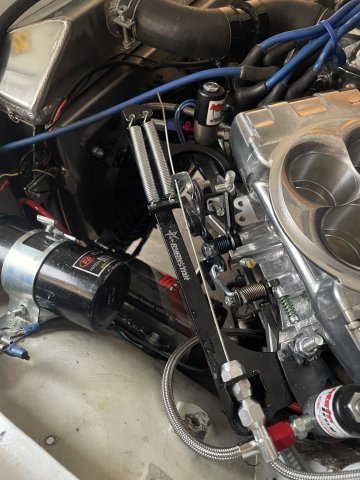
I will do this -eventually. I did pull the center ITB and tested the flow past the butterfly using a vacuum cleaner . Not sure thats an appropriate testing method but the sync tool showed same flow between the two ports. So maybe my issue with 4 is a porting of that intake runner at low flow. At this point I did another valve adjustment -cold- and I did end up finding small adjustments needed, so we will see if that changes anything. Meanwhile I am going to use injector trim to even things up the best I can before Zcon.
-
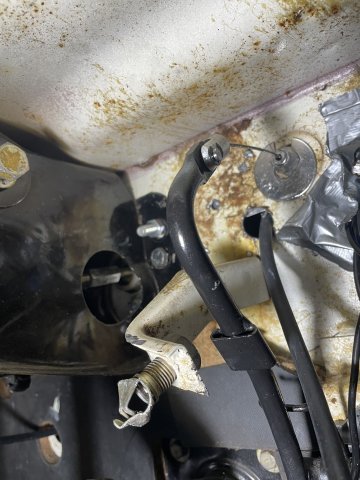
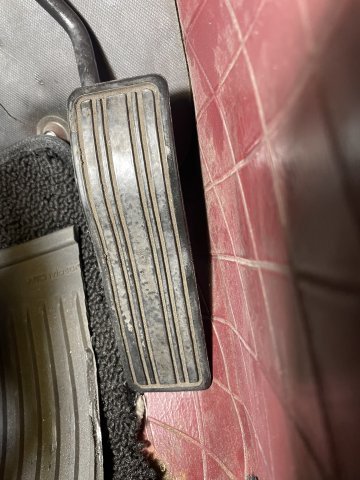
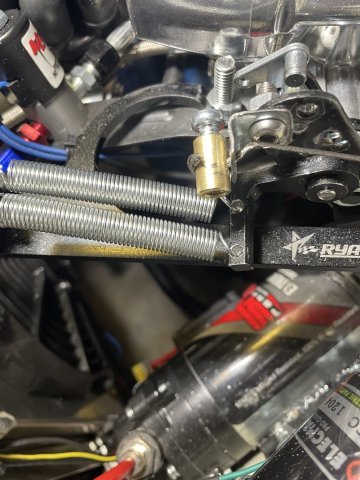
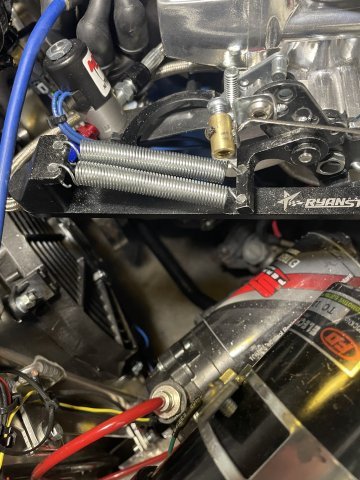
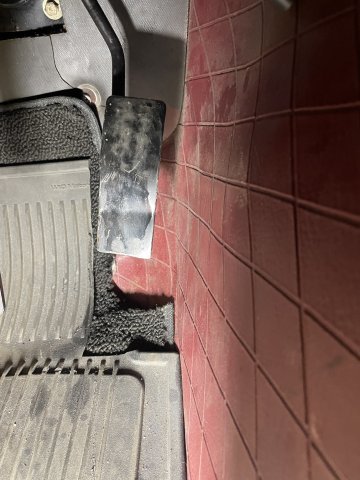
I have had a lot of problems with the throttle cable and related parts. a late night job came up with an extremely basic solution for cable hookup at the carb....I made a bracket and got a brass cable stop at Auto Zone, and the gas pedal bottom edge hitting the floor keeping full range from happening were the culprits. FIXED.
-

Getting the right oil pan for a big HP RB swap in a 240Z is not easy!
primaz replied to primaz's topic in Nissan RB Forum
Keep in mind for a 240Z it is rear wheel drive so to me the best RB swap would be an 2 WD RB 30, or a 2WD RB25. For a more demanding big HP version of those the pan must be rear sump, larger capacity, have the oil pickup designed to match the 2WD RB30 or 2WD RB25 at a minimum. I literally spent days searching the web and so did Robbie at RIPS Racing. I sent him so many links and none of them had what he knows is needed to keep the RB engine reliable, especially when it will be putting down big horsepower numbers. The JHK from UP Garage had one their website that it was for a 2WD RB20 or 25 block which is the same as a 2WD RB30 but that was not as claimed; If I had used that pan it would have severely damaged my expensive engine. Thus plan on a custom pan if you want the engine to last...


-
Who's Online 3 Members, 0 Anonymous, 476 Guests (See full list)