

Mike Mileski
-
Posts
355 -
Joined
-
Last visited
-
Days Won
3
Content Type
Profiles
Forums
Blogs
Events
Gallery
Downloads
Store
Everything posted by Mike Mileski
-
Its assembled as a single unit. I don't think you can replace just the handle unless you do some minor custom fabricating. In other words, the handle isn't just pinned on or secured with a set screw. I think you'll have to get a complete unit from a junkyard or a new one from a dealer or parts house. Mike Mileski Tucson, AZ
-
AZ car 240z front arm MOD
Mike Mileski replied to buZy's topic in Brakes, Wheels, Suspension and Chassis
I also purchased a set of the Arizona Z Car front arms and think they are great. I did wish that the main arm had additional wall thickness and that they were left hand / right hand threaded so I could do adjustments them without unbolting them, so I decided to do the following: I purchased some 1 1/8" tubing with a .220 wall thickness from bulletproofsteering.com. It comes with a 3/4-16 RH thread on one end and 3/4-16 LH thread on the other end, but I had them do left hand threads on both ends (which they did at no extra cost). Then I cut a length off of each end, giving me two pieces, each having a 3/4-16 LH thread on one end. Then I got a right hand metric tap to match the ball joint threads on the AZ Z Car piece and tapped the opposite end. Now I have two replacement arms that are super beefy and can be adjusted on the car. In addition, I also used a 3/4-16 shank rod end that has a 5/8 bore on the ball that replaces the standard 5/8 rod end that came with the piece. It makes it a lot stouter all around. I also replaced the AZ Z Car TC rod with a rod that utilizes a 3/4†shank clevis on one end and a 3/4" shank rod end on the other, replacing the stock 5/8†hardware, making these much stronger too. I realize that the mods I’ve done would greatly increase the price, making them pretty much unfeasible to produce, but I feel I have improved on an already excellent and proven design.
-
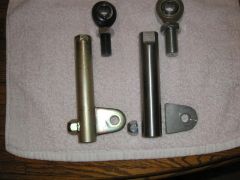 Comparison between AZ Z Car front a-arm and custom piece made from 1 1/8" OD tubing with .220 wall.
 -
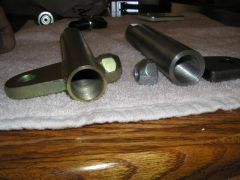 Made from 1 1/8" OD tubing with .220 wall. 3/4-16 LH threads one end, 22mm-1.5 RH threads on other end. Allows on-the-car adjustment.
 -
Nemesis280ZX and Rival5, I'm also in Tucson (far east side) and I have a ZZ Chevy crate motor in my 71 240 but I also have an early Bronco, 1969, that I swapped in a 91 Mustang motor using Ford's harness. Let me know if you have questions. Mike Mileski Tucson, AZ
-
It adapts to a 1310 style U-joint. You bolt this adapter onto your R230 rear end and have your driveshaft guy use the same style yoke on your driveshaft. Mike Mileski Tucson, AZ
-
Power Train Industries part no. 3102-42
-
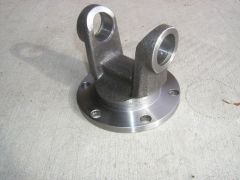 Powertrain Industries R230 Nissan 300ZX Driveshaft Flange, Part No. 3102-42 that utilizes a Spicer 1310 U-joint
 -
power window motor install?
Mike Mileski replied to a topic in Brakes, Wheels, Suspension and Chassis
The first thing to do is disconnect the arm going to the window channel to allow you to raise the window all the way up by hand and secure it there with some tape. Then, after you unbolt the motor you should be able to jockey it around and get it out. Then, since you probably won't remember exactly how you got it out, you jockey around some more putting in the new one. Mike Mileski Tucson, AZ -
Where to buy OEM 240Z Steering Rack?
Mike Mileski replied to cyrus's topic in Brakes, Wheels, Suspension and Chassis
Speaking of steering racks, I know the later Zs, up through 1978, had a different rack than the early 240s. What makes it different? Is it beefier or is it just different some how in configuration? Mike Mileski Tucson, AZ -
I haven't been able to link to Modern Motorsports website for several days now. Anybody else having that problem? Mike Mileski Tucson, AZ
-
Chevy V8 T5 Hydraulics Slave/ Release Bearing setups...
Mike Mileski replied to Mikelly's topic in Drivetrain
Mike, I'm using the stock Chevy aluminum bellhousing, stock slave cylinder and a 7/8" Tilton master cylinder. I bought one of the 5 spped Camaro Lakewood bellhousings but when I bolted it up, I saw that the big flange on the bottom was going to ruin my ground clearance, so I returned it. Are you planning on chopping off some of that extra meat on the bottom to help with the ground clearance issue? Mike Mileski Tucson, AZ -
Your best bet is to try Nissan oriented junkyards and look for 90-96 300 ZX Twin Turbos. Mike Mileski Tucson, AZ
-
If you get one from a 90-96 300ZX Twin Turbo, you'll be guaranteeing you end up with a viscous limited slip R230. Mike Mileski Tucson, AZ
-
So, what's the trick to getting into the SEMA show if you're just a car nut like me? I hear you have to have connections with someone in an automotive related business. Is that really true because I'd love to be able to go? Mike Mileski Tucson, AZ
-
Quick Q on an oil pressure gauge...
Mike Mileski replied to KraZeeZX's topic in Gen III & IV Chevy V8Z Tech Board
Fix it with an electrical gauge. It isn't that difficult or expensive to convert back The wires are probably already there and waiting. Can you imagine what would happen if that tiny little tube came off or sprung a leak with 40 psi oil in it? I've heard of it happening more than once. Mike Mileski Tucson, AZ -
I couldn't agree with you more. I also purchased a set of aluminum hubs from Ross and they are literally works of art. Mike Mileski Tucson, AZ
-
Juan at JSK Innovations?
Mike Mileski replied to Mike Mileski's topic in Brakes, Wheels, Suspension and Chassis
I've emailed him several times over the past several weeks with no response. I just tried calling him at (518)505-5826, at 2:15 pm EST, and only got a message machine. You're right, he's normally very quick and cordial to respond but no response, numerous times, over a several week period is causing me a little unease. Mike Mileski Tucson, AZ -
Has anyone heard from Juan lately? I've sent him several emails about my 5 lug rear setup he's working on and keep getting return messages that my emails are being forwarded to another server. Mike Mileski Tucson, AZ
-
Tilton master - T5 slave clutch adjustment info needed.
Mike Mileski replied to namz7791's topic in Drivetrain
Before you do that, make sure that the rear stop on the clutch pedal is backed off so you have as much pedal movement as possible. I was pulling my hair out because mine wouldn't work and, as soon as I backed off the stop, I got more pedal movement and my clutch magically started working. Mike Mileski Tucson, AZ -
I "mistake proofed" my hood latch by attaching a little cable to the same location that the stock hood latch cable goes to and routed it over and down below the vacuum booster. If the stock cable ever breaks, I can just reach up from underneath the car and access it. In addition, if you can weld on the nuts that hold the JTR latch assembly in place (essentially making a nut plate), it makes for a much quicker assembly/disassembly process. Mike Mileski Tucson, AZ
-
One other thing to try. When your clutch pedal is at rest, in the back position, it sits against an adjustable stop. You can adjust this stop so the pedal comes back even farther. After doing this you need to readjust the rod that goes from the pedal into the back of the clutch master cylinder. After doing this, your clutch pedal now has a longer stroke, meaning more fluid movement, which results in more movement of the clutch fork. Mike Mileski Tucson, AZ
-
3 7/8". I measured mine last night. Mike Mileski Tucson, AZ
-
Out with McLeod throwout for stock setup
Mike Mileski replied to earlycanz's topic in Gen I & II Chevy V8 Tech Board
Both NAPA and Checker sell replacements but they look exactly like the GM piece. I just looked at one at a Checkers in Phoenix yesterday. It listed for $69, cheaper than the GM but it looked like its twin. Mike Mileski Tucson, AZ -
Clutch Bled but not working.....
Mike Mileski replied to a topic in Brakes, Wheels, Suspension and Chassis
I'm in the middle of bleeding my clutch system and am also experiencing some frustrations. I've bled the master cylinder at least ten times (one time being a cycle of pushing the pedal all the way and then opening the bleed screw, releasing fluid, tightening the bleed screw and then allowing the pedal to return to the up position) and the clutch slave cylinder (stock Chevy for a T-5) at least twenty times. I only have about 1/2" of movement in the clutch fork and I know it should move at least an inch. The bleed screw on the stock GM slave cylinder doesn't have a nipple to attach a hose to, so I took it all the way out, thinking I would try to match it to one that does. Unfortunately, it isn't like most other bleed screws. This one doesn't have a hole down the middle, fluid just comes out around the threads when you loosen it. Any suggestions here, other than just continuing to go through the same motions? I only had it apart for a couple of weeks and it worked fine before that and, from what I can remember, I never had these issues when I initially did it a couple of years ago, when I first got it running. Mike Mileski Tucson, AZ


