z240
-
Posts
397 -
Joined
-
Last visited
-
Days Won
4
Content Type
Profiles
Forums
Blogs
Events
Gallery
Downloads
Store
Everything posted by z240
-
E-mail sent. I can help. Jim
-
Six-Shooter: Indeed DIY has them. I was hoping for one that someone had already gone to the trouble of mounting and centering. zGuy, let me see what else comes up and we'll go from there. Jim
-
Looking for a crank balancer mounted ignition trigger wheel and sensor for L6 such as that suitable for EDIS or similar. With or without the balancer. Show me what you have and we'll take it from there. With all the conversions to that nice in-dizzy trigger wheel that DIY is making now, there must be some spare crank trigger parts looking for a home. Must be willing to ship postal to Canada. I'm converting to MS and COP. ByeBye dizzy. Please send email to z240@shaw.ca. PM works too. Thanks! Jim
-
I'm assuming you're talking about the apparent clever starter location. Another brilliant breakthrough in packaging design. Also known as "screw the owner for servicing costs. Starter cost? $100 bucks. Labour? $1000...." Hey, Its not just laying in there is it? Is it April 1 already? Just seems so wrong...
-
Get that bent sheet metal off and look at the front rad support and front structure for any folds and creases, especially the areas where it joins to the rockers. It really doesn't look that bad to me. The skin is wrinkly but the bones are likely not broken. You're not leaking fluids, all the glass is in place. Do the door work exactly like before? One step at a time. And learn EXACTLY what you policy provides as Larry suggests before any arguing starts. But that seat being out of position is not good news.....
-
speedometer and rpm guage stopped working
z240 replied to Ghettodeffender's topic in S30 Series - 240z, 260z, 280z
Since you have an S30 which has a mechanical cable driven speedometer, I can't imagine how it quit and be related to the tach which also quit unless you have an aftermarket electrically driven speedo in there. If thats the case, then the wiring for it is all custom and you'll have to dig in to that wiring to solve the problem. Its been a week, made any progress? -
If the camber is truly way off, the only obvious thing is the T/C rod or bushing or its mounting may have failed.
-
Safety, Please this is Important
z240 replied to Sanchez's topic in Brakes, Wheels, Suspension and Chassis
First, very sorry for your loss. There are just some things that a human cannot survive, no matter what safety technology is in place.The very best safety equipment is defensive driver training, emergency handling training, and a 100% commitment to safe driving. To make any significant safety improvements to a Z, you'de have to have a full race cage with 6 pt belts and a helmet with HANS reinforcement. Not practical for daily use.At the very least, ensure you upgrade your seat belts to modern standards. The rest is in your hands. All the very best for your family.Jim -
Regarding rack bushings. There are two different widths of the left side (near column pinion) bushing. 240 racks are narrower between the bushing retaining ears than 280 racks. Hence 240 bushing on a 280 rack is loose and lets the rack move left/right. Bad. It has to be shimmed or get the right bushing. From the Energy Suspension Catalog 1970-78 240Z Rack and Pinion Bushing Set 7.10101 1974-78 260, 280Z Rack and Pinion Bushing Set 7.10102
-
Just got a quote from them. $140 incl shipping to me in Calgary. Bit less for the US based locations of course. Maybe a bit too much. They also confirm its pressure based, is not compensatable (is that a word? well it is now!) for height/volume uniqueness and further more CANNOT be tweaked with external resistor networks to attempt to match it resistivity range to your gauge.
-
Last time I checked V=IR, so if V goes down, I goes down for the same resistance. All you'll get is a dim bulb....
-
This is a brilliant idea. Need to find out how that works. Ultrasonic transit time reflection? Do you order it to length?This type of gauge that reads the level is prone to make our gauges read a bit stangely. With our uneven tall on one side tank, the volume vs level relationship is not linear. A level based gauge will make our gauge go down more quickly in the top lump of our tanks, then it will slow down once the level gets into the main part of the tank. It should get the empty part right right no matter what. The flatter 77-78 tanks would be less pronounced.The picture shows its top "may" be thin enough to fit above the tank without a new hole in the hatch floor. Those of us doing the cool new in-tank fuel pumps that mount in the top are handling this anyway.
-
Alright, I want to say a few words about this character "One tuff David" or whatever he calls himself... Its not very often that you deal with a guy like this. Creates products that fill a need, prices them fairly, makes the product with outstanding quality, packs them well and ships them promptly. And he has sales!! Talk about perfect "excuse" fodder when explaining your last purchase to the misses!!! "But it was on sale honey!!! See? and its pretty too!" Then as if that's not enough, ask him for something custom, and he not only designs and makes it, but exceeds your expectations, AND he communicates well regardless of the situation. Only thing I haven't tested him on is return policy or replacement of defective goods, but I don't think that will ever be an issue!!! Great work, keep it up. Jim
-
The tank requires two vents. One while filling and one while running. You'll just hate trying to fill your tank without hooking that vent line at the filler neck to the tank, and the tank will collapse as it empties without a vent to somewhere while running. Study the FSM's and you'll see how it works. There is a great thread on here someplace that fully explains methods to remove the vapor canister but keep venting.
-
They are 6 x 1mm about 20mm long. Assuming you mean the ones that hold the motor to the cowl.
-
Peter Brock can be reached at bre2.net. I don't think he is a forum member here.He does currently offer a BRE logo'ed Z car cover. I have it and it fits perfectly.I'm sure he can ID and old cover for you.
-
Aftermarket Speedometers and Tachmeter pics!!!
z240 replied to MidnightRider's topic in S30 Series - 240z, 260z, 280z
Has anyone considered the quad combo speed hut gauges in 4"? GPS speedo with tach on the left and oil/temp/fuel/volt on the right. Leaves your stock tri gauge pods for afr, clock and user choice of oil temp or EGT etc. ONLY comprimize is the smallish tach.... May not suit everyone, but its going to do me just fine. -
You better ask Steve's brother Pete....
-
Ah, the old 10 x 1.25mm.. or is is 1.50 mm thread pitch problem/confusion... Perhaps a rule of thumb is in order for virtually every 10mm bolt on the Z. If it screws into the block or transmission casing, its 1.50 thread pitch. Head bolts, trans to block bolts, engine mounts, starter, alternator mount. Only exception that I can think of, and its weak, is the nut that holds the one stud on the alternator mount. Its 1.25mm I'm pretty sure. That stud is 1.50mm into the block though. If its a suspension component, connections to another, or to the frame, its 1.25 mm thread pitch. Engine/Trans, 1.50 course, Everywhere else 1.25mm fine. "1.50 for the engine of course, but that suspension is mighty fine..." Every 8 mm bolt is 1.25mm thread pitch. There may be one or two exceptions somewhere on something that are 8 x 1.00, but damn rare. All 6mm are 1.00 thread I look forward to hearing the exceptions to these rule from others. There are always exceptions..... And as a take home exam, who can tell us where there are, lets see.., at least 6 occurences of SAE threads on a Z??? Jim
-
overseas auto in Vancouver British Columbia has Weber parts as well. http://overseas-auto.com/?page_id=812 I've purchased a few things from them recently, good service.
-
All is not lost. How badly broken is it? I repaired one where the connector casting between runner 2-3 was broken such that a 1.5 in diameter hole was left in the side of the #2 runner with that broken out plate still attached to the connector casting. It was a "cleanish" break. no little bits or shards. I fixed it using HTS 2000 welding rods, which I've grown to absolutely love. Totally easy using MAP gas torch. Put up some pics and I'll give you some ideas once I see it. If I remember tonight I'll take a couple of pics of the repair I did to help you understand how big the problem was and how easy it was to fix. Jim
-
First, she is a keeper. Treat her BETTER than you treat your Z. Second, now you have a bugger of problem. How are you going to top that present with something better for her? Good luck! Merry Christmas!!! Jim
-
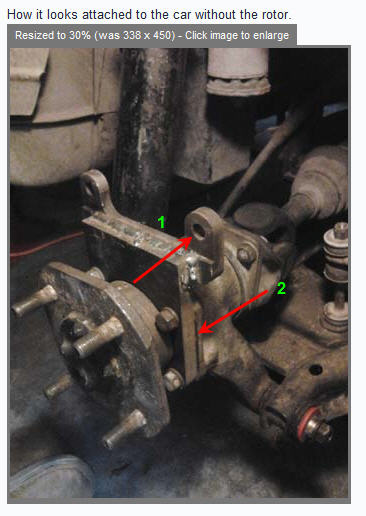
It appears to me that no matter what stock thickness you use, (as long as its at least twice the depth of the relief you cut in the upper piece to keep enough for some strength), that you retain the exact caliper mounting face geometry/location as you have now. Stare at this doctored picture and imagine what happens if the stock is 1/2 the thickness in the picture, but built and attached the same way. The arrows point to the two reference surfaces involved. Seems to me that you remove material from the front (wheel side) and back (diff side) of the stock, that the position/location of the #1 arrow does not change.... You're simply positioning the caliper mounting face on the two upper ears back (toward to diff) from the bracket mounting surface by the depth of the relief you cut. Nothing more. Please tell me if I'm missing something here. I hope its that simple.

-
I've worked on two cars that have had the conversion on at least one side. Folks just remove the old striker from the body, attach the 77-78 striker to the body, (new holes, new backing plate, weld up old holes, not simple, but do-able). Yes, the inner vinyl door panels are "unique" and only fit the 77-78 doors, they are shorter, the rear edge is at a different angle, the door lock button in ~9inches from the end instead of the usual 6, etc. One of my friends and I have been through hell trying to find 75-76 inner door panels as about three sets that we've bought have shown up and been the later 77/78 style. Anybody need any, I have lots!!! I've had all three styles of hinges and all three types of doors in the shop at once, and was amazed that as far as hinge to door goes (definitely not hinge to body), all hinges mount to all doors and appears to be in the same location/spacing position. I think some had three bolts, some had two, but all share at least two holes. So, that said, you can switch the entire door, from just about any year to any year with some work, and have them fit. Just don't start swapping pieces from one to the next. Lots in internal and external uniqueness. About the only thing they all share are the exterior door handles and maybe the little plastic cover on the end of the lock release rod.
-
75-76 doors are a perfect match to yours. Just check the door latch and make sure its the same as yours. Not exactly sure when they changed to the new latch assemblies, may have been late late 76, like 7/76 or something so beware. Happy door hunting.