

MONZTER
-
Posts
826 -
Joined
-
Last visited
-
Days Won
27
Content Type
Profiles
Forums
Blogs
Events
Gallery
Downloads
Store
Everything posted by MONZTER
-
Thanks Paul, After this last round of CNC work I can see the areas that I think need to be changed, so back to the computer. I will probably add epoxy to the low spots I don't like, and hand finish one of the chambers to flow test it. At my speed it will be another year, so I figured I would finally show it. I have some other things coming together which I will be posting soon. Have a good one, Jeff
-
This next set of pictures is of a P-90 head that has been "welded up" and roughed out with a CNC on the chambers and port bowls right of the Cad files above. The surface machining was done in a radial pattern outward from the center of the valve guide at 3 degrees and it took 8 hours of machine time. A finish pass would be 1 degree and waaay more time. Since this is just a test I figured why waste the time. There a still plenty on low spots that would need more welding and another pass, but I would probably just start over. Some details to note - angled spark plus towards the exhaust valve 15 degrees. Designed for OS valves 46 and 38. Would need the block eyebrowed I assume. Double quench pads. Streamlined leading and trailing edges on the valve guides. 54cc chamber size. Jeff

-
Been thinking alot about what a modern 2 valve Z head would look like given all the info out there about 2 valve American engines and everything being done to them to generate big power on pump gas. So I have spent time on and off working on a 3-D CAD model of what I think it would be like for a Z-head. First, I by any means do not know what I am doing, I have only built and run 1 welded and reshaped head that is currently on my 240, and luck would have it, it runs pretty darn good. I am only doing this for fun, and really have no idea of how it will work until I finish it up, flow test it and ultimately run it. This thread has been kinda dead for a while, so hopefully this will get some more ideas going, Here some pics of the CAD File for discussion.
-
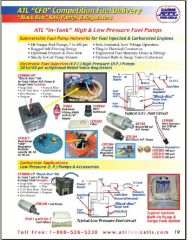
Hi David, Yes I am fuel injected running a Tec3r; it is a 240 block with a welded chamber N-42 head. I run the early 280 5-speed tranny with a Quaife 4.11 diff. I don’t remember what I paid for it, but it does come as a complete kit with bulkhead fittings, hose, HP Walbro pump, electrical bulkhead, filter, pretty much everything. I ordered it from here Earl's Racestore 1 Lawndale, CA 310.644.0881 You can actually buy the trap doors and all the parts separately, I don’t remember where I found it but I know ATL can send you a complete parts list, if you want to make you own box. Jeff
-
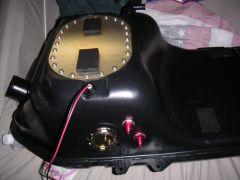
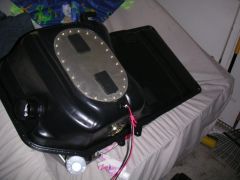
Sorry no other pics during the build, I actually did more work than I think I really needed, as I actually cut the entire tank apart top to bottom along the seam weld. I did this thinking I was going to originally build my own baffles and trap doors. I then found the black box and said "@#%$" what would have been a lot easier. So it still has the baffle plate inside with a trap door right along side where the fuel level sender float moves. It ended up being a perfect way to hold the safety foam away from the sender float. So here is the hot tip, - the top of the tank is not totally flat, and the tank cannot get any thicker because the spot were the opening is, is where it hits the bottom of the car to mount. What I did was make a template of the fuel cell plate 3/16 offset around the perimeter. I then cut a 3/8 thick pc of aluminum of this template to make a forming buck. I clamped a pc of 18 gauge steel sheet and hammered the sheet around the form to make a "pocket". I then laid this pocket on top of the tank and traced it on the tank, then cut the tank out this exact size. I set the pocket into the cutout and tacked it in place. some of the leftover flange from the pocket will be sticking up and some of the low spots were it is not flat will be just flush. Grind off the extra flange to match the shape of the tank top, and then weld to make a perfect seem. Then re-cut the access hole in the new pocket and drill all of the mounting holes. The original fill plate will now fit into the pocket perfect. I know pictures would help, but I think if you look at the pics close you will see what I mean. Have fun Jeff
-
-
-
-
I bought a thing called "black Box" from ATL with the pump and all. It has trap doors built into it like the Nissan Comp oil pan. I cut a access hole in the top of the tank for a standard Fuel cell plate. Mounted it all up with safety foam and AN fittings. Works perfect for Autocross no matter how low the fuel is. Best part is it looks stock when mounted. Jeff
-
Would I be correct in thinking that the hot water from the thermo housing is going into the turbo, getting hotter, and then back into the engine for another trip without seeing the radiator. Hmm seems bad, but I think this is how the factory did it, I wonder if feeding off the back of the block and returning to the radiator is better for cooling, but probably not as good for flow. This has got me thinking even more... Thanks for all the input Jeff
-
I have had my Quaife for over 2 years now, and there build quality must have improved over the years. I also disassembled it before installing it and much of the crappy machining and random chamfering on the helical gears and housing shown on the OBX was present on my Quaife. At the time I paid $1200.00 for it, maybe the new ones cost more to make better. I would have second thoughts about buying another Quaife based on my experience. Some other problems I had: the dust shield on the companion flange was hitting the aluminum bearing housing due to the fact that inserts that the stub axles thread into were installed backwards. Quaife America figured this out and pressed them in correctly. The unit has always been really noisy (clunky) and I have had it rebuild again by Quaife America where they simply inspected it and replaced the washer stack which was already worn out. This is just my experience and .02 Jeff
-
Thanks for the advise. Jeff
-
Anyone have any thoughts if there would be a problem running the turbo out coolant line directly into the radiator. It is an aluminum radiator and it is cross flow, I would be run into the hot side. The in for the turbo will come off the water pump housing, or do you think the drain plug on the rear of the block would be better? Thanks Jeff
-
Hey, On mine I used 1 5/8 and the tubes are 26.5 long. It is a lot of tubing to fit it all in there. On my center two ports I simply made the form to go from square to round for that one first, and then ground it down more after making the center ones and used it to make the others. As a side note, I made the form in 3 pcs so that I could remove the center section of the form to let it collapse for easy removal. This may be necessary because the short side of the rectangular port is narrower than 1 5/8. The size and length of the tubes was all given to me by Burns Stainless. They have software to determine the correct details given a list of parameters I supplied. This service is free if you buy there merge collectors. I think a lot of people here will argue that long equal length turbo headers are unnecessary, but if you look at Corky Bells book on turbo charging, and check out the section on headers, you will see all of the Indy and professionally prepared cars with long tube merge collector designs. Now if this actually helps on a 2 valve Z engine, I guess we will see. Personally, I love the challenge and the look, so if that's all I get by doing it, then I am still happy.
-
Hi John, Thanks for the post, pretty cool to see your timing chart for the turbo vs the NA car. Would you mind posting your target AFR chart as well? I am finishing my conversion to turbo and would like to see what you have done. Thanks for sharing all your hard work, I wish more people would contribute to this post as this would really help settle the nerves of people starting off there new project. I wonder if Timz would be interested in sharing his info on his awesome build, I believe he also uses an electromotive system. Even the MS guys could get valuable info from looking at this info and posting there findings. Best Regards Jeff
-
Here is what I did. Simply make a form out of steel by grinding it to shape. Make it the size of the inside of the tube you want. Once the form is made, grease it up as well as the inside of the tube, then use a press or vise to press the tube over the form. The steel should be formed perfect.
-
Not much reading, but some great pics http://gurneyflap.com/engine.html
-
has anyone seen this? http://www.grit-tune.com/part.html translation: It is largest fault of the direct 6 engines, it is the new product in order engine block twist it accompanies, to prevent the bending of the crank. The plate is inserted during engine block and the oil pan, by the fact that the vibration of the engine is absorbed, substantial improvement of durability is brought. Processing which accompanies the installation of the lower deck plate you receive.
-

AZC rear control arms...watch for cracks
MONZTER replied to viperredls1z's topic in Brakes, Wheels, Suspension and Chassis
Thanks for the comments, Ya there mine, made just 1 set for my personal project Jeff -
AZC rear control arms...watch for cracks
MONZTER replied to viperredls1z's topic in Brakes, Wheels, Suspension and Chassis
Do you think rosebud welds through the tube into the insert, and then overlaping the cross tubes would have helped, It sounded like a good when I was making mine, I hope so. cracks scare me...
-
Have any of you ever seen this build http://www.radrides.com/69cuda.html Sick...
-
If your going to use pre-preg for structural reasons it must be temperature cured under pressure. The heat can be any source as long as it is controllable for the proper ramp up and cure cycle. The pressure can also be from many sources. You mentioned vacuum bagging, probably the simplest and cheapest. You can also bladder mold with clam shell molds, Compression mold, or even shrink tape. If the parts are not going to be structural, I would stick to a wet lay-up a company called JD Lincoln in Costa Mesa sells Prepreg in various forms http://www.jdlincoln.com/default.htm
-
-
Forming the sheet with match dies and then folding it half with a break for production would be cake for .125 wall. I think hand forming .063 over wood will be easy and plenty for prototyping. It is amazing how strong a small boxed in shape like your plenum design is. FYI the BMX bike I showed was race by 220lb pro riders who could squat hundreds of pounds. If you have ever seen a BMX gate start you would be amazed how stiff and strong a monocoque tube can be. The wall thickness on the downtube for the bike was only .050. I think .120 will just make manufacturing and handling easier when it is time for a production run. Jeff
-
Hi Justin, Why not just make it Monocoque style / sheet metal? One pc would be cheaper than cutting up expensive mandrel bent tubes and running a mile long weld bead - also none of the warpage. The shape is simple enough that you could bang it out over a wooden buck. Aluminum is easy to anneal and age after. Check the pics below for a better explanation. The first one shows the small weld seam, the second one shows the end cap, but I think you could form this in also with a small center seam, and the last one shows it unfolded. I designed a bike years ago that the downtube was made this way / graphics and all. BTW .120 wall? how much boost ya gunna run? Best Regards, Jeff


