

MONZTER
-
Posts
832 -
Joined
-
Last visited
-
Days Won
34
Content Type
Profiles
Forums
Blogs
Events
Gallery
Downloads
Store
Everything posted by MONZTER
-
Hey, On mine I used 1 5/8 and the tubes are 26.5 long. It is a lot of tubing to fit it all in there. On my center two ports I simply made the form to go from square to round for that one first, and then ground it down more after making the center ones and used it to make the others. As a side note, I made the form in 3 pcs so that I could remove the center section of the form to let it collapse for easy removal. This may be necessary because the short side of the rectangular port is narrower than 1 5/8. The size and length of the tubes was all given to me by Burns Stainless. They have software to determine the correct details given a list of parameters I supplied. This service is free if you buy there merge collectors. I think a lot of people here will argue that long equal length turbo headers are unnecessary, but if you look at Corky Bells book on turbo charging, and check out the section on headers, you will see all of the Indy and professionally prepared cars with long tube merge collector designs. Now if this actually helps on a 2 valve Z engine, I guess we will see. Personally, I love the challenge and the look, so if that's all I get by doing it, then I am still happy.
-
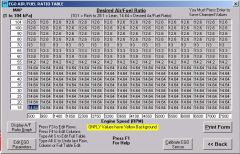
Hi John, Thanks for the post, pretty cool to see your timing chart for the turbo vs the NA car. Would you mind posting your target AFR chart as well? I am finishing my conversion to turbo and would like to see what you have done. Thanks for sharing all your hard work, I wish more people would contribute to this post as this would really help settle the nerves of people starting off there new project. I wonder if Timz would be interested in sharing his info on his awesome build, I believe he also uses an electromotive system. Even the MS guys could get valuable info from looking at this info and posting there findings. Best Regards Jeff
-
Here is what I did. Simply make a form out of steel by grinding it to shape. Make it the size of the inside of the tube you want. Once the form is made, grease it up as well as the inside of the tube, then use a press or vise to press the tube over the form. The steel should be formed perfect.

-
Not much reading, but some great pics http://gurneyflap.com/engine.html
-
has anyone seen this? http://www.grit-tune.com/part.html translation: It is largest fault of the direct 6 engines, it is the new product in order engine block twist it accompanies, to prevent the bending of the crank. The plate is inserted during engine block and the oil pan, by the fact that the vibration of the engine is absorbed, substantial improvement of durability is brought. Processing which accompanies the installation of the lower deck plate you receive.
-

AZC rear control arms...watch for cracks
MONZTER replied to viperredls1z's topic in Brakes, Wheels, Suspension and Chassis
Thanks for the comments, Ya there mine, made just 1 set for my personal project Jeff -
AZC rear control arms...watch for cracks
MONZTER replied to viperredls1z's topic in Brakes, Wheels, Suspension and Chassis
Do you think rosebud welds through the tube into the insert, and then overlaping the cross tubes would have helped, It sounded like a good when I was making mine, I hope so. cracks scare me...
-
Have any of you ever seen this build http://www.radrides.com/69cuda.html Sick...
-
If your going to use pre-preg for structural reasons it must be temperature cured under pressure. The heat can be any source as long as it is controllable for the proper ramp up and cure cycle. The pressure can also be from many sources. You mentioned vacuum bagging, probably the simplest and cheapest. You can also bladder mold with clam shell molds, Compression mold, or even shrink tape. If the parts are not going to be structural, I would stick to a wet lay-up a company called JD Lincoln in Costa Mesa sells Prepreg in various forms http://www.jdlincoln.com/default.htm
-
-
Forming the sheet with match dies and then folding it half with a break for production would be cake for .125 wall. I think hand forming .063 over wood will be easy and plenty for prototyping. It is amazing how strong a small boxed in shape like your plenum design is. FYI the BMX bike I showed was race by 220lb pro riders who could squat hundreds of pounds. If you have ever seen a BMX gate start you would be amazed how stiff and strong a monocoque tube can be. The wall thickness on the downtube for the bike was only .050. I think .120 will just make manufacturing and handling easier when it is time for a production run. Jeff
-
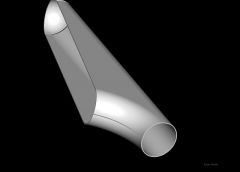
Hi Justin, Why not just make it Monocoque style / sheet metal? One pc would be cheaper than cutting up expensive mandrel bent tubes and running a mile long weld bead - also none of the warpage. The shape is simple enough that you could bang it out over a wooden buck. Aluminum is easy to anneal and age after. Check the pics below for a better explanation. The first one shows the small weld seam, the second one shows the end cap, but I think you could form this in also with a small center seam, and the last one shows it unfolded. I designed a bike years ago that the downtube was made this way / graphics and all. BTW .120 wall? how much boost ya gunna run? Best Regards, Jeff
-
-
So I found this link http://forums.hybridz.org/showthread.php?t=73222&highlight=simpson+belts It has answered many of my questions. I have a friend at Simpson and I am looking at this set up. Any comments. I will only be using this for Autocross, I will retain the stock belts for commuting. http://www.simpsonraceproducts.com/products/product_detail.aspx?cat_id=189&prod_id=7103 Belt in / pull down / polyester webbing Thanks Jeff
-
That sounds like a great ride, I wish I got a chance to travel more and ride new spots. We have a website for our local rides, it is www.geoladders.com Jeff
-
Hey, Thanks for the pics, Thats really clean the way the eyebolts hold the factory belts and the harness. I like your harness bar as well. Do you or anybody else know if the shoulder belts could hook to a really solid strut bar?, or is it simply too high. Does anybody know what the correct angle for the shoulder belts should be. Thanks again for the help, I think I now have some work to do Jeff
-
You win the $1.00 prize; Correct. Are you a Mountain Biker? I assume you are since you know the trail. Whitting is our lunch ride loop, great fun for a quick hour ride. My office is 5 min away. Do you also ride in the Cleveland National Forest? What are your favorite trails? Good talking to ya this weekend Jeff
-
Hi Tony, You camera sounds pretty cool and simple. The one I got is called a Viosport 3 http://www.viosport.com/ It plugs into a Sony Handycam to capture full 500 lines resolution in DVD quality. It is defiantly more hassle having to run the wires, but the image stabilization built into the camera really helps. I will try it tomorrow on the side of my car. I want to see how the tires roll over in the corners. Have fun Jeff
-
Got a new helmet lipstick camera to use on my car during autocross. I couldn't wait to try it, so I put it on my Mountain Bike for a test ride. The video came out out pretty cool. Can't wait to put it on my front bumper for the next practice. Check it out http://www.youtube.com/watch?v=qCIsYrT5f_w
-
Good Idea. Here is the Dyno chart from the above setup The headwork on my car is the reason for the timing like it is. I have tried advancing it further with 100 octane and felt no difference. here is a picture of the chambers
-
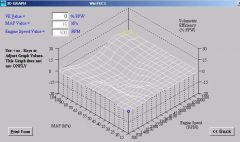
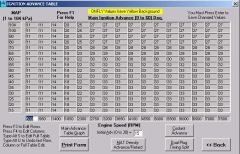
Hey, I am sure some of you may not want to share this info, but some of you might find this info helpful to others. Want to share some of your Standalone settings? Me first: Please remember, everybody's car is different, and one persons settings may kill someone else's engine, Please view with care PS I would love to see someone's Turbo Setup and compare it to my NA Setup Jeff L-24+1 NA 10.75: compression MSA Satge 3 cam Electamotive Tec 3 Target AFR Timing Curve VE
-
-
-
-
everyone that has built a custom intake for the L6
MONZTER replied to turbobluestreak's topic in Nissan L6 Forum
Amen!!! The quickest way to ruin your hobby is to make it a business. It has to be for the love of it. The reason good art is so beautiful is that is was done for no other reason but to make the artist happy. Commercial art is usually trying to make everybody happy, and in doing so really becomes a compromise. I know there is a lot of you out there who know what I mean.


