socorob
-
Posts
1144 -
Joined
-
Last visited
-
Days Won
10
Content Type
Profiles
Forums
Blogs
Events
Gallery
Downloads
Store
Everything posted by socorob
-
The new ones he sends are made in china from a company called omega.
-
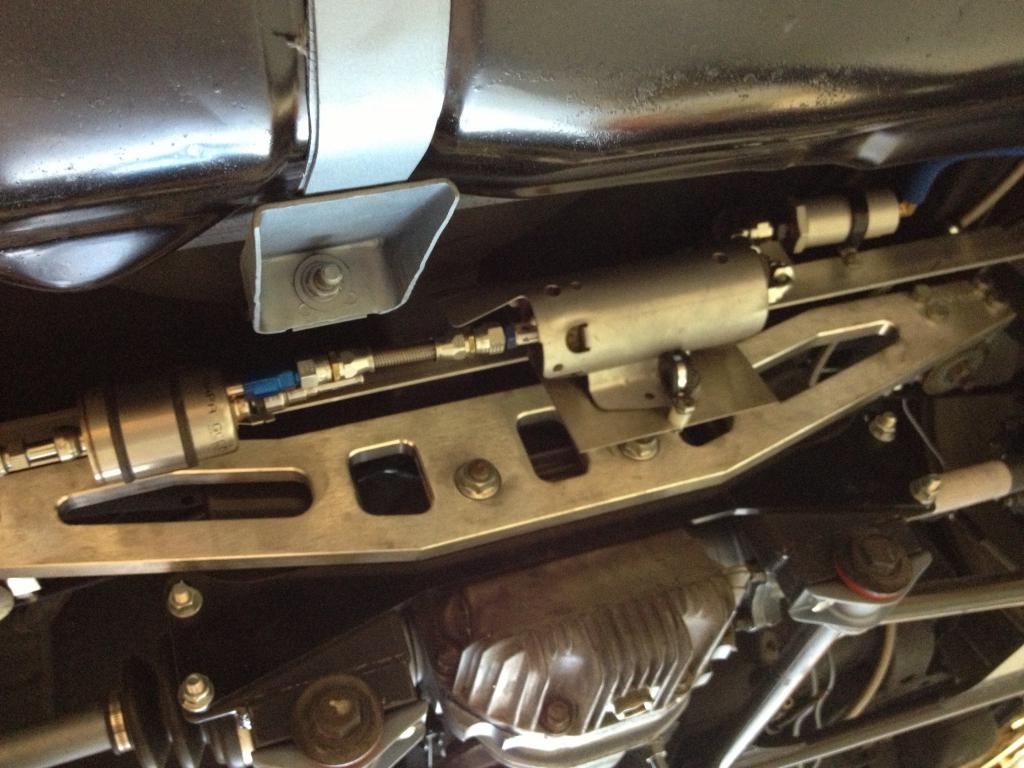
Fuel system is finished except for a short piece of return hose and 4 clamps.

-
If you have a local speed shop check them out. There's one about 45 min from here and they sell main hoops. From the narrowest to widest they carry, they come in about 6-8 widths. It looked like they were 2 inches increments in widths. They said they could get any hoop width made, and they were under $100 for ones they had in stock.
-
Please do. I would like to see how they look installed.
-
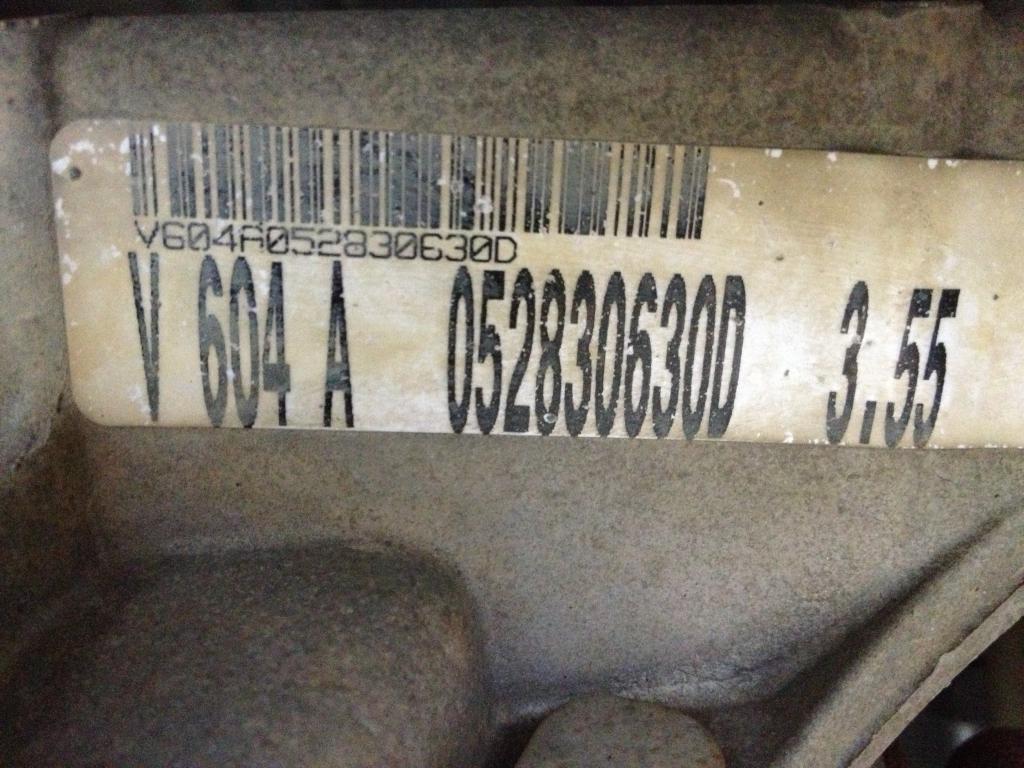
And here is the explorer service tag in case anyone wants to go a googlin some specs.
-
Just for a little info. There is an explorer parked right next to my Z. My 6 bolt Q45 axle looks to be about 1.25 and the explorer is 1.430. That's the best I could get with a caliper under there. Almost 1/4" difference.
-
What kind of driveline angles are you getting with that setup?
-
http://www.epcoshiftknobs.com/push_button.html This place has some choices of knobs and can add a button to it, and the prices arent bad. Where would the button be less obtrusive, on the top, or the 11:00 position? http://www.canadiantire.ca/en/pdp/automotive/interior-auto-accessories/shifter-knobs/gear-shift-knob-with-engine-start-button-0416042p.html#.U0gAAFf6GIA This one is nicer with the hidden button, but would prefer all black. http://www.rhdjapan.com/night-pager-missle-shift-knob-universal.html This would be the ultimate if it wasn't so expensive and could have the Datsun logo. http://www.dctms.com/product__ACS_Mercedes_carbonfibershiftknobs.html I would like to find a knob with a flush button, or a covered one as second choice. Anyone got anything?
-
How does it work? I've read up on how the stock works and it would be very difficult to have it work in our cars in that way. I think it looks at speed, pedal positions, etc.
-

Leaking oil pressure sender
socorob replied to RebekahsZ's topic in Gen III & IV Chevy V8Z Tech Board
If you can't find the right adapter, try using WOG to seal it. That stuff works really good. -
Litmans hood looks to be fiberglass in his pictures. Thats probably why 30 pounders worked for him.
-
I did the same on mine but didn't plate it. I thought about intersecting that bar with one coming down from the top inside corner of the A pillar to sort of make an upside down T, but I was getting tired of welding on all the while I'm at its and just moved on.
-
If it works out, please post some of the mounting distances from common points on the car.
-
This is kind of like the way TTT has the slotted rear to get some camber adjustment.
-
I wish! I have to finish up the fuel system, all of the exhaust, all wiring , put body panels back on, interior back in, and paint. My goal is to be able to at least start it by July1. Plus we have a crawfish boil to go to this weekend.
-
https://www.pegasusautoracing.com/productdetails.asp?RecId=1550&gdftrk=gdfV25409_a_7c2692_a_7c9840_a_7c30205 I think these look similar to the mirrors 280s came with , but haven't used them so can't comment on the visibility. Talbotco advertises them in convex so that would help.
-
I would use the mounts again, but not the radiator hoses or AC stuff. Maybe just the AC bracket and compressor to keep from having to make your own mounts, but I would get the hoses,drier, and the rest of the AC system from vintage Air. I wasn't happy that he uses an AC compressor that's made in China. I'm hoping a sanden will bolt into the same place when this one fails. The JTR headers fit well. I am mostly pleased with everything I used so far.
-
400WHP - best circuit engine choice
socorob replied to 260DET's topic in Gen III & IV Chevy V8Z Tech Board
I think LS2 is 400 hp stock but 6 liter? Check out LS1tech.com -
I ordered the urethane supply stuff and it came in yesterday. Maybe next weekend I will have time to get started to see how it works out. I'm going to use great stuff foam instead of melting the rod because the tool was almost $300.
-
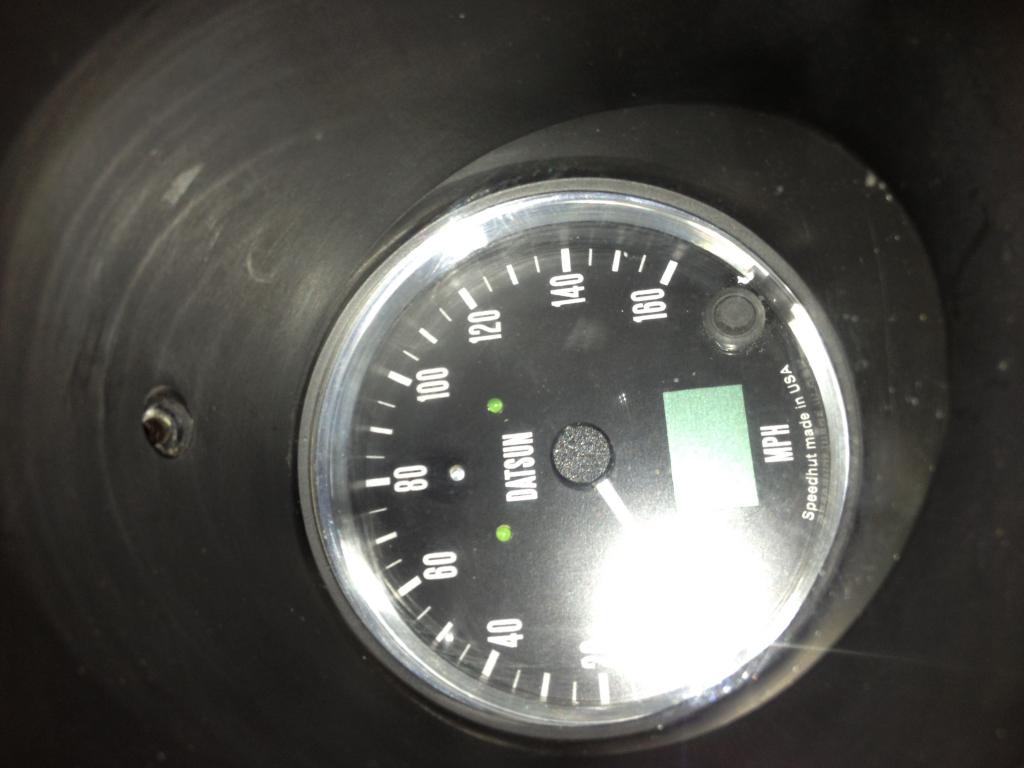
You just have to make sure you push it tightly all the way forward when you tighten the mounting screws so that angled oval piece of plexiglass in the Datsun pod doesn't rattle.
-
I believe the manual on xenons shows how to open it. Looks like you put half in a vice and then bolt a bar onto the cylinder bolts and basically unscrew it. Does anyone know if that's correct? I got a booster from rockauto and I didn't put it on the car for a long time from when I got it, and it looks like they put the 2 halves back together 180 degrees out. The tube for the vacuum is in the wrong place. Will that hurt anything? I will be finishing up the brakes and bleeding them in the next few weeks, and would rather take it apart now if there will be a problem than after I have everything full of fluid.
-
Wheel Show! Post your pics of you wheels
socorob replied to k3werra's topic in Brakes, Wheels, Suspension and Chassis
What did you use to roll the lip? -
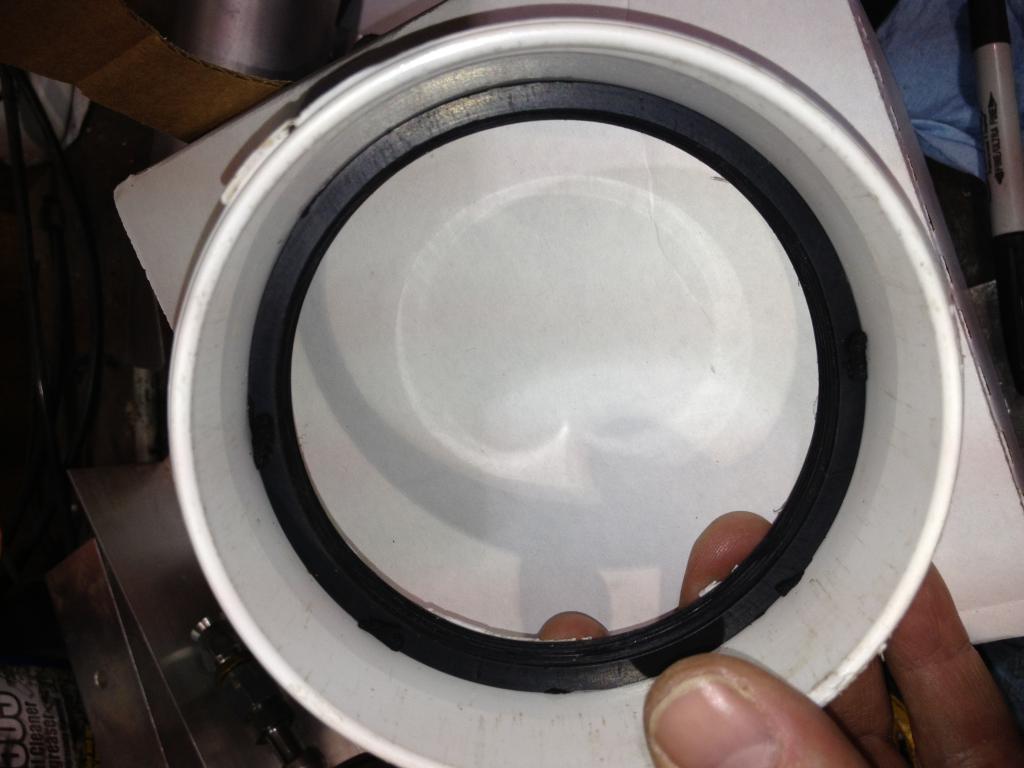
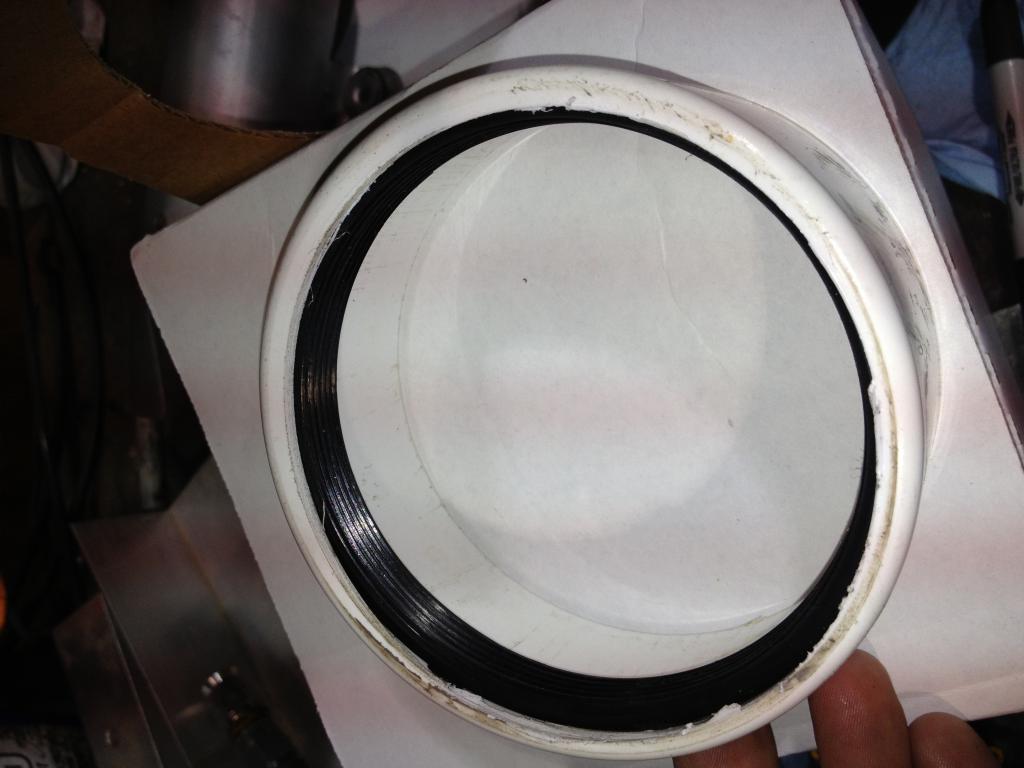
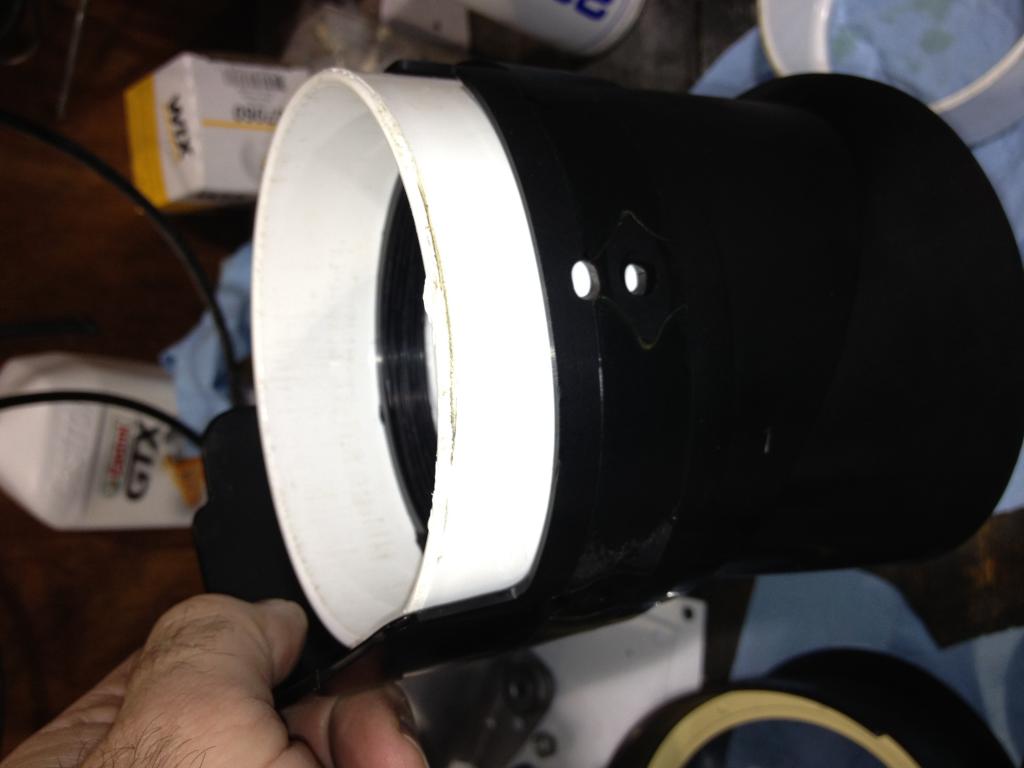
I already had 1 cap laying on my table in the garage when I was taking the old gauges apart and thought that looks about the right size. Happy accident. I had to go buy one more cap, borrowed the right size hole saw, so this project cost me $2.86.I drilled small holes in the sides of the cap and used the 4 screws that held the original one in to screw this in the same way.
-
Here's how I decided to mount speedhut gauges into the Datsun Z. I used a 4" PVC sewer cap from Ace hardware since it was flat on the end. I just cut a hole with a hole saw and grinded the knobs off the lock ring and it fit tight inside the cap. The cap is only about 1/16 smaller than the gauge pod so it all fit together easily. The hole saw was about 1/8" larger than the gauge, but since the locking ring with the nubs grinded off is exactly the same size as the inside of the cap, that keeps it centered.
-
http://www.mcmaster.com/#gas-springs/=rdn0lu