z2go
-
Posts
361 -
Joined
-
Last visited
-
Days Won
3
Content Type
Profiles
Forums
Blogs
Events
Gallery
Downloads
Store
Everything posted by z2go
-
how to identify a 4-speed manual from a 5 speed tranny?
z2go replied to 209s30280Z's topic in S30 Series - 240z, 260z, 280z
Here's a good place to look also, these guys have published a lot of technical references. They have microfiche, FSM's, etc. They also have an S130 site for if you have a later model 5spd. http://www.xenonz31.com/s30/reference.html -
It would help if you knew what thread you got those pictures from... I'm assuming you don't though, that you saved them at some point, but can't recall from where?
-
I'm curious, did the stock radiator with no fan even work at ALL for the setup? I can't imagine it would...
-
Very nice. I'm curious about two things... one, what were your times? Two, where in Nor Cal are you guys?
-
The larger one is going to be your original feed, so you have it setup correctly.
-
On your 77 it might be a bit different, if you have a Haynes manual around it might help. On my 72 it is really obvious, because the feed is 5/16" and return is 3/16". One way to tell is if you take the fuel sender unit out, and look in to see which one has a tube running down to the bottom of the tank, and which one does not. Obviously, the one with the tube is your feed line.
-
No picture?
-
I just had my tank apart to weld on a sump, and I had a pretty good look inside the tank. The stock feed line looks like a normal soldered in pipe that runs from the wall of the tank straight down to near the drain plug, the lowest point in the tank. I'm thinking a couple things could be wrong with your fuel pickup... Since you said it was pretty heavily rusted, it may be that your line itself is deteriorated, or the solder on the pipe has busted, either on the inside or the outside. Either way I don't think you have an easy fix with this one... if you clean up the outside, you might be able to re-solder the joint. I would do a simple check with some clear tubing on the outlet, creating a siphon into a jug, and see if you get air bubbles, or if it even siphons at all. The other thing you might think about is your hoses... they don't last forever. If you took the tank out and did not replace the rubber hoses, they might not be making a good seal anymore.
-
Who's The Best Media Blasting in Central Calif?
z2go replied to ccwade81's topic in Body Kits & Paint
I have my 72 in the same state as yours, doing some metal work and then sending it to the blaster. I'm going with American Stripping out of Sacramento. Don't know if that is central enough for you. It was recommended by my paint guy, who is a well respected cobra customs guy. They have a website, you can see everything they do. It's recommended to use an epoxy primer on the bare metal to prevent rust, and they do that too. If you aren't in a hurry, I can let you know in a month when I get it done, how it was -
You should do some searches on replacing the floor pans so you have an idea of what is going to be needed... the chance that the pans from the donor car will fit perfect is pretty slim, so you will need to do some teasing of the metal to get them right. Also, if you are getting new rails anyway, bad dog rails is a good choice. Chances are, you aren't going to find many people who bought zed findings rails without using them, but I guess if you wait long enough, anything is possible.
-
Holy crap, that is a stupid rule. I guess any campus can make their own rules... Just to be a smartass, you should argue that you backed in to the parking spot, and you did not pull through. *** I just read that it says pulled through/backed in... dammit!
-
If you are ok with bending and flaring your own lines, I recommend checking out http://www.fedhillusa.com/. They do copper/nickel alloy lines that are really easy to bend and flare, and they rent out a very nice double flare tool.
-
Old rubber brake line wont come off
z2go replied to logan1's topic in Brakes, Wheels, Suspension and Chassis
From experience, you want to go to Sears and invest in a flare nut wrench. It's the only easy way to keep from rounding off the nut. I suggest also using some WD-40 and let it soak a bit first, to try to break up some of the rust and buildup. Then, using an open ended wrench on the rubber line side to hold it and the flare nut wrench on the other, slowly ease the nut out. For reference, here's the wrench I'm talking about: http://www.sears.com/shc/s/p_10153_12605_00978979000P?keyword=flare+nut+wrench Just don't get the wrong size on accident -
That is good, that you weren't in it. I second the motion for a Speed, I hear they are quite the treat
-
So what did you use to plug the vent and fill holes? I know my saran wrap method will not work very well for a pressure test.
-
Thanks for the advice, I am planning on leak testing it but I hadn't thought about pressure testing. What did you do to test it?
-
I bought a set of dovetails from him, they are top quality. He is a great guy to deal with, and working with him was a breeze. I will definitely be looking out for more things from David in the future!
-
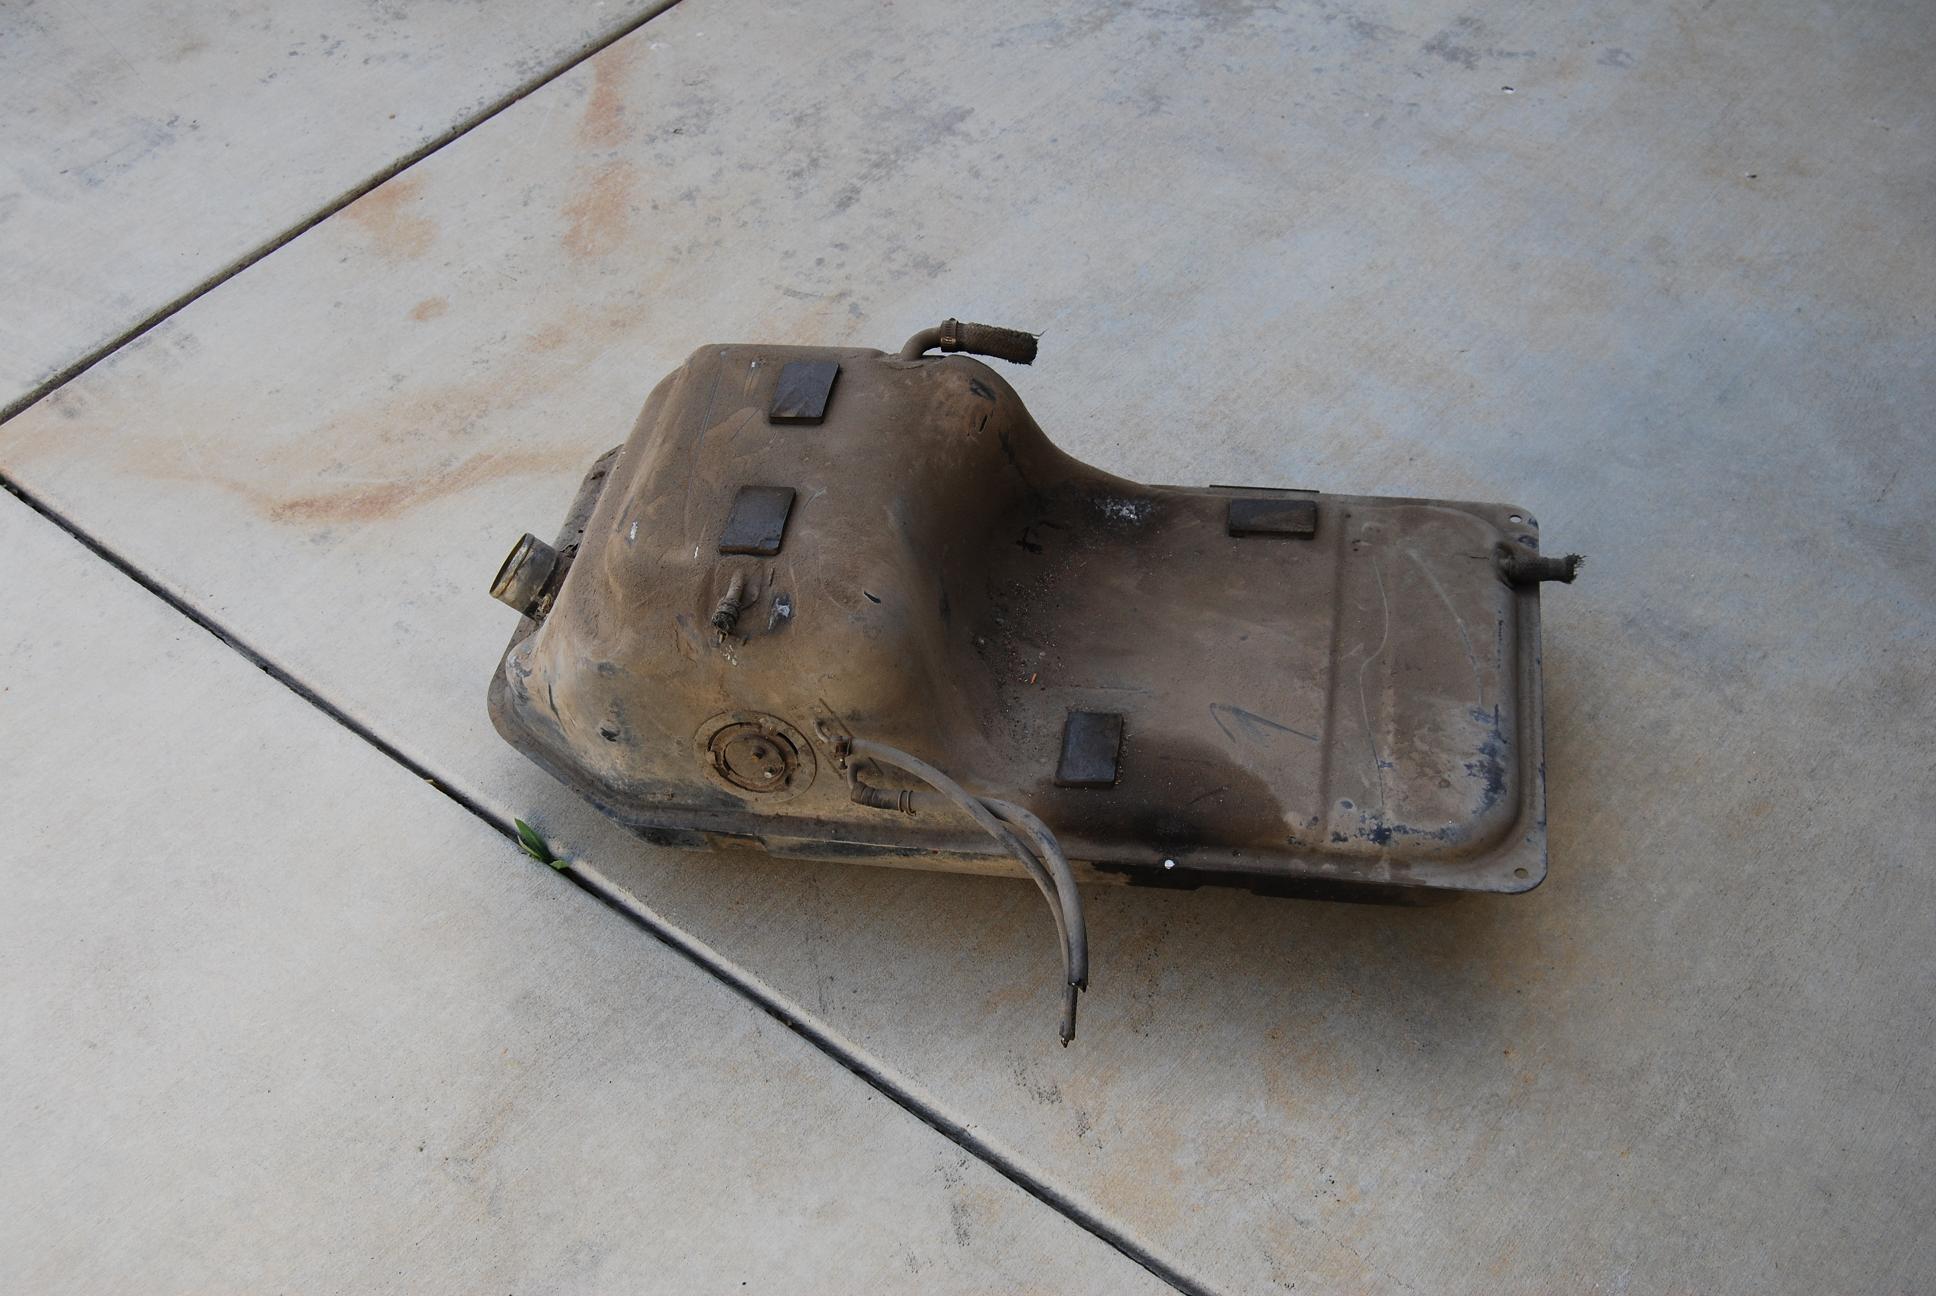
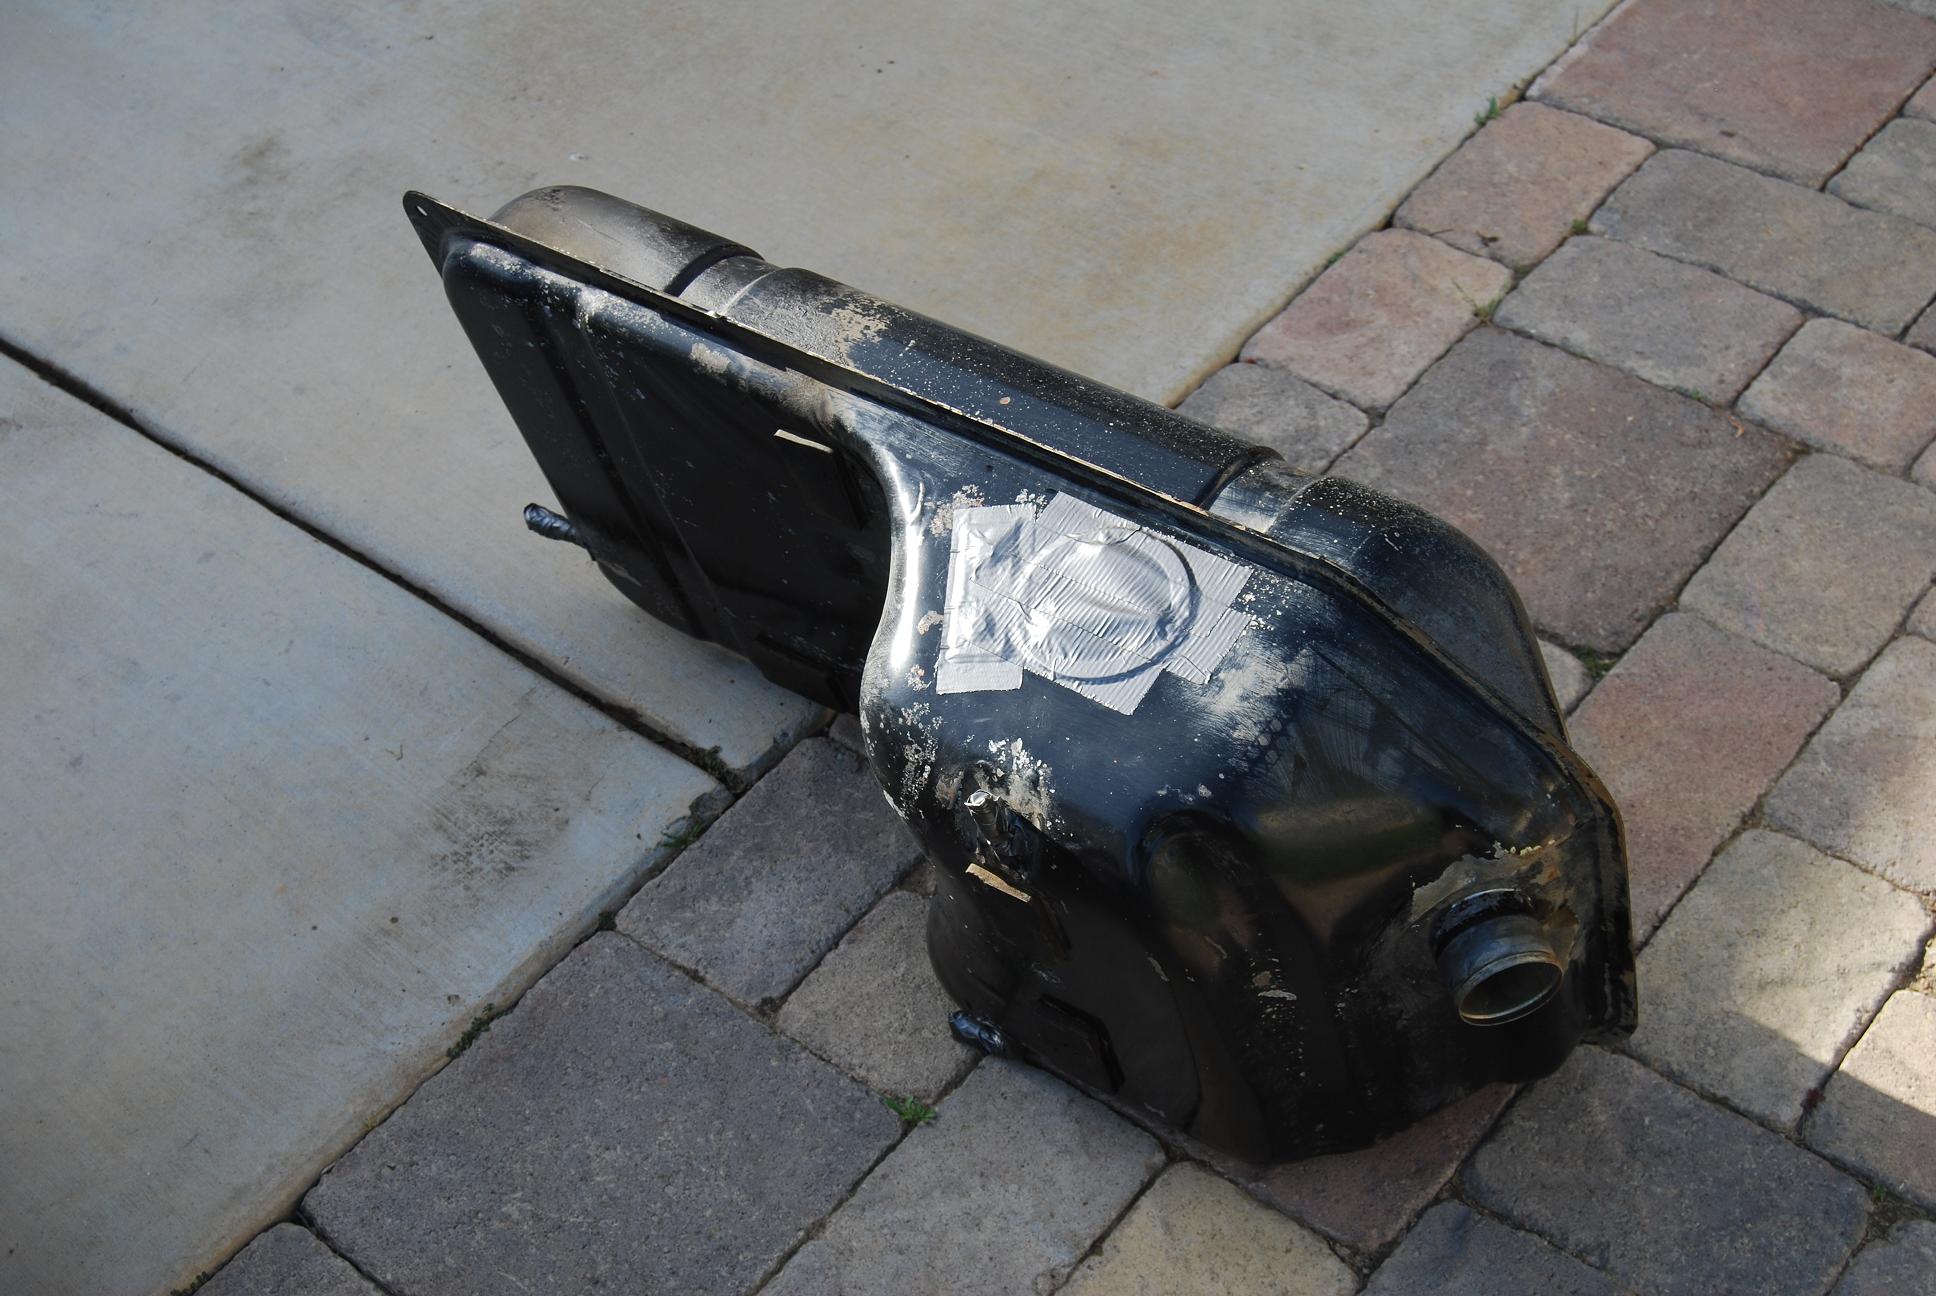
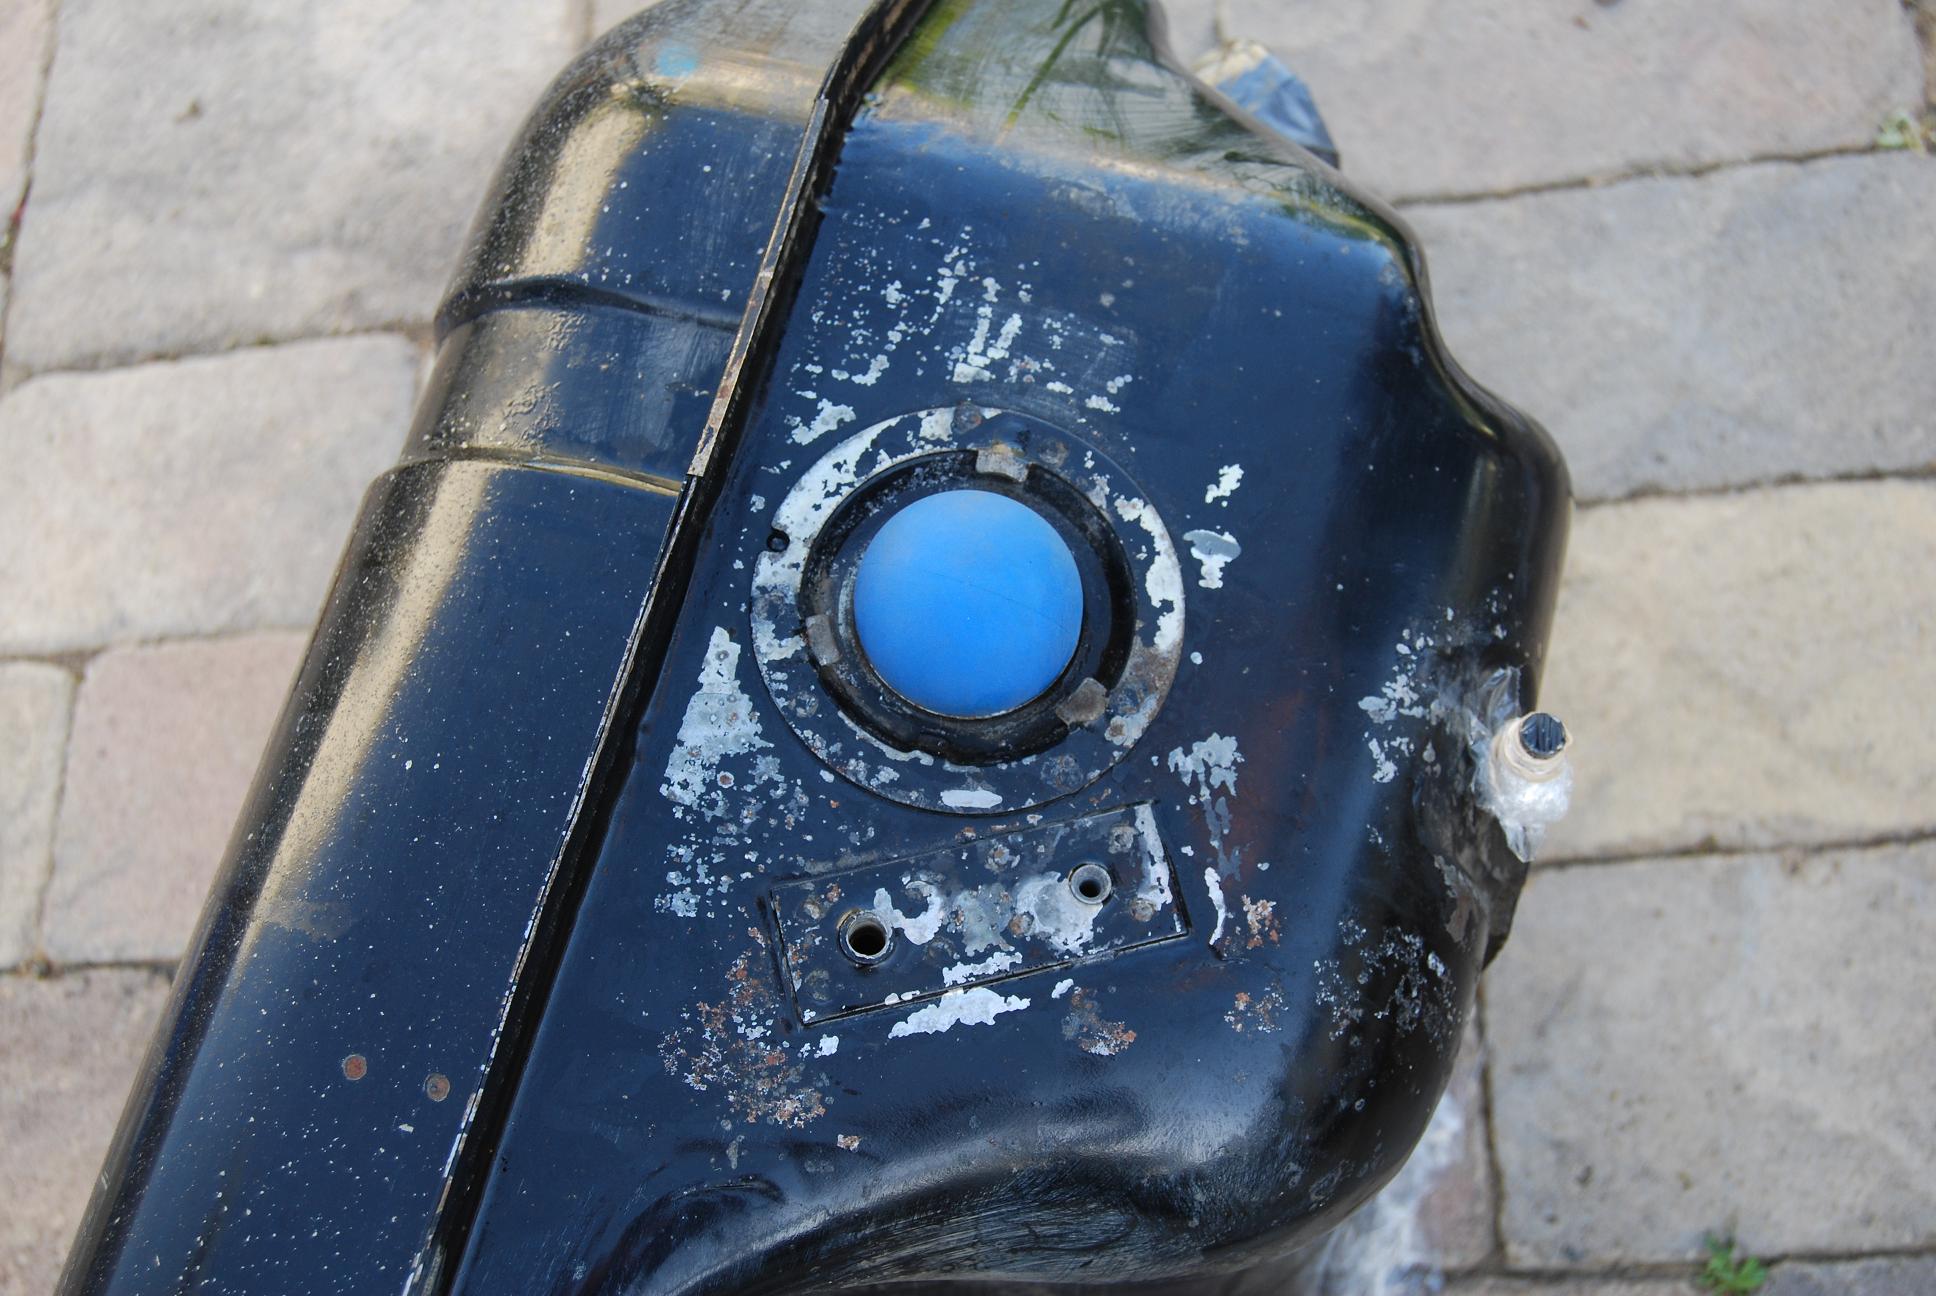
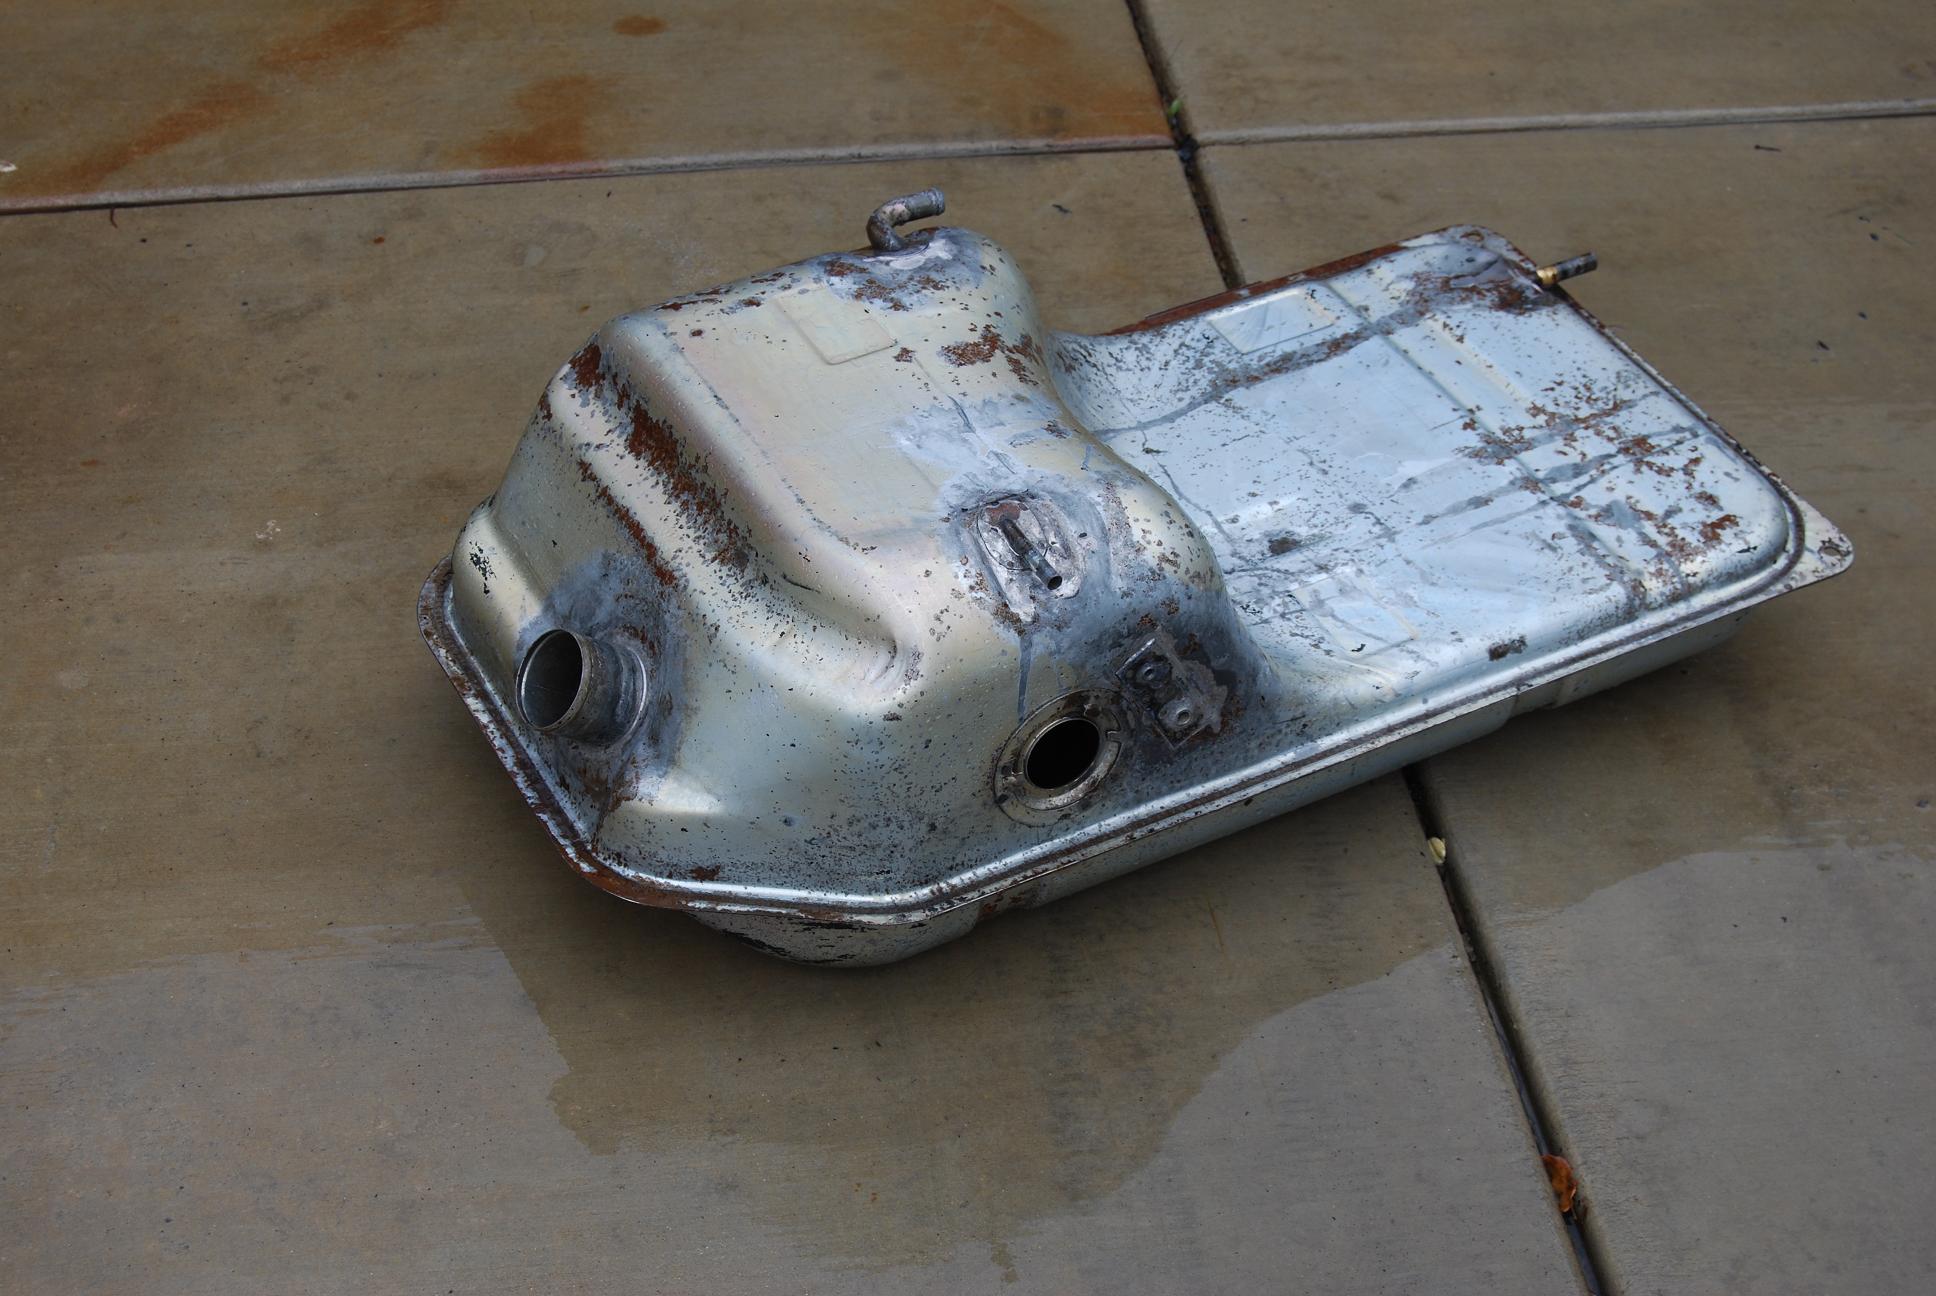
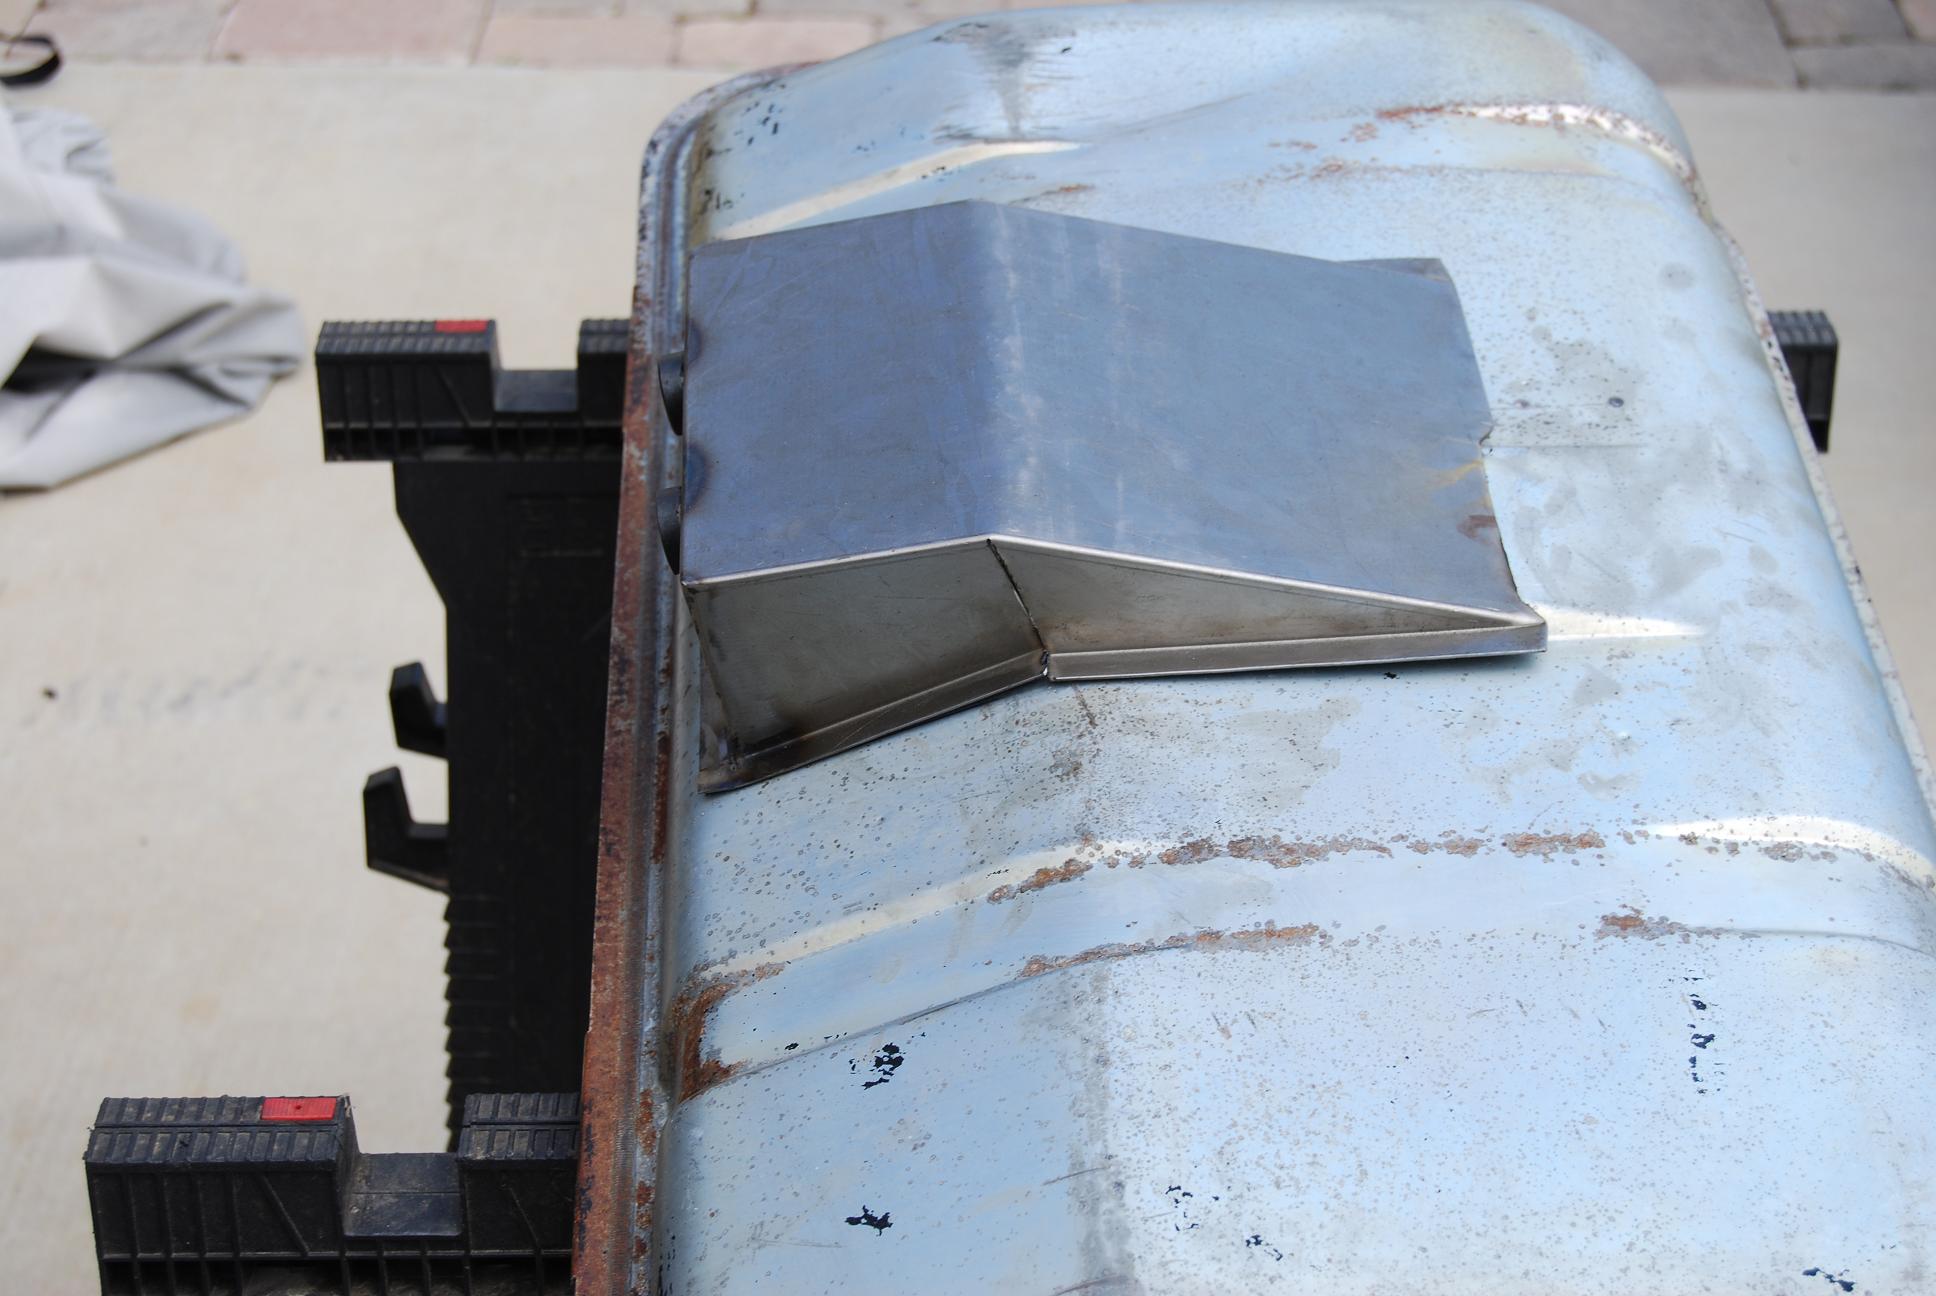
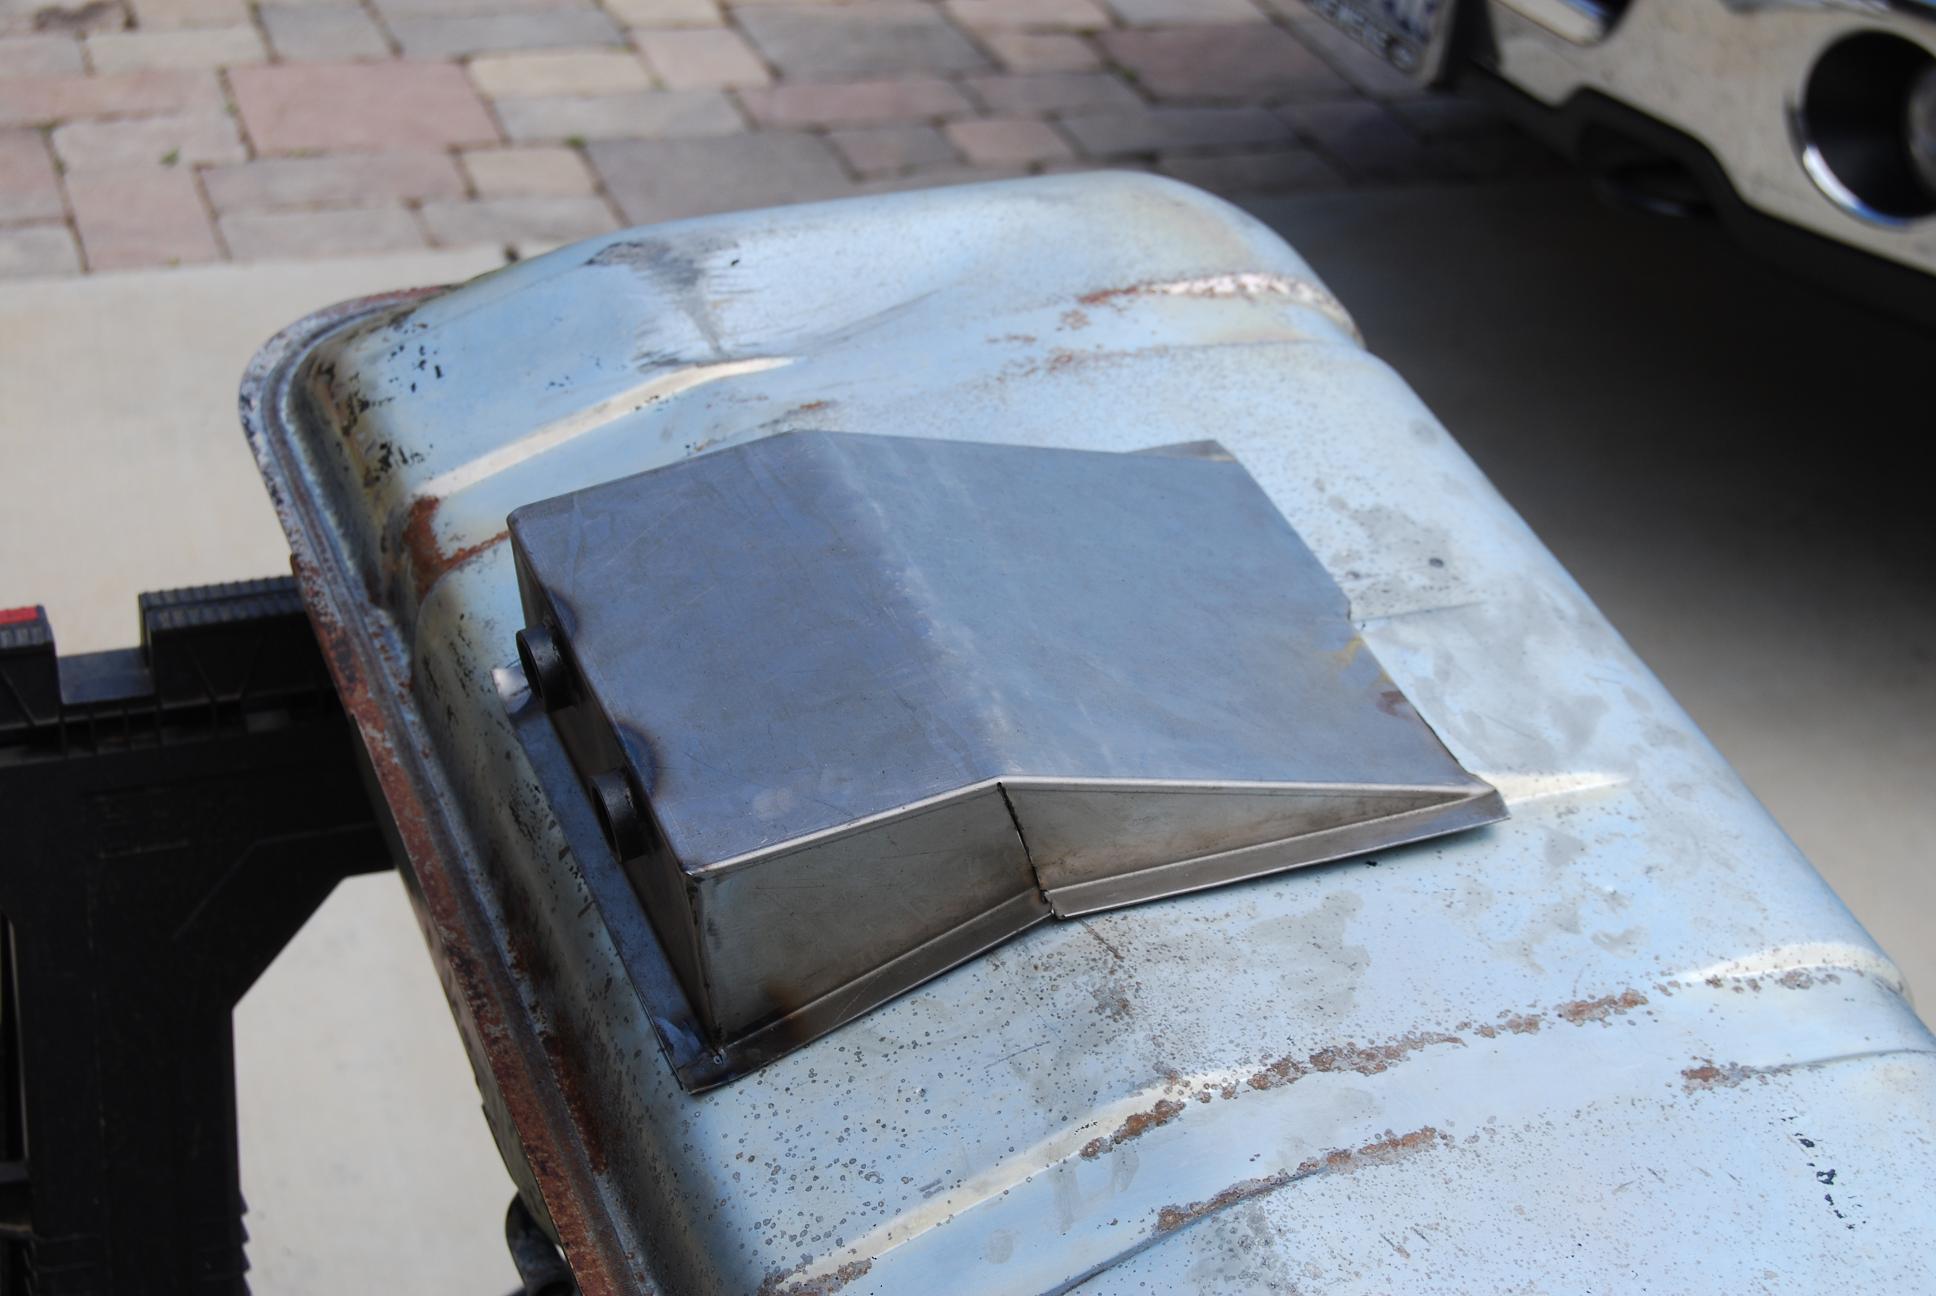
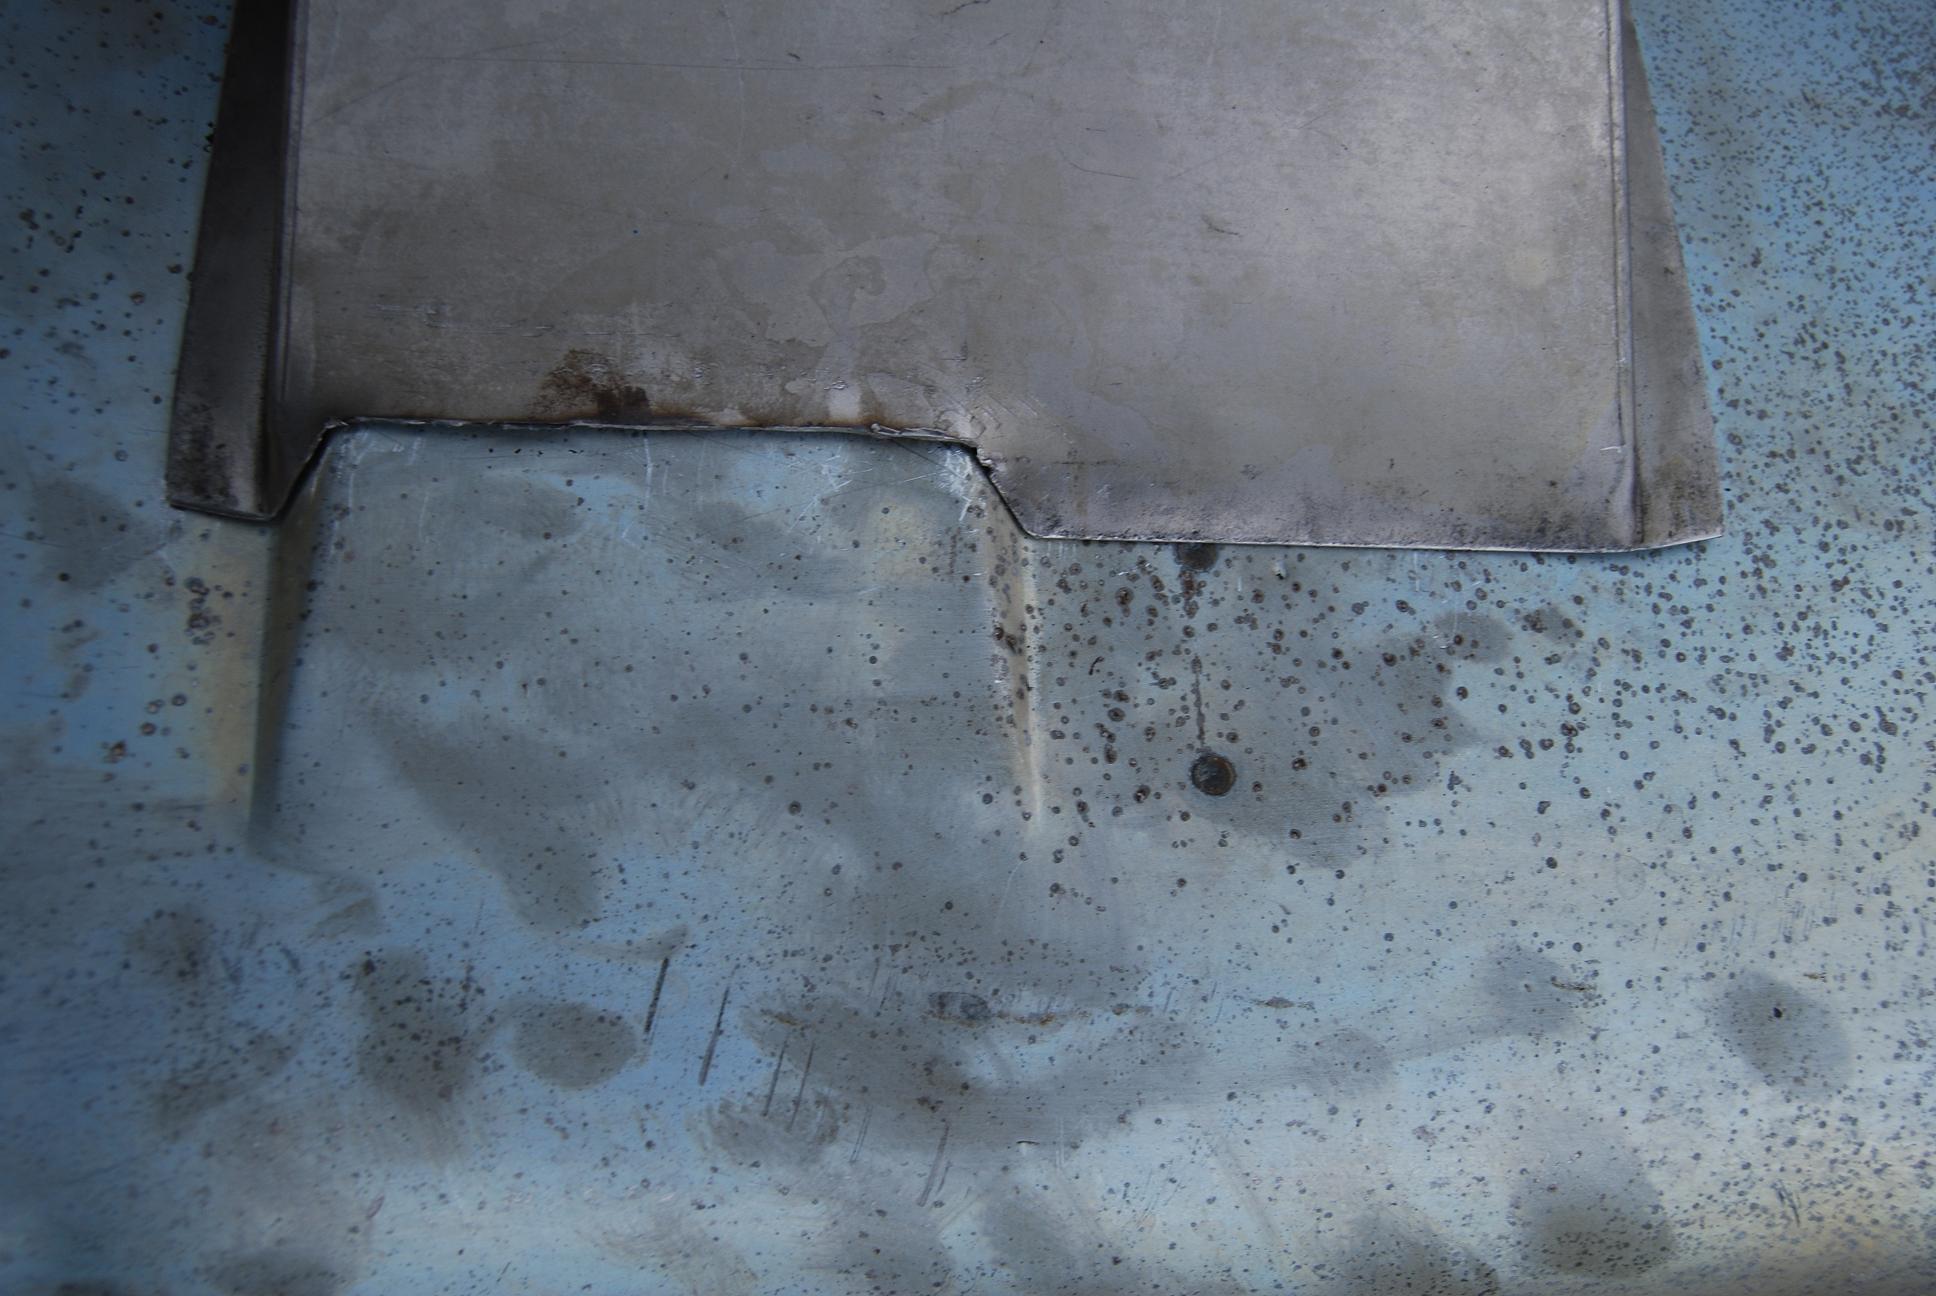
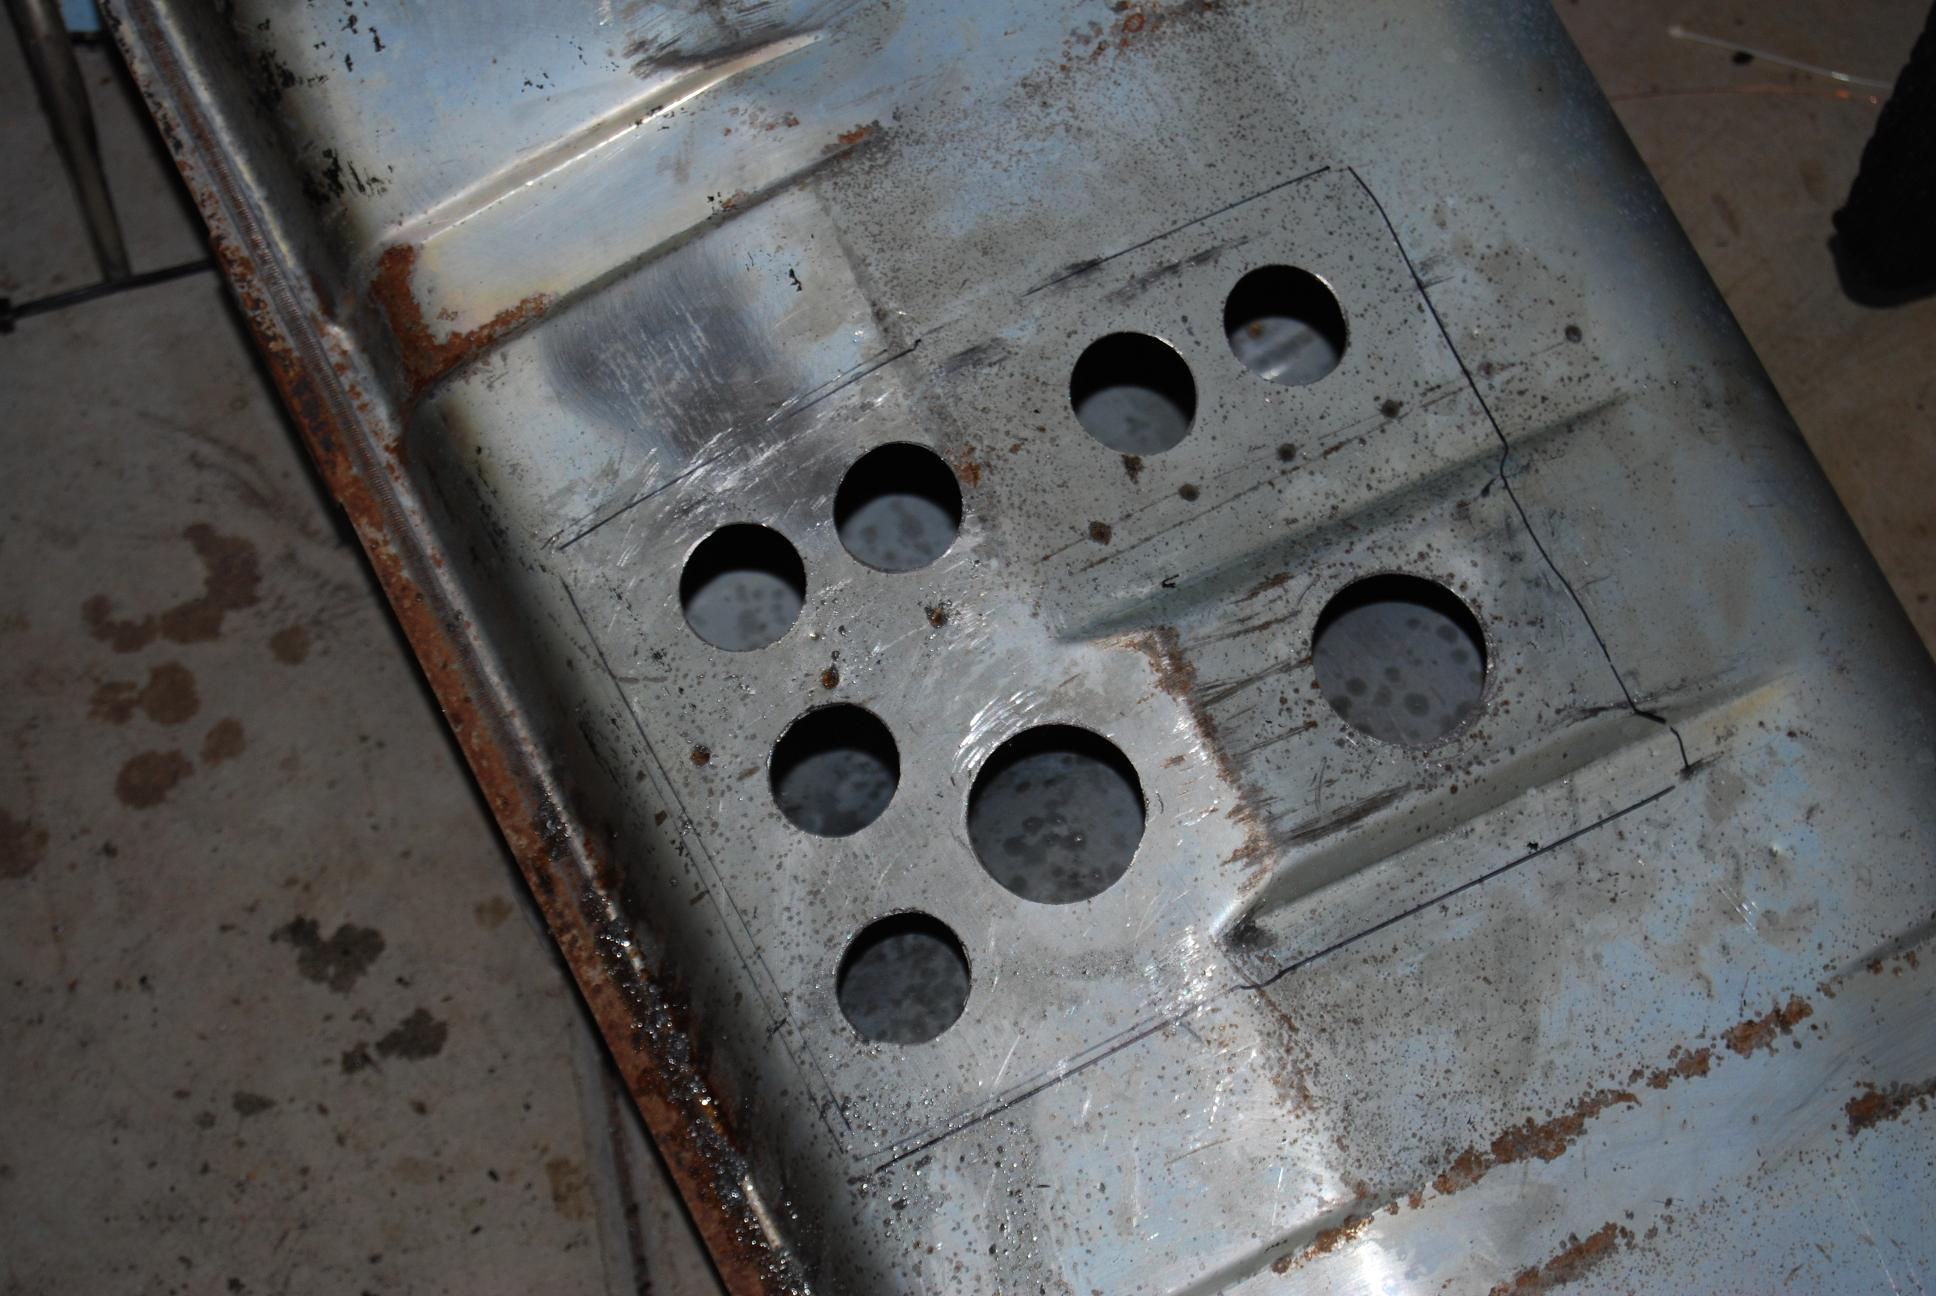
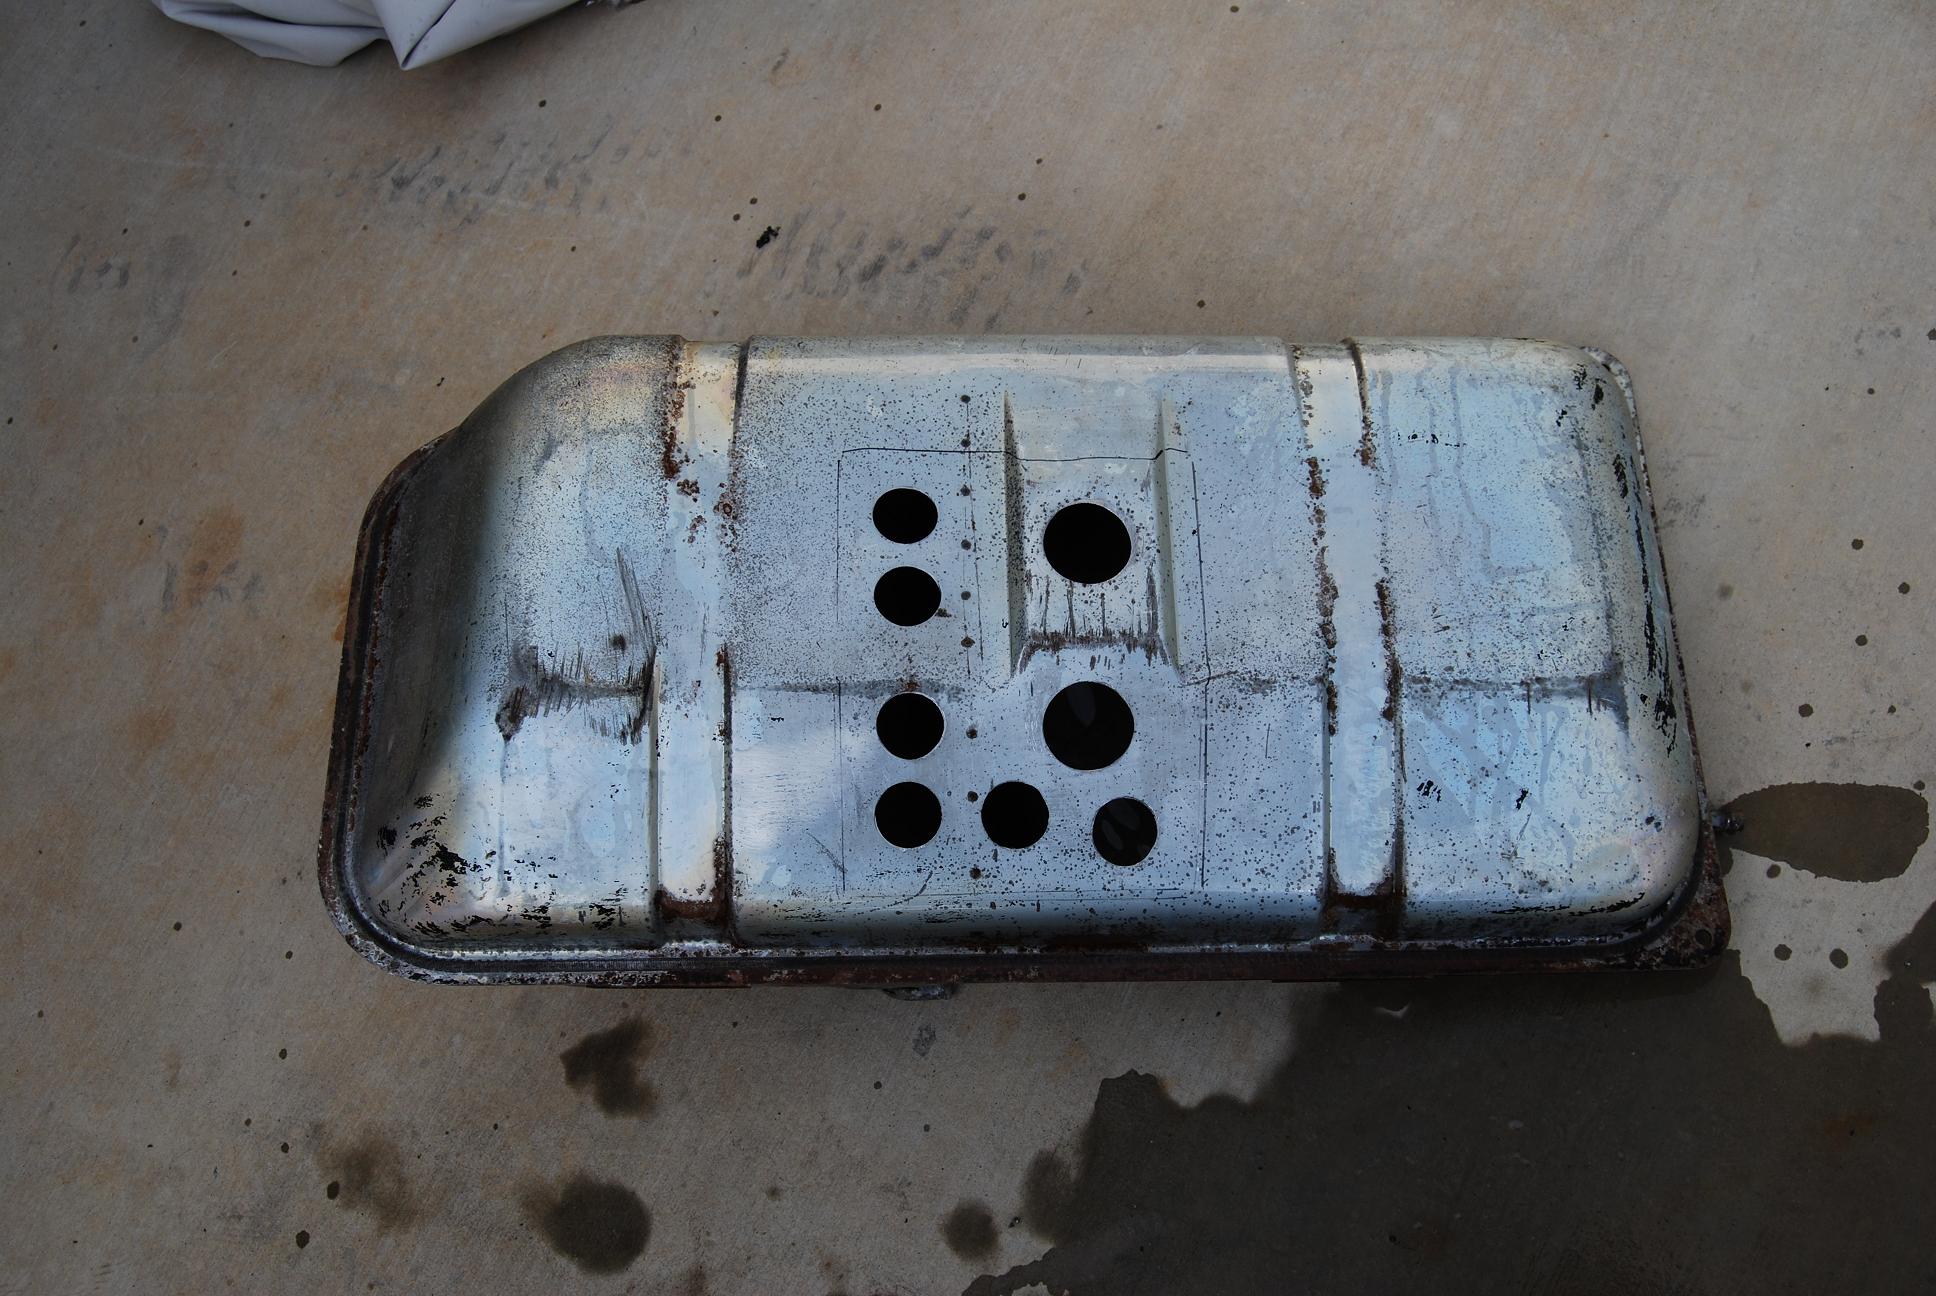
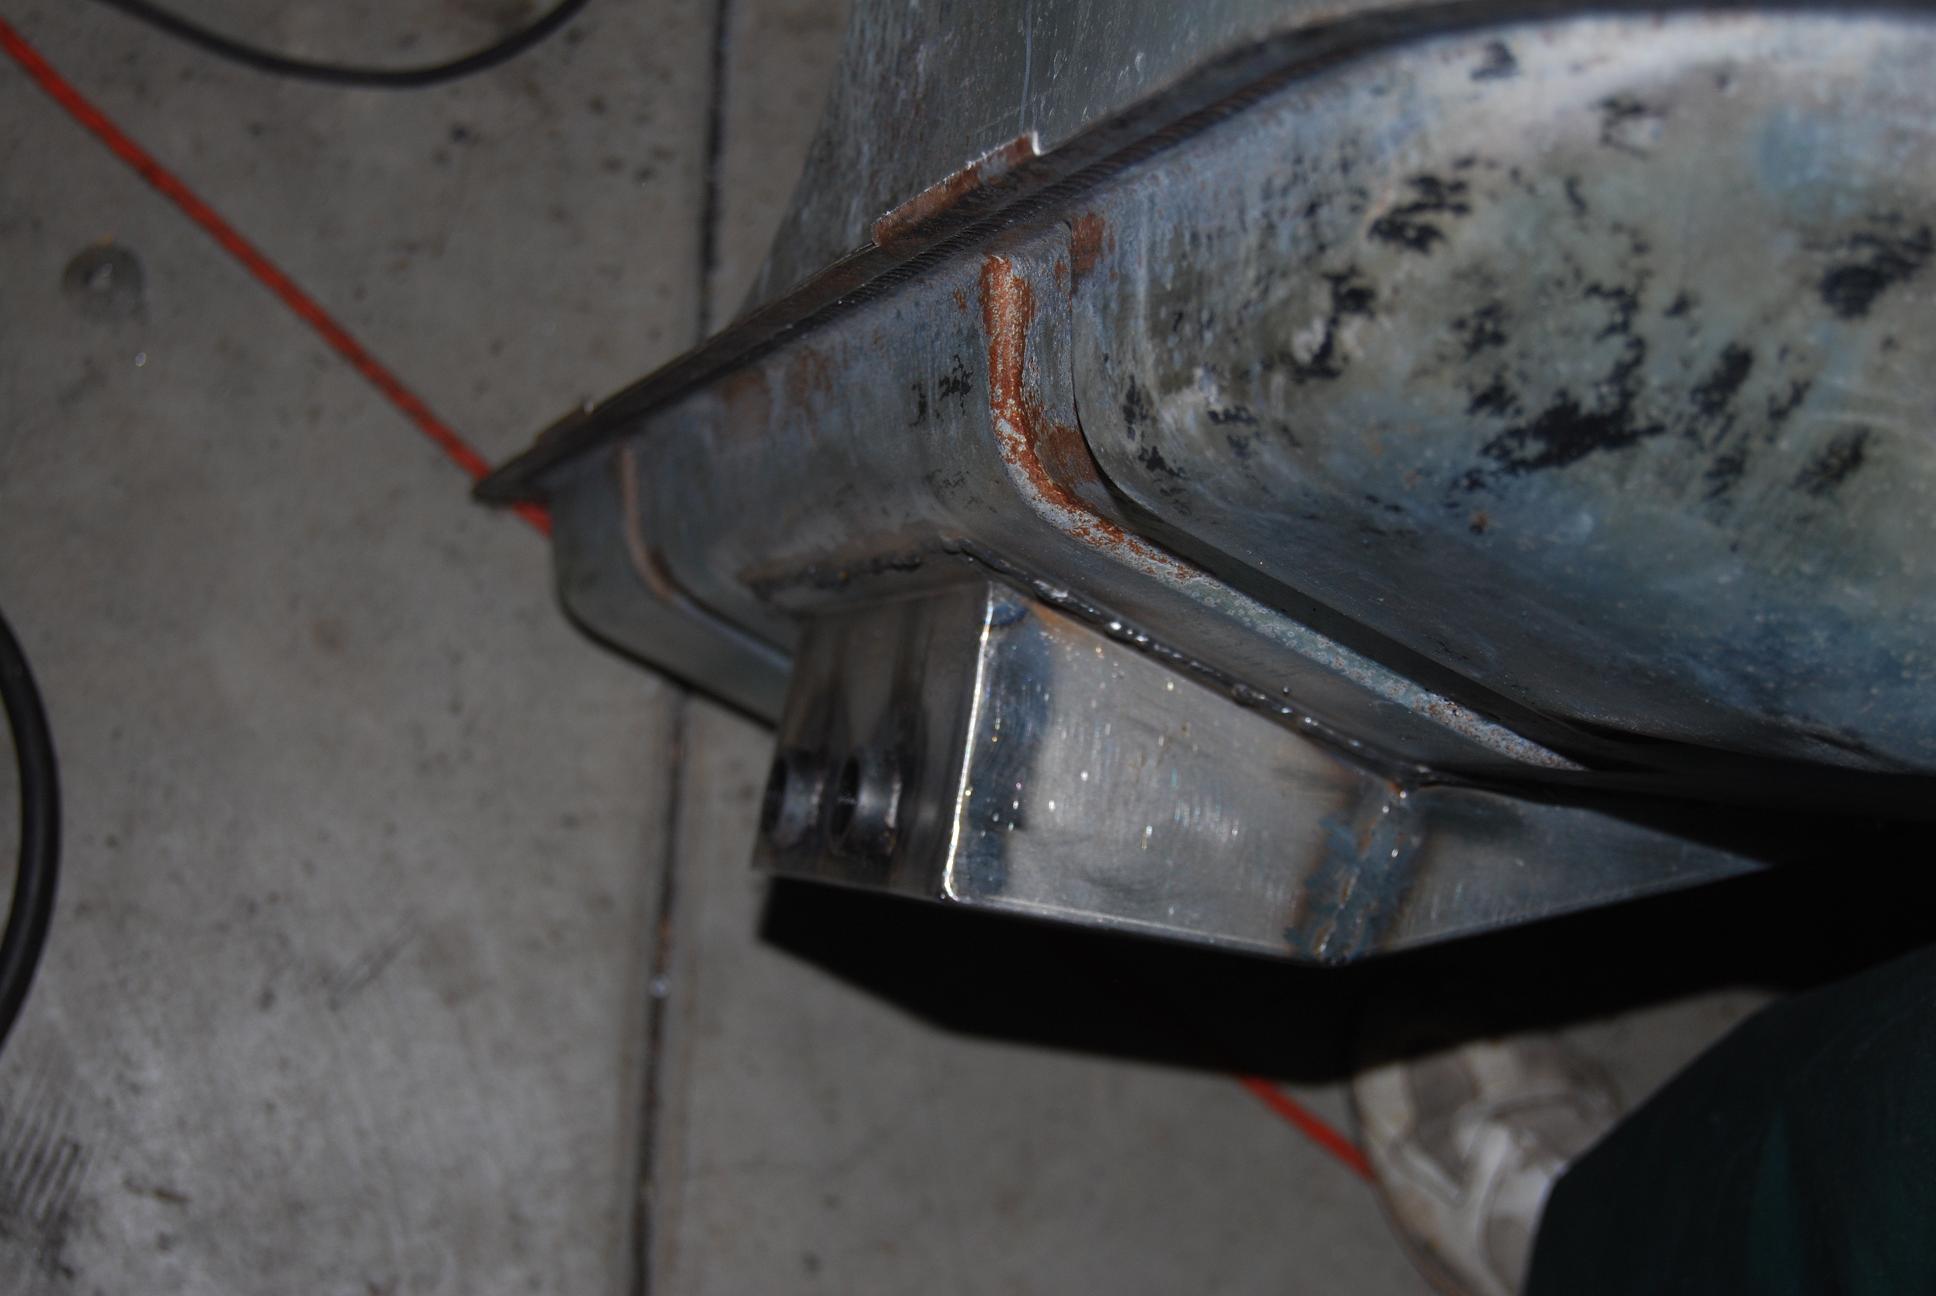
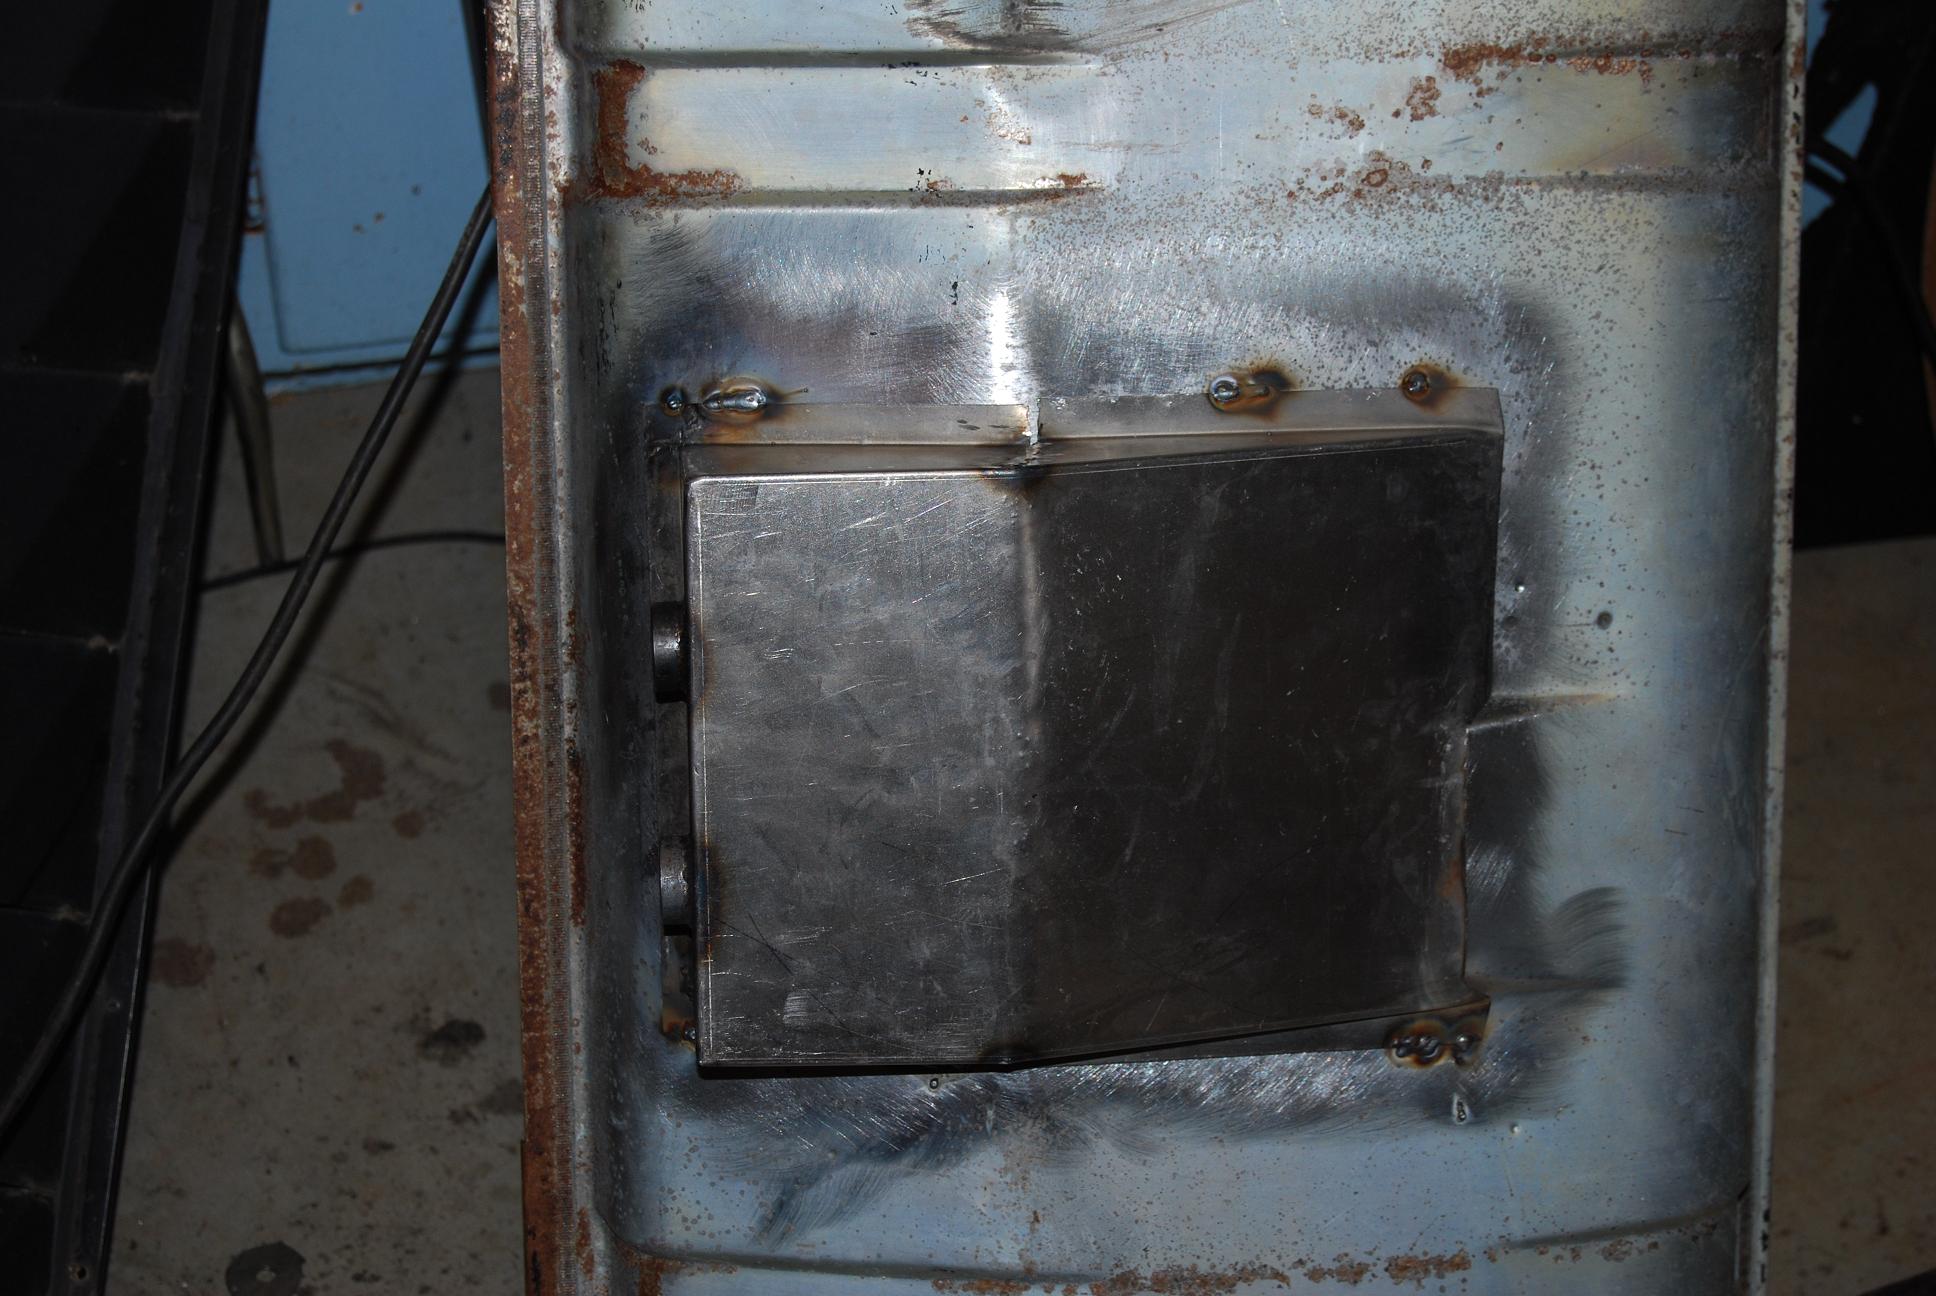
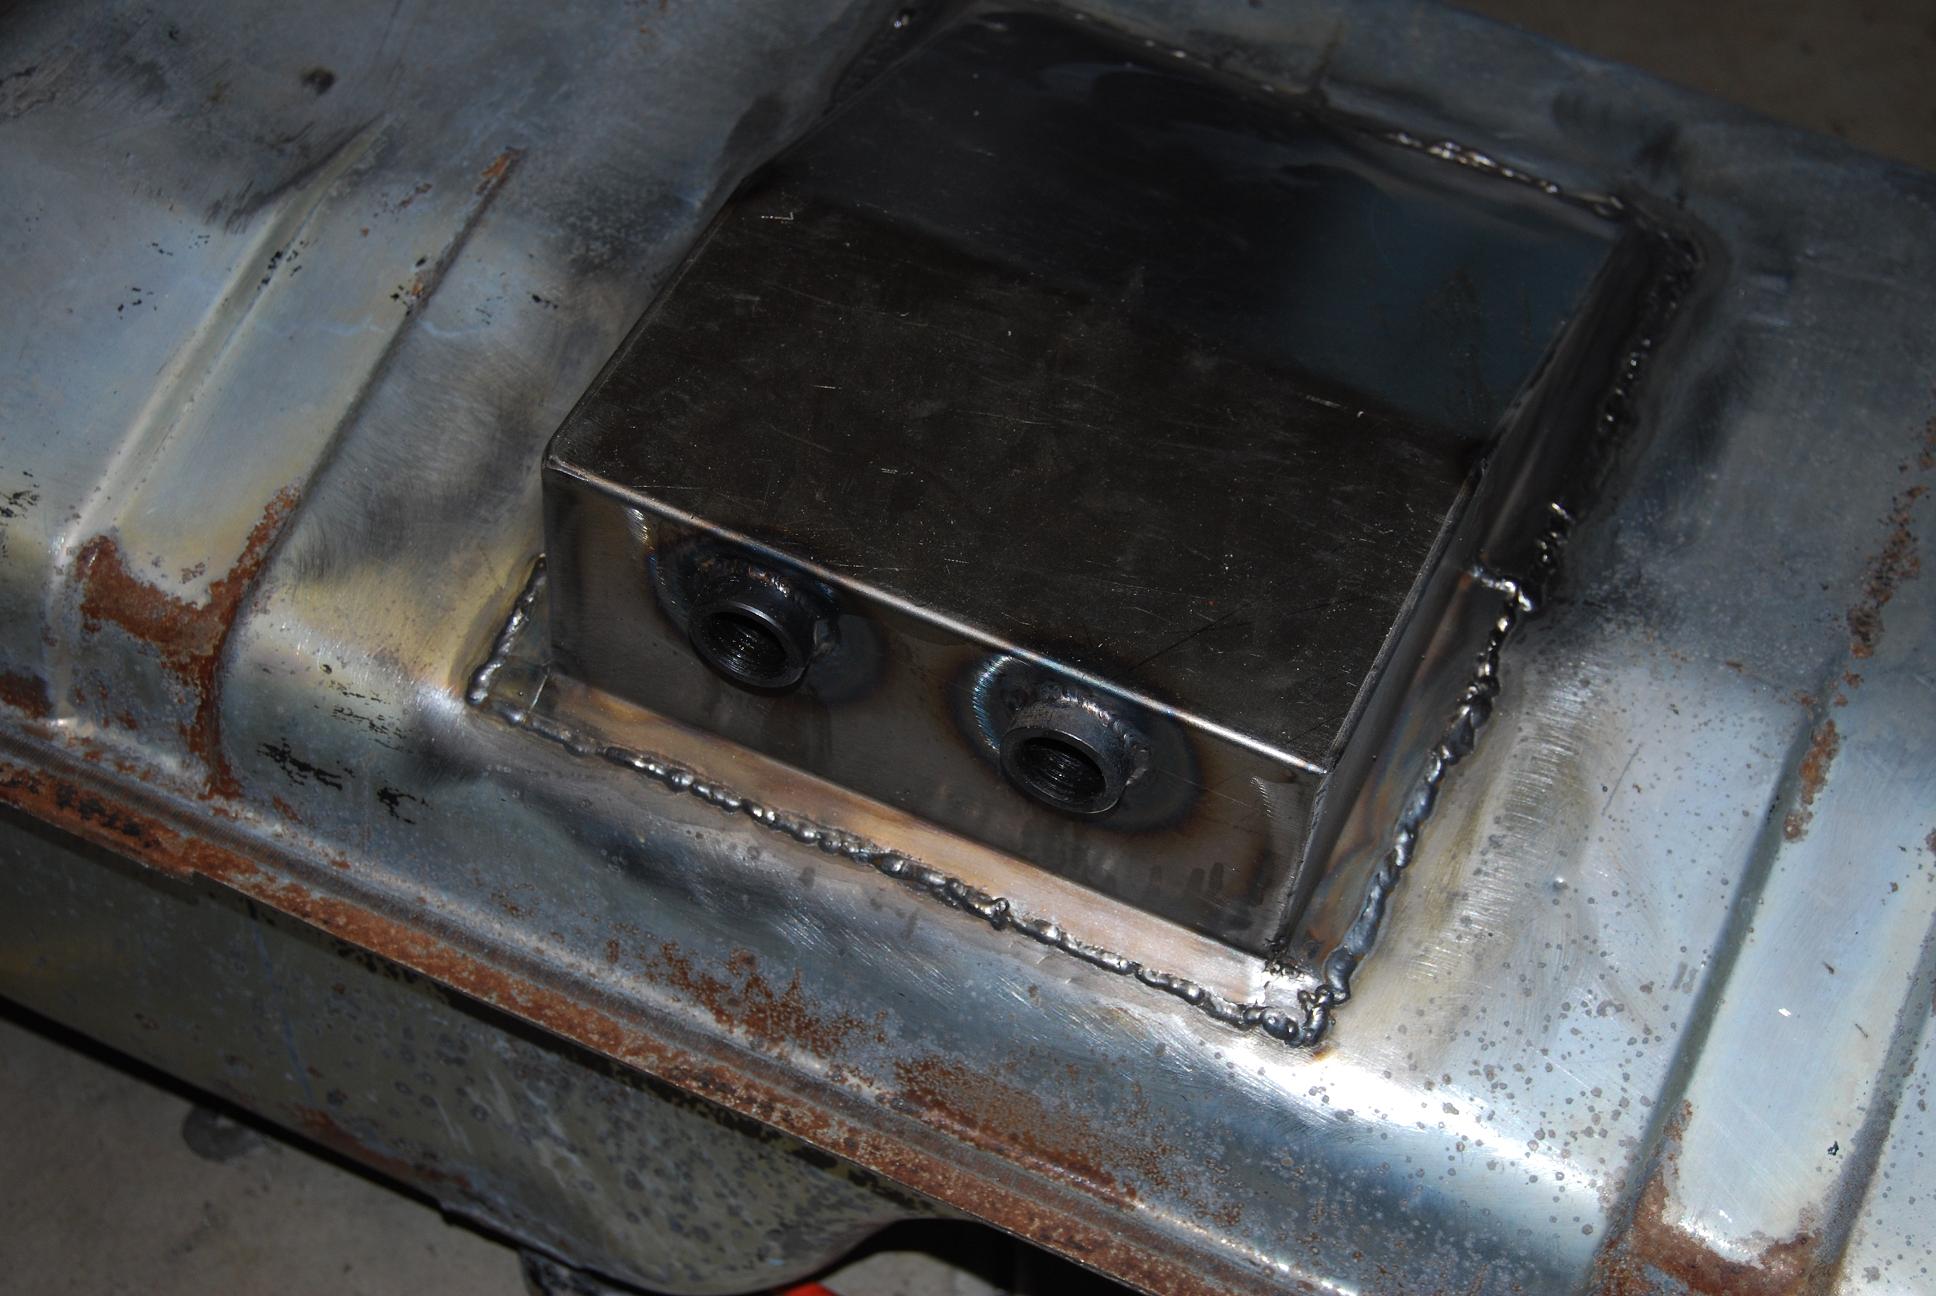
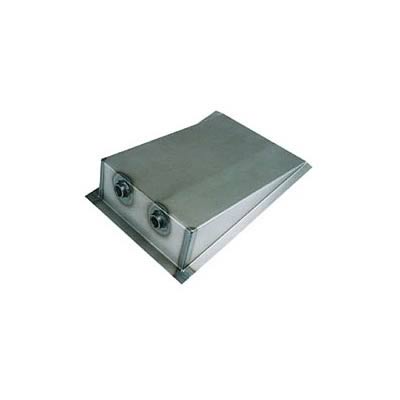
Thought I would share my sub-project for the last couple of days. I'm doing a JTR V8 swap and wanted to make sure I got the best fuel delivery possible. So, I went with a Competition Engineering fuel tank sump kit, with 1/2" inlet and outlet. I found it on Ebay for $10 cheaper than on Summit, and it's from a reliable Ebay company, it seems. It got here in almost no time. The goal was to attach this: To this: I started with giving it a good wash, and stripping all the old hoses and sending unit. I went ahead and started cleaning the inside with the POR 15 system of Marine Clean. The hardest part about that was finding things to plug all the holes. I tried using duct tape at first, and that was a complete failure. I ended up using a racquetball to plug the sending unit hole, and used plastic wrap with rubber bands to cover all the other holes. The stock fuel line holes were the hardest, because I couldn't really get anything in the holes besides a bunch of plastic wrap, and then duct tape to try to hold it in. Still, it leaked a bit after a while through the wrap, so I replaced it every so often. If anyone has any better ideas for plugging these holes for the next guy, please add your .02. As you can see, the tank is really clean after the soaking, and there was absolutely no smell of fuel in the tank anymore. It smelled like a fresh metal can, actually. After two days of the cleaning process, I used some Talstrip II aircraft coating remover to get the paint off the outside. It did not take very long at all, the stuff is really good at lifting off paint, almost as a whole sheet in areas. I decided to place the sump right in the middle, covering the stock drain plug, and facing towards the back of the car. I had to cut a 'v' in the sump and bend it to get the right angle for the bottom of the tank, but it worked rather easily. I also had to notch out the end of the sump to fit over the drain area bulge, and welded up the sides of the sump. I then used a 2" and 1 1/2" (I think, I can't remember exactly, but the size is not important, just that I used two different sizes and one was 2"). The sump directions called for five 2 1/2" holes, but that would not work with the z, because of the baffle going down the middle of the tank, and the drain plug area. After drilling the holes, I filed down the edges and washed the tank with Marine Clean one more time. Then all I had to do was tack on the sump, and weld all around. I made sure to jump around and not weld in one area too long. My welds didn't come out very pretty, I'm still pretty new at it, but they are completely solid and I didn't warp anything in the process, so I'm happy. So, the final product looks pretty decent I think, for a home grown project. It decreased ground clearance by about 1.5-1.75 inches at the lowest point, but I don't think this is going to be a problem. Please post any questions/comments/advice!

-
Removed tank, stuff rolling around inside, how do i clean?
z2go replied to icapture's topic in Fuel Delivery
I'm in the process of doing the POR 15 sealer kit on my tank, I found that racquetball works really well to fit the hole! I tried a tennis ball in the filler neck without thinking about it, and of course it leaks because of the fuzz... I used plastic saran wrap and rubber bands to cover the vent holes, but it doesn't seem to work very well. -
Since it's not a Chevy, there's no JTR style in the books about it, but I know that if you research enough, you will find what you need.
-
Drilling them with the above mentioned style drill is going to be your best bet, second best would be grind the area where the spot weld is down until it is thin enough to break off... you don't want to hit it with the chisel because those welds are kind of strong... you might warp and bend the metal behind it. For that matter, so will grinding if you go too fast. I'm curious, what do you have in your former dash area? A custom gauge box or anything?
-
Oz, you are right about removing the rear bracket IF you need to repair all the way back. I didn't think about that... my car only had rust from right before the rear seat mounts up to the front, so I was able to keep both in.
-
Tony, that has got to be the most epic salvage-title-car-goat-breeding story ever, hands down.
-
Granted, I have no idea how to use the thing...
-
Oh no, what happened???