Dat73z
-
Posts
852 -
Joined
-
Last visited
-
Days Won
8
Content Type
Profiles
Forums
Blogs
Events
Gallery
Downloads
Store
Everything posted by Dat73z
-
240z SCCA vintage race car, restoration
Dat73z replied to AydinZ71's topic in S30 Series - 240z, 260z, 280z
I was thinking you had some areas with pinholes, etc. maybe ok metal but not cut out and patched. Generally I would use stranded filler for any areas with gouges or pinholes, areas which require reinforcement. But best practice is to cut out and replace those areas, dolly, or pull them out as good as possible. You don't really want to be layering on the body filler thick on any area, just a skim coat which mostly gets block off. Your prep work sounds about right. Personally I'd go single stage non-metallic fleet color for easy match when things inevitably need touch up on a racecar. But since you already have the base/clear I'd stick with it. I think nowadays people prefer to epoxy to seal then filler over that. Whatever you do absolutely 100% follow the mfg instructions for prep, time, compatibility, etc. Your prep work will dictate the outcome. You can easily spend weeks guide coating and blocking the whole car multiple times over It's probably been 15 years since I did any serious bodywork. I was working on the mechanic side and moved over to help prep whole cars, repair rust and collision damage when things got slow -
240z SCCA vintage race car, restoration
Dat73z replied to AydinZ71's topic in S30 Series - 240z, 260z, 280z
Not a race car guy but I've worked t a bodyshop and we had some racecars come through. If you don't care about the surface finish I'd neutralize the rust and epoxy coat it. Topcoat for UV protection with minimal single stage coverage for weight savings is what we did for racecars. Also easy to touch up. If you care more you could always use some stranded filler, etc. -
'78 280z 5 speed transmission rebuilt - still rattles
Dat73z replied to alex44's topic in S30 Series - 240z, 260z, 280z
Also consider a 240sx 5 speed, have your existing 5 speed belhousing machined to work. I think there is also a TL70 adapter coming to the market soon. That my be a good new/newer 6 speed replacement option for you -
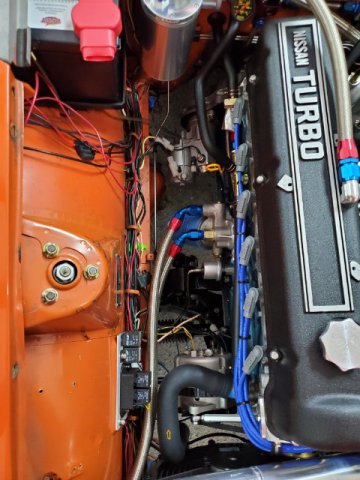
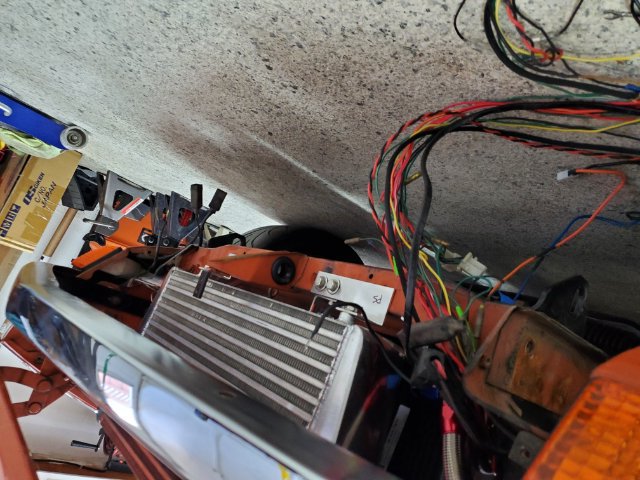
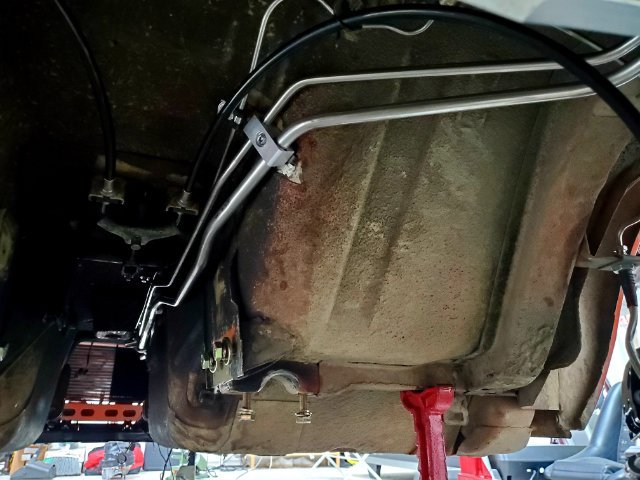
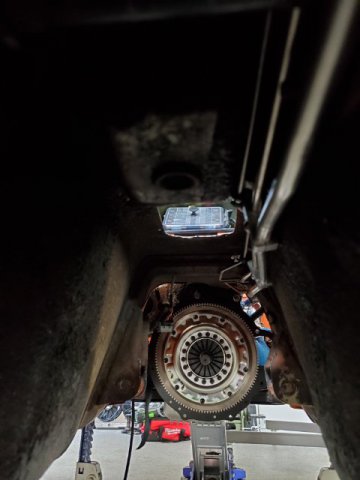
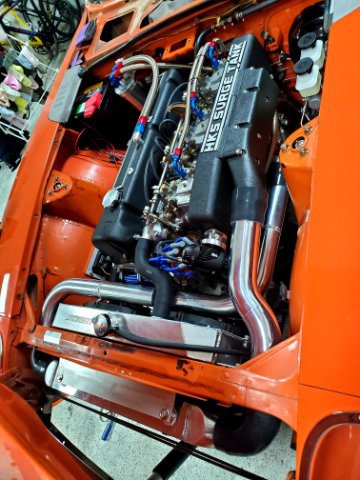
So with the majority of the exhaust fabrication complete this afternoon I've started back in on finishing relooming the harness. I started off by unlooming and cleaning each wire with QD parts cleaner. I then replaced all of the aged and cracked connectors/terminals with new. I plan to integrate all of the add-on harnesses into one large harness and have a few rolls of tesa tape to reloom. Specific to the turbo cooler packaging I needed to reroute the wires in the rad support area below the intercooler. I got some grommets from mcmaster carr and am planning to reroute the wires through there. I also created custom brackets for the horns as I'm using that area for my intercooler mounts. One thing I'm still unsure of is how I'm going to do power and ground distribution. I have like 5 pos and neg leads for my MSD box, fuel pump, headlight relays, etc. If anyone has clean ideas for distribution please let me know

-
@ZetsazYeah I couldn't figure out the best way around the trans mount. I basically ran it down from the downpipe then back up after the mount. All as close to the edge of the trans tunnel as that's the area with the most clearance. Half a finger gap or so around that area as to not melt the poly bushing lol. I did see a thread here on HBZ from years ago where people were running oval piping there for the most ground clearance. I'll post up what I end up doing for the hangers and bracing. Everything is solid as-is but I know from experience if I don't at least brace the DP it'll crack out from the extreme heat cycles Just realized you have a 75. I think the 280s have more clearance in that area due to the catalytic converter? I've only seen the underside for 240s and 260s so I'm not sure either
-
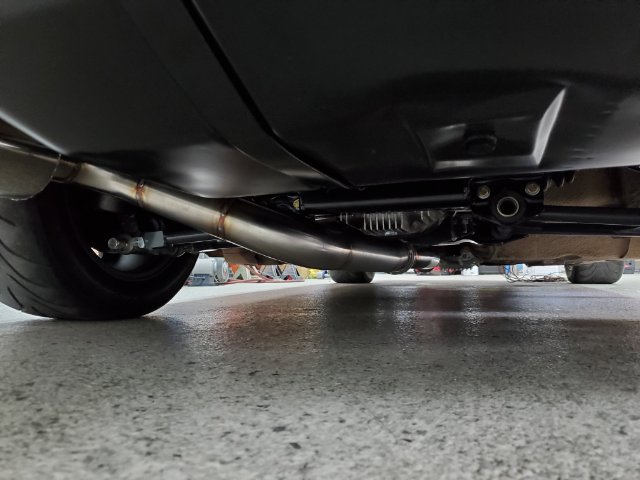
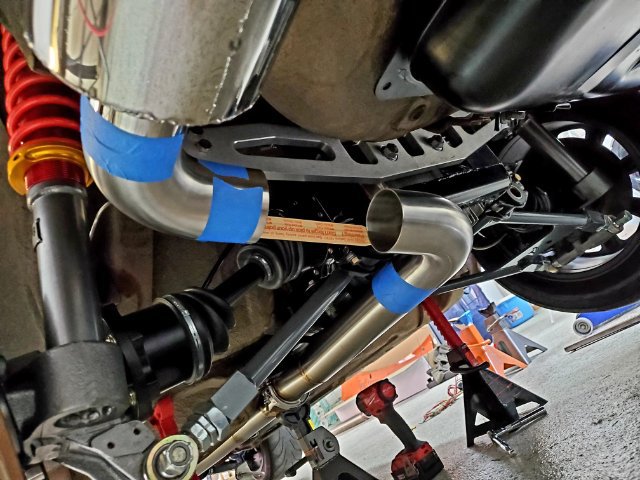
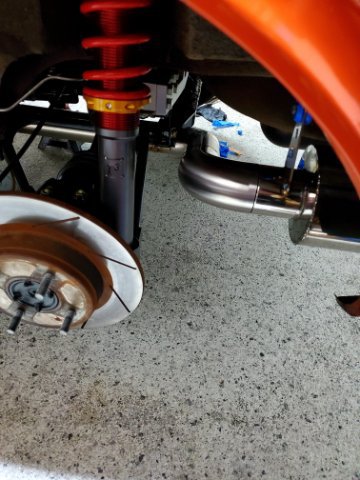
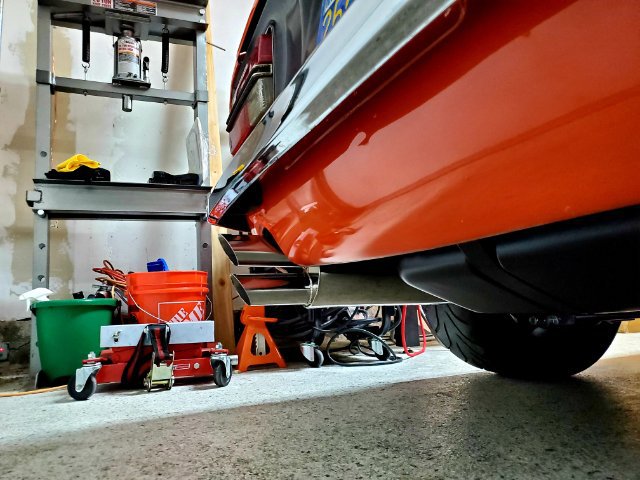
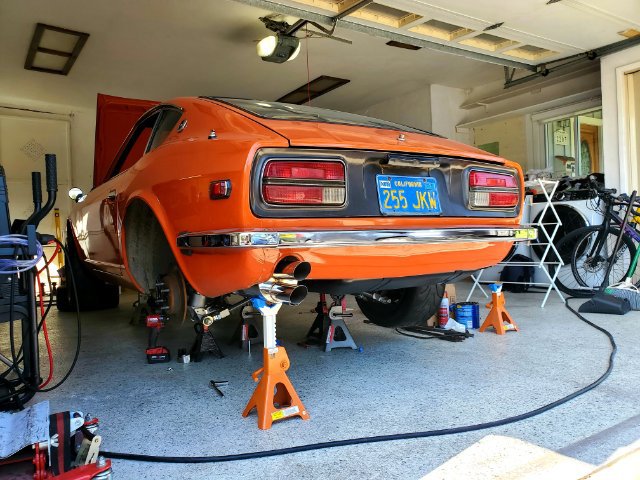
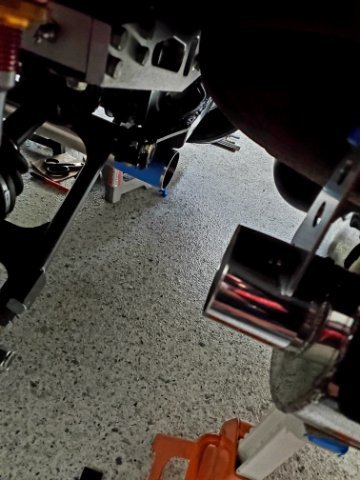
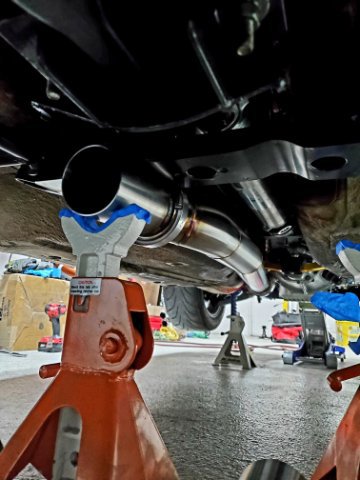
And a final system shot. The lowest part of the car are the cooling fins for the oil pan. I probably could've gained 1/4" of clearance or more for a lot of the system with the exception on the trans mount area. I had to kick the pipe down then back up from there and only left about a finger gap. Not sure how I could gain more there, probably oval pipe would've worked...maybe someday in the future
-
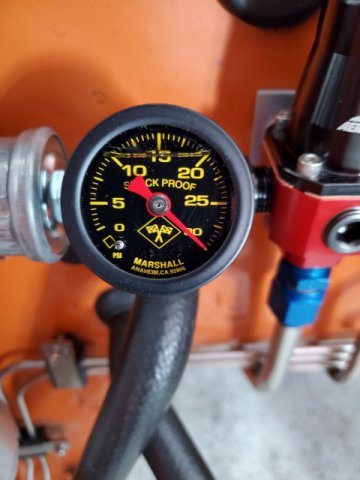
So this morning I couldn't resist final welding out the muffler. I backpurged that rear section and I finished welding right as my regulator gauge hit 0 lol The rear section was definitely the most challenging to weld due to the size of the piece and the angles so most of the welding was done completely out of position. The muffler I actually tacked on the car on my back holding it with my knee, filler and torch with my hands, and foot pedal on the ground actuated by rolling my other foot. I welded the muffler itself completely standing up which was good practice. With everything mounting and vbands tight it's actually really solid. I could've probably gained another 1/4" of clearance by tucking the pipes even higher than I did. I'm still thinking of bracing the downpipe/midpipe to account for thermal expansion/contraction off the turbo and one more by the rear diff just for full support. Any thoughts? 20220501_091947.mp4
-
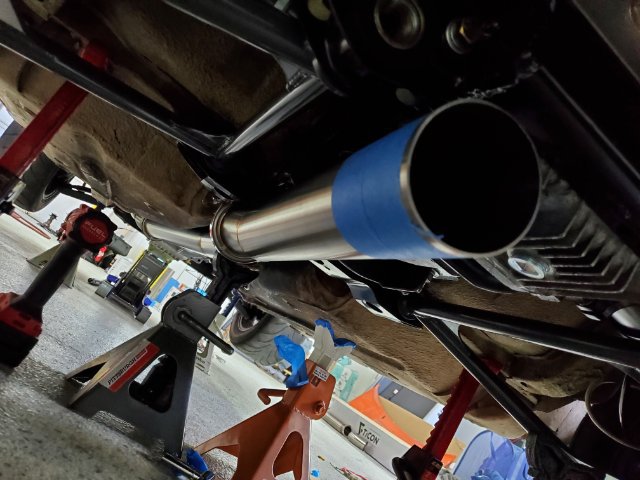
Today I managed to get the rear section welded out with the exception of the muffler. I was able to achieve perfect alignment to the muffler in position with the assistance on a paint stirring stick and a bunch of painters tape because I don't have 10 hands. Unfortunately I'm running out of argon. I think I have just enough to tack the muffler, final hangers, and o2 sensor bung. I have been backpurging everything including the hangers so I've been going through argon like crazy. I've basically gone through an entire 145cuft tank just for this exhaust. Fortunately this will be the last fillup. Knowing what I know now, if I was going to do this again I'd go 4" or larger oval pipe as the 3" was easily able to be tucked under the car. Maybe on the next turbo build.
-
Lol. Mig is pretty well suited for what you're doing. The annoying thing about tig is all of the prep work that goes into a single piece. It can easily be hours of prep for a 5 minute weld job. I definitely miss being able to just send it with the mig. The nice thing is there are a lot of affordable hobbyist tig options now. I remember looking like 10 or 15 years ago and the only "affordable" option was like the $10k+ miller dynasty
-
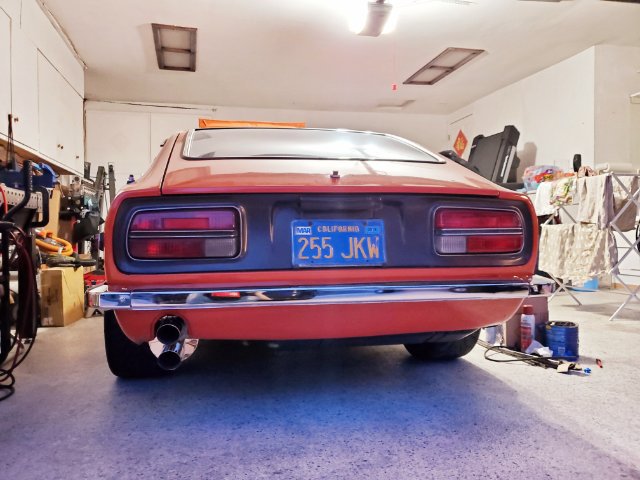
A couple of hrs more than I should've spent today but I finally figured out the issue. The front SS bracket I fabricated duplicated the OE mounting with a welded SS nut and uses an OE Nissan mounting strap. When I was mocking it up A couple mm of offset angle in the strap translated to the muffler moving a couple mm vertically in either direction. I ensured the strap was fully vertical and tacked the hanger in place. The result is the muffler sits as I measured and fabricated the bracketry. A couple mm slant up which follows the lines of the 240z gas tank and also centered out the back. I set the car down just to be sure. This weekend I'm going to try and finish the exhaust.
-
Thabks @AydinZ71! Yeah I've been doing all this myself and re-teaching myself how to tig on this project. Before this I was probably a decade away from the torch. Really it's like 5% welding and 95% fitup and cleaning fundamentals. My cleaning still isn't where it should be to get the quality of welds I want...but it's all part of the learning process
-
I tacked the rear muffler hanger in place and ended up spending the hour I was hoping to get the muffler final mounted instead looking at it from every angle. I was crawling all over the ground at different distances...my neighbors must think I'm crazy. I don't know why but each time I've been looking it seems the angle keeps changing so I keep repositioning the muffler. I think my eyes must be tired. It's pretty well centered but I want just a hair couple mm angle up. Definitely no downward angle. I'm going to tack in the front hanger and call it a day. I figure I can still bend the hangers a bit with the tacks, maybe it'll look different in the morning.
-
Thanks @Zetsaz! It's not perfect but I've learned a lot. I think I'm finally at the tail end of this project. I spent like an hour positioning the muffler and hangers. I think I'm going to tack the muffler hangers first to lock in that positioning then fit up the final tubes. I'll probably do one joint at a time and be super careful with the heat input so in case anything moves I can still do some fine tube profile adjustments. I'm planning to add 2 more hangers, one by the diff and one to brace the downpipe. Then the o2 sensor bung. Finally send the downpipe off to be inconel shielded.
-
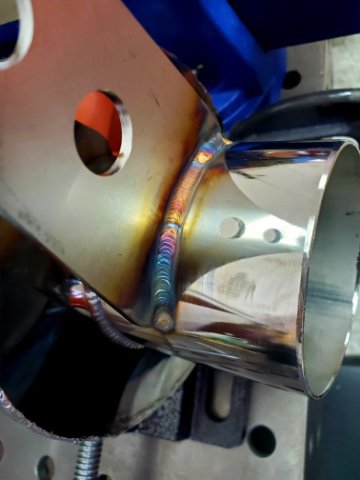
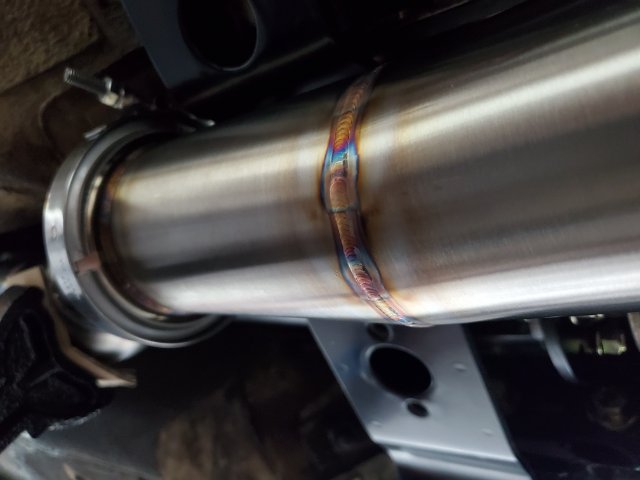
A bit off topic but maybe someone searching someday may find useful. One thing that I've found really helpful on SS tube is just cranking up the post flow. I think I was hesitant to try it earlier as I was attempting to save gas but to my untrained eyes I've noticed even when I run further the quality of the final weld appearance seems to improve as well.
-
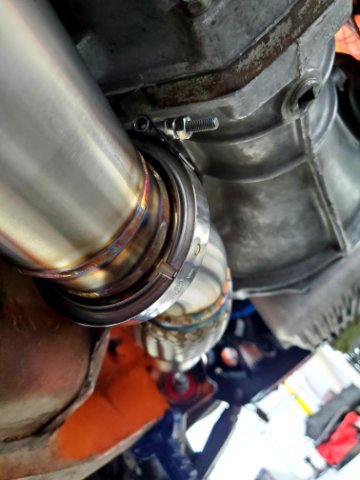
That is a good point. I actually pringled out one vband early on but fortunately I had a spare as I only needed one side for the turbo. I think I kept the warpage for them all to a minimum but worst case I'll get them skimmed by my local machinist. I feel like I've had to re-teach myself tig fundamentals through this project but I guess there's no better way to learn than by doing
-
Finally got a solid hour today and finished welding out the midpipe. It felt like a small victory after a crazy schedule this past few weeks. Tomorrow I have a few hours off so I'm hoping I can tack and start welding out the rear section. Now that I have a bit more fabrication experience, fitup is getting a bit quicker but I think I need to pay more attention to making absolutely sure everything is "white glove" clean before welding
-
240z SCCA vintage race car, restoration
Dat73z replied to AydinZ71's topic in S30 Series - 240z, 260z, 280z
@AydinZ71 yeah outside of WOT it's going to come down to airspeed. I think the smallest venturis they make for the 50s is something like 40mm. Ime most of the bog at very low airspeeds you can make up for in the pump shot. With 47s and a 3.0 NA you would likely be running a 36-38mm venturi? Without a doubt you are going to get better control and performance with EFI. I was thinking you were considering carbs for some vintage racing class rules or something -
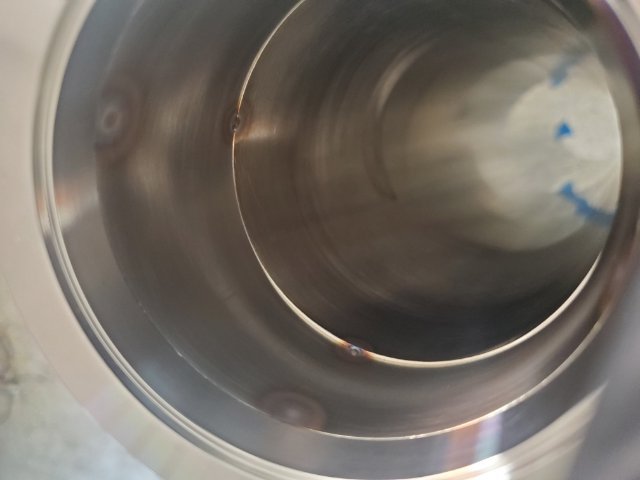
So the pictures I posted earlier was a part that did move a bit...my fitup was perfect no gaps and I did 4 autogenous tacks. When I welded the vband in one go one of the tacks broke loose due to the thermal stress/strain and a 1mm gap appeared. When it fully cooled the gap shrank to something like 1/4 of a mm. I was able to retack and weld it back no problem but 1mm on that end of the tube moves the other end of the long tube a couple mm. I think I need to do like 8 or more tacks and work on my heat controk a bit more
-
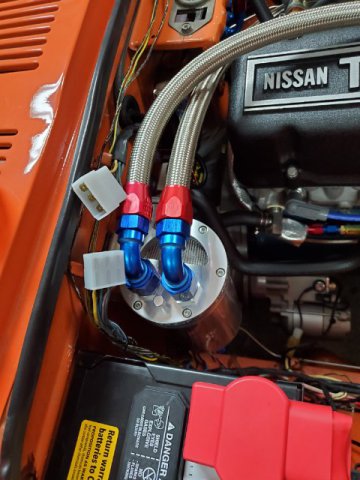
Thanks @rossman. The catch can is an off the shelf Vibrant. I did cut and tig weld the bracket though. Originally I thought I could bend it but it turned out to be like 1/8" SS which was impossible to bend with my garage tools. I reused the firewall ground threaded hole and did a rivnut on the other side.
-
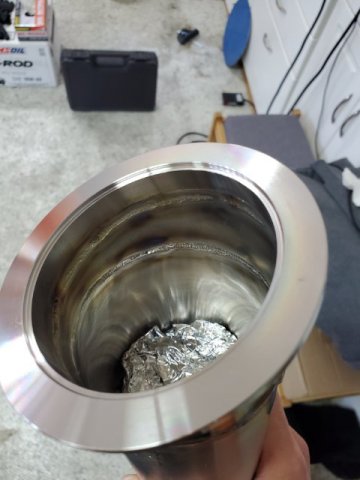
If any amateur welders like me were wondering in the future...what I found this past couple of days was if I shove a piece of foil into the tube and poke some holes into it I can fill just that section within a couple of minutes. You can see in this pic that the sugaring from the non-purged tacks is basically fully consumed when I penetrated through. They're still there as little black dots but that is because I was going conservative on the penetration because these pipes were not fully concentric and I was concerned about overdoing it as an amateur. On some test pieces I was able to fully dissolve the sugaring where my non xray eyes couldn't differentiate anything at least. For an exhaust this is probably fine and I don't need things to be pretty just to hold.
-
240z SCCA vintage race car, restoration
Dat73z replied to AydinZ71's topic in S30 Series - 240z, 260z, 280z
I don't have much to add, but since you'll likely be running at WOT most of the time and if it's an option in the budget OER is making the 50mm carbs again (they were NLA for years). The OER carbs are easy to set up and tune with the external and accessible pump stroke and float level adjustments, but once they're set you're not really messing with those parameters much anyways. Parts are also readily available but shipping from Japan has been expensive this past few years. -
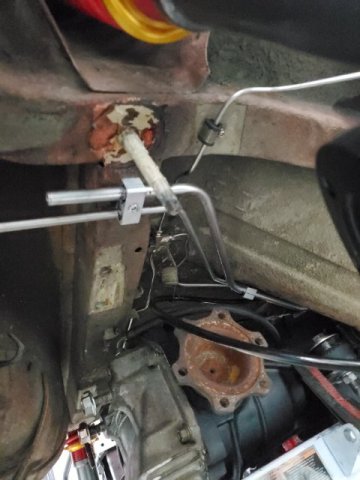
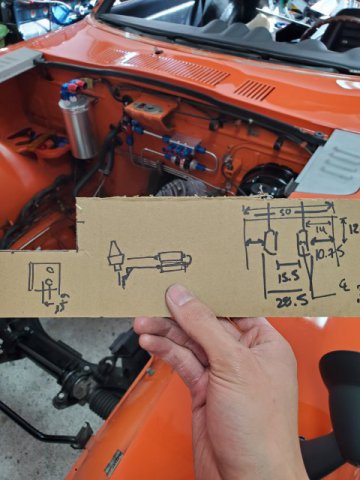
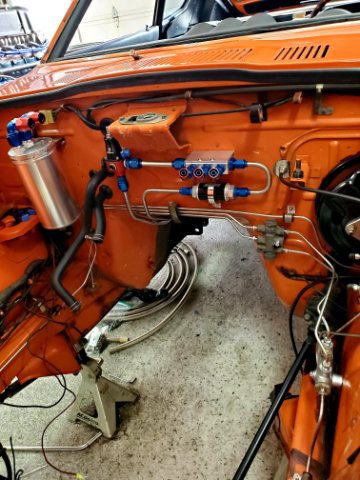
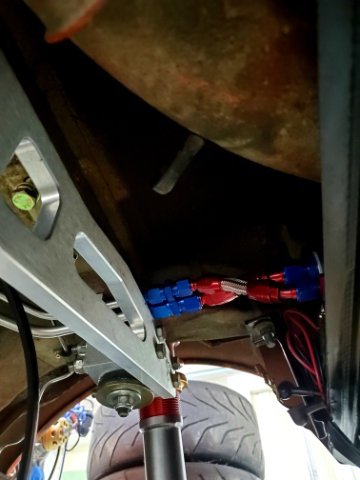
Was cleaning up some albums on my phone and realized I never posted the turbo fuel system setup. Maybe someone can find this helpful. I decided to do -6 feed and -8 return with an in-tank 255 pump bypassing through an aeromotive regulator. I had considered a 270 pump as well but didn't see it as necessary. Based on my research this should support 600whp on carbs which gives me some headroom. I fabricated the lines from basic SS tubing, AN flared connections, and limited braided SS softline use just at the small section by the tank and from the fuel logs to the carbs. Most of what I saw online for blowthrough/nitrous carb fuel setups were big v8 guys but maybe someone will be searching and find this in the future as well for sidedraft carbs on an inline 6. If I decide to go itbs later this setup will support that as well. If I was going to do the setup again I'd run the lines out of the tunnel for safety but I got to the point where everything pressure tested out good and I wanted to get the car back together by this summer.
-
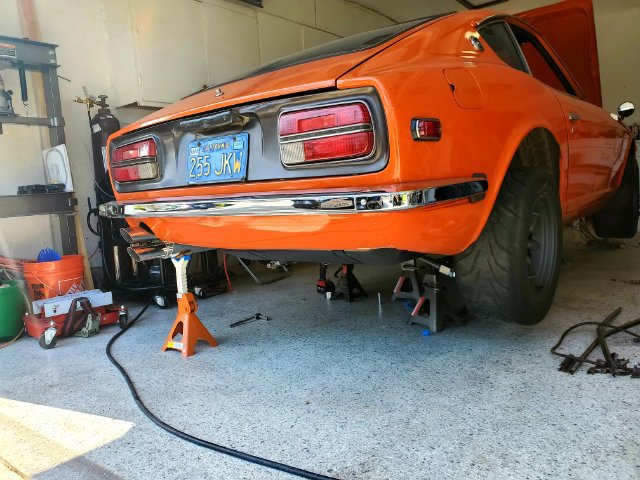
Had a bit of time to work some small items today. Kept welding and fabricating the exhaust. I have half of the midpipe tacked out and half of it welded but it's been hard to find solid blocks of time to make good progress. Slowly but surely it's getting there. Also got the cold side piping in so I profiled and chopped the tubing in preparation for welding. I still can't believe it came in so quick, I've been used to waiting weeks or months for parts lol. As I suspected I was able to get good angles and clearances with 2x 45s trimmed. Now to order a bead roller. The weather is improving too so time permitting this weekend I can paint my cowl section and get the windshield back in.
-
Yeah I did some test pieces over the weekend and any sugaring from the small tacks is consumed on full penetration. Really I shouldn't be penetrating through to the other side on tacks but that is mostly due to alignment (ex partially cut mandrel radii where the tube ends arent perfectly concentric so there's only 1/2-2/3rds wall thickness joint to joint at some areas) and my lack of skill. Since I'm just a hobbyist I'm still trying to find ways to save any gas especially with the way prices are nowadays. High priced gas prices to drive to get more high priced argon adds up. I've been thinking perhaps for the longer sections where the welds are close to the ends of the tube I could crumple an AL ball with some gaps around the edges and shove it into the pipe to produce a smaller argon "chamber" as opposed to filling the whole pipe every time. Either way I'm about 1/2 done with my first full custom SS exhaust project now so I may as well keep experimenting and learning As an aside another reason I've been going through so much gas is I've found SS can really move around a lot when welding. So most of the backpurge gas I've used is due to purging the pipe, welding a bit, then walking away to let the part cool. I've found the part doesn't move much when I do this. If I could weld an entire section in one go instead of constantly coming back and repurging then I could save a lot of gas
-
Yeah I had some time to think about this and research more as I was waiting on filler. I'm going to backpurge the rest since I've already gone down that path but I'm not going to go crazy like the downpipe where I backpurged the tacks and let the purge run for like 10 mins until there was 0 air left in the pipe...I burned through like 1/2 of a 145cu ft tank just on that part alone. From my research some air left in the pipe is fine. There will be some discoloration like blues and whatnot but no sugaring and not critical on the exhaust post turbo