Dat73z
-
Posts
852 -
Joined
-
Last visited
-
Days Won
8
Content Type
Profiles
Forums
Blogs
Events
Gallery
Downloads
Store
Everything posted by Dat73z
-
Offsets hurt my brain
Dat73z replied to 19782plus2's topic in Brakes, Wheels, Suspension and Chassis
What pictures are you looking for? It's a fairly basic setup. Nothing custom or fabricated except the q45 diff mounting which doesn't affect the track width or anything -
Offsets hurt my brain
Dat73z replied to 19782plus2's topic in Brakes, Wheels, Suspension and Chassis
Thanks @calZ that was the thread I was thinking of -
Offsets hurt my brain
Dat73z replied to 19782plus2's topic in Brakes, Wheels, Suspension and Chassis
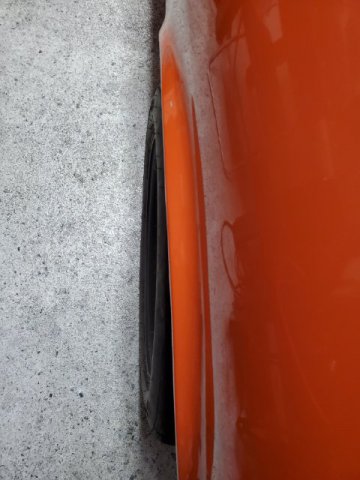
Here's a picture of the inboard clearance at ride height (~2 figer gap) with coilover sleeves. Theres room to go further inboard. I think I measured at one time you could fit 245s under the stock rear arches rolled maybe trimmed and welded if you have the proper offset. I believe some other members here have done that for maximum tire. I think someone here has actually gone wider but I don't recall their username.
-
Offsets hurt my brain
Dat73z replied to 19782plus2's topic in Brakes, Wheels, Suspension and Chassis
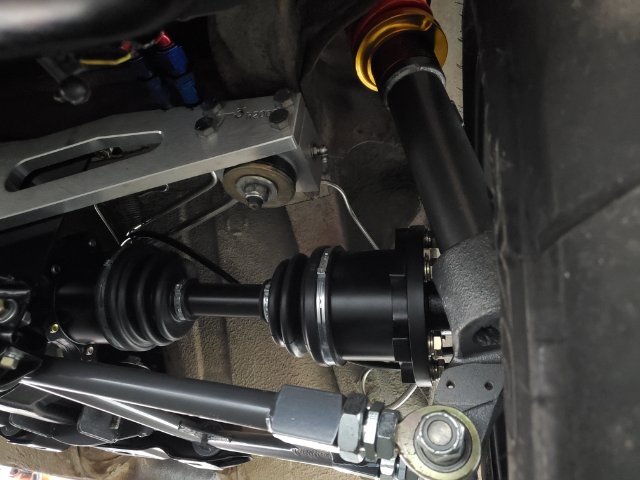
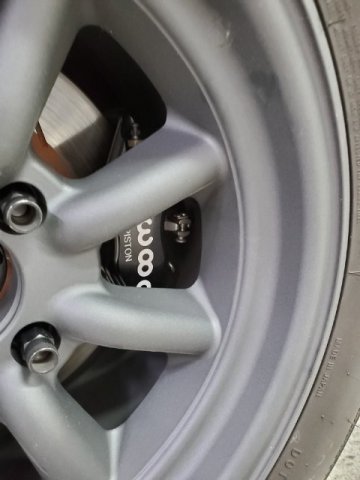
I am running a similar setup to what you describe. Specifically on the rears is the T3 BBK, T3 LCAs, stock tophats, T3 coilovers (non-evolved so using OEM cores) with ground control springs and sleeves, 280z hubs. 15x8 0 offset rota RKR with 225 50 Toyo R888. Not sure what you mean by "flush" but everything will fit. If you want to go low you will need to roll your fenders. I think if you run 205s for a bit of stretch and dial in more negative camber you can get away with no roll. I wanted a square sidewall, maximum tire, the ability to go wider in the future so I opted to roll. I may go back and trim/weld for more clearance. Here are some pics, hope it helps
-
Realized I haven't updated this thread in a while. This has been my first ground-up turbo build and I've learned a lot along the way. Over the winter I replumbed and pressure tested the entire brake and fuel system. I also got the full driveline back in which consists of a Q45 vlsd rear end, aluminum driveshaft, and modified s13 transmission for the L-series bellhousing and OS Giken twin plate clutch. I rebuilt and restored everything I could along the way that wasn't replaced since I was already in there. Anything I've missed will have to wait until the next time I tear the car down for paint. I think this is the 3rd time I've had the car completely apart. Now that all of the major running gear is back in I've been working on hooking everything up which has mostly been plumbing. The last major fabrication will be modifying the charge piping to fit as I changed the configuration of everything over time and fully fabricating the exhaust from stainless. I received the stainless pipe earlier this week from Ticon/Stainless Bro's so that will be my spring project.
-
CD009 Transmission mount Buy vs Weld
Dat73z replied to mutantZ's topic in S30 Series - 240z, 260z, 280z
Do you have any pictures of what you did? I've been curious about these swaps and haven't found any good information on driveshaft angles. I'm assuming you moved the tail of the trans further up in the tunnel? Do you even have room to do that without cutting more of the tunnel? -
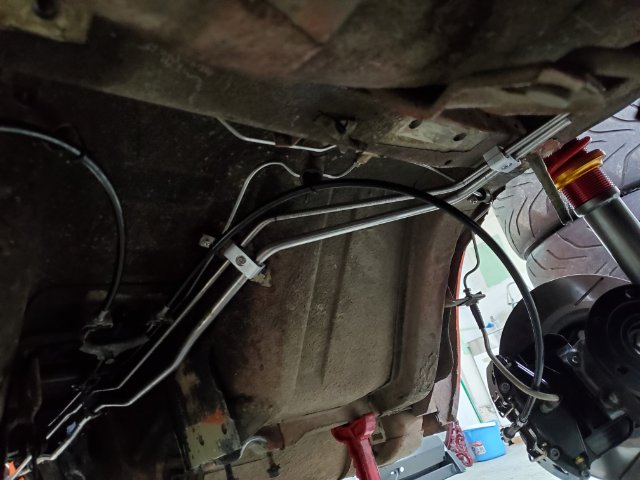
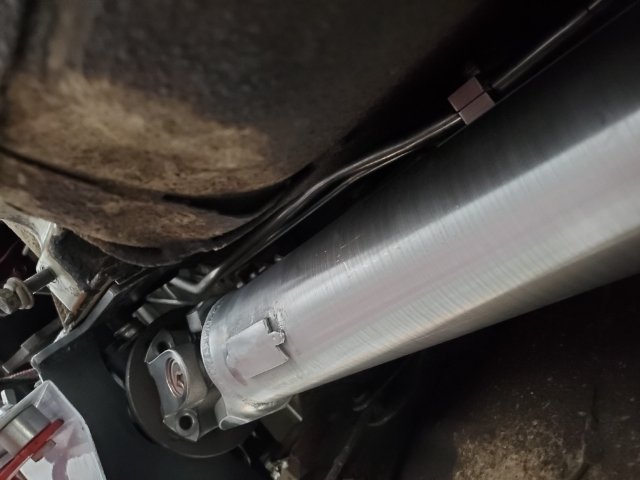
@tube80z the L-series or 240sx adapted trans won't be an issue, as I kept the tube profile about the same as the stock 240z setup and running along the same hangers. You can see from my pics I even tucked the rear brake line up higher than where it would be stock (but still along the same path). You have plenty of clearance at the front by the block as well. Where you may run into issues is if you install a CD009 trans or one which requires completely removing the stock trans mounting area but I don't have a CD009 retrofitted car to compare.
-
Should've kept my 44's!
-
Do you have any references to racing regs about this? I found a bunch for road racing/autocross about routing fuel in the cabin but haven't been able to find much on firewall mounting. A few people have brought up mounting a fire supression nozzle in that area but this is basically a 95% street car. Do you have any thoughts on that? Good points though. I think the fuel log is a few inches from the head. I don't think it's outside the realm of possibility that the head could move back/flatten the hood latch area and hit the fuel system in a crash as these cars will basically pancake the frontend with a 20-30mph frontal impact.
-
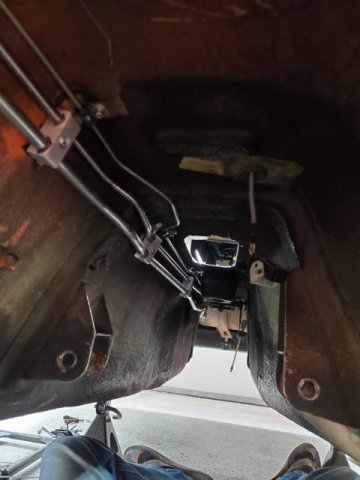
So I've asked around locally, on FB groups and a few forums and people are pretty divided on this. I think the most concise answers I received were from drag racers interpretations of NHRA rules which are basically: the firewall can and will deform in a crash, the lines by the bellhousing/clutch within a distance should be shielded or stainless braided in the event of clutch explosion, and generally if there is a fire on the firewall smoke and flames will enter the passenger compartment much quicker I think all of these concerns have merit but also based on responses I don't know how heavily enforced these rules are (I'm not a drag racer). Also as I was doing more research on early versus late model Zs it seems by the late 70s the 280z had moved the lines out of the tunnel and ran them by the framerail? This seems to make sense to me as you'd be in for a bad day if your driveline let go with all the plumbing in the tunnel. What threw me off is I've done numerous HPDEs over the years and haven't been questioned or seen anyone been questioned for fuel components on the firewall both OE and aftermarket. Even my Integra Type R has the filter bracketed to the firewall as factory with fuel lines running across. Doesn't mean it's safe but the response I got from drag racers on this one was OE cars have been rigorously crash tested so they get a pass (so people don't need to modify their OE cars with the configuration to pass tech). Either way to be honest not only for safety but also simplicity and flow I'm thinking you'd be better off staying out of the tunnel entirely, route the lines along the pass framerail and meet the engine at the front. Attach some skid plates or shielding for off track excursions. Here's some pictures of what I did in the original design, basically 20 or so bends per line with custom cnc machined brackets duplicating where the OE lines went. The tunnel can be a massive massive pita if you try and hug it close like I did. By moving to the framerail you'd only need a couple bends per line, much easier, safer, and better flow. These are in progress pics from my phone but I have the finals from the last iteration if you want anything for reference.
-
I'm Back, 1971 240Z and Yes, it will be TurboCharged
Dat73z replied to 240Z Turbo's topic in S30 Series - 240z, 260z, 280z
Welcome back! Looking good 👍 -
After some further research this appears to be an unsafe configuration. So I'll need to chop the stainless hardlines at the firewall and run braided past the bellhousing to an alternate location. Surprised I never knew about this as all of my vehicles have had a similar configuration and I've seen more than a few cars like this at Buttonwillow and Laguna over the years at track days.
-
I mounted my FPR, Filter, and Fuel Rail on the firewall and ran stainless lines for the feed and return. I didn't think too much about it as some of my other vehicles which I've taken to HPDEs have this configuration both from the factory and what I've done in the past. After doing some further research it seems like this is banned from drag racing. I don't intend to drag race this vehicle but I do plan HPDEs and I'm curious if I should relocate these components and what the safety concerns are. Could those more knowledgeable let me know? I've attached some pictures of what I've done. Thank you
-
ZCarDepot Fan Shroud and Mishimoto 12" Fan?
Dat73z replied to NorthStar's topic in S30 Series - 240z, 260z, 280z
Not the entire shroud, just a small 1/8" lip top and bottom would stiffen the flat plate up significantly. Basically like this
-
ZCarDepot Fan Shroud and Mishimoto 12" Fan?
Dat73z replied to NorthStar's topic in S30 Series - 240z, 260z, 280z
I think OP is underdriving their water pump and alternator with the ati damper. I think the underdrive is fairly significant but it's been a couple years (pre-covid) since I've last seen an ati running in person. Yes caps are just to keep junk out -
ZCarDepot Fan Shroud and Mishimoto 12" Fan?
Dat73z replied to NorthStar's topic in S30 Series - 240z, 260z, 280z
Yes just a flat piece of AL. So far as I can tell the ZCD bends serve 2 purposes: (1) air gap for those rads that don't have it and (2) add rigidity. With the Mishimoto rad you have an inset portion between the mounting surface and core so if you wanted to and has access to a large enough brake you could add some bends inwards on the top and bottom of the plate for rigidity. I would do this before you start cutting the holes for the fans. Alternatively, tig on some flat AL strips in those same areas or just use thicker AL. With the way it mounts at 4 corners though there's minimal flex -
ZCarDepot Fan Shroud and Mishimoto 12" Fan?
Dat73z replied to NorthStar's topic in S30 Series - 240z, 260z, 280z
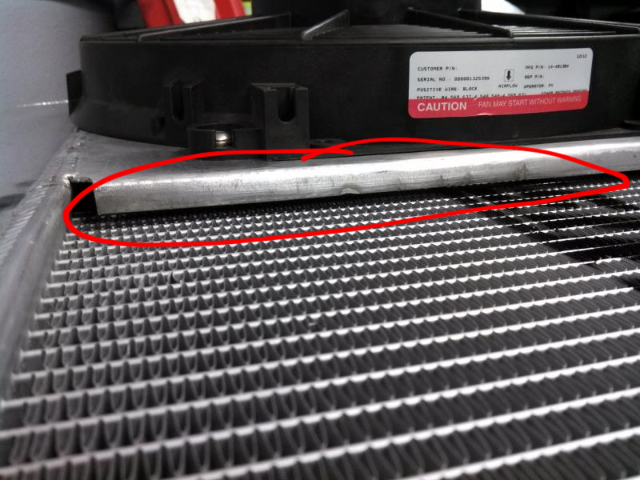
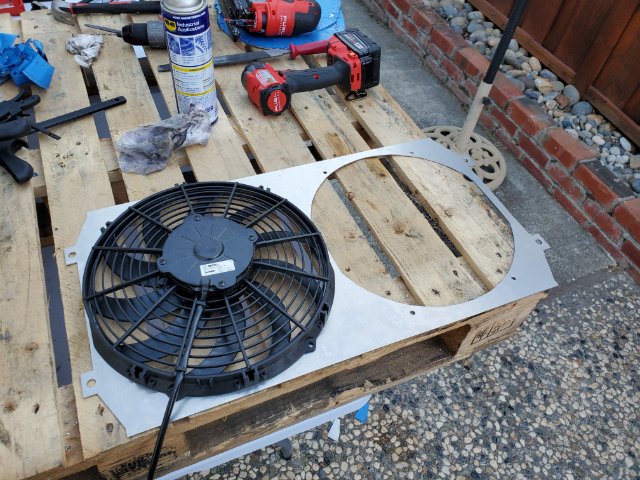
@Zetsaz iirc they don't here's a pic of when I laid them on top see how they hang over the stepped edges (coffe table pic) so I traded it. Also some pics of what I ended up doing with some 0.080 AL.
-
ZCarDepot Fan Shroud and Mishimoto 12" Fan?
Dat73z replied to NorthStar's topic in S30 Series - 240z, 260z, 280z
I had that shroud a while back, it's a nice piece that bolts up to the mishimoto mounting ears. Ended up traded it and made my own for some 12" spals because I wanted more clearance in front of the engine. For the fans it looks like they're rated at 1850cfm each so with 2 you pullers should be fine. I think the stock mechanical fan was rated at ~2600cfm but maybe others can chime in. Lots of great references on this site as well -
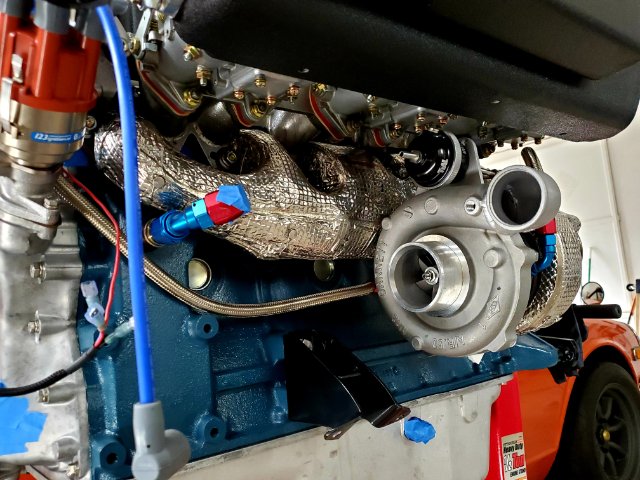
It is an inconel alloy custom heat shield. I sent the full assembly to these guys https://atpwrap.com/
-
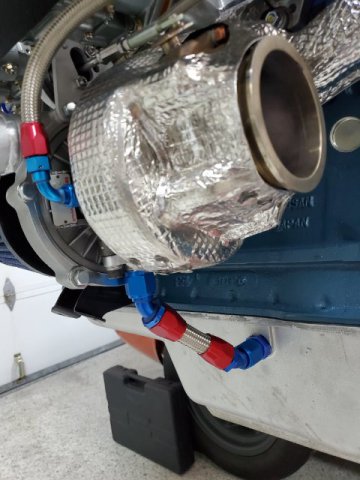
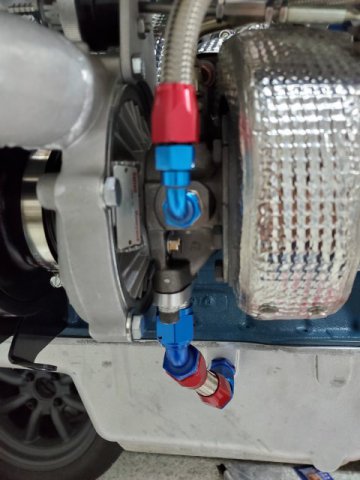
Realized I never updated. 2x 45s non swivel (for more clearance) did the trick. It's not perfect but it should work. Also realized I was cutting the 10an line all wrong. With a perfect cut, no frays, and some motor oil the line comes together really easily. The 6an and 8an was always more forgiving to me on this
-
@AydinZ71 yep I had a similar dilemma...was moving and contemplated selling all of these random stroker parts I had laying around. Ended up dropping them off at Rebello since he was local to me and getting a 3.2 turbo stroker built. A monster NA would've cost about the same since labor is pretty constant
-
Great progress. Are you planning to replace the dash pad or restore the dash while it's out? Now is a great time to do it
-
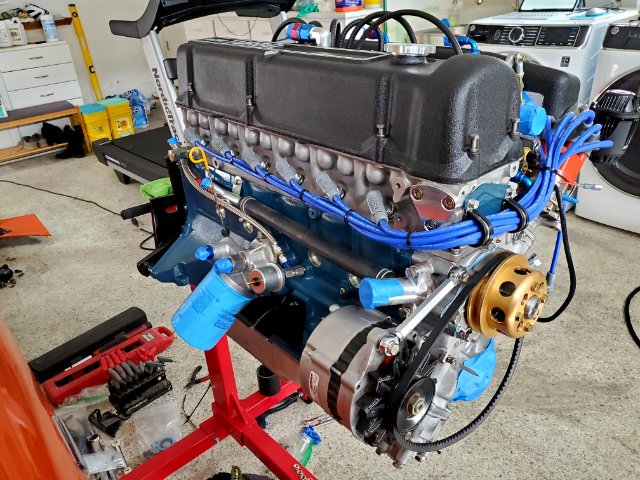
Realized I haven't updated in a while but this build has been going on in the background. Did a bunch of welding this past few months and other mini projects to get things prepped. Started mounting up the intercooler, catch can, oil temp sensor, plumbing oil/coolant, and misc. accessories. For anyone doing this type of build the turbo gets really close to the shock tower. I think the charge piping I had mocked up before pulling the last motor had the turbo outlet lightly rubbing against it with the way I wanted things clocked. I welded a cast 90 which gives me another 1/2-1" of clearance. Not really a turbo thing but I found the BHJ damper isn't coated so I pulled that off to paint it with 2k clear. When I had a volvo washer machined down for the pulley, finger prints from myself and the machinist started to flash rust. Nothing a bit of steel wool didn't fix but it wouldn't surprise me if it fully rusted over a few weeks on the car even rubbing it down with WD40 or other oil.
-
You already have a lot of great responses here. Not sure if there is a local Z community in KY but if you have the opportunity see if you can drive a stroker L and a turbo L to see what makes the most sense. IMO even a mild stroker or mild l28ET is a lot of fun in the light s30 chassis. The L28ET is likely going to be the best bang for your buck. My friend just got their 3.1 Rebello stroker race car with triple Mikuni 44's back on the road and if you're going to build it all of those parts and work are not cheap. If you really want to light money on fire you could do both a turbo and stroker but you could also move off the L series and get a lot more unless there is a nostalgic reason to stay L.
-
Thanks @Miles. I placed an order for the 15/16 from AZC. It's around the same price shipped as the Wilwood 1" MC. Hopefully no more leaks. FYI- it looks like Steven has taken over AZC from Dave full time now. Nice guy, I think he answered some Q's earlier this year on a bunch if AZC parts I purchased new from Dave a long time ago.