Dat73z
-
Posts
852 -
Joined
-
Last visited
-
Days Won
8
Content Type
Profiles
Forums
Blogs
Events
Gallery
Downloads
Store
Everything posted by Dat73z
-
I do have a unicoil left over somewhere from redoing the gas tank lines, might give that a shot if I can't find my box of an tube nuts and sleeves.
-
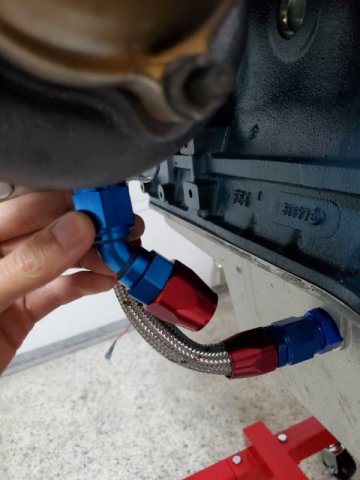
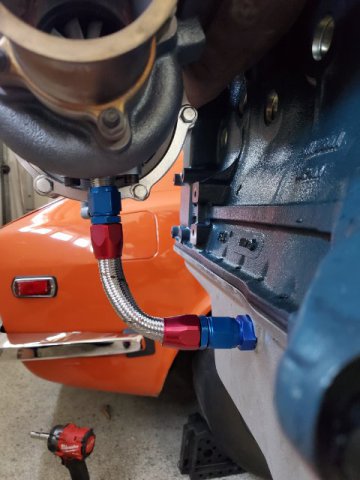
Alright so no dice with the push lock fittings and hose but man they are so easy to work with. Assembly is a 3 minute job. May need to use them for my oil cooler and vent hoses. Hose kinks too easily. Since I already have all the flaring and bending tools from the stainless hardlines the new plan is to do the bend in hardline and run a short straight section of hose to absorb any movement. Although I'm not sure how much movement there will be seeing as the oil pan and turbo should not move. Will update when I get it together.

-
When I pulled the setup apart I was surprised to find the RTV on the head still looked reasonable. Maybe because the head is water cooled. On the turbo hot side all of the rtv had turned to dust. I agree long term (more than a few hours?) there would be no RTV left so the seal would need to exist from both sides perfectly flat. Im leaning towards running the gasket. And on the turbo side it'll all be stainless crush gaskets. I'm still curious if any turbo hybridz members run RTV and how that holds up over time. If this was a race only engine and my service intervals were a few hours I would actually prefer the RTV since there is virtually no cleanup after inspection before resealing. If this was a non-turbo motor I would probably also consider the RTV.
-
I'm doing the final preparations on a turbo motor before dropping it in and wanted to solicit some opinions on using a gasket versus RTV for the intake/exhaust. On my Rebello built turbo stroker motor, it was recommended to me to run grey RTV for the intake, Red RTV for the exhaust. If both surfaces are true there should be no leaks. I've attached a picture of what the head looked like after removing the manifolds, the motor was run in on the dyno so likely only ran at most for some hour(s). Leaks are either due to improper rtv application or flatness. I'll do finals checks for flatness and get things decked as needed. In my parts bin I have a new spare Nissan OE intake/exhaust gasket with the metal inserts for the exhaust side. If I run this I could probably put some copper rtv on the exhaust side to ensure a good seal if there are any surface imperfections. This will mostly be a street motor with some track days perhaps a couple times per year so a few 20 min sessions across a couple days, canyon drives, etc. Probably no more commuting with this car. I have run RTV only on motorcycles bit the service iterval for me was measured in hours so I don't know how well RTV holds up over time to the extreme turbo temperatures. Any thoughts on if it's better to run RTV or the OE gasket? For those running RTV what is your service interval and how do you drive the car?
-
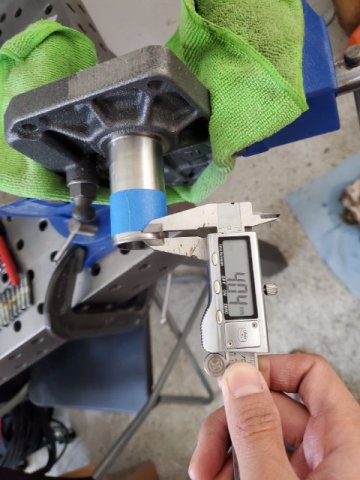
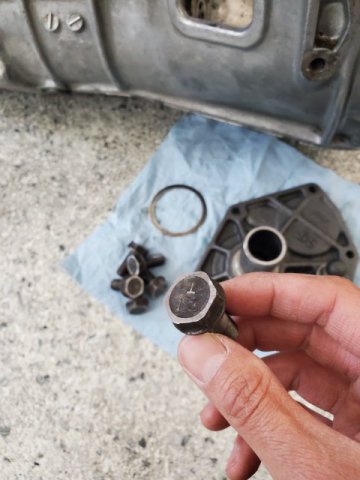
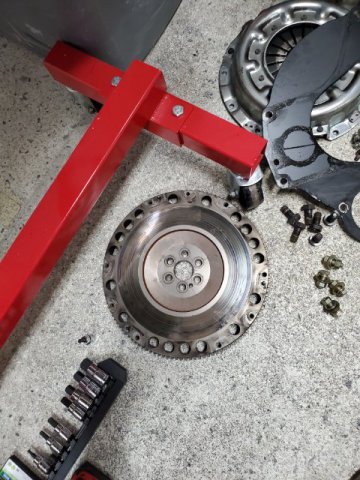
Finished modifying my transmission input cover and flywheel bolts. For the OS Giken dampened twin plate 4mm needs to be removed from the input shaft area of the cover, and bolts ~8-8.5mm head thickness. The bolts are actually around the same head thickness now as the 240mm turbo/2+2 flywheel bolts but I gave those to the buyer of my old clutch setup so they could bolt the setup right in. Next step is to finish prepping the turbo manifold and send the assembly off to ATP for their inconel heatshield treatment.
-
Thanks rossman, good suggestion for plan B.
-
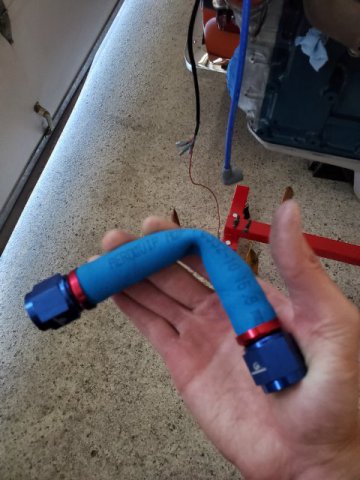
So I gave the angled fitting a try and no dice, the angle is close but stainless braid really doesn't want to give. It was actually a 30* fitting I think, the 45 would've been too tight from the T3/T40E to the AZC pan. I went ahead and ordered some 10AN push lock fittings and Parker hose. Hoping that'll bend a bit better. Will update when I get it all together.
-
Does anybody have an extra they're willing to part with?
-
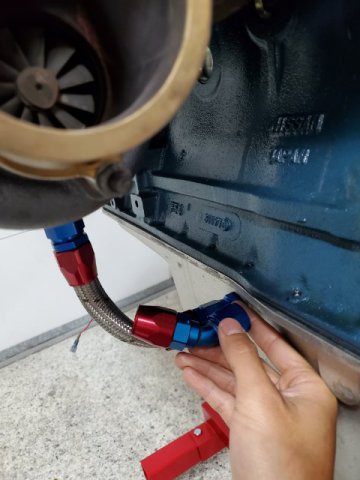
Thanks, yeah no pressure more concerned about the kink causing oil to back up. Good point I may try the 45 approach on the bottom line which would take up some of that kinked area. Looks like the top angle may be too extreme.
-
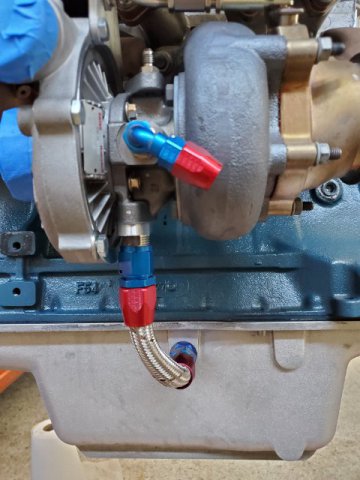
Hi all, I'm wrapping up my turbo plumbing and wanted some feedback on the drain. I assembled 2 ends of Earls 10AN fittings. It looks like the stainless braided hose is about to kink with the bend and curve it needs to run from turbo drain to pan. This does not look legitimate to me and I'm looking for other options. I was thinking maybe if I can find some shorter hose ends to reduce the pressure on the hose or maybe just go to a push on/push lock style system for the drain which would give the hose more room to run the bend without kinking. Any thoughts? Or am I overthinking this and it looks ok. Thanks!
-
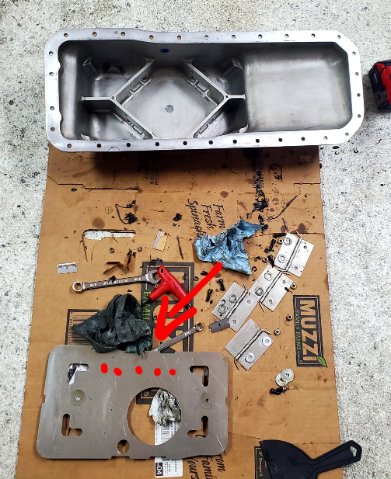
Images in the thread above didn't work for me but what was discussed made sense. For reference I ended up drilling 4x 3/4" holes on the windage (passenger) side of the tray.
-
Thanks zbloke!
-
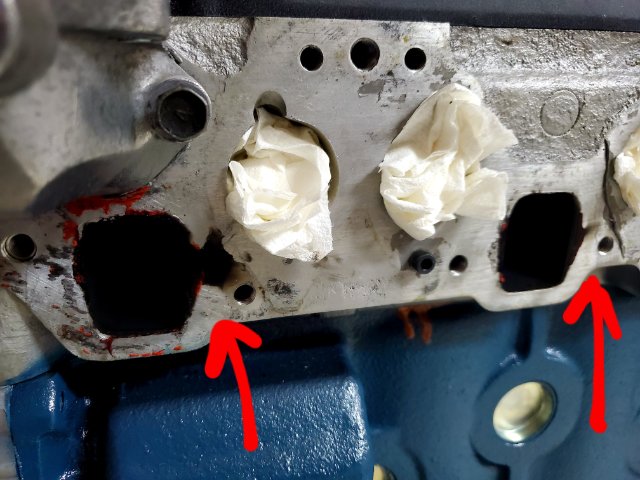
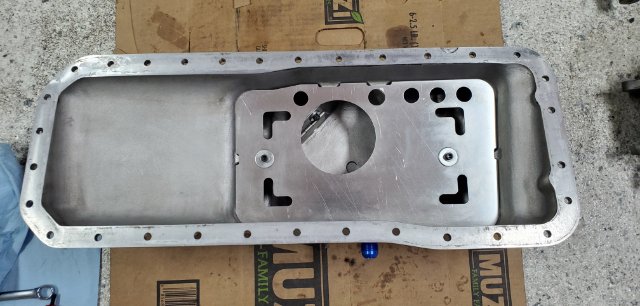
Hi all, I recall reading years back that the AZC pan can have oil drainback issues if you're moving a lot of oil, and the fix would be drilling some holes in the tray. I currently have my AZC pan taken apart for another engine and figured this would be a good time to perform this modification. Does anyone know where these holes should be drilled, how many, and size? I was thinking something like the attached where the red dots are (excuse the mess)
-
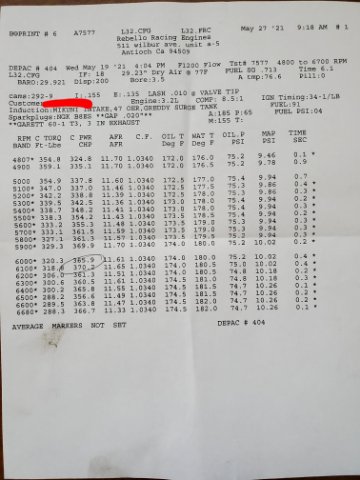
Pre-weekend Update: Sold all my old clutch stuff and ended up ordering a OS Giken twin plate. Will need to modify my trans a bit but I'll get on that next weekend. Also managed to pick up the motor from Rebello today. Dyno sheet attached for reference. It's a 3.2 stroker @ 8.5:1. The f54 block, p90 head, and knife edged diesel stroker crank were spares I had in my garage that I didn't want to move when selling the house. Turbo parts from earlier in this thread. The other parts in the build like forged rods, pistons, bearings were all specified by Rebello. Edit: Realize the img is fuzzy. 10psi it made 359.1 Ft-lbs @ 4900 RPM, 370.2 HP @ 6100 RPM. ~11.5 AFR's, need to check the timing data, I think intercooler was heat soaking as well. Since the Mikuni short runner is ported out for my OER 47 carbs maybe I'll go OER 47 ITBs down the line.
-
Just about wrapped up with the engine bay prep and starting to unpack the other parts for the build. I'm planning to have my 240mm chromoly flywheel resurfaced + balanced and need to order a new clutch. I have brand new and lightly used exedy oe replacements in my parts bin but I'm pretty sure they won't hold 450+ hp/trq. I see OS Giken has a few options but they're pretty pricy and I'm not sure how streetable they'll be. Any suggestions on cost effective options?
-
Weekend update: Motor is done going to see if I can pick it up next week after the holiday. I went through and powdercoated all the suspension maybe 5 or 6 years ago? Decided to finally degrease the engine bay and tidy things up. So far as I can tell it's mostly original paint given the completed faded paint code tag on the radiator support. Might consider doing a quick body color respray or at least scuffing and shooting any areas of exposed metal.
-
Bringing this build back from the dead. Wow I can't believe how much time has flown by, especially this past pandemic year. Ended up moving 3x since my last post but we're finally settled back in now and I brought the car along with me for that journey the entire way doing misc. things here and there. Finally got my garage partially set up and my engine is finally on the dyno as of this week @ Rebello with the blowthrough setup. Since the last post I've put in a q45 rear end, fuel tank, stainless hardlines, did a custom fan shroud, bunch of other random items. Got a day off from work this Fri so the current motor is coming out for final engine bay prep. Will be updating this thread again as the build progresses.
-
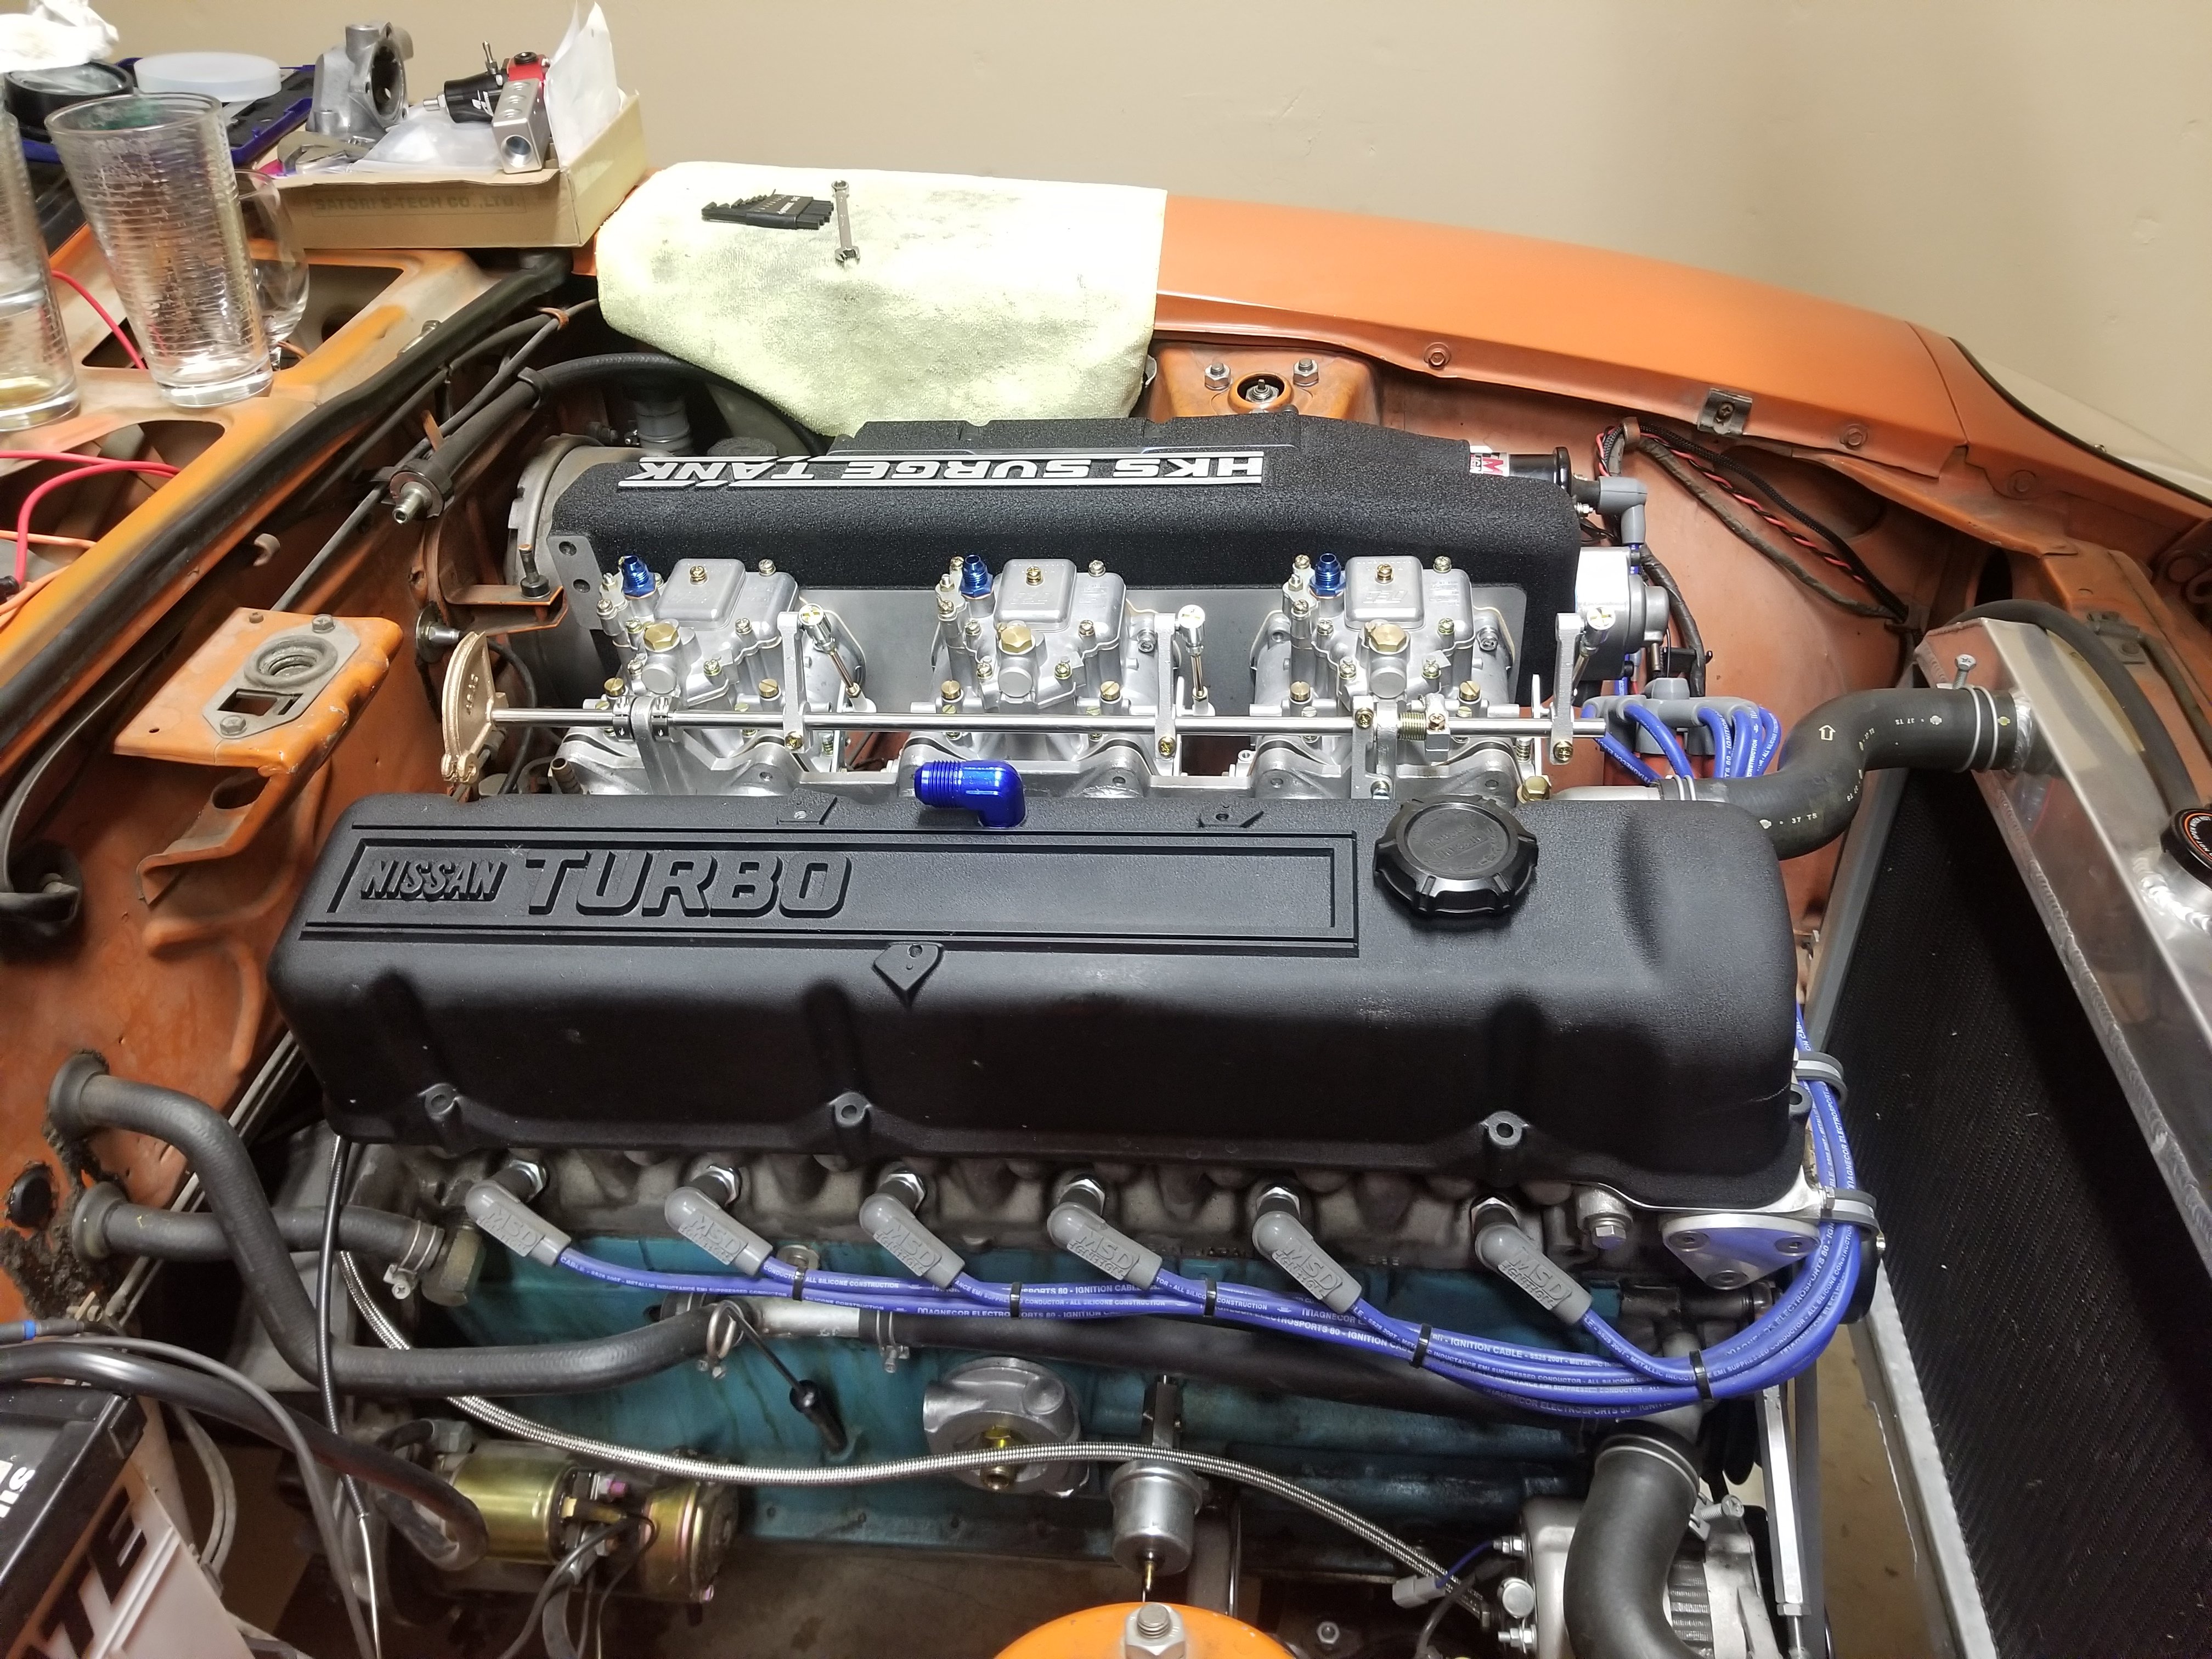
Thanks for the feedback Tony. Wish I had known your tips for the funky hole drilling on the later boxes before. Useful information if I ever go for another set of carbs or ITBs in the future. I had considered making a spacer plate at that time but just ended up drilling out either end of the carbs taking care to ensure everything was centered and level. I think my concern was that even with the Mikuni short runner the manifold inlet on the later tank was coming pretty close to the shock tower. In hindsight making a spacer plate would have been easier and less time consuming. As I was measuring I also think the previous owner of my car had already "clearanced" the bottom of the shock tower lightly above the frame rail back when the car was drawthrough turbo. Edit: Specifically what I had done was drill the holes enough to remove the threading where the trumpets used to mount via studs. The spacing at this point at the front of the manifold looked good with the bores for each carb aligned to the holes in the HKS v2 Surge Tank and the float tank pressurization port aligned as well. These dimensions looked ok and I bolted them up with stainless hex head hardware. I then had to drill out the rear mounting points for each carb to line up with the Mikuni manifold. I took care not to really hog out the holes. Just enough to be a hair under an interference fit with the manifold studs when slipping the carbs + surge tank on. I don't know what the ID of the Mikuni runners is but the OER 47 and the phenolic? spacers are much larger. I think Rebello is going to port everything between the head and the carbs- I'll need to confirm this. A question for you Tony if you read this and have input: How is venturi selection affected in a blowthrough setup? I currently have 36mm venturis on the OER 47s (the smallest they make for these carbs). I figured the smaller venturi would be good for off boost throttle response. I see NA cars running much larger venturis on these carbs, but we're cramming a lot more air in with the turbo. Got an update from Rebello earlier today- motor is moving along quicker than expected and they're already machining the block. We settled on the 8.5:1 compression ratio. BHK? dual row damper with a trigger wheel was selected in the event I decide to move off the 123 unit. Cam selection is still in the air.
-
Wow I can't believe it's already been a year (married, house sale, moving, etc.) but this build goes on. Just dropped off the random stroker parts, spare n42 and p90 head I had laying around to Rebello earlier today. Figured it would be easier to drop them off at his shop which is local to me rather than keep moving them around while we're getting re-rooted. The new engine setup will be a 3.1 stroker, knife edged ld28 stroker crank, forged rods, pistons, p90 solid lifter head with supertech valves, headwork custom cam, ported mikuni short runner etc. Hopefully done in a few months and hopefully ready to throw back in if we can close on a new house sometime next year. Still need to decide on a compression ratio. Apparently my p90 head is straight and virgin according to Dave when he measured it out earlier today. I'm thinking 8.5:1 for safety on pump gas and off boost response but Brian and Dave mentioned we could go up to 9:1 if we shave the head. Seems risky esp with 91 CA pump gas. Car will be primarily street with some track time @ laguna seca which is my closest track. Any thoughts? I should probably add the custom pistons have a quench area which matches the p90 head. Dave was talking me through the benefits but some of the details were over my head having never built a stroker turbo motor myself.
-
I'm in, could use one for my vintage turbo build. Had Sean's 2.5 "JDM" twin exit muffler for a few years- truly a beautiful piece.
-
The turbo looks great 👌. Maybe consider a shield instead of a blanket too. They have some bolt-on solutions or I've seen some posts online about people making one from a dollar store pot. https://www.supraforums.com/forum/showthread.php?326366-DIY-Turbo-Heat-Shield-write-up-with-pics
-
Sounds like a neat project. Turbo setup is a standard Garrett ball bearing T3/T40E 50 trim/63 AR with the ATP ultimate internal gate, Tial 10psi actuator. What will you be running for ignition? Keep me posted on your build, always looking for more perspectives 👌 Build is still moving forward. Just got back from a long work trip and it's too smokey in CA from all the wildfires to make good progress.
-
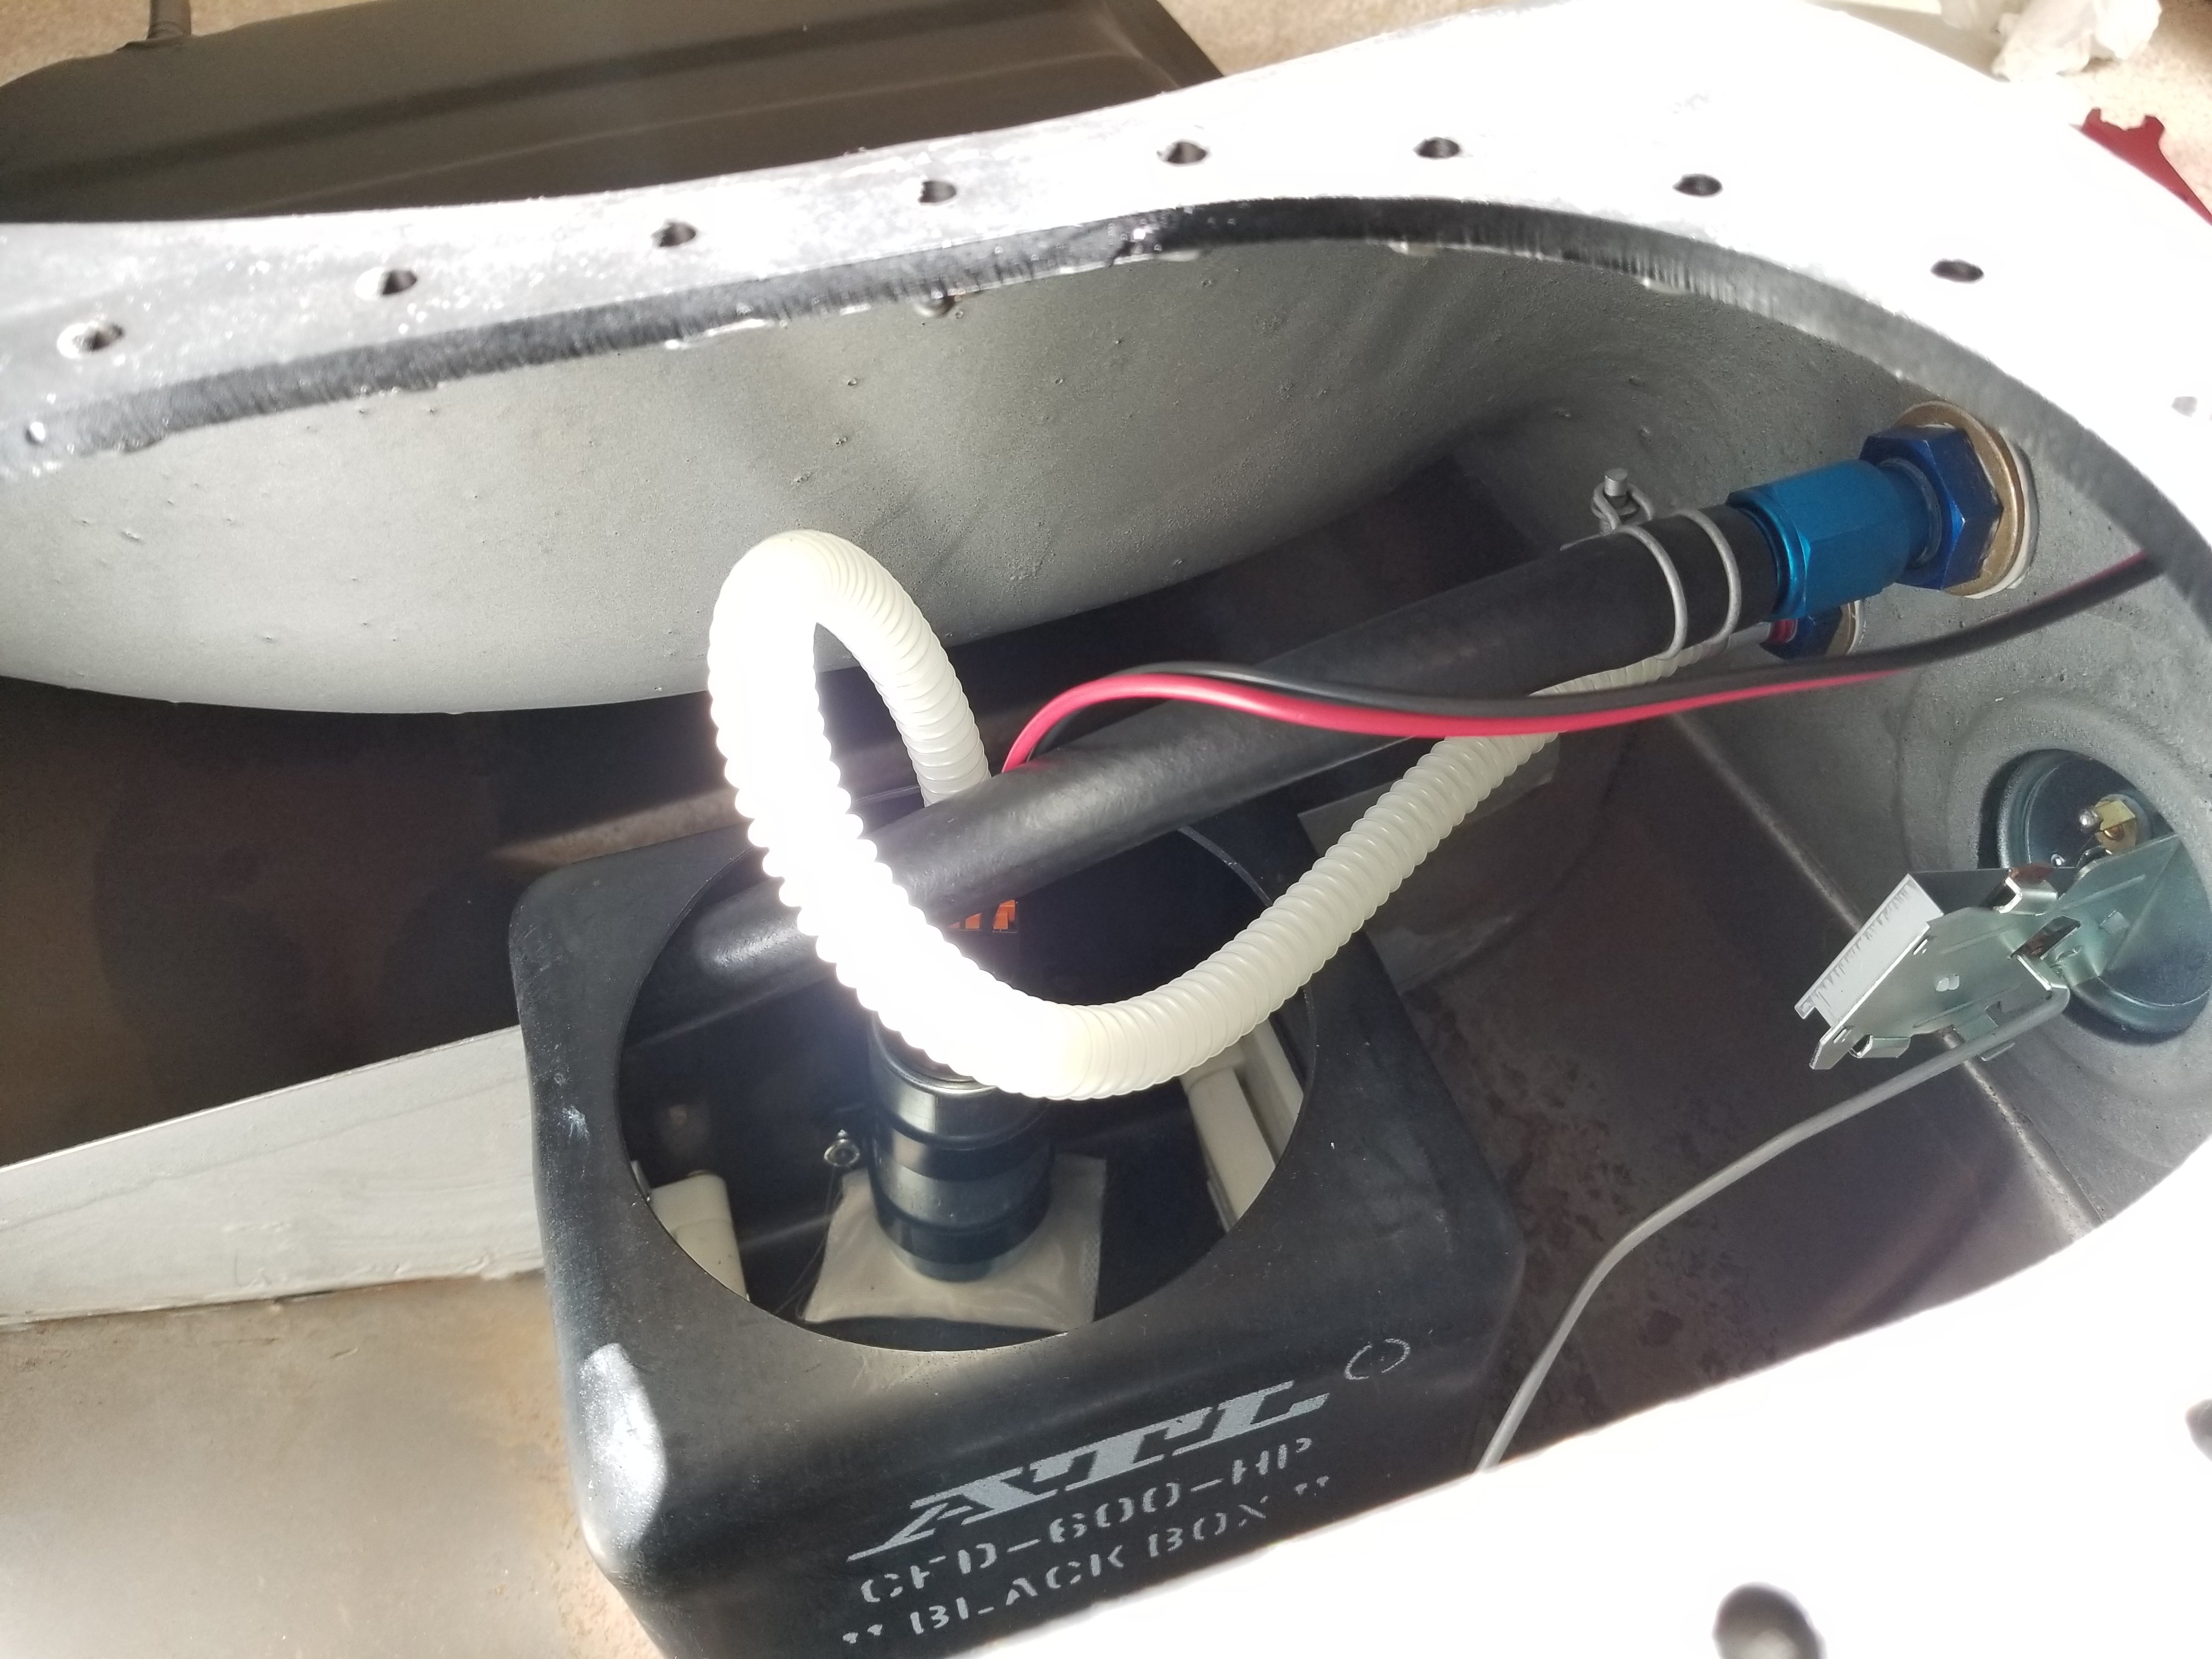
Been a busy week but finally getting back into this. Trimmed a spare valvecover to fit over the oil spray bar and buttoned up the rest of the fuel tank. Ended up running teflon AN washers on either side of each bulkhead fitting with a washer on the back to spread the load. Routed the return at the top of the tank which feeds back into the top of the black box. Hoping for no leaks and adequate return flow to maintain 3-4 PSI at the carbs with no boost. Still waiting for the AN fittings and stainless hardline to come in, but plenty to button up this weekend.
-
Thanks for the offer 👌 I may take you up on that if this one doesn't work out.
-
Thanks. Ultimately I'd like to get somewhere around 3-400+ whp. I don't think that will happen with this motor (I'm thinking 2-300+) so maybe a couple of years down the line I'll build the stroker on the side. This round is focusing on getting everything fabricated so I can put this setup on any L-series and running well enough to daily drive again.