hornedcow
-
Posts
65 -
Joined
-
Last visited
Content Type
Profiles
Forums
Blogs
Events
Gallery
Downloads
Store
Everything posted by hornedcow
-
Working more on it. Completed the belt drive and intercooler mounting and plumbing. Just electrical, PCV, and tuning to do.
-
Presented without commentary:
-
LS1 Gas Tank Conversion Question
hornedcow replied to Craig76z's topic in Gen III & IV Chevy V8Z Tech Board
This is what I did, but I got a pump bulkhead/lock ring for a late model GM in tank pump and welded it on top of the stock tank. Then cut a hole in the floor of the hatch for access, raised it an inch or so, then put on an access panel for future pump access. -
LS SWAP 280Z e A few questions for the wiz's
hornedcow replied to TheZkid's topic in Gen III & IV Chevy V8Z Tech Board
I would assume that means they just give you wiring for the senders in their harness. You'll still need metric adapters and re-use the stock Z coolant and oil pressure sending units if you want the stock gauges to work. Tach might be able to be made to work but not going to be plug and play. And you have no speedometer cable so the two main gauges are not going to work. The fuel gauge will work if it did before (ha) and the amp gauge will work if you wire everything through it electrically ... I bypassed it all and did new gauges. -
LS SWAP 280Z e A few questions for the wiz's
hornedcow replied to TheZkid's topic in Gen III & IV Chevy V8Z Tech Board
I cut everything out of the front harness except for the lights and wipers. Time consuming ... -
I still wasn't happy with the shifter effort required for the TKO after relocating the shifter. At the same time, I found an insane deal on a LS style T56. Had to drive almost 4 hours, but worth it. I knew that if I didn't put the T56 in the Z, there is another project I will be working on shortly and this was too good of a deal to pass up. So either way I needed to take advantage of the deal. I had planned to mess with the shifter again in the TKO, but after kicking the idea around for awhile I just decided to put the T56 into the Z. I am going to keep the same clutch but I upgraded to a Fidanza aluminum flywheel. I'm hoping between the light weight of the Z and the bottom end torque from the motor it doesn't make the clutch too much of a hassle. Never had a car with an aluminum flywheel before. I also purchased a Pro-5.0 shifter for the T56, I had one before on my T-5 and I absolutely loved that shifter. Anyway, the T56 is mounted in place, just waiting on the CX mount to arrive. Then I need to have a new clutch line made and I should be all set to be on the road again. Edit: Also, the driveshaft is going to work out fine. Originally I gave the driveshaft guy the measurement with the yoke bottomed out in the tranny, and told him to subtract 1.5" from that for slip. He marked it 1.5" inches back, and when I came to pick up the shaft he had taken another 1.5" from where he marked! Needless to say, the yoke was not engaged as far as I would have liked on the TKO and I was going to bring it back to him at a later date and have him re-make it. However, the T56 is a little bit longer (not that much than the TKO) and the slip yoke I found was also about 1/2" longer than the TKO slip yoke. Now the yoke has almost full engagement in the tranny. Just enough to push it into the tranny and back out onto the rear flange on the diff with a little play left in for drivetrain movement.
-
We were supposed to be on vacation this week but we ended up cancelling our trip. Which gave me lots of time to finish the car. Installed a headunit Installed speakers Cleaned up the wiring around the column Spent an ENTIRE DAY getting the turn signals to work Installed the rest of the interior trim Made access panel cover for fuel pump Got windows tinted Installed front valence Installed front bumper Washed car DROVE CAR I've put about 100 miles on it so far. There are some things that I need to mess with in the tune and I'm still not quite happy with the shifter but both of those are pretty minor and don't impede me from driving around and getting some miles on the car. My primary goal for finishing this week was because of a car show today, which I was able to make it to. We had over 60 cars enter, and I got a top 10 trophy. I was hoping for best import but I was snuffed by a tube chassis drag 'Solara'. It was powered by a 2JZ with the largest turbo I think I've ever seen short of a dump truck, so I guess it was technically a Toyota still.
-
What did you modify on the DD mounts? With the DD mounts and the low mount alternator the alt would keep me from getting the extra inch back because of interference with the mount. Ended up modifying the alternator a bit to get it back as far as I could. I know you're trying to get it forward, is that why you modified the mounts? Or some other issue?
-
The differential mounting bushings were the root cause of the noises I was hearing. What was making the noise is kind of scary. The pinion (and thus the driveshaft) were lifting up several INCHES and hitting the parking brake equalizer on the bottom of the body. The rear of the differential is solid mounted to the 1/2" thick billet mustache bar through 2 studs on the rear differential cover. I cannot believe that those parts would flex as much as they did. I'm sure if I attempted WOT I would have broken something, either the diff cover, mustache bar, or the mounts for it. Anyway, I'm a little miffed that I missed those bushings but I'm glad their catastrophic demise didn't seem to cause any other issues. I had some energy suspension urethane bushings shipped in, since literally every other bushing on the car has been replaced with such. Went for a little test drive down my street and no more noises! Woohoo! Side note, air chisel was worth every penny to get the old bushing shells out. Screw doing that any other way. I've got a few minor things to button up and I can start driving around on the street for some real testing.
-
Been working on lots of other peoples vehicles, finally made some progress. I may have found the noise under medium/heavy load. I inspected the front diff bushings before I installed the diff, since it was a used drop out from a 96 Q45. They looked fine and had no cracks that I could see so I installed them as is. When I put the Z on the lift tonight it looked slightly askew - when I took the front mounting bolts out the center of the bushings literally fell into my hands. Nice. I'm lucky I didn't break the rear hanger since the front mounts were just aesthetic apparently. Going to order some energy suspension replacements, should be easy since the hard part is usually removing the old bushings! There is a car show being held at my job on October 1st, I'm going to try and bring the Datsun there but not if it's her maiden voyage. So far she has only been up and down my street 4 or 5 times while I'm trying to figure out the noises and issues. If I can get a few days driving in before that date then maybe I can make it there.
-
I'm not using the CX racing mounts but I am using their exhaust setup. I have the JCI AC setup, I would have preferred the low mount AC but I don't think it's possible without some fabrication. There are many high mount AC kits on ebay and online, but I don't like the compressor sitting up so high. At least with the JCI kit it's not right in your face when you're looking at the engine. He still makes them, best to email or call. I got mine earlier this year. Edit: Here are some pics of the JCI kit. I see no reason why it wouldn't work with pretty much any of the LS mounts available.
-
shops that do turnkey ls 240z swap?
hornedcow replied to alphalonewolfxiong's topic in Gen III & IV Chevy V8Z Tech Board
If its 12K + parts bring it to me and I'll do it in my shop! Lol. Just finishing my LS Z, a little over 6 months in right now. Only working on it when I have no customer cars to work on and when I'm out from work. Upgraded Z32 brakes all around, complete T3 rear Q45 setup, new gauges, new Vintage Air setup, all carpet removed, sound deadened and new carpet installed. L33 + TKO600 trans. If it's 12K total with parts, I'd be wary of what you're getting. It adds up fast. -
Progress still being made ... Engine bay is pretty much done. Wired up senders for the gauges, and ran the AC compressor lead. Made an overflow tank bracket and mounted that. For the A/C controls I cut out the factory control section (was all controlled by levers) and made a blankout plate out of black ABS to cover it. Then I took the rotrary AC controls from the vintage air setup and mounted it into that panel. Looks decent, and keeps the controls where they were intended to be. Still have some minor wiring to do but nothing that has to go under the carpet so I went ahead and laid the new carpet into the car. AC works well, blows out mid 40's out of the center vent, and this is with the car idling in the shop in 90+* high humidity weather. The condenser I'm using is a more efficient parallel flow design but is smaller than what is usually recommended by Vintage Air. I'm pretty constrained size wise unless I move the condenser way in front of the radiator, which will kill airflow from the radiator fans. Because of this I ended up needed a smaller refrigerant charge than what they figure you will need. I figure this is what is keeping me from getting any colder air from the evap. Of course, I may be pleasantly surprised when I actually have more airflow over the condenser. Got the drivers seat rail modified and bolted in. Passenger side was already modified earlier. Cleaned out everything from the hatch area and then insulated it and made a spare tire cover. Boxed in the fuel pump cutout and then laid the carpet down. I don't have any lighting working yet, so I can only drive around my block for now. Happy with the sound deadening thus far, once everything is buttoned up it should be even a little bit quieter. The real test will be on the road because who just sits in their car listening to it idle? Oh right, I do. Backing out of the shop I scraped the shit out of the exhaust and more worryingly the flex sections on the Y pipe. I raised the rear coilovers up a bit but it still didn't give me enough clearance so I put a pair of coil boosters on the front for now. Going to order coilovers for the front next week. First drive down the road was OK, but under medium throttle there is a large knocking noise under the car. I put it on the lift and couldn't find anything loose or any evidence of the drivetrain /exhaust hitting anything. Ran it up on the lift through the gears and it doesn't make the noise. Drove it around again today and it's still there. Not sure where it is coming from. The top of the shifter assembly is very close to the underside of the tunnel, but I don't see any scuffs or marks from interference. Nonetheless, the shifter effort from my shifter extension is far from ideal so I ordered a shifter relocation that uses a lower pivot point that should reduce shifter effort. It also appears to be lower profile so it should take care of the clearance issue. Probably going to just get the lighting working in the mean time and then see if the new shifter takes care of the noise issue. It's really tight in the back of the tunnel and with the exhaust in place you can't really see or do much. Hopefully I don't need to drop it to get the shifter out but with my luck I will. A/C controls in place Passenger seat in place Both seats in place with new belts and reels Engine bay and intake completed. Just need to loom the sender wires Out in the sunlight for the first time in months! Blue still looks good under the layers of shop dust.
-
I had kind of the same idea, but I have the battery and new engine bay fuse box in the original battery location and the ECM run inside the car. Was going to try and mount the ECM next to the battery but with the battery I'm using it wouldn't quite fit nicely. Instead of the super expensive lightweight battery, I'm using a Miata battery. Same physical size as a lawnmower battery or some brands lightweight batteries, but still a flooded lead acid battery with reliable (standard) battery characteristics. Half the weight of a standard automotive unit with no special care needs.
-
IT'S ALIVE! Lots more do electrically and physically in the cabin. But not too much longer hopefully!
-
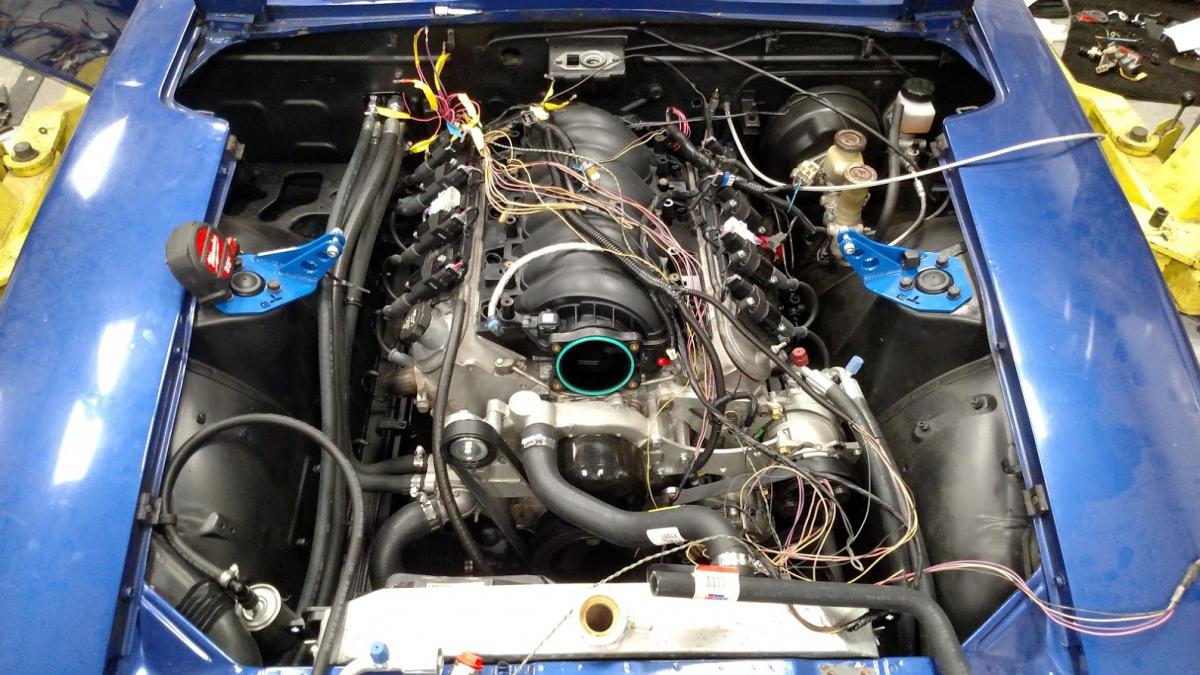
UPDATES! On the home stretch now hopefully, assuming everything I have purchased so far works/runs. I've done a lot underhood, mainly electrical. Got the engine bay fuse block installed and wired in, as well as the dash harness tie-in. New battery cables made up, with 2x 4ga wires on each. Also made a hold-down for the cute little battery box I'm using. Once that was done I reconnected the heater and A/C lines to the bulkhead. Then I installed the intake manifold for what is hopefully the last time. In doing that I discovered a new clearance issue with the throttle body to water pump, but nothing a little grinding couldn't take care of. Made a half assed throttle bracket, but the attachment point at the throttle body isn't allowing 100% opening. I will need to get a different style cable end and make a new bracket to correct that issue. But for now it will work for testing purposes. Ended up having to lengthen the ECT and alternator pigtails a little further due to the harness routing. Not a big deal. Really close to being able to start it. To start it I need to Install and flash PCM Wire in fuel pump (relays and plumbing in place just not run to the back of the car) Wire in ignition trigger for fuse block To finish for real I need to Re-check/tighten a lot of bolts Mount PCM Wire in OBD port Wire senders for gauges Make new throttle bracket Wire electrical for AC unit, pressure switch, heater valve Modify faceplate for AC Install kill switch Install new carpet/speakers/seats/radio Zipties Here are some photos from the engine bay progress
-
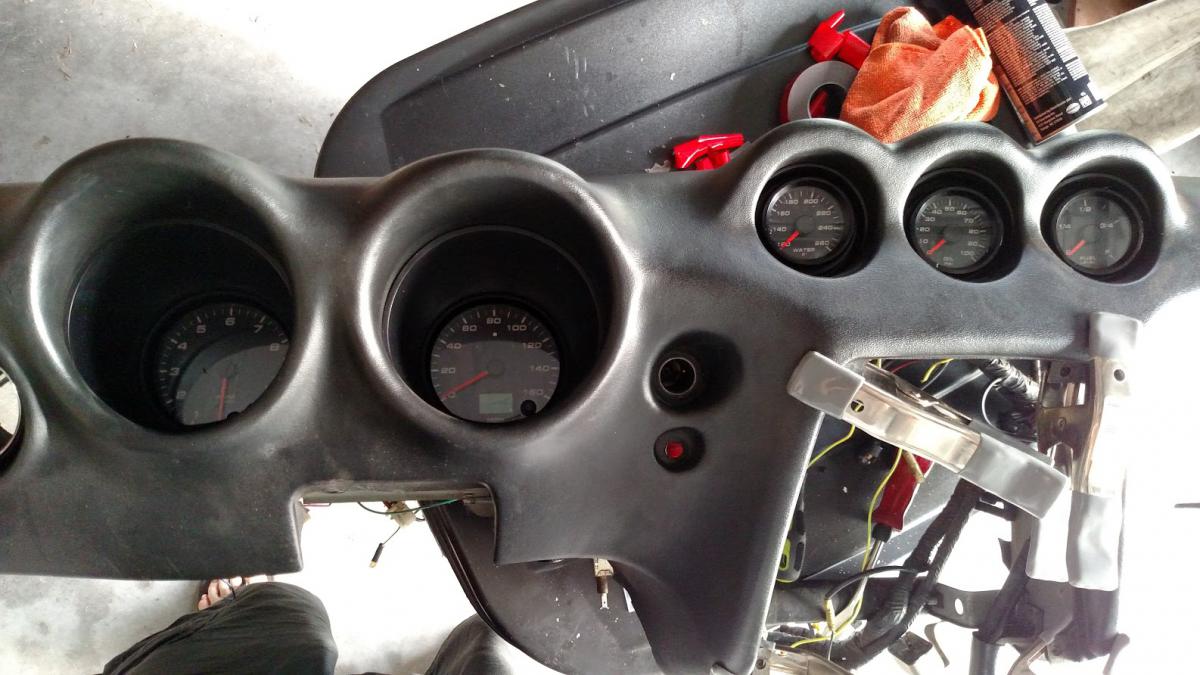
Sorry for the lack of updates, too much has been going on to make serious headway on the Z. Electrically I have gotten the new MSA fuse block installed, and the new underhood fuse block figured out (in my head, not physically) Mechanically I have installed the vintage air unit and re-installed the dash and vents. I fitted the speedhut gauges to the stock housings and re-installed them into the dash. It was very difficult fitting the small gauge cups back into the dash as the foam had swollen significantly. When I got the gauges they weren't fully seated/straight either. Once I got the gauges in as best I could I installed the dash cap and then the dash. Starting to figure out what wiring I need and what I don't. I've hooked the two leads from the ammeter together and installed the fuse block and ignition switch. Can anyone help identify which relays are what on the giant relay block on the passenger side? I've done a bit of searching and looked at the FSM and I'm not coming up with anything besides tracing down each wire color and looking on the diagram for it.

-
'82 280zx LQ4/T56/R200 Drive Shaft Help
hornedcow replied to ford's topic in Gen III & IV Chevy V8Z Tech Board
Different mounts will set the engine in different locations. You will need to have a driveshaft made once you have the measurements from your vehicle. It's not a big deal, once you have the length and angles figured out, you can have one made from scratch at a local driveline shop or order one online from TDS, etc. -
Had a welder extend the lower hose connection on my aluminum radiator, now my dual fan assembly will clear. Fitted the fan assembly in place. Need to trim the sides off, they overhang the core but the fan area itself is a near perfect fit against the radiator. Went ahead and threw the wheels on and dropped it off the lift. Time to start wiring and interior work! Sits pretty nicely, going to raise the rear slightly to match the gap with the front wheels. Ground clearance isn't too bad and will get better with the increased height. My Vintage Air unit came in, plan on making a blank plate where the existing heater controls were and mounting the switch panel from Vintage in the factory location. Pulled the dash Then the heater box and evaporator So much room for activities! I think I'll actually shave a few pounds with the vintage air setup, the factory heater box is pretty heavy, never mind the evaporator or blower housing. My Japanese is a little rusty, but I think this translates to "Final QC check OK'd by Frank"
-
Ha I'm sure it won't be hooking with those tires. Going to use them to get a feel for everything and get any kinks worked out. There are some stickier options out there.
-
I don't have any pictures and I can't really get any decent ones now as the exhaust obstructs it. I basically cut off the eyelets off of the mount body, and then welded some thick bar stock steel at about a 45* angle to bring the mount further rearward and downward from the stock location. Wheels are 15x8 +0, tires are Kumho ASX 225/50/15. Got a few things done this weekend, just about ready to start on the electrics now. I had some rotors modified to work with the Z32 front brake calipers/adapters. I've had the calipers kicking around for awhile now so it's nice to be able to finally fit them. They installed without any drama, although my brake line solution I was planning on won't work - I found a hose that will but was only able to locate one for today. The line for the other side will have to wait. Old front setup was solid 10.6" rotors with 2 piston cast iron calipers. New setup is vented 11.6" rotors with 4 piston aluminum calipers. Old rear setup was 11" drums, new setup is solid 11.6" rotors with 2 piston aluminum calipers. I also did a bit of non-swap related maintenance. The lower ball joints were bad, so I picked up some new Sankei joints, new LCA bushings, new outer tie rods, and new rack boots. The LCA bushings and ball joints were shot, the outer tie rods weren't really bad but they had to come out to get to the rack boots so I changed them anyway. Luckily the inner tie rods don't have any play, because they are not very easy to find. New setup ready to install These are still good, right? I actually think they are original ... I need to replace the tension rod bushings as well, but I don't want to use the poly replacements I have. Going to order in some high quality rubber ones instead.
-
Right, if the pads are aligned correctly and the pistons are evenly compressed then the seam of the caliper should match the offset between the pads but its easier to just look at the seam. I wonder if my car got 280Z hubs at some point in its life or if it's in the calipers. Either way it was a simple install with the adapters.
-
Well, this is interesting. I just got my rotors back from my machinist again and he opened up the center bore as required. When I flipped the adapters and used a washer as JoeK did my pads were offset with a large gap on the outboard pad. I flipped the adapter back and removed the washer and then I had a large gap on the inboard pad. So I kept the adapter facing the same way and added the washer back. Ended up about as centered as it's going to get. Eyeballing the pads it looks slightly off but if you judge the center seam of the caliper against the center of the rotor it is right on. My calipers may be off of a different year Z, so that might make the difference here. Just need to make a new hardline and we're good to go! Fills out the 15" wheels nicely, don't think 14" wheels would clear the caliper. There is just enough room to use sticky weights on the wheels without them hitting the caliper.
-
Have had too much going on with side jobs and commitments that I haven't been able to put any time into the Z lately. I did finish up getting the rear suspension sorted and rough camber/height adjustments in place on the struts. Also figured out what I'm doing for the rear brakes/hoses/hardlines. I was going to run a hose directly from the back of the caliper to the factory hard line connection, but ended up going with the stock style hard line->hose->hardline to body. I re-used the brake hose brackets off of the old struts and with a little modification to the new brake hoses I made them work. The pictures on car are taken at full droop, at ride height the hose is about level on both ends. I also found a dual fan setup from some car that fits my radiator pretty nicely - but I need to re-angle the lower outlet on the radiator. I don't have any aluminum welding experience or a spool gun so I called in a favor. Once the fuel tank is back in place I can get started on wiring ...
-
Hawks Motor & Trans Mounts - Install with Pics!
hornedcow replied to MECH-E's topic in Gen III & IV Chevy V8Z Tech Board
I was just looking at my Z up on the lift and the Hawks mounts definitely sit the engine quite a bit lower than the DD mounts do. Which is good for everything, except ground clearance. Going to be tight if you're lowering it!