280Z-LS3
-
Posts
208 -
Joined
-
Last visited
-
Days Won
2
Content Type
Profiles
Forums
Blogs
Events
Gallery
Downloads
Store
Everything posted by 280Z-LS3
-
t56 Magnum vs. t56 Magnum-f
280Z-LS3 replied to WailordUseBodySlam's topic in Gen III & IV Chevy V8Z Tech Board
Look on my build thread for some good pics and discussion of trans in tunnel. -
Purchased a set of Jendoza flares and initial fitment looks good, hugs the body contour nicely. The over all width is 2" front and 3" rear when measuring the flare its self. Installed on car the added width over stock fender flare is approximately 1" front and 1.5" rear. Don't know if I would like using a larger flare, this size seems about right. What I have found, both front and rear, the limiting factor of positive offset of wheels is the coil over threaded spring seat interference. The front has 11.75" and rear has 11" from spring seat to Jendoza flare lip. Curious that the front has a bit more room under fender than rear, must be result of different track widths. I have the camber and ride settings loosely dialed in close final measurements. The car is still on stands. Considering ditching the 315 rear tire, no way will it fit with the Jendoza flare. Thinking of running a square 275 on all four corners with 10" wheel. Added plus would be ability to rotate tires. Need to check if one offset size will work front and rear. Since the rear has smaller offset that would necessitate using a wheel spacer on rear.
-
280Z build w/ LS3 and 2015 Mustang spindles/8.8
280Z-LS3 replied to 280Z-LS3's topic in Gen III & IV Chevy V8Z Tech Board
Honestly, I had no input on new knuckle design as my mechanical engineering knowledge is like zero, lol. I had the 3T arms already so we decided to go with OEM pickup points for compatibility. -
280Z build w/ LS3 and 2015 Mustang spindles/8.8
280Z-LS3 replied to 280Z-LS3's topic in Gen III & IV Chevy V8Z Tech Board
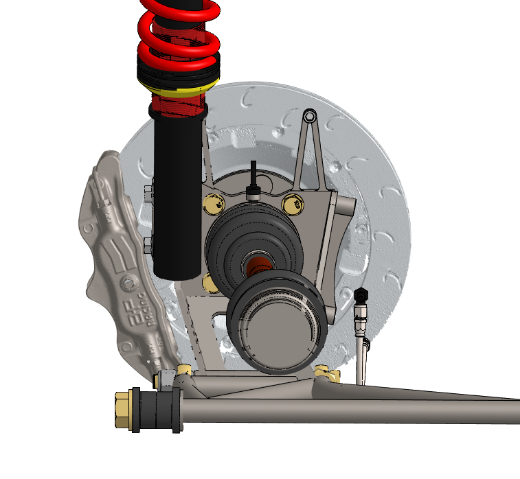
Thanks Richard! Been busy with life which equates to not much time in garage. Talked Noah Dropkin into redesigning the 8.8 rear knuckle for the 8.8 swap for me. Noah's design accomplishes two things, sheds something like 5-7 lbs off current knuckle (substantial reduction in sprung weight) and eliminates the caliper mount bracket. The steel for the knuckles are currently being cut and will be welded up by a friend in his shop. Here are a few pics of Noah's Solid Works mock up generated with a 3D digital scan of the Essex AP rotor/hat and calipers. I don't plan on using a parking brake but a bracket was added in the design in case I change my mind. The rear lower control arm shown is Noah's own design. I will be using a pair of 3T arms.
-
ANOTHER Datsun Z/LS3/T56 Swap Thread
280Z-LS3 replied to Ironhead's topic in S30 Series - 240z, 260z, 280z
I found post #13 in this thread informative. https://f87.bimmerpost.com/forums/showthread.php?t=1270915 -
ANOTHER Datsun Z/LS3/T56 Swap Thread
280Z-LS3 replied to Ironhead's topic in S30 Series - 240z, 260z, 280z
Maybe the DSUNO might work for you. The Ferodo graph for their pads start at 150C so it's anyone's guess how they perform at ambient temp for first few stops. -
ANOTHER Datsun Z/LS3/T56 Swap Thread
280Z-LS3 replied to Ironhead's topic in S30 Series - 240z, 260z, 280z
When I purchased my kit Essex recommended the Ferodo DS2500 pad as good place to start while experimenting with pads for a street driven car. The DS2500 looks to be their lowest aggressive pad with an average 0.42 Mu over operating temp range. Hope to offer up an opinion on these pads in the coming months. https://www.ferodoracing.com/products/car-racing/racing-brake-pads/ds2500/ -
ANOTHER Datsun Z/LS3/T56 Swap Thread
280Z-LS3 replied to Ironhead's topic in S30 Series - 240z, 260z, 280z
I think Ironhead's inline resonator design is not the limiting ride height factor. Recall it is the header collector??? Ironhead, what was used as the resonator? My thoughts are using a small race muffler which there are many to choose from. -
280Z build w/ LS3 and 2015 Mustang spindles/8.8
280Z-LS3 replied to 280Z-LS3's topic in Gen III & IV Chevy V8Z Tech Board
Thanks Ironhead. Ryan said about 4-5 weeks for the wheels. Jeeze, I hope it's not three times that long! Have him in a holding pattern as of now, which is not helping time wise, while waiting on fender flares. Went with Jendoza JDM style. They shipped yesterday so should be here soon. -
ANOTHER Datsun Z/LS3/T56 Swap Thread
280Z-LS3 replied to Ironhead's topic in S30 Series - 240z, 260z, 280z
Are you happy with exhaust note? Mentioned before my past interest in the inline "resonators" design you used but due to fitment constraints on other projects was never able to give it a try. -
280Z build w/ LS3 and 2015 Mustang spindles/8.8
280Z-LS3 replied to 280Z-LS3's topic in Gen III & IV Chevy V8Z Tech Board
If I can keep the current pace of progress then I would like to have wheels sooner. -
280Z build w/ LS3 and 2015 Mustang spindles/8.8
280Z-LS3 replied to 280Z-LS3's topic in Gen III & IV Chevy V8Z Tech Board
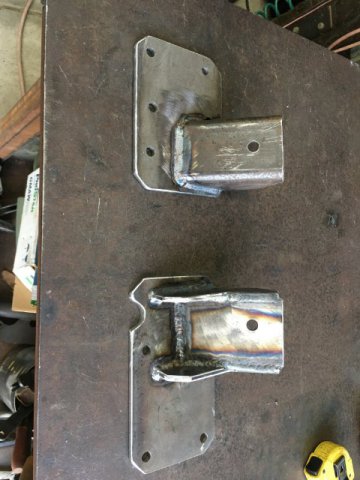
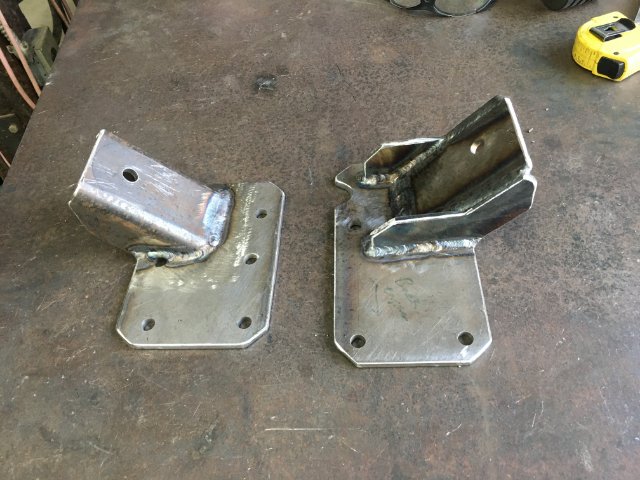
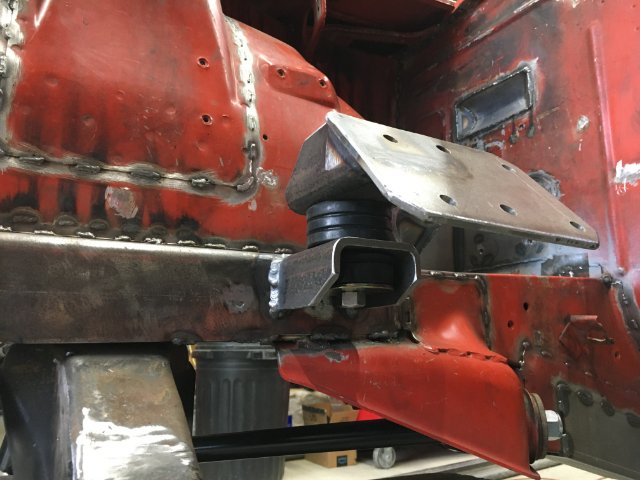
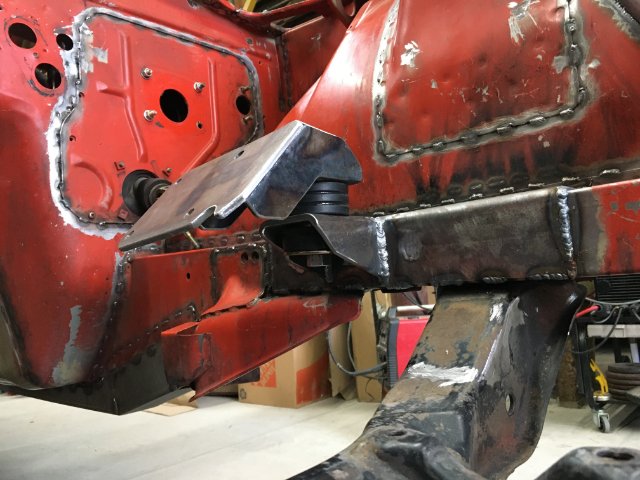
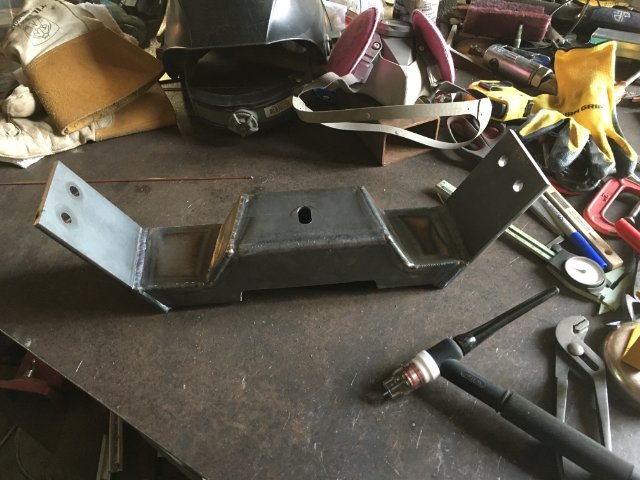
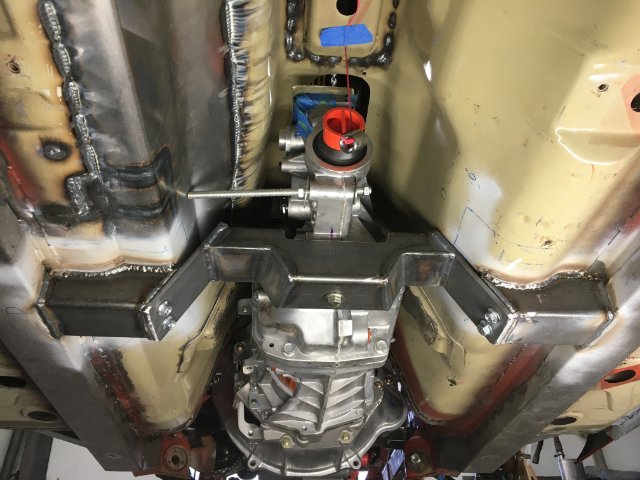
Welded up the puck style engine mounts. Originally planned on welding engine mounts on cross member. However, I wanted the engine as far back as reasonably possible (block/belhousing mount face 1.5" off firewall) but this would have required the engine mounts to extend some 4-5" rearward of cross member. Was not comfortable with that much cantilever. Also, the volume of space such a mount would require is right where the dry sump pump lines will run from pan to pump. So the only other solution was to have the engine mounts come off frame rail. Installed height of engine was determined by oil pan/steering rack clearance and steering shaft/alternator clearance. Placed the engine to get 1/2" at those pinch points. The mounts were constructed of 0.25" plate and 3x3" 0.250" wall tubing. The frame rail support was made from 3/16" plate which is about 12" in length to span from just in front of T/C bucket to just in front of cross member mount. The bushing is Energy Suspension 9.4102G Universal Mount. Here is the competed setup. Happy with how trans and engine mounts turned out with basic tools at my disposal (drill press, band saw, angle grinder and brake press). Extended the legs on the bracket which welds to the driver engine plate to add strength/welded area. You can see from the weld penetration coloration in the 4th and 6th pic the bracket does not have a large overlap onto the plate so felt the legs were necessary. It's overkill strong now... Now time to get the engine back in and start on DIY custom SS headers! Thanks for looking!
-
280Z build w/ LS3 and 2015 Mustang spindles/8.8
280Z-LS3 replied to 280Z-LS3's topic in Gen III & IV Chevy V8Z Tech Board
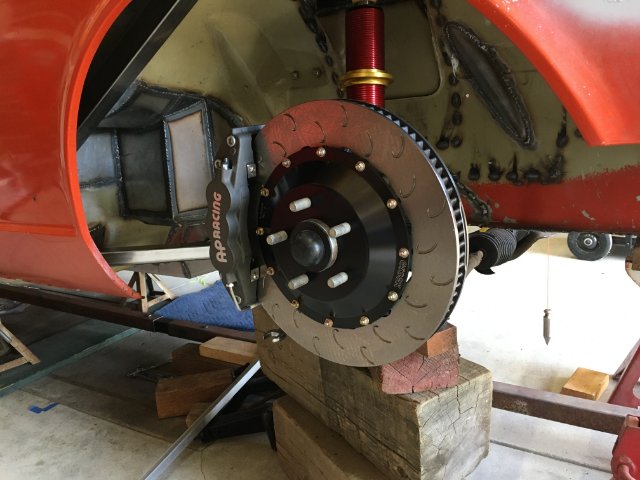
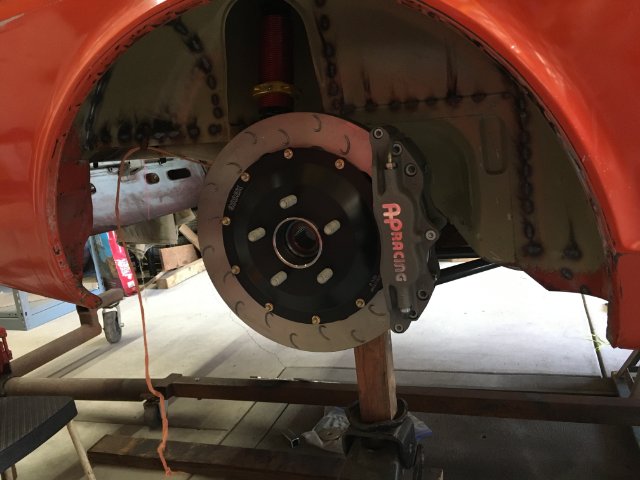
Utilizing the front spindle off the 2015 Mustang presented few options for brakes without designing one off custom caliper brackets and rotor hats that would be needed with my original thought swapping in a large OEM brake kit from Mustang or Caddy CTS. Using 17" wheels like I originally wanted would require the custom parts too. After much research the choices came down to OEM and offerings from various after market brake manufactures. Further reducing choices was rotor diameter that kits employ. Most performance after market brakes packages for the S550 Mustang use 15" rotors which necessitates a 19" wheel, too big for the S30 chassis IMO. OEM, Wilwood and Essex AP Racing kits fit under "most" 18" racing wheels. 18" wheels too big too??? Maybe, maybe not. Decided to take the plunge and up the wheel diameter to 18" for ease of purchasing off the shelf brake kit. This cut out the hassle of designing hats are caliper brackets. I am not even vaguely familiar with CAD design and at this point don't have time to experiment and learn so this saved me a ton of work. Someday I'll mess around with CAD... Pulled the trigger on the AP Racing kit designed by Essex Racing. The front use 6 piston caliper with 372x34 mm rotor and rear 4 piston caliper with 340x32mm rotor. Yup, that there are some big brakes! I ran brake fitment template by a few wheel manufactures with styles I liked to confirm brake fitment. Work Wheels said no go. Too bad because they are a good value for a three piece. BC Forged, CCW, Volk and JongBloed confirmed fitment. Really liked the Volk TE37V Mark II but Covid has really messed up supply with lead time 6 months or more! Damn, that removes the beautiful one piece forged wheels from consideration... With so many more designs to choose from I settled on the Jongbloed 557 Series. They are made in USA about 2 hours drive from me so those are two big pluses and it's a three piece design. Currently working with Ryan to dial in back spacing for 10" front and 11.5" rear wheels (275 and 315 tires) which hopefully we can get hammered out after my ZG style flares get mocked up on car. MMM.... Brakes
-
ANOTHER Datsun Z/LS3/T56 Swap Thread
280Z-LS3 replied to Ironhead's topic in S30 Series - 240z, 260z, 280z
Just purchased a brake kit from Essex and now the next step is to talk with Tilton on what they recommend for masters cyl with their dual master pedal. How close/realistic are theoretical values like pedal effort and effort derived brake calcs? My first time going through this exercise so don't now what to expect. Thinking they can give me an idea of pedal travel amount based on caliper specs but have a feeling it's going to be trial and error to find the right compromise between pedal effort and travel. -
280Z build w/ LS3 and 2015 Mustang spindles/8.8
280Z-LS3 replied to 280Z-LS3's topic in Gen III & IV Chevy V8Z Tech Board
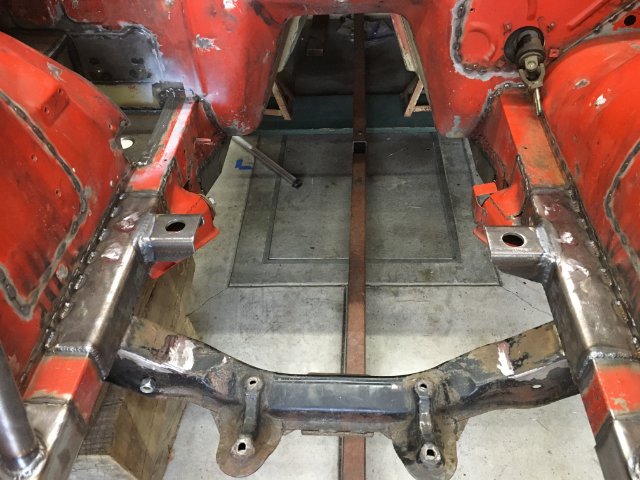
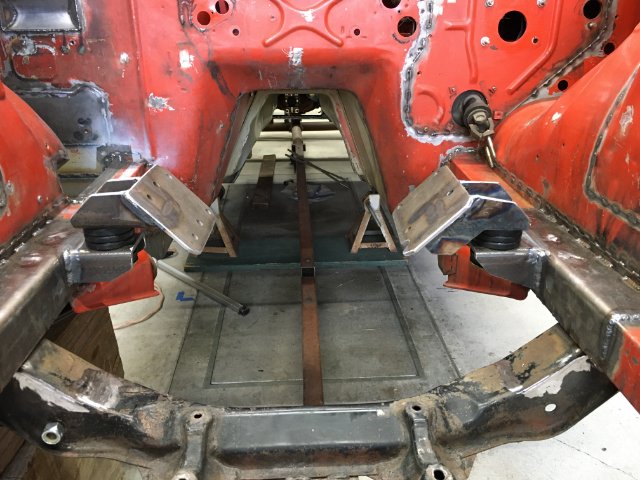
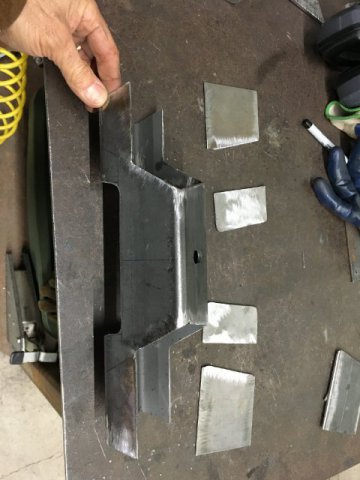
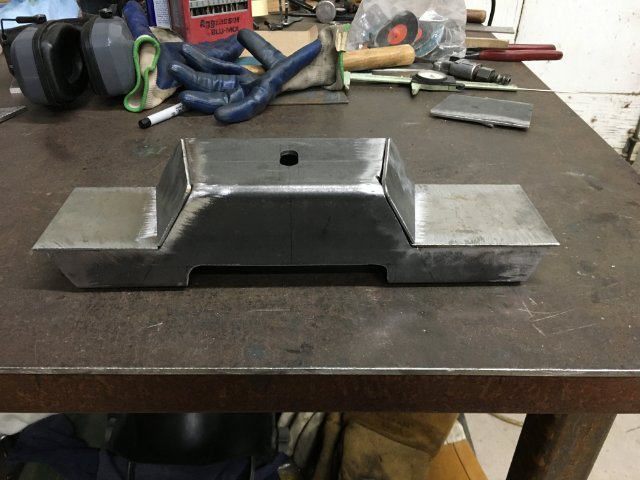
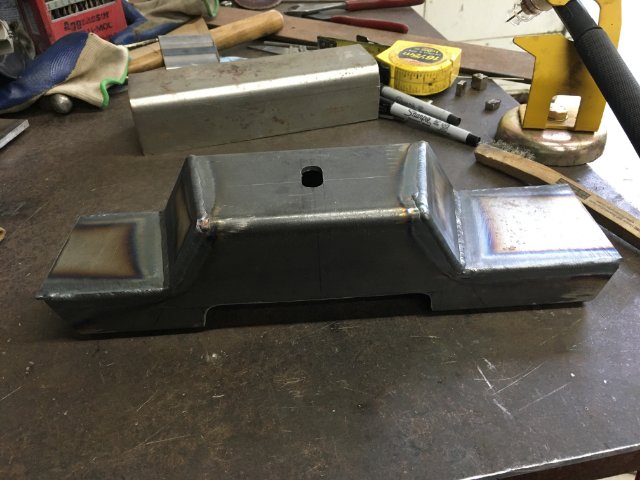
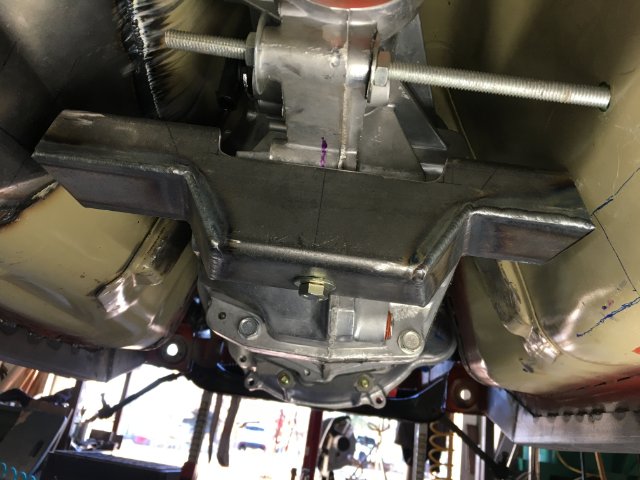
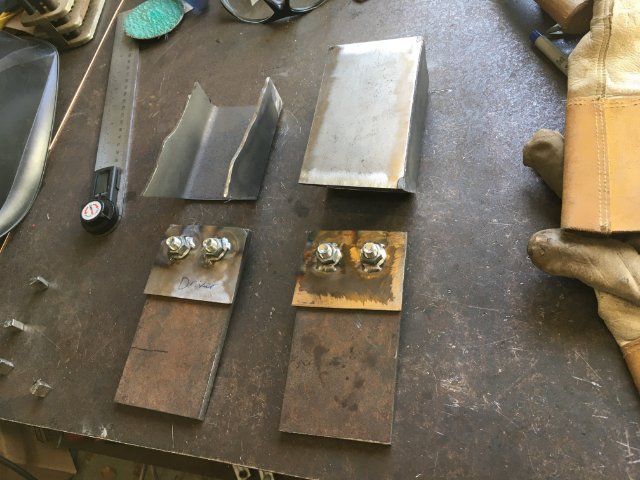
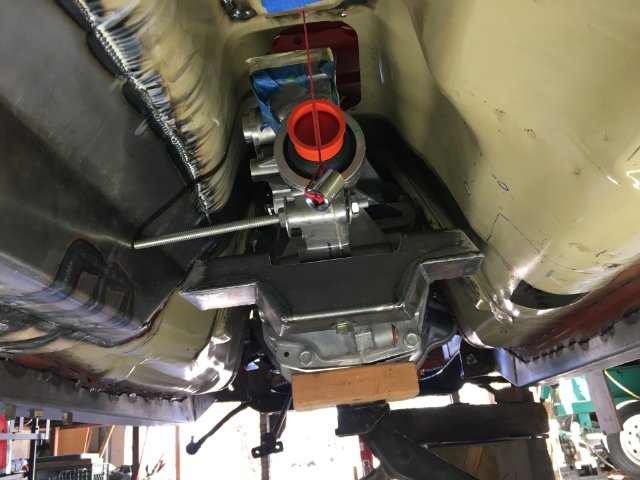
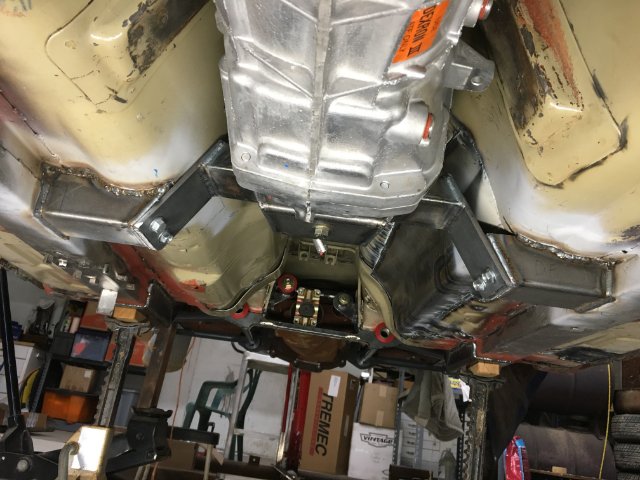
Been working a bunch so progress has slowed a bit. A few things are starting to come together and finally got the trans mount sorted out. Really wanted to tie into the frame rails for strength and after considering many options decided on building some stub frame rails perpendicular to the main frame rails. First I started with some 3x3 .125" wall square tubing by cutting out top for poly trans mount to sit inside tube and sectioned the ends for exhaust clearance. Welded that up and installed on trans. Made stub frame rails out of same 3x3 tubing, drilled some 3" .250" bar stock for 10mm bolts and welded nuts to back of face plate on stub frame. Passenger side has floor that extends down below frame rail so I cut it out to allow stub frame to extend straight to the frame rail. Welded legs on cross member Here is finished install The top side of driver side stub frame still needs to be boxed in with 20 gauge. Will do that when engine gets pulled to weld up the motor mounts which are just tack welded.
-
ANOTHER Datsun Z/LS3/T56 Swap Thread
280Z-LS3 replied to Ironhead's topic in S30 Series - 240z, 260z, 280z
Intimidating power, YEAH! LOL. This IS why you have labored for over the years!!! Once upon a time got the keys to my Dad's 81 Corvette. Cold, wet roads so traction was non-existent. Had the high school sweet heart in the passenger seat and came to the stop sign at the local pizza place where all the kids came to hang out. Wanting to show off nailed the throttle while making a left out of stop sign and the car just started fish tailing. Guard rail, on coming traffic, guard rail, the OH SHIT kinda stuff. Learned a lesson but have since not experienced that sort of power exceeding traction/skills. My build will be similar to yours in power so very excited indeed to get it on the track for some adrenaline pumping action! Curious how pounds of pedal effort you have designed into your system. Using a brake calculator I plugged in 60 lbs of pedal effort to produce 1g and choose the dual master cylinders accordingly. -
$3500, wow! That's what I paid for a T-56 Magnum F-Body which is rated at 700 ft.lbs.
-
Don't kow what "built" entails but I looked into upgrading a WC T-5 with GForce stuff for another Ford project of mine. After spending $2k you still have a trans rated to 400-500 ft.lbs. I choose to run a V6 T-5 and bellhousing from late 90s to early 2000s Mustang which is the same trans that came in 90's Cobra rated just over 300 ft.lbs. It has same Windsor bellhousing bolt pattern for my 5.0 block so it bolts up fine. When I blow it up will buy another from wrecking yard, they are cheap and plentiful. Long story short, I think you will spend good money to upgrade and make fit that T-5 which is better spent on a T-56 or Magnum.
-
ANOTHER Datsun Z/LS3/T56 Swap Thread
280Z-LS3 replied to Ironhead's topic in S30 Series - 240z, 260z, 280z
Congrats! Do you have a dB meter, does not seem loud on video. I think there is a sound meter app for smart phones that is reasonably accurate. -
ANOTHER Datsun Z/LS3/T56 Swap Thread
280Z-LS3 replied to Ironhead's topic in S30 Series - 240z, 260z, 280z
Re-paint, ugh! Such a chore when you don't have dedicated body shop facilities. Really hard to anticipate how things will go together and build accordingly When I get to dialing in alignment and suspension setting going to learn how to do alignment also. Having to take the car to alignment shop for every little change would be too time consuming and I'm sure price of home shop alignment equipment could be paid for with just a few trips to alignment shop. Is the lowest part of exhaust right underneath the rear control arms? I have a feeling that is going to be the lowest point on my build. -
ANOTHER Datsun Z/LS3/T56 Swap Thread
280Z-LS3 replied to Ironhead's topic in S30 Series - 240z, 260z, 280z
Do you have a dip stick oil level in your tank? I am curious what is the difference in oil level/volume between running and after sitting for a few days. I have heard that dry sumps do bleed oil into pan after sitting for some time. It's just a matter of physics, the oil seeking level throughout the system I suppose. As long as there is a good amount of oil left in the tank for oil pressure at startup you should have no problems because, as you said, the scavenge will empty the pan pretty quick. -
5cm would be too small I think. MiKelly used RetroSpec flares. He said they were 3.5" wide rear with 315 in his build thread so thinking I need at least that much clearance. The RS web page says their flares are 3.25" front and 3.75" rear so some conflicting info there too. The "InZanity" 240Z build used 315 on 11x18 rear as well but can't find what brand he used or where sourced. Getting good fitting flares in this size maybe a challenge. The search continues...
-
Right, I saw that too. Just can't find any info the actual size of the "deluxe" type. And more confusion is that Jesse got back to me saying after contacting MG they offer 1" ZG flares. I detailed in email to Jesse wanting a large size for the 275 and 315 tire and that was the response. Lost in translation?
-
Searching for good fitting ZG flares to fit 275 front and 315 rear tires. Currently looking into purchasing the wheels after mocking up the suspension up to appropriately size offset of 9.5" front and 11" rear wheels. Searching here and around the web reveals plenty of builds with these size tires but flare sizing and brand is not clearly mentioned. Retro Spec has a wide ZG set at 3.25" and 3.75" front and rear. However, many members caution dealing with Retro Spec as of lately. Margugen Shoukai are quality and the thickest "Special" model are recommended. However, it's unclear if they made a wide version to fit above wheel/tire. Jesse at jesse@jessestreeter.com will ask MS and get back to me. Has anyone dealt with https://jdmfenderflares.com/ Any other info and leads on good fitting flares? Thanks
-
Ford Super 8.8 irs swap thread. Rear brakes too
280Z-LS3 replied to Invincibleextremes's topic in Drivetrain
What are the three sets of plates for, the ones located in the 3 o'clock position in the photo?
.png.e7de7ec81b3ddc5bda252007699061f1.png)
.png.25611c8e4de2a80fbcb4037017aec12f.png)
.png.6eed9f44243676f527d07583e1905043.png)
.png.56e40766118b8a961a10306336b556f1.png)
.png.b125e526a517905db5e61321d977cd62.png)