-
Posts
970 -
Joined
-
Last visited
Content Type
Profiles
Forums
Blogs
Events
Gallery
Downloads
Store
Everything posted by ezzzzzzz
-
I agree with John and Jon. It all depends. What you can't see is any microfine crack that may rear it's ugly head down the road (literally). You're already in there. Swap out for a new r&p and be sure there will be no problem. Heck, it could be a good time to do a ratio swap if you're so inclined.
-
That's a great link Braap!
-
Try these links for info... http://www.ls1tech.com/forums/conversions-hybrids/790188-you-want-gm-cruise-control-your-cable-driven-tb-6.html http://www.thirdgen.org/techboard/ltx-lsx/552764-digital-cruise-ltx-lsx.html
-
There's a similar CC box in my garage out of a 2000 LS1 Camaro along with factory service manuals for same. I can look at some wiring diagrams I have back at home to try to assist. Are you using the GM ECM for the Lm7? My 4.3 ECM has a pin with the VSS output for driving electronic gauges. My LS1 ECM probably has the same. It would seem reasonable that all of these GM ECMs have such an output. If so, you could simply add that lead to the harness. I've always gutted factory harnesses of unneeded wiring the same most of these aftermarket suppliers do. One time I tapped into the VSS output wiring to the ECM for a signal to drive an Autometer speedo in my Land Rover without any problems. Electrical pins/connectors are available at your local GM dealer. They're usually in a large box behind the counter with lots of weatherpack parts.
-
Anyone know anything about this car? http://richmond.craigslist.org/cto/2148566593.html
-
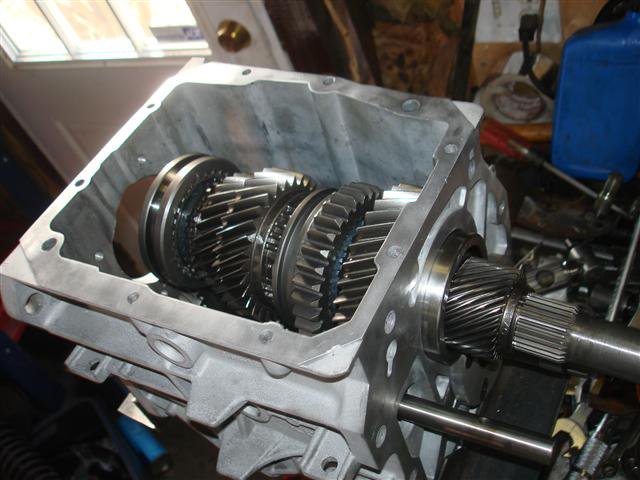
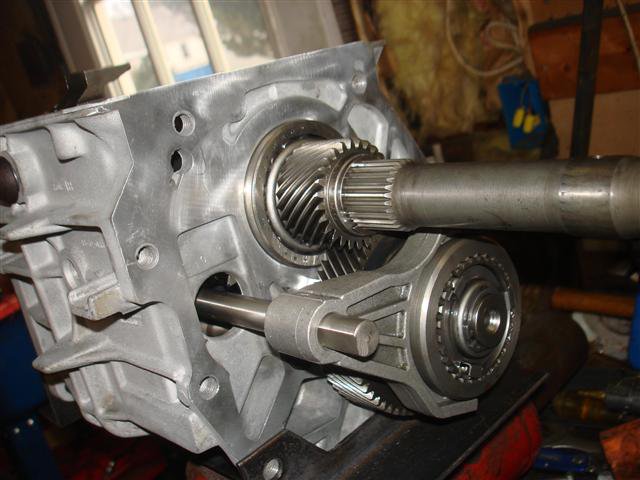
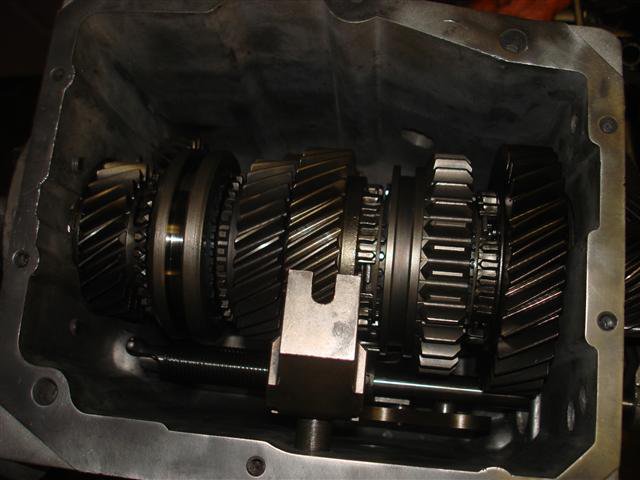
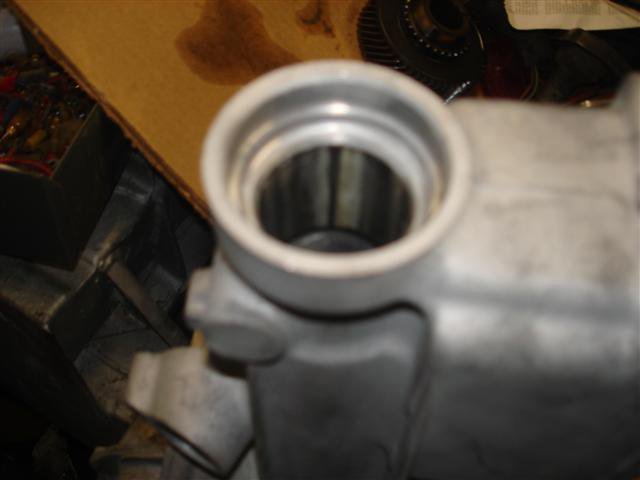
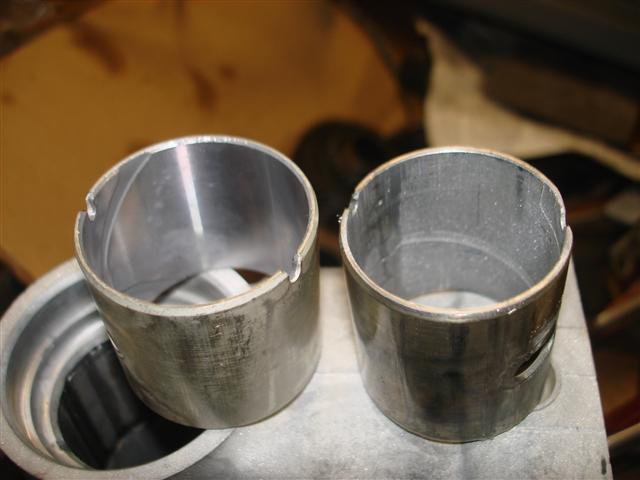
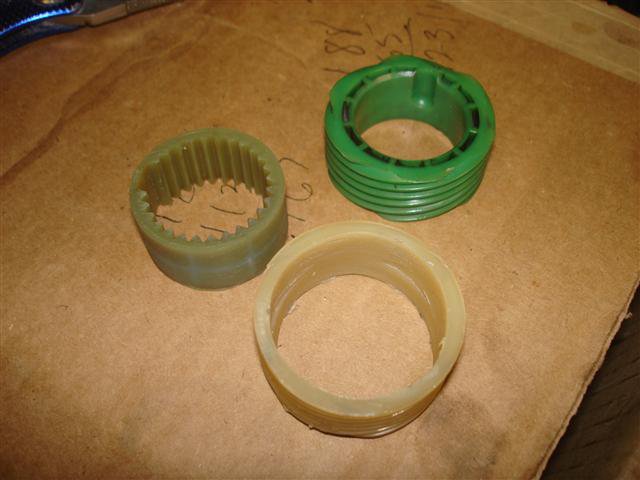
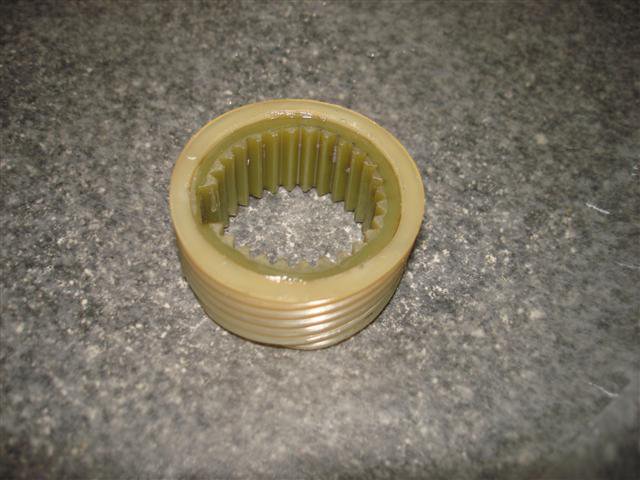
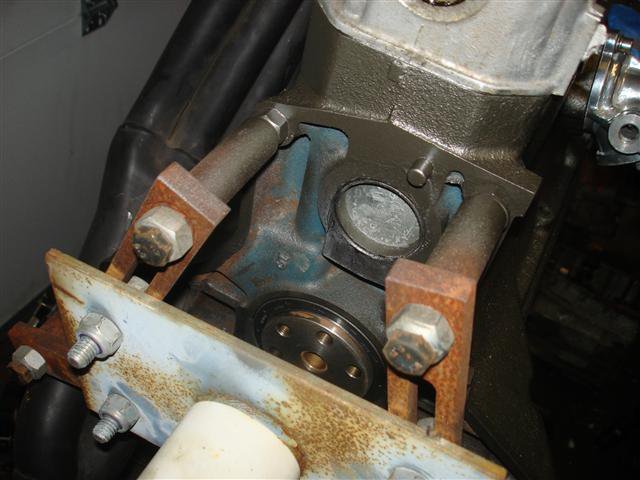
I've been busy building a WC T5 for my SC'd L6 project. The premise was easy enough. Build a close ratio gearbox, bolt on the bellhousing, top shifter plate and tailhousing. I've found a few stumbling blocks but nothing too serious. starting at the front the bearing retainer required a bit of reaming to clear the larger OD of the WC input shaft. The top shifter cover was a direct fit. I knew I'd have to relocate the speedo drive gear using shim stock to build up the OD of the mainshaft which is a simple task. After I cleaned up the tailhousing I decided to replace the rear bushing. Whoa, the new bushing is much larger than the old one. I mic'd the splines of the mainshaft and then tried the old driveshaft. No go. I realized that I'll need to mill out the tailhousing for the new bushing. Because that thins the casting wall (about .125" but primarily on either side but not top and bottom) I think I'll have to tig some additional aluminum in those areas to build up the thickness prior to milling to add strength. It then occured to me that speedo gear wouldn't fit either. I ended up turning down the Ford gear OD and opening up the Nissan gear for a press fit and super glue. I know there are other transmission options but I wanted to try something a little different that wouldn't require cutting and banging on my tunnel. There's a KA conversion I built a while back installed but the 3.90:1 r&p makes first gear pretty much useless.
-

Can't pull engine because tranny won't come off
ezzzzzzz replied to dpuma8's topic in Trouble Shooting / General Engine
I'm betting you've missed a bolt. It shouldn't take more than a good shake as mentioned above. -

5 lug and 4 wheel disc brakes
ezzzzzzz replied to ktmp's topic in Brakes, Wheels, Suspension and Chassis
The info is here. You should read the brake options for S30's sticky. Many of these posts get hijacked and lose direction. You'll get a lot more help once you try to help yourself by going through the many posts plus it makes for interesting reading. As I understand it the Z31 front hub doesn't need a spacer if you're using the matching caliper BUT does need it if you're using the 4x4 caliper. I'm not 100% sure as I'm going another direction so I haven't researched it a bunch. In the rear you can use Maxima brackets if they can be located. Again read that sticky. The quick bet is the brackets from MML that allows you to use 240SX calipers and provides for a parking brake. You can spend big money at Arizona, MML or Silvermine too on complete kits. Unless this is a track car only be sure you can fit a parking brake for inspection purposes. I'm using the Z31 front rotors and fitting '90 Z32 rotors and calipers and out back I'm using the Z32 rotor/parking brake assembly/caliper with custom 19mm offset axles. The bottom line is you're going to find it difficult to do a junkyard conversion without a lot of searching and modifications. Sometimes it really is much smarter to just drop the coin on a complete thought out kit. Did I mention reading the sticky? -

Revolution gauges for my 1971 240Z
ezzzzzzz replied to ezzzzzzz's topic in S30 Series - 240z, 260z, 280z
I'd say yes. My gauges didn't come with that additional ring. If the later orders do then you're in luck. -

76' 280z 4 spd to 280zx BW Straight Install?
ezzzzzzz replied to SirLaughsALot's topic in Drivetrain
Assuming this is a BW T5, the matching driveshaft will be needed (or a custom driveshaft built). The stock driveshaft will also need to be shortened. I'm not sure if the rear flange will mate to the R200 without a yoke change. Not sure of the trans mount either but can take a measurement tonight to compare a stock 5 speed with the BW T5. The 225mm clutch can be utilized. The Nissan BW T5 is not a close ratio box. First gear is 3.50:1 and intended to be run with a 3.54 r&p. Any higher r&p (3.70, 3.90 or 4.11) will start rendering 1st gear useless. I'm building a WC BW T5 for my 240Z SC'd project. It is a Mustang case with a close ratio gearset (2.95:1 first gear). The bellhousing, top cover and tailhousing are all off a '83 280ZX Turbo. -
I've got one on my 71 240Z. The only thing I'm missing is the gaskets but I'll make those when I get the car repainted. I also saw one on a silver 240Z at the ZCON 2010. Apparently, they are quite rare. The purpose of these was not so much competition as it was removing underhood heat causing vapor lock on 240Z's and early FI'd engines. Instead of cutting that horrific oval hole in my hood I opted to have two rows of louvers punched by an old hotrod fabricator. Mine came off a 260Z at the local Pick-N-Pull. I think I paid about $50 for the scoop and rusting hood. This is a "love it or hate it" item.
-
This is a NWC T5. You would need to find a complete gearset (used or new) to get a different first gear ratio. Just swapping in another input shaft would not be viable as it would be horribly noisy as the countershaft is a solid assembly so you couldn't just swap out the matching fourth gear. If you choose to swap gearsets you will also need to have a custom pilot bushing made from oilite bronze (no big deal) because the OD is different. You'll need to use a Ford gearset so the input shaft length isn't an issue (7.18" vs 7.188") and probably move to a 240mm flywheel for the Ford clutch or have a custom clutch rag made (again not a big deal).
-
I've heli-coiled one of my cylinder heads and will do the other when I need to pull the intake and exhaust. Using a header has lead to leaks when not tightening in some given sequence. My personal experience has been to snug up everything then do a final torque starting with the lower hardware first then move on to the nuts clamping the intake/exhaust together and lastly the upper intake hardware. I've never experienced a leak since following this procedure. It might not be an issue with the stock exhaust manifold. A torque wrench has never been used. Grandpa always said "Tight is tight". That applies to most everything in life...
-

Starting L28 rebuild need info
ezzzzzzz replied to Prest's240's topic in S30 Series - 240z, 260z, 280z
You can start by reading this... http://www.amazon.com/Rebuild-Your-Nissan-Datsun-Engine/dp/1555611591 There are probably other viable sources like your local book store. Even if you don't intend to do the assemble you'll still be miles ahead in basic knowledge of these engines. -
Assuming this is a Nissan BW T5 the first gear is 3.50, not 3.06. With the 3.54 r&p that translates to 12.39. With a 3.7 it is 12.95 and with the 3.9 it is 13.65! You'll be shifting into 2nd before you get through the intersection. I'm building a Nissan BW WC T5 using a 2.95 first gear and a 3.90 r&p. That's 11.505. That's a difference of .885 from the 3.54 which is a lot (1.445 with the 3.7 and 2.145 with the 3.9!). I did this by mounting the Nissan BW T5 bellhousing, top cover and tailhousing to a WC case. It will require a 240mm flywheel and 10 spline clutch rag or custom 10 spline clutch rag if using the 225mm flywheel. You'll also need to relocate the speedo gear on the mainshaft. None of this is complicated though.
-
I had a similar issue. It was resolved by placing a potentiometer inline with the purple looped lead of the tach. Contact Speedhut about this and they will help get it resolved. My potentiometer is located where the dimmer control used to be. Once it's adjusted nothing else is needed. I suppose you could get the tach to stabilize then measure the pot resistance and swap it out for a fixed resistor but getting to the rear of the gauges is a PITA in these dashes.
-
I use one of these without any problems but don't recall the calibration of it now. Call Speedhut. They are very helpful and will walk you through the process.
-
I'm thinking Clifford or Pierce made that back in the day.
-
Two things come to mind. First, the fuel bowls are vented into the air filter housing(s). Since yours are open element you could be getting the vapor smell from that. Secondly, Webers have a crappy choke enrichment system that tends to leak while sitting dormant. Pull the filter housings to see if there is fuel puddled in the bore of any carb. Just a thought.
-

coolant leak from back of motor
ezzzzzzz replied to AleksS30's topic in S30 Series - 240z, 260z, 280z
-

Need help. Still having slop in diff/axles
ezzzzzzz replied to Blakt Out's topic in S30 Series - 240z, 260z, 280z
The RT mount will require some massaging to fit a 240Z unless Rooster has modified for a 240Z. Not a big deal. How much lateral play do you have in the axle shaft when the car is sitting level? You may pull the halfshaft and check it for binding under compression in the back of the CV housing. Reversing the inner CV knuckle may be the only problem you have to resolve. Others have done this conversion with success. -
I put my 240Z into a 20' container, strapped it down and padlocked the doors. It's pretty safe now but sucks to drive in that short space.
-

Need help. Still having slop in diff/axles
ezzzzzzz replied to Blakt Out's topic in S30 Series - 240z, 260z, 280z
The Wolf Creek setup can be modified to use with your Diff. BlueovalZ and I both designed and run a Porsche 930 CV jointed axle in our cars. These are damn near identical to what Wolf Creek sells. You'd just need to machine an adapter to fit between your R200 output flanges and the Porsche 930 CV. That may require shortening the halfshaft axles but I'm thinking you could make the adapter the same thickness as the Wolf Creek part. It is doable if you want to run a really stout halfshaft. The only other thing that comes to mind with your problem is the nut retaining the flange to the stub axle may have loosened. That will create enough slop to cause the noise you've described too. -

Need help. Still having slop in diff/axles
ezzzzzzz replied to Blakt Out's topic in S30 Series - 240z, 260z, 280z
Seems that a couple of decent set screws could be installed into the caps of the down brackets to keep the tube from moving back and forth...maybe. I'd looked into that control arm but never realized that flaw(?). This tube is suppose to remain stationary unlike the OEM LCA. Tightening the clamping force by using a thin split tube over the bushings might provide the forces needed to keep it in a fixed location. As for the CV axles, these can be rebuilt BUT if there is wear in the tulip housing it can't be repaired only replaced. I always thought that custom axle shafts should be produced to use the OEM CV's instead of flipping parts around to provide clearances. As mentioned by another, that solid diff mount will transmit horrible noises into the cabin Not that the heim jointed LCA won't do that too!). The RT mount is designed to fit over the top fo the diff nose. A GM transmission mount attaches to the diff nose and the RT mount. This keeps the diff from lifting under acceleration. Just search the forums for the RT mount to see it installed. Also, try to get this up on a two ramp lift so the vehicle is sitting in it's normal ride height. It's easier to notice abnormalities that would cause problems (e.g. things that could contact but shouldn't). LASTLY, Please clean that car up. It is an attrocity underneath and an abomination to our eyes! HAHAHAHA -

5 Stud Front Hub Conversion
ezzzzzzz replied to diggs's topic in Brakes, Wheels, Suspension and Chassis
Most use the 5 lug 300ZX hub (it does have a 19mm offset). Staggered wheels could compensate for that. I have two different 300ZX hubs in my garage. The difference in how the seal is installed. I don't know what years (85 and 87, I think) they came from because I NEVER mark anthing for what it is. I'm using the later hub with the seal that mounts over a machined lip, not pressed into the hub. early hub seal - http://www.napaautoparts.com/Search/Detail.aspx?A=NOS17909_0069118744&An=599001+101985+50090+2090018 later hub seal - http://www.napaautoparts.com/Search/Detail.aspx?A=NOS17691_0069119510&An=599001+101987+50090+2090018 Both seals have the same I.D. of 1.811 while the S30 has a slightly larger I.D. ( don't have that in front of me). It takes some effort to get the 300ZX hub over the S30 spindle. Some cut off the inner lip to make it easier. My intention is to machine a simple ring that presses over the machined lip of the later hub. The I.D. of that ring will accept the stock S30 seal. It will be a perfect fit and factory spec'ed. The other option you have is contacting Ross and Moderm Motorsprots Limited. He produces a custom zero offset 5 lug hub for the S30 machined from billet aluminum.

